
How to Delete a Virtual Machine or LXC Container in Proxmox VE
Deleting a virtual machine or an LXC container is a basic task that every Proxmox VE hypervisor administrator should know how to do. However, when you're just getting started with this solution, you may wonder where the delete option is hidden. That gave me the idea to write this tutorial to shed some light on the subject, while also covering the command-line methods.
Creating a virtual machine or a container on Proxmox VE (aka PVE) is easy: there are two big buttons at the top right of the interface to do it. But the reverse operation, namely deletion, is a little more hidden. Yet you will inevitably need to use it, whether for testing purposes or to remove a decommissioned server. On the one hand, that's not necessarily a bad thing, as it prevents deletion from being too obvious or too direct.
This tutorial will guide you step by step through this task, using the web administration interface and the command-line interface (CLI) method.
You can also read my previous Proxmox VE tutorials:
- Getting started with Proxmox VE: the complete guide
- Proxmox VE: how to create a Windows 11 virtual machine?
- Proxmox VE: snapshot management
- Network configuration with Proxmox VE: the getting started guide
Table of Contents
What you need to know before you begin
Before proceeding with the destruction of your virtual machine or LXC container, take note of the following points:
- Check backups: deletion is irreversible. It may be wise to take one last backup of the resource before deleting it. You never know...
- Stop the resource : Proxmox VE includes a safeguard that prevents the deletion of a running virtual machine or container. You must send a shutdown command before you can act on a resource in this way.
- Check permissions: your user must have the appropriate permissions on the node and on the target machine to perform this action. If you are an administrator, no problem. In larger infrastructures, your scope of action may be more limited.
Delete a VM or container through the Proxmox web interface
Whether you want to delete a virtual machine or an LXC container through the Proxmox VE web interface, the procedure is the same. Here are the steps to follow.
1 - Log in to the Proxmox VE administration interface through your web browser (https://<IP_PROXMOX>:8006).
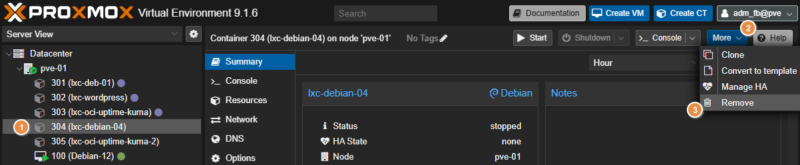
2 - In the navigation pane on the left, select the node hosting the VM or container to delete.
3 - Click the virtual machine or container you want to delete.
4 - Make sure the resource is stopped. If it is not, click the "Shutdown" button in the top right corner (also accessible via a right-click on the resource).
5 - Once the machine is powered off, click the "More" button in the top right corner of the interface, then select "Remove."
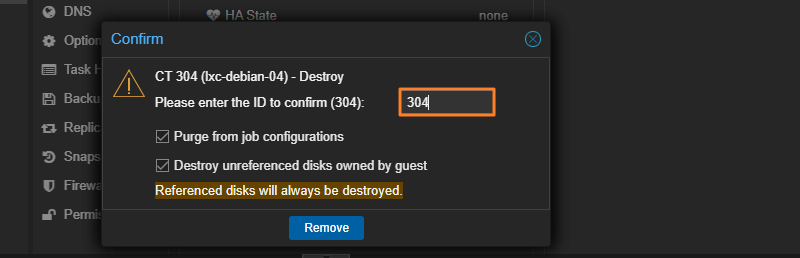
A confirmation dialog then appears. This validation step helps prevent accidental deletions.
To confirm, the system asks you to type the ID of the machine or container. For example: 304. As a reminder, this ID is visible in the inventory on the left, next to the name. You will also notice two options:
- Purge from job configurations: this checkbox allows Proxmox VE to perform cleanup, for example by also removing replication jobs or scheduled backup jobs associated with this resource.
- Destroy unreferenced disks owned by guest: this checkbox enables a more thorough cleanup of disks created by this resource, but which are no longer currently associated with it.
Once everything is ready, click the "Remove" button. The resource is deleted immediately. In fact, in the task window at the bottom of the screen, you will see a "Destroy" task appear.
Delete a virtual machine with the qm command
For the rest of this article, we will switch to the command line. Let's start by learning how to delete a virtual machine from the command line. On Proxmox VE, KVM/QEMU-based virtual machines are managed by the qm command.
Connect via SSH to your Proxmox VE server or directly through the Web console.
To identify the ID of the virtual machine to delete, you can list all VMs present on the node with the following command:
qm list

# Exemple de sortie
      VMID NAME                 STATUS     MEM(MB)    BOOTDISK(GB) PID
       100 Debian-12            running    2048              32.00 1467
       101 Ubuntu-2404          stopped    4096              32.00 0
       102 PVE-DOCKER-DEMO      running    4096              32.00 752323
Once you have identified the ID (for example ID 101), make sure the VM is powered off. If the status shown by qm list is running, stop it with:
qm stop <ID>
qm stop 101
Finally, delete the virtual machine using the destroy command:
qm destroy <ID>
qm destroy 101
You can add the --purge 1 parameter to reproduce the behavior of the web interface checkbox, which will remove the VM from all backup or replication jobs:
qm destroy 101 --purge 1

# Exemple de sortie
  Logical volume "vm-101-disk-0" successfully removed.
purging VM 101 from related configurations..
The configuration file /etc/pve/qemu-server/101.conf associated with this virtual machine will be deleted, along with the associated storage volumes.
Delete an LXC container with the pct command
For managing LXC containers from the command line, Proxmox VE provides a dedicated tool called pct. I presented it in detail in my article on getting started with LXC containers on Proxmox VE. The logic remains the same as for virtual machines, except that the command name is different.
List your containers to find the ID of the container you want to delete (it is better to check!).
pct list

# Exemple de sortie

VMID       Status     Lock         Name
301        stopped                 lxc-deb-01
302        stopped                 lxc-wordpress
303        stopped                 lxc-oci-uptime-kuma
Stop the container if necessary:
pct stop 301Run the deletion command:
pct destroy 301To also remove the job configuration, as with the virtual machine:
pct destroy 301 --purgeAs with qm, the pct tool will delete the configuration file located in /etc/pve/lxc/301.conf and request deletion of the container volume.
Conclusion
We have covered all the steps required to permanently delete a virtual machine or a container on a Proxmox VE server. It is easy to do, but you need to know how. The qm destroy and pct destroy commands are convenient for acting easily on a set of resources, provided you know what you are doing!