
How to Manage Proxmox VE Snapshots in the Web Interface and CLI
Among the features offered by Proxmox VE for managing virtual machines and containers, there are snapshots and backups. Although these two features are associated with data protection, they serve distinct purposes and work differently. This article focuses on snapshots with Proxmox virtual machines, but I think it is important to also include a reminder about the differences between snapshots and backups (backup).
Table of Contents
Differences between snapshot and backup
There is sometimes some confusion between snapshots and backups, and yet the purpose of these two features is different.
- Snapshots (Instantaneous snapshots)
A snapshot in Proxmox VE is a capture of the state of a VM or container at a specific point in time. Its main purpose is to create a fast restore point so you can roll back (or move between several states).
When you take a snapshot, Proxmox VE records the VM configuration at that moment. Then, all subsequent changes to the VM are written to a new file, while the original data remains unchanged, making it possible to quickly return to the captured state. In general, this data is stored in the same directory as the virtual machine's own data.
The main goal is to be able to quickly return to an earlier state in case of a problem (for example, after a failed software update, a risky configuration change, or for testing). A snapshot is meant to be temporary.
- Backups (Backups)
A backup is a complete and self-contained copy of the data and configuration of a VM or container at a given point in time. To perform its backups, Proxmox VE relies on its integrated backup tool: vzdump, not to be confused with the Proxmox Backup Server solution. This tool creates a complete archive of the resource's data (virtual machine or snapshot), including configuration files. The backup, on the other hand, is preferably stored on external storage (NAS or other).
The main goal is to ensure disaster recovery (data loss, critical system error, etc.) or long-term archiving. A backup, unlike a snapshot, is associated with a retention strategy.
Proxmox VE: snapshots with the web interface
To begin, we will see how to create, edit, restore, and delete a snapshot from the Proxmox VE web interface (GUI). This will be an opportunity to look at how snapshots work by using an example.
Before starting, here is a note about disk format and snapshot compatibility:
- The
qcow2format (QEMU image format) natively supports disk image snapshots. - The
rawformat (raw disk image) does not support snapshots on its own, so it requires the storage layer to provide this functionality.
In other words, in some cases, snapshots may not be possible! You can consult the table on this page; it provides a good overview.
Create a snapshot
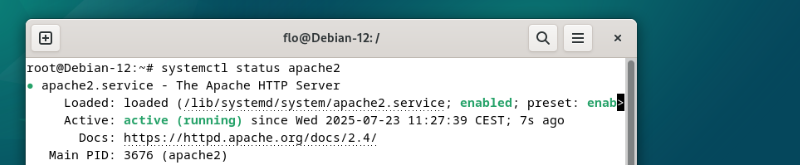
We are going to see how to create a snapshot of a Proxmox VM. At the moment, we have the following state: a Debian 12 machine on which Apache2 is not installed. Before proceeding with the installation, and in order to be able to roll back, we will take a snapshot.

Here are the steps to follow:
1. Log in to your Proxmox VE web interface. In the resource tree on the left, select the node on which the VM is hosted.
2. Select the VM for which you want to create a snapshot, here it is the VM with ID 100.
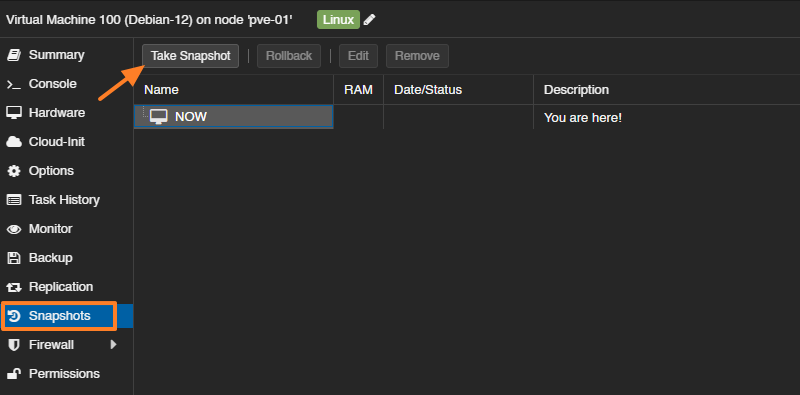
3. In the VM-specific menu, click "Snapshots" then click the "Take Snapshot" button.
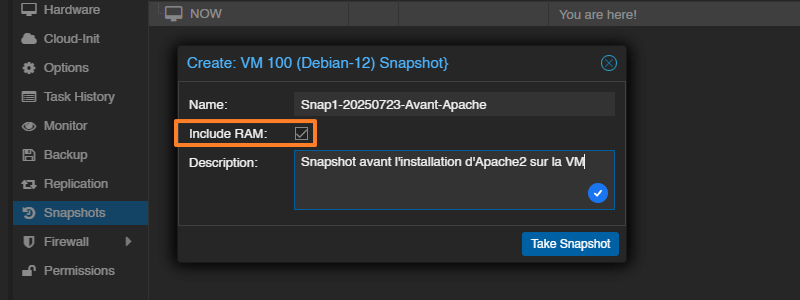
A dialog box will open. You must then enter a name, for example Snap1-20250723-Avant-Apache and a description. Note that you can create multiple snapshots for the same VM.
When creating an instant snapshot on a virtual machine, there is an option called "Include RAM". Check this option if you want the snapshot to include the VM's RAM state. This makes it possible to restore the VM exactly as it was at the time of the snapshot, without requiring a full boot.
Click "Take Snapshot" to confirm.
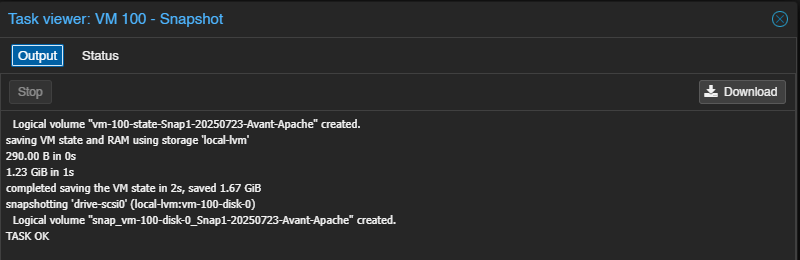
The snapshot creation is successful, as shown by the TASK OK message in the output.
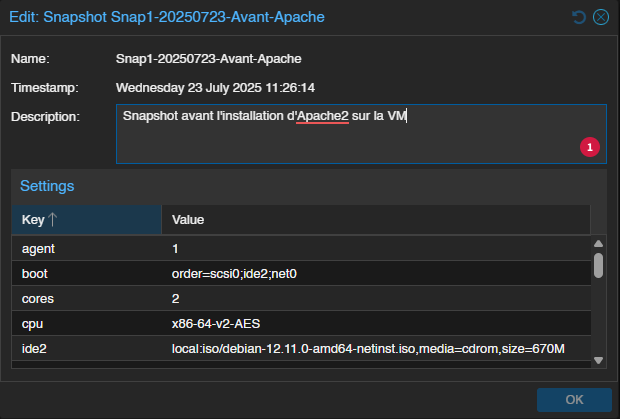
From now on, the current state (NOW) is positioned under our snapshot, since it corresponds to an earlier state. The date and time at which the snapshot was created are clearly specified, which is essential information.

You can edit a snapshot at any time, which gives you the opportunity to modify its description.
Restore a snapshot
Still on this same Debian 12 machine, I was able to install Apache2. But in the end, I want to roll back. I could take the time to remove the package and clean up the system. However, we will simply restore the snapshot to return to the previous state.
Follow these steps:
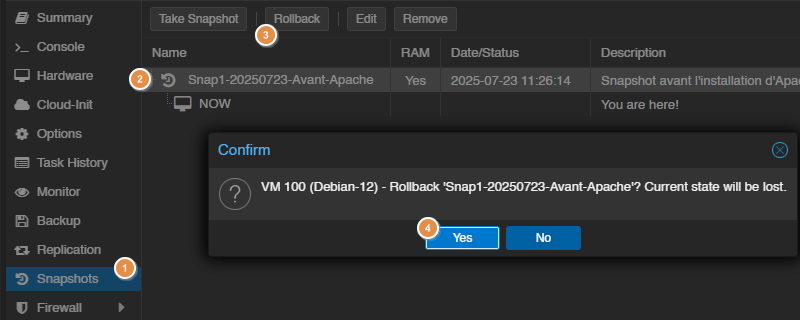
1 - Still in the VM management, click "Snapshots"
2 - Select the snapshot to restore.
3 - Click the action button named "Rollback".
4 - Click "Yes" to confirm. Warning: changes made after the state captured in the snapshot will be lost.
Wait for the operation to complete.

From there, the snapshot has been restored, but it is still present. If you no longer need it, you should delete it.
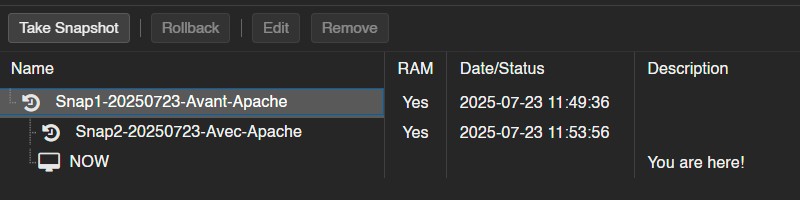
Let me also mention the ability to create multiple snapshots. You can then move between different states. What matters is the position of the "NOW" pointer. Here, we can see that the current state is based on snapshot Snap1, not Snap2.
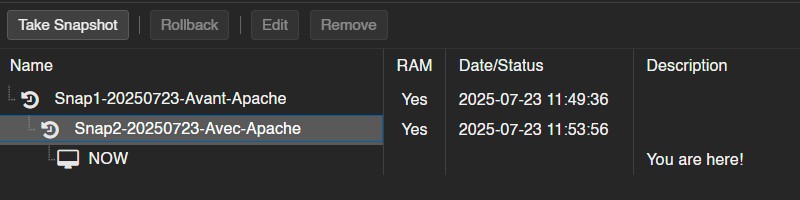
With this second example, the current state is based on Snap2.
Delete a snapshot
We no longer need our snapshot, so it is time to delete it. Indeed, a snapshot can affect performance and also increase storage consumption. Let us not forget that it is intended to be temporary.
To delete a snapshot, always go to the resource's "Snapshots" section. You simply need to select the snapshot to delete and click the "Remove" button. Confirm the operation.

Proxmox VE: snapshots in CLI
In the rest of this tutorial, we will switch to the command line to manage snapshots on a virtual machine. Before starting, you need to access this terminal either through the Proxmox VE web interface or by direct SSH connection.
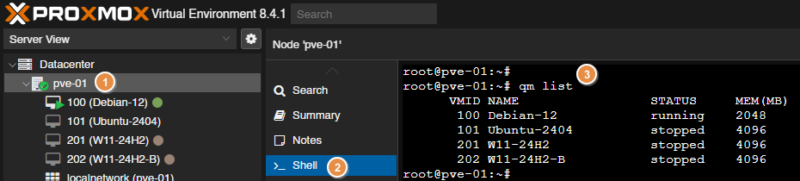
1 - Click your PVE node on the left.
2 - Select "Shell" in the menu and log in with your account.
3 - You can list your virtual machines with the qm list command.
Create a snapshot
You must use the qm snapshot command to create a snapshot. It expects several pieces of information such as the VM ID and the snapshot name. The syntax to use is as follows:
qm snapshot <VMID> <NOM_DU_SNAPSHOT> [OPTIONS]So, to create a snapshot on the VM with ID 100, name this snapshot Snap-avec-Shell and add a description to it, while capturing RAM state, you should run this command:
qm snapshot 100 Snap-avec-Shell --description "Snapshot créé depuis le Shell Proxmox" --vmstate trueYou can then list the snapshots for this VM:
qm listsnapshot 100
Of course, on the Proxmox web interface, this instant snapshot is visible:

Note : to create a snapshot on a container from the command line, it is different. In fact, the pct snapshot command must be used.
Restore a snapshot
To restore the snapshot we just created, we need to use the qm rollback command like this:
qm rollback <VMID> <NOM_DU_SNAPSHOT>In our case, the command would therefore be:
qm rollback 100 Snap-avec-ShellDelete a snapshot
Finally, if we no longer need this snapshot, we can delete it with another command designed for this purpose: qm delsnapshot. It is used on the same principle as the rollback command:
qm delsnapshot <VMID> <NOM_DU_SNAPSHOT>In this case, we must run the following command:
qm delsnapshot 100 Snap-avec-Shell

  Logical volume "vm-100-state-Snap-avec-Shell" successfully removed.
  Logical volume "snap_vm-100-disk-0_Snap-avec-Shell" successfully removed.
Conclusion
By following this tutorial, you are now able to create, restore, and delete snapshots on virtual machines (and containers) hosted on Proxmox VE. You can do this through the web interface or the command line, depending on your needs. The command line is more useful when there are tasks to automate.