Getting Started with Proxmox VE: Installation and First Steps
Are you looking to take your first steps with the Proxmox VE hypervisor? You’re in the right place. In this tutorial, we’ll see how to install Proxmox VE and how to create your first virtual machine.
Propelled into the spotlight following VMware’s strategy changes, Proxmox VE (Virtual Environment) is an open-source hypervisor designed to run virtual machines (VMs) and containers. Based on Linux, and more specifically the Debian distribution, Proxmox VE relies on two technologies: Kernel-based Virtual Machine (KVM) for full virtualization and LXC (Linux Containers) for containers.
The Proxmox VE project started in 2007, in Austria, and its first stable version was released in 2008. Since then, it has been updated regularly, with new versions bringing additional features. At the time of writing, the latest version is Proxmox VE 9.1, based on Debian 13.
Proxmox VE provides administrators with a web management interface that lets you manage your entire virtualization infrastructure. A command-line interface is also available, as well as a REST API. It can run standalone, meaning in a single-node architecture, or as part of a multi-node cluster to ensure high availability of resources. On that note, it is important to know that it follows a multi-master approach, so any node in the cluster can perform all management tasks.
Although it takes some time to get used to and understand all its moving parts, Proxmox VE is extremely flexible. If we take storage as an example, it supports local storage, network storage (SAN/NAS), and distributed storage solutions such as Ceph.
Proof that the broader Proxmox project continues to expand, a backup and restore solution called Proxmox Backup Server was launched on November 11, 2020. Today, PBS, as it is commonly called, and which is written in Rust, is a reliable and long-term solution for backing up Proxmox VE environments.
In this introductory article, we’ll start with the basics by carrying out the following tasks:
- Create a bootable USB drive
- Perform a basic installation of Proxmox VE 9
- Update the packages
- Import an ISO image
- Create a first virtual machine
- Create a dedicated user for an initial look at permission management
Here, we’ll install Proxmox VE from the official Proxmox VE ISO image. Another option is to install a Debian machine and then install the packages required to turn it into a Proxmox VE host (packages: proxmox-default-kernel, proxmox-ve, etc.).
More articles will be published to help you fully leverage Proxmox VE and train on this solution.
Note : Proxmox VE 9.0 has been available in beta since July 18, 2025. This new version is based on Debian 13 Trixie, the next major Debian release, which will be available on August 9.
Table of Contents
Prerequisites for Installing Proxmox
Hardware requirements
Before considering the installation of Proxmox VE 9, it is important to ensure that your system meets the hardware requirements. Here are the key points to consider:
Processor (CPU)
- A 64-bit CPU (Intel 64 or AMD64) is required, with at least 2 cores.
- To benefit from full KVM virtualization, the CPU and motherboard must support virtualization (Intel VT or AMD-V).
- If you plan to use PCI(e) passthrough (allowing virtual machines to access physical devices directly, such as graphics or network cards), the CPU must absolutely support VT-d or AMD-d.
Memory (RAM)
- A minimum of 1 GB of RAM is required, but 2 GB of RAM is recommended. This applies only to the operating system and Proxmox VE services themselves.
- You must also plan for additional memory dedicated to the virtual machines.
Network cards
- At least one network interface is required to ensure connectivity for the Proxmox host
- Redundant Gigabit network cards are recommended for production.
- For Ceph deployments, a network bandwidth of at least 10 Gbit/s, or more, is recommended for production and it should be used exclusively for Ceph traffic.
Storage
- The choice of storage location and capacity depends primarily on your needs.
- Proxmox VE supports various storage types: local storage, SAN, NAS, and distributed storage solutions such as Ceph RBD.
- During installation, you will be able to choose the file system among ext4, XFS, BTRFS, or ZFS.
Secure Boot
- Since Proxmox VE 8.1, Secure Boot is natively supported and works out of the box. Otherwise, you must disable it in your machine’s BIOS settings.
These are guidelines to keep in mind, but by no means a standard configuration. Every project is different.
Creating the bootable USB drive
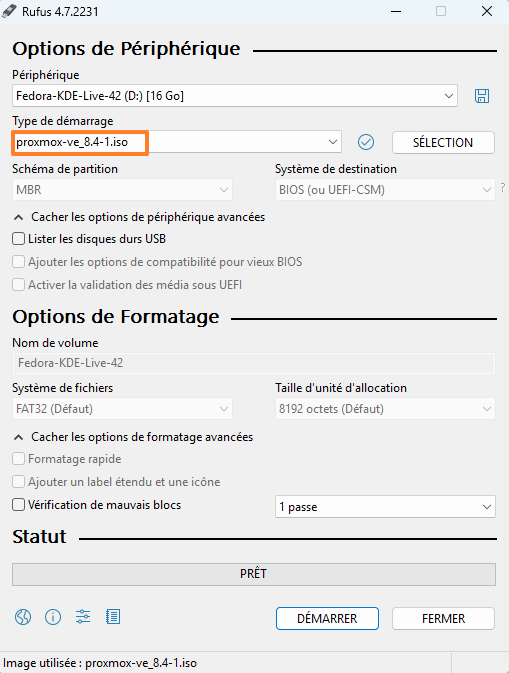
First, you will need to download the installation media (ISO) in order to create a bootable USB drive to install Proxmox on our server. The drive must have at least 1 GB of free storage. On Windows, tools such as balenaEtcher or Rufus (in DD mode) are recommended. Here, we will use Rufus, simply out of habit. If you are using a Linux machine to create the bootable USB drive, you can use the dd command (see below).
The safest way to obtain the installation sources is to go directly to the vendor’s website.
Click the "Download" button in the "Proxmox VE 9.1 ISO Installer" section to download the ISO.

Warning: the USB drive will be formatted, so make sure you back up your data.
Next, create the bootable USB drive with a utility. I recommend using Rufus: all you need to do is select your USB drive and the ISO file. You can download it via this link:
Select the ISO image and your USB drive. A warning message "ISOHybrid image detected" will appear, and you can click "OK". The bootable USB drive will be created without any issue. Click "Start" to begin creating the drive.
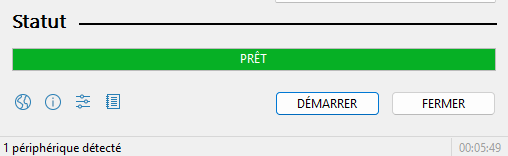
When Rufus shows the status "Ready", consider the drive ready to use.
If you want to create a bootable USB drive on Linux without using a tool like Rufus, you can run the dd command:
sudo dd bs=1M conv=fdatasync status=progress if=./proxmox-ve_*.iso of=/dev/sdcThe command above assumes that the ISO image is named proxmox-ve_<version>.iso and that the USB drive corresponds to the device /dev/sdc. If in doubt, start by running lsblk to identify the disk corresponding to your USB drive.
You now only need to connect the bootable USB drive to your server.
BIOS/UEFI configuration
On your server, some changes will need to be made to your BIOS or UEFI settings (for systems using newer firmware versions).
Check the motherboard manufacturer’s website for the key used to access your BIOS/UEFI. The most common keys to access BIOS/UEFI are: F2, F8, F10, Delete, Esc.
In some cases, the key combination may be Ctrl + Alt + Esc or Ctrl + Alt + Delete, although these are more common on older machines. Also note that a key such as F10 may launch something else: the boot menu (Boot menu).
As mentioned earlier, to enable virtualization, it is necessary to enable features such as virtualization technology, called:
- VT-x or Virtualization Technology on Intel
- AMD-V or SVM or Secure Virtual Machine Mode on AMD
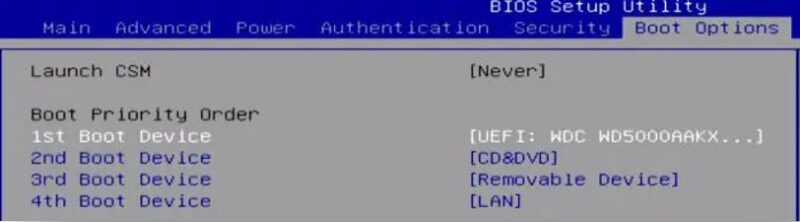
Next, it will be necessary to change the boot selector options, by setting the boot order and placing the USB drive in first position. This boot device must be placed before the machine’s disk. Another option is to use the Boot Menu to boot from the USB drive only once (this avoids changing the BIOS configuration).
If you want to change the boot order, follow these steps. The goal is to place our USB drive on the "1st Boot Device" line. It corresponds to the "Removable Device" entry, but in some cases, you may see the name of the USB drive displayed.
When that’s done, save and exit.

The machine will restart and should boot from the USB drive: the Proxmox installation process can now begin.
Installing Proxmox VE 9.1
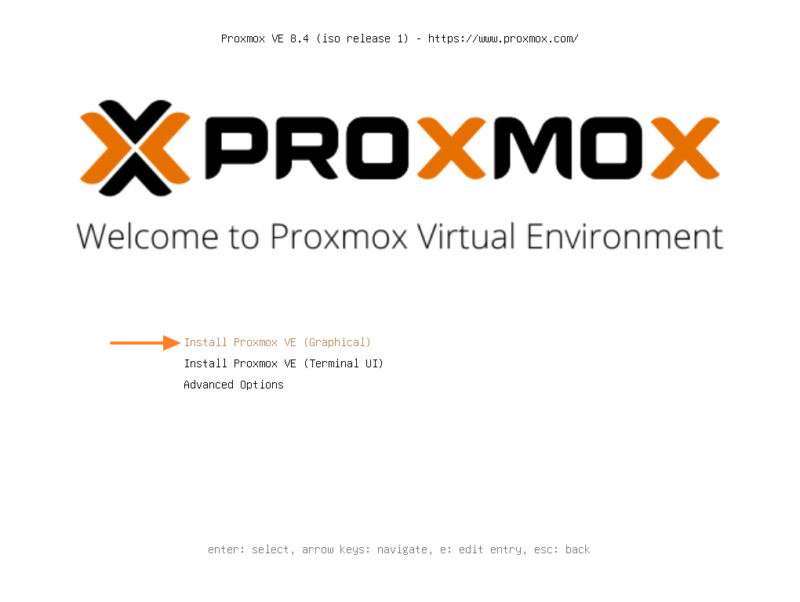
There it is, the Proxmox interface is displayed! We will proceed with the installation. Select the option called "Install Proxmox VE (Graphical)" from the list. The "Install Proxmox VE (Terminal UI)" option also allows installation, but from a more austere console-based interface.
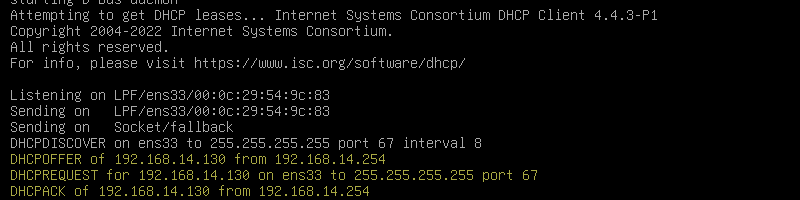
You will also see the console appear. This is a good time to note that the Proxmox server will try to obtain an IP address automatically if it is connected to the network.
Accept the end-user license agreement and continue.
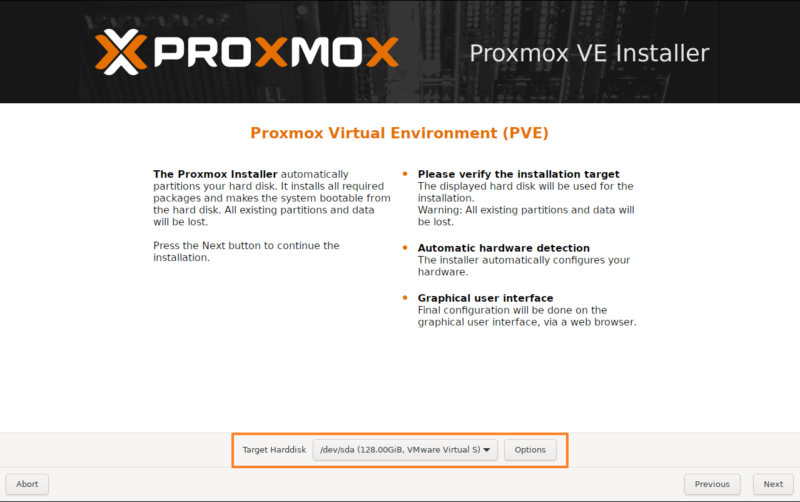
Select the disk that will host the system. In this example, and for this quick start, we assume the machine has a single disk. You can customize storage, including the file system choice, by clicking the "Options" button. By default, Proxmox VE will use LVM with the EXT4 file system. Here, you could instead choose ZFS or Btrfs to benefit from advanced features, but that will also consume more RAM.
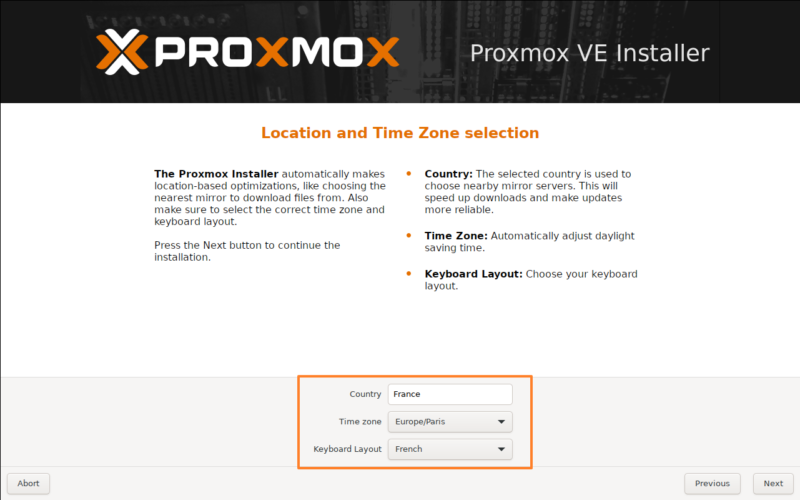
In the next step, you must select your country, time zone, and keyboard layout.
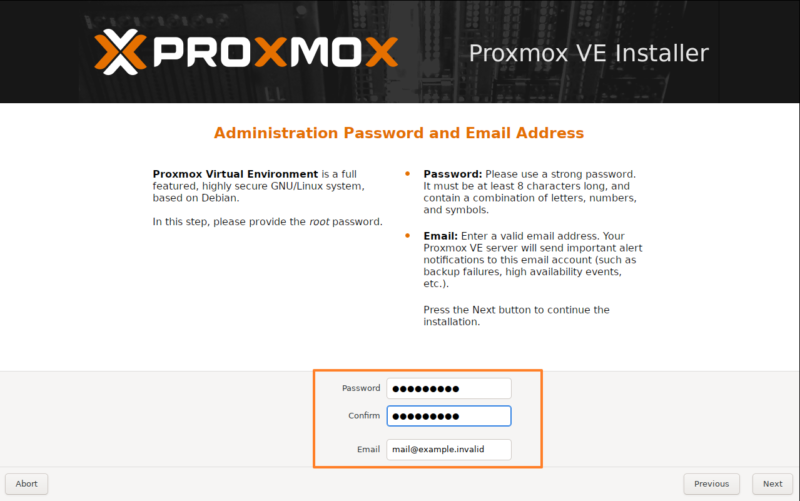
The next step is to set a password for the platform administrator, associated with the superuser root. You must also provide a valid email address, which is mandatory. This password must be strong, as it gives full access to your Proxmox environment.
The rest of the configuration concerns the network and, more specifically, the Proxmox management interface.
1 - The active network interfaces on your machine are displayed, allowing you to select the one to configure and assign as the management interface.
2 - Specify the FQDN of your server, meaning its full name: host name + domain name.
3 - Now you need to configure the IP address of your management interface. If the server obtained an IP address via DHCP, it is filled in automatically.
Here is what I get on my side:
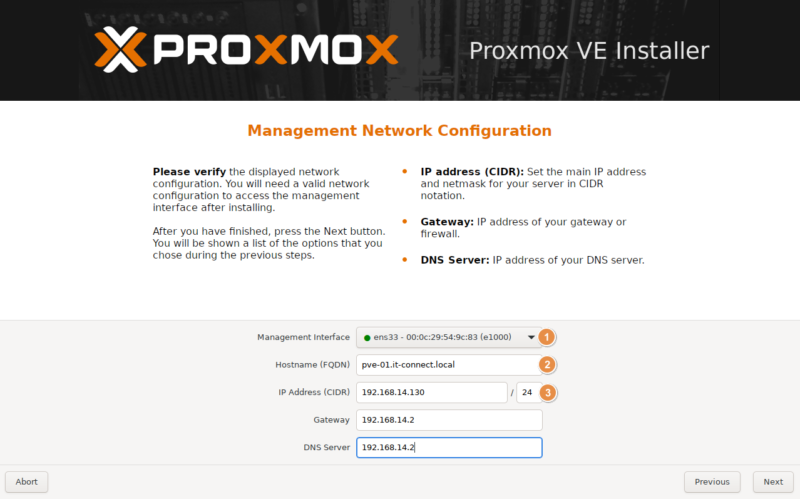
By default, the installer creates a Linux bridge named vmbr0 and binds it to the first physical Ethernet card. This bridge is where the IP address and gateway of the Proxmox node will be configured, serving as the basis for management communication.
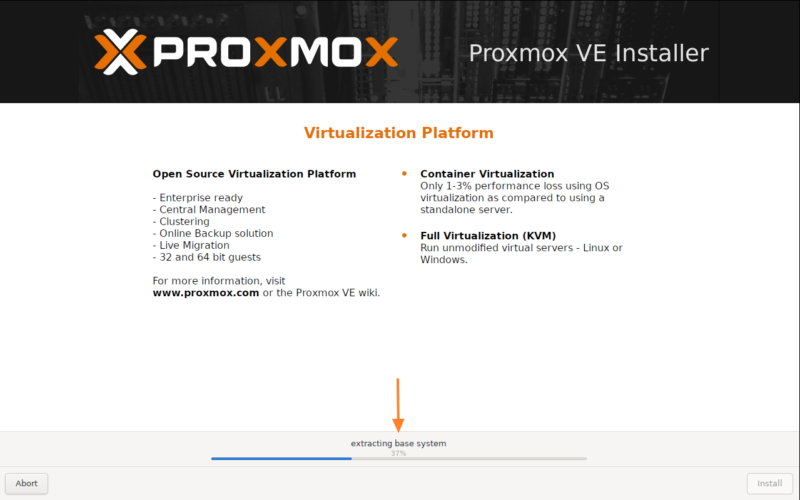
Before clicking the "Install" button, review the summary displayed on the screen and make sure everything looks correct. The server will reboot automatically at the end of the installation.

Wait while Proxmox is being installed.
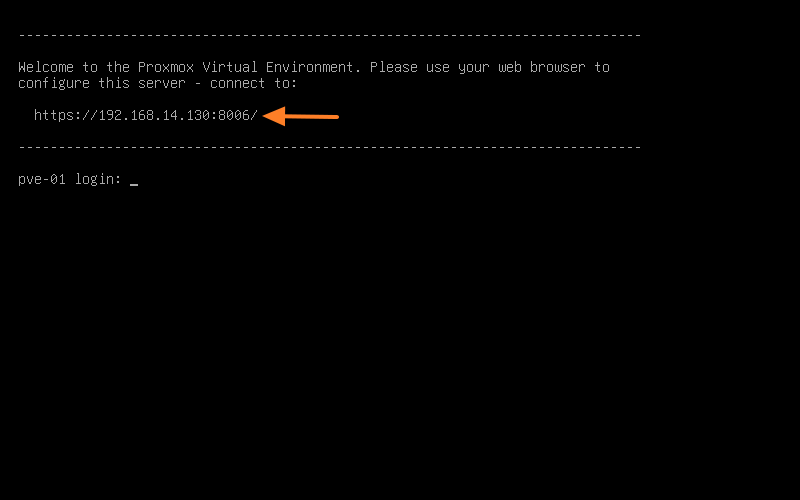
Once the installation is complete, the console appears. Most importantly, the full URL to access the configuration interface is displayed. Access is also possible via the command line, but we won’t cover that here.
First Login to Proxmox
You can access the Proxmox VE web interface by pointing your browser to the IP address or FQDN (be careful with DNS resolution) that you specified during installation, on port 8006, using the HTTPS protocol. For example: https://<adresse IP>:8006. You will see a warning when connecting, which is normal because Proxmox VE uses a self-signed TLS certificate.
Log in to the Proxmox Web interface with the "root" account and the password set during installation.
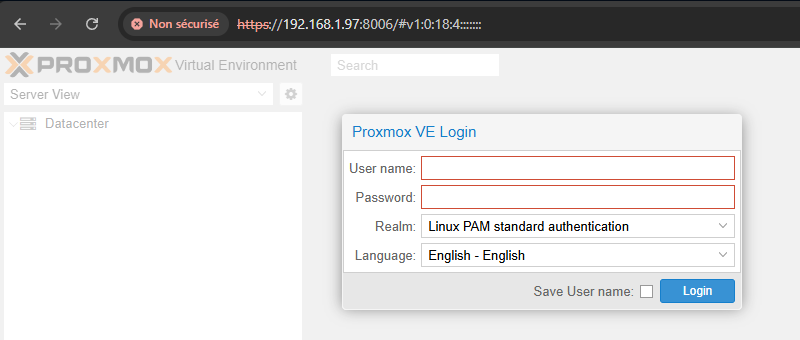
When connecting to the Proxmox VE web management interface, the "Realm" option determines the authentication source used to validate your credentials. Proxmox VE is designed to integrate with multiple authentication systems, whether internal or external to the platform.
This option lets you specify which "domain" or user directory should be queried with the username and password you provide. By default, on a new installation, you will log in with the user root and the realm PAM (which corresponds to standard Linux PAM authentication).
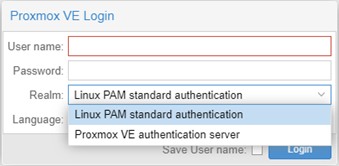
By default, there are these two realms:
- Linux PAM Standard Authentication : for users defined locally on the Linux host system, managed through standard system commands.
- Proxmox VE Authentication Server : an internal password management system, ideal for standalone installations where users are entirely managed through the Proxmox VE interface.
The available features, especially for permission delegation, may vary from one authentication mode to another.
Once connected, a "No valid subscription" message will appear. What? You need a subscription to use Proxmox? Isn’t it free? Don’t worry, it’s optional.
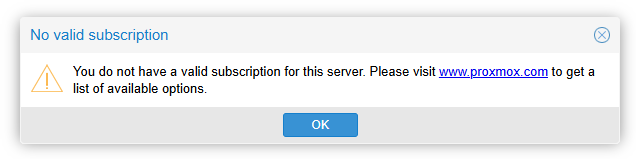
A few explanations are in order...
Proxmox VE is an entirely open-source virtualization platform based on Debian. The software can be used and deployed free of charge, without requiring a subscription for its basic operation. However, for production environments and to ensure maximum stability, the company behind Proxmox offers subscriptions for Proxmox VE.
These subscriptions (4 different tiers, including an affordable community tier), although optional, bring benefits. Among them:
- Access to the Enterprise repository (Proxmox VE Enterprise Repository) : this repository contains the most stable and thoroughly tested packages, suitable for production use. It is enabled by default after a fresh installation. Access requires a valid subscription key (which is the source of the alerts).
- Commercial Support : depending on the subscription tier, users get access to the Proxmox Customer Portal, with help and dedicated support, and a limited or unlimited number of tickets depending on the offer.
This business model allows Proxmox VE to remain a high-performance, stable, and accessible virtualization solution while offering support tailored to businesses that want it. It is also a way to financially support the project.
Welcome to the Proxmox interface!
Updating Your Proxmox VE Environment
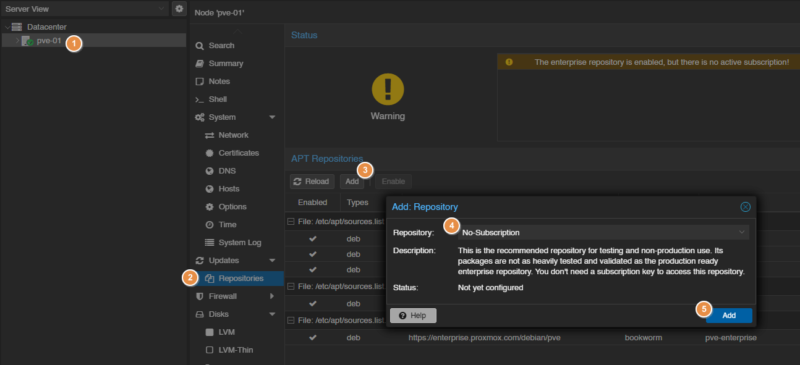
From the Proxmox administration interface, you can update the packages installed on your server. The problem is that by default, Proxmox is configured to allow the subscription-required APT repository (with packages tied to a stricter validation policy).
For users without a subscription, Proxmox VE offers the "No-Subscription" repository (Proxmox VE No-Subscription Repository). This repository also provides updates, security fixes, and new features, but its packages are not tested and validated as extensively as those in the Enterprise repository. To switch to this repository, proceed as follows:
1 - Click your server name on the left.
2 - Click "Repositories" under "Updates".
3 - Click the "Add" button.
4 - Select the "No-Subscription" repository from the list.
5 - Confirm by clicking the "Add" button.
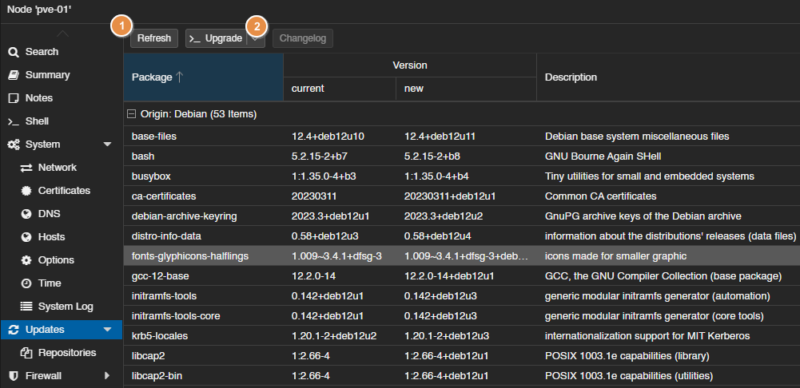
Then click the "Updates" entry in the side menu, then click the "Refresh" button (1). This will search for available package updates. The Proxmox interface will list the packages, showing both the current version and the new version. Start the package upgrade using the "Upgrade" button (2).
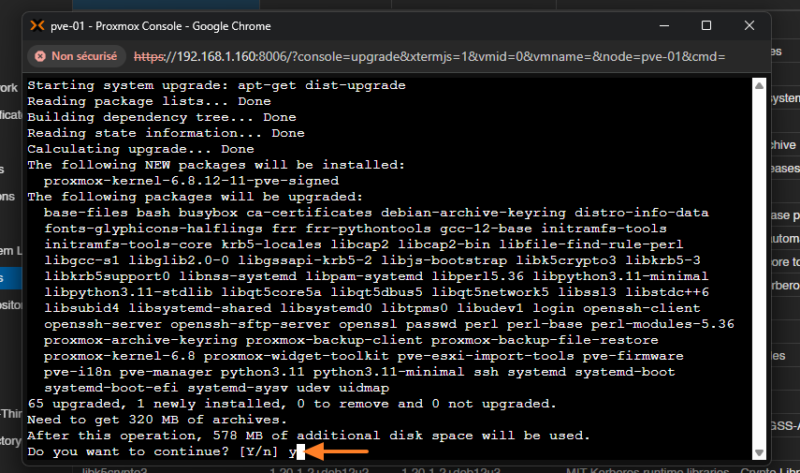
A second window will open and you will need to confirm with Y then Enter. Here, we can see that this actually launches apt-get dist-upgrade, which will update Proxmox VE in its entirety. On a fresh installation, it is best to do this right away so you start from an up-to-date base. On an existing production installation, tracking updates is important too, but it requires taking precautions.
Once the updates are complete, reboot your server using the "Reboot" button.
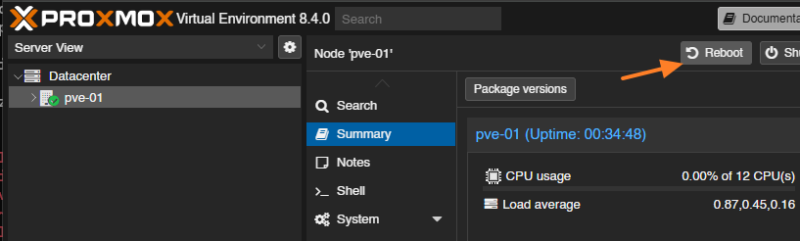
Wait for the reboot.
Importing an ISO File into Proxmox
To install operating systems on our various virtual machines, we must first download the system images (ISO) and import them into Proxmox.
Proxmox VE has a dedicated area for these ISO images in the form of a storage repository reserved for them. Let’s see how to add a first ISO image, which we’ll then use to create a virtual machine.
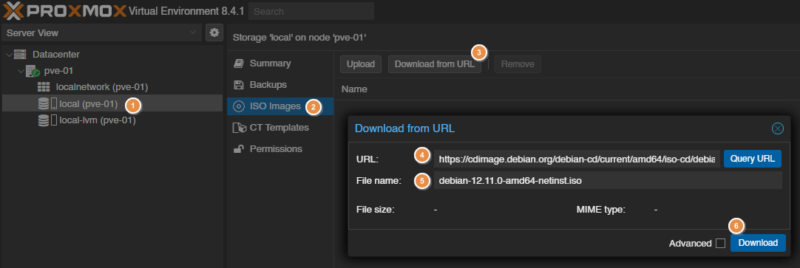
Select your node, then the storage (local, in our case) (1). Click on "ISO Images" (2), then you have two choices:
- Click the "Upload" button to browse for the image to import from your local disk.
- Click the "Download from URL" button (3) to download the ISO image directly from a web link.
Here, we’ll use the second option to download the Debian ISO image directly from the official website. This gives the following link for Debian 12.11.0: https://cdimage.debian.org/debian-cd/current/amd64/iso-cd/debian-12.11.0-amd64-netinst.iso. Then, you must specify a filename (5) and click the "Download" button to start the download (6).
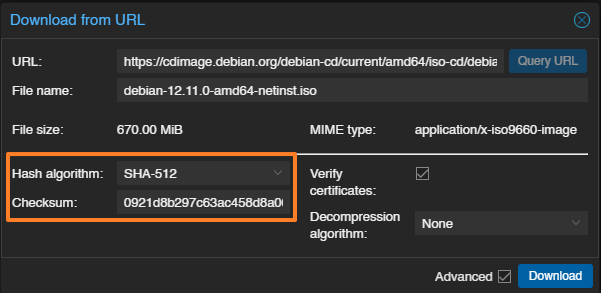
To ensure the integrity of the downloaded file, you can use the advanced options ("Advanced") to provide the ISO image checksum. The Debian website provides the value 0921d8b297c63ac458d8a06f87cd4c353f751eb5fe30fd0d839ca09c0833d1d9934b02ee14bbd0c0ec4f8917dde793957801ae1af3c8122cdf28dde8f3c3e0da as the value with the SHA-512 algorithm.
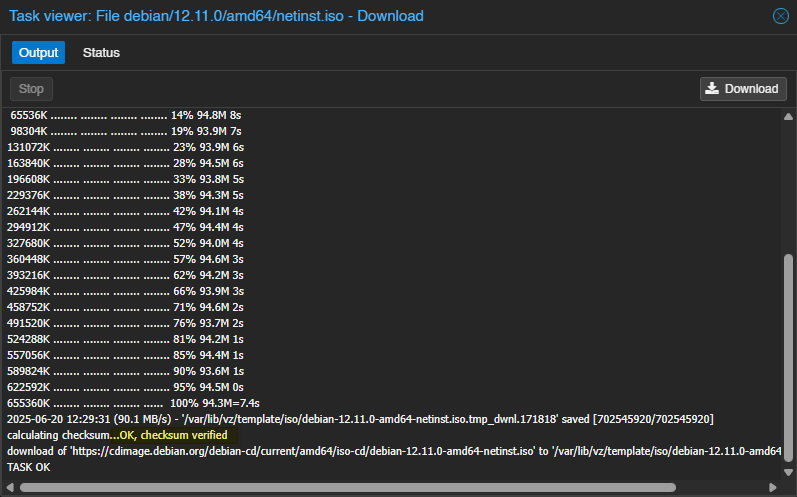
Wait for the download to complete. At the end of the operation, the file integrity is verified. This is a way to ensure the image is not corrupted.
Repeat the operation as many times as necessary depending on the number of ISO images to import; the only limit is your storage space.
Creating a Virtual Machine in Proxmox
Now we’ll see how to create a Proxmox virtual machine, using a Debian 13 VM as an example. To create a new virtual machine, click the "Create VM" button at the top right of the interface. Do not confuse it with the "Create CT" button used to create containers: a topic we will cover in a future article.
Warning: in this screenshot, you can see that I’m connected as root; later on, it’s better to avoid that. It is preferable to log in with a dedicated PVE administration account other than root.

A VM creation wizard now appears on the screen. We’ll go through the different steps.
General step
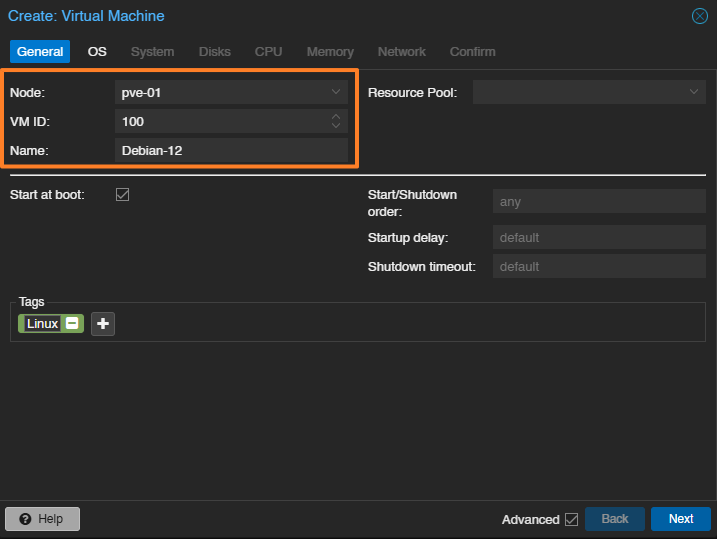
Here, we’ll name the machine Debian-13. It may be wise to prefix VM names to make them easier to identify in the Proxmox console. Note other important details:
- Node : the name of the node on which the VM will be created. Here, we only have one server, so it will necessarily be
pve-01. - VM ID : each virtual machine must have a unique identifier. It can be customized, but note that Proxmox VE will increment it automatically every time you create a VM. The first VM gets the ID
100.
In addition, on each step, you have access to advanced options. Here, we have the "Start at boot" option to automatically start the virtual machine when the Proxmox VE host boots. On the right, other options let you customize this behavior (for example, by adding a delay). You can also add tags, which can be useful for associating a project, OS type, environment type, and so on. Here, the tag named "Linux" has been added.
OS step
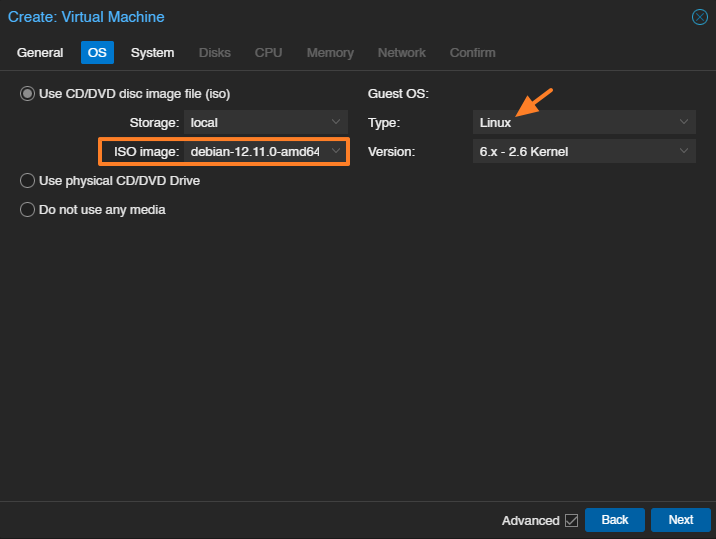
Now select the ISO you want to install on the machine and the corresponding system type. Note that it is also possible to use a physical CD/DVD drive directly, or even a USB drive plugged directly into the server.
Here, we select the ISO image downloaded earlier. On the right, the "Guest OS" section lets you choose the type of guest operating system (that is, the one installed inside the VM). So we will select "Linux".
System step
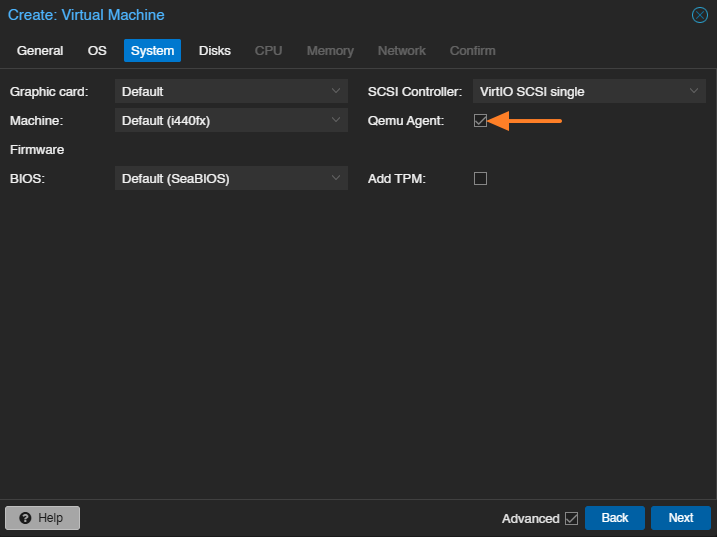
This tab contains many options, best used sparingly and with a clear understanding of what you are changing. For example, it allows you to modify the firmware type (BIOS or UEFI), the disk type (IDE, SCSI, SATA), and so on.
Here, we will simply check the "Qemu Agent" option: this agent improves compatibility between the physical host and the guest system, and is the equivalent of VMware Tools. For example, it allows you to power off the virtual machine cleanly from the Proxmox interface (without interacting with the guest OS manually).
Disks step
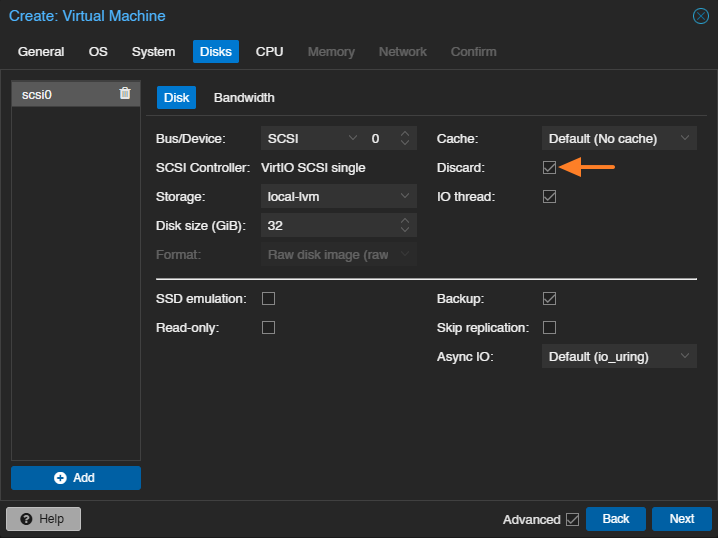
The next step is to configure the virtual machine storage, including the choice of disk, its type, and its size. A 32 GB disk will be created this time. This VM has a single disk: scsi0. You can add several. Proxmox VE supports multiple virtual disk formats, including qcow2 (QEMU image format) and raw disk images in raw format. Here, we can see that the image will be in raw format.
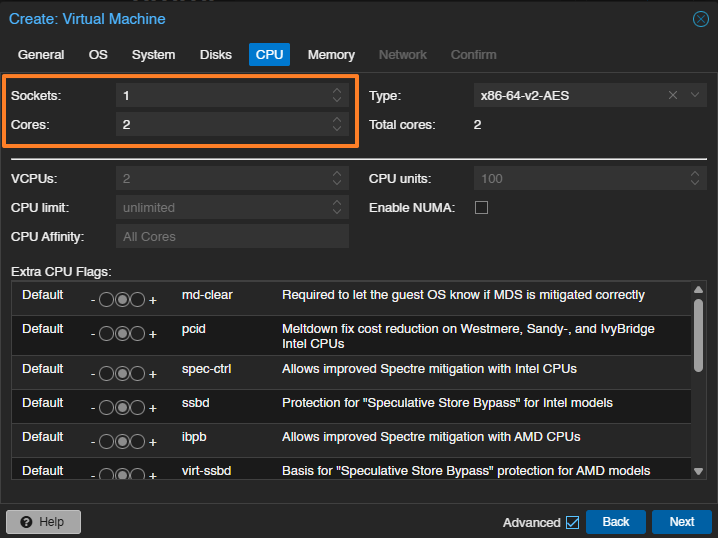
CPU step
Now it is time to define the CPU specifications, with the option of setting the number of CPUs (sockets) and the number of cores for each CPU. The example below assigns the VM 1 virtual CPU with 2 cores.
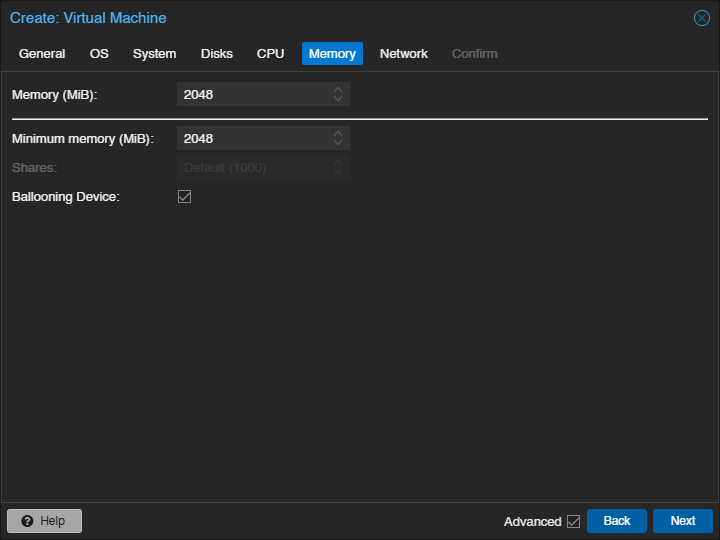
Memory step
Next, we define the amount of RAM allocated to this VM. 2 GB seems like a suitable value. Note that some operating systems need more RAM to install, and once the installation is complete, this can be reduced.
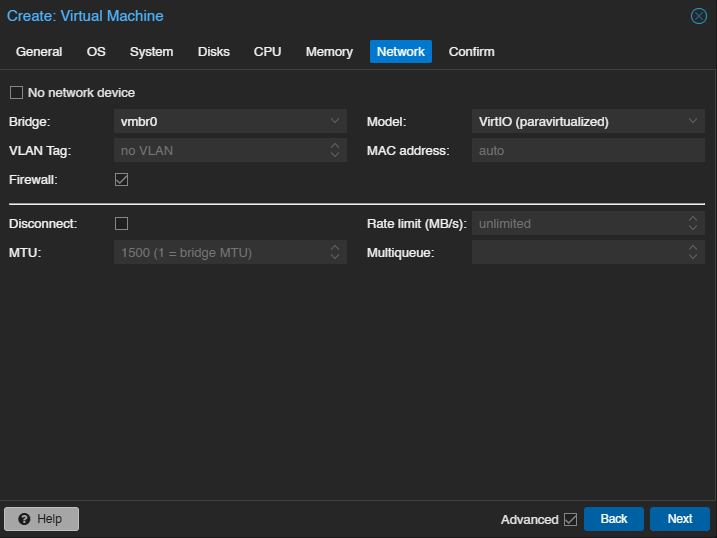
Network step
Since our PVE network is using its default configuration, the choice is fairly limited for now. We will simply select the bridge named vmbr0. The "Firewall" option relates to firewall management at the level of this virtual machine. We’ll come back to that in a future article.
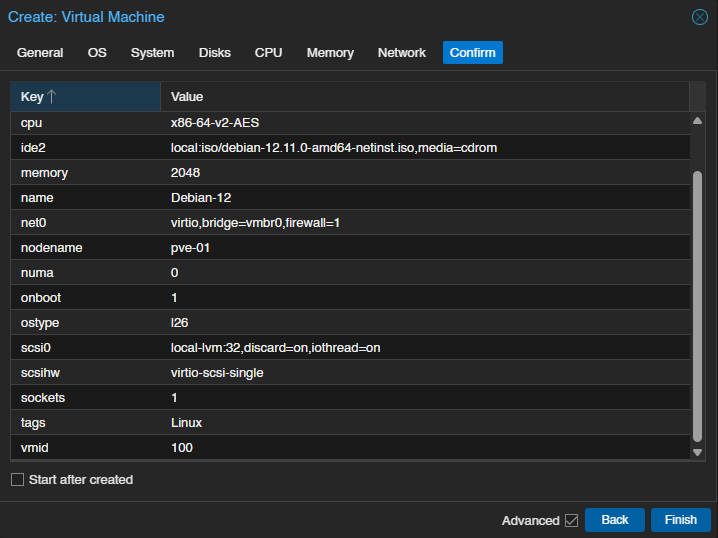
Confirm step
We are at the final step, where we get a summary. If everything looks good, click "Finish" to create the virtual machine. This does not install the operating system inside the VM, but the machine will be ready for installation. Let’s say we now have an empty shell.
Our VM is then created and can now be found on the left, under the PVE server name.
First Boot of Our VM in Proxmox
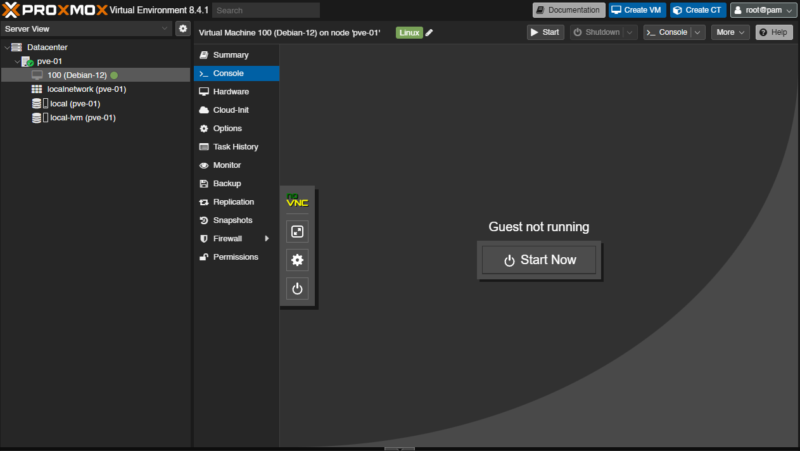
From the Proxmox VE web interface, there are several ways to start a virtual machine. A right-click on the VM name and then clicking the "Start" button may be enough. Here, we will use the console.
Click the virtual machine, then click the "Console" name in the menu dedicated to it. Click the central button named "Start Now" to launch the VM. This console provides visual access to the VM, which is essential for performing the manual installation.
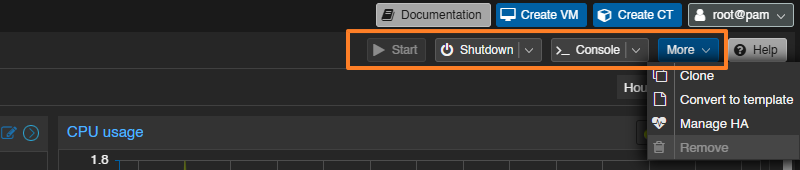
You can see a menu in the top right with various action buttons, including options to start or shut down the VM. The "More" button gives access to other options, such as converting it into a template or cloning it.
From this console, all you need to do is follow the prompts to install Debian. There’s nothing more to add, since these steps are specific to the operating system you want to install.

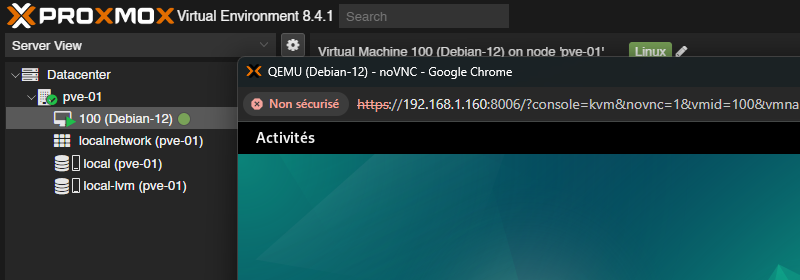
Instead of using the console shown above, you can double-click the VM name. This will open a new dedicated console window instead of the embedded version.
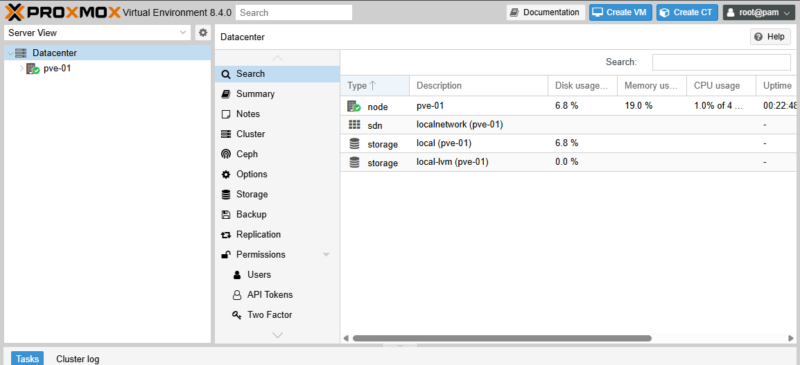
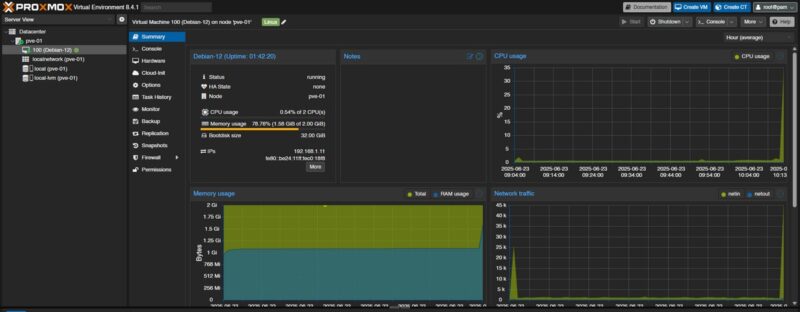
Once the machine is started, we can access metrics by selecting "Summary" » (CPU load, RAM, storage space, etc.). In the same way, it is possible to monitor the overall state of your hypervisor by selecting "Datacenter" then "Summary".
In the screenshot below, we can see an arrow on the left side. It gives access to additional options for the VM’s noVNC console, such as:
- Full screen mode
- Enable a key combination (CTRL+ALT+DEL)
- Etc.
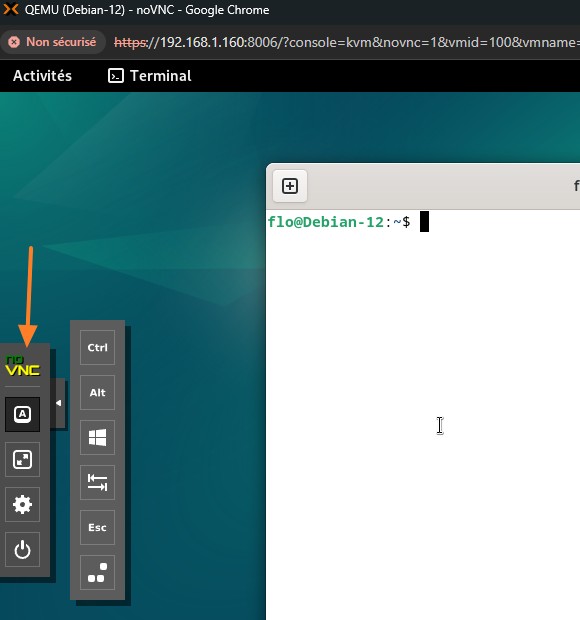
Note: on Linux, if you use the CTRL+W shortcut to search with the "nano" editor, the window will close, because this is also a browser shortcut that closes the window. This will not shut down the VM, though. What should you do? You need to select [A], then [CTRL], and then your [W] key to allow the search. Once the word is found, disable the feature.
From now on, you can continue configuring your VM, or even create other VMs!
Managing Permissions with Proxmox VE
Proxmox VE provides a set of features for fine-grained permission management, either at the node level or for a resource (permissions on a virtual machine, for example). We can create users and groups, as well as roles, opening the door to Role-Based Access Control (RBAC).
Proxmox VE includes a management system designed to let you define granular access to your entire virtual infrastructure. This goes beyond simply using the default root account, so creating a dedicated, named administrator account is a first step in that direction.
Users
A user in Proxmox VE is generally identified by its username and authentication domain in the form <user>@<realm>. After Proxmox VE is installed, the root account is the default user for logging in to the web management interface.
This system root user can still log in via the Linux PAM domain and is considered an unrestricted administrator. It is important to note that the root account cannot be deleted, even if that might seem logical.
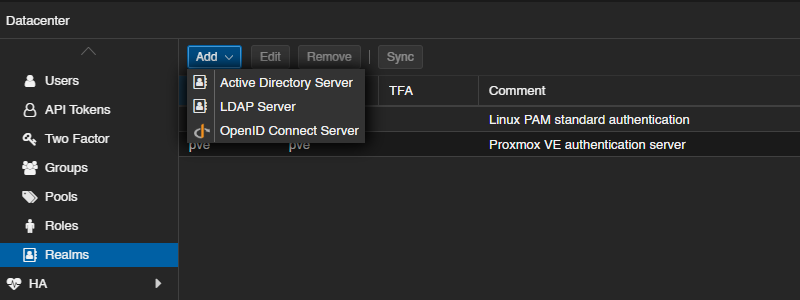
Authentication domains (Realms)
Proxmox VE supports several authentication sources, called "realms" or "authentication domains". By default, there are two realms, as we saw earlier: the Linux PAM module and the user database managed by Proxmox (Proxmox VE Authentication Server).
You can add other realms corresponding to these types:
- LDAP directory : Proxmox VE can integrate with an external LDAP server for user authentication. You can specify the base domain name and the user attribute used to search for users. Automatic synchronization of users and groups is possible. Proxmox supports LDAP, LDAPS, and LDAP + StartTLS.
- Microsoft Active Directory (AD) : Microsoft’s directory service is also supported as an authentication domain. It uses LDAP as the authentication protocol and allows synchronization of users and groups.
- OpenID Connect : Proxmox VE supports OpenID Connect, an identity layer on top of OAuth 2.0, allowing user identity verification via an external authorization server.
Groups
Each user can be a member of several groups. Groups are the preferred method for organizing access permissions, whether with PVE or another solution... It is strongly recommended to assign permissions to groups rather than individual users, as this results in an access control list that is much easier to maintain.
By default, no group exists in the Proxmox VE configuration.
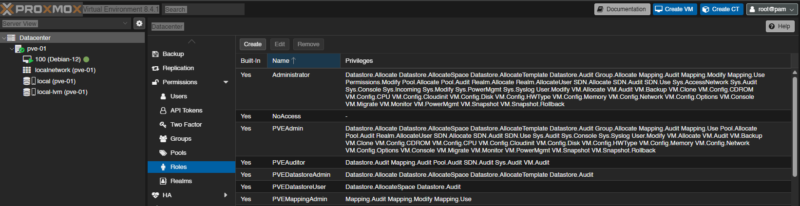
Roles
A role is a list of privileges. A privilege is the right to perform a specific action. To simplify management, privileges are grouped into roles, which are then used in the permissions table. Privileges cannot be assigned directly to users and paths without being part of a role. Privileges cover various aspects of administration, including node/system privileges, virtual machine privileges (for example, VM.Monitor, VM.PowerMgmt, VM.Snapshot), and storage privileges (for example, Datastore.Allocate, Datastore.Audit).
You should know that Proxmox VE comes with a number of predefined roles that cover most needs: creating and configuring virtual machines, read-only access to the platform, and more. Among them are:
- Administrator : has all privileges.
- NoAccess : has no privileges (used to deny access).
- PVEAdmin : can perform most tasks, but is not allowed to change system settings or permissions.
- PVEAuditor : has read-only access.
- PVEVMAdmin : can fully administer virtual machines.
- PVEVMUser : can view, back up, configure the CD-ROM, access the VM console, and manage VM power.
You can create new custom roles or use the default roles.
Permission management
Proxmox VE uses a role- and path-based permission management system. An entry in the permissions table allows a user, group, or API token to assume a specific role when accessing a given object or path.
So, an access rule is represented by three pieces of information: path, subject, role, where the subject can be a user, a group, or a token.
Objects and paths form a tree-like structure similar to a file system. Here are some examples of object paths:
/: covers all objects in the cluster./vms: covers all virtual machines./vms/{vmid}: access to a specific virtual machine (where{vmid}is the VM ID)./storage/{storeid}: access to a specific storage./pool/{poolname}: access to the resources contained in a specific pool.
Permissions can be inherited by objects lower down in the tree (the propagate attribute, which corresponds to permission propagation, is enabled by default).
Creating an administrator account on Proxmox VE
The final step in this introduction is to explain how to create a new administrator account on your Proxmox VE platform. This will be an opportunity to set aside the root account, although it can still be useful for certain actions reserved for it.
We’ll see how to create a new administrator account using the "Proxmox VE Authentication Server" realm and assigning it the "Administrator" role. If you need to add other administrators later, consider creating a group as well.
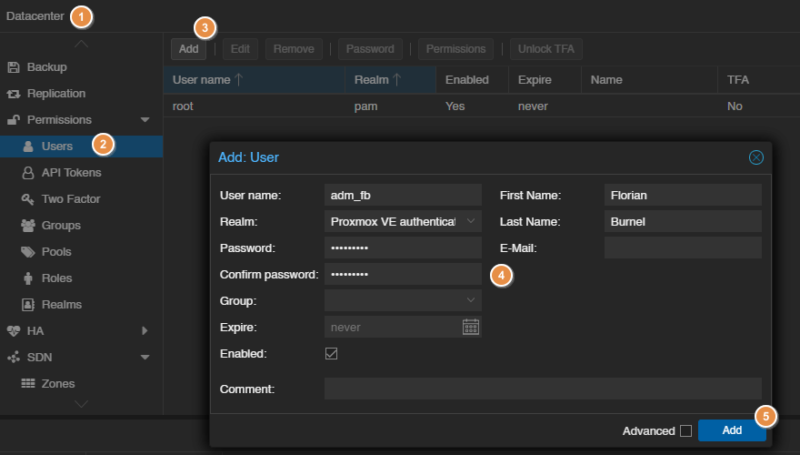
1 - In the navigation menu on the left, click "Datacenter".
2 - Under the "Permissions" section, select "Users".
3 - Click the "Add" button.
4 - In the "Add: User" window, fill in the following fields:
- User name : choose a name (for example,
adm_fb). - Realm : select "Proxmox VE Authentication Server"
- Password : set a strong password for this user
- You can fill in optional fields such as an email address, last name, first name, etc. You can also add the user to a group.
5 - Click "Add" to create the user.
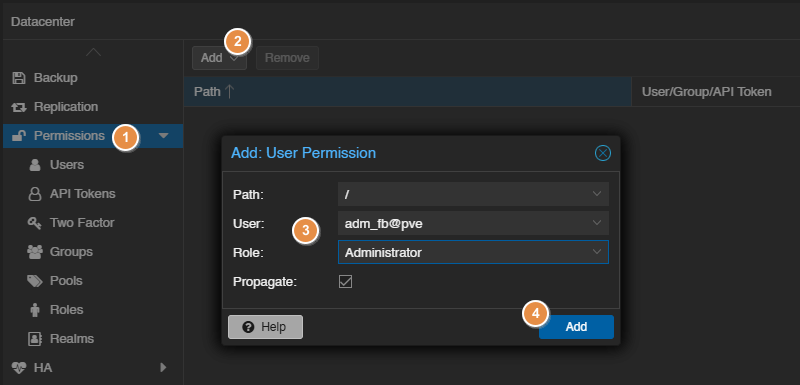
We will now add permissions to this user (or group), associating the role "Administrator" with the root path (/), which covers all objects.
1 - Go to the "Permissions" entry in the menu (still under Datacenter).
2 - Click the "Add" button, then "User Permission" to add permissions to the user created earlier (you have the same option for groups).
3 - In the "Add: Group Permission" window:
- Path : select the root path
/(this means the permissions will apply to all objects in the cluster, including virtual machines, storage, nodes, etc.). - User : select the user created earlier.
- Role : select the predefined role named
Administrator. - The "Propagate" option is enabled by default and should remain enabled so that permissions are inherited by all sub-objects.
4 - Click Add.
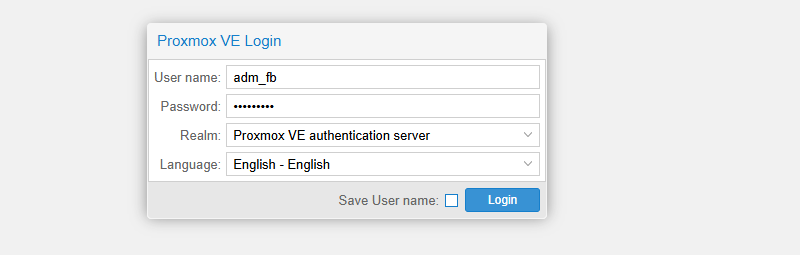
After completing these steps, you can log out of the root account and try logging in with the new user to verify that you have the necessary administrative rights. Pay attention to the selected realm when logging in. You can also test from a private browsing window.
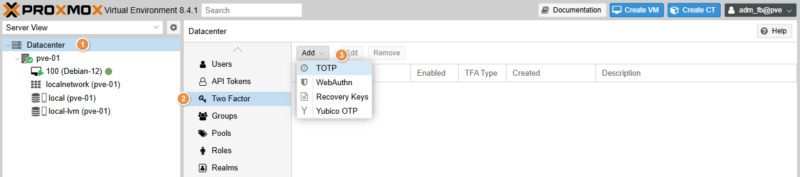
To finish preparing this account, you can configure multi-factor authentication. Proceed as follows:
1 - Click "Datacenter" in the menu on the left.
2 - Click the "Two Factor" entry under "Permissions".
3 - Click the "Add" button and choose your method. The simplest is TOTP, otherwise you can use Yubico OTP if you have a physical token. Follow the guidance to complete the setup.
Conclusion
You are now ready to unlock the full potential of Proxmox VE 9.1! In this tutorial, we walked through the essential steps to get PVE up and running: from preparing the installation media to creating and starting your first virtual machine.
This article is the starting point for anyone who wants to learn Proxmox VE. More articles will be published to help you master the configuration and configuration of Proxmox VE.
If you have any questions, feel free to comment on this article.