How to Secure Proxmox VE Servers and VMs with the Native Firewall
Mastering network filtering on your hypervisor is the first line of defense for your virtualized environments. In the context of Proxmox VE, administrators can rely on an integrated firewall. It has the advantage of enabling traffic management at multiple levels: datacenter, node, and resource (virtual machine or container). How do you configure the Proxmox VE firewall? That's what we'll cover in the rest of this article.
Find the other Proxmox VE tutorials:
- Getting started with Proxmox VE: installation and first steps
- Network configuration with Proxmox VE: the guide to getting started
- Proxmox VE: getting started with LXC containers
Table of Contents
How the Proxmox VE firewall works
The firewall built into Proxmox VE (called pve-firewall) is a filtering solution based on native Linux kernel features, notably iptables (the module for nftables is in preview). This is not about deploying a virtual appliance that provides firewall functionality. In fact, the Proxmox firewall runs directly on each node (physical server) in the virtualized environment, whether it is a standalone host or a cluster.
The Proxmox VE firewall system is hierarchical and divided into three distinct zones:
- The Datacenter (ideal for a cluster): defines global rules that apply to all nodes in the infrastructure. This is where you create elements such as security groups, IP address aliases, and lists (IPSets).
- The node (physical host): rules specific to the Proxmox server itself, notably to protect its management interfaces (WebUI, SSH).
- The virtual machine (VM) or container (LXC): filtering rules specific to a single resource and adapted to the services hosted by that resource (web server, database, etc.). At this level, node and datacenter rules are not inherited.
Thanks to these different levels, rules can be applied as close as possible to the source and destination of the traffic, depending on requirements. Most importantly, Proxmox VE can block traffic before it even reaches the resource, which is an advantage.
Note: Proxmox VE applies firewall rules on nodes in a logical hierarchical order, from the outermost perimeter to the closest one. This gives: Datacenter > Node.
Enable the firewall on Proxmox VE
Enabling the firewall in Proxmox VE is done in several steps, and above all, at all levels. If the firewall is not enabled at the highest level, lower-level configurations will not be applied. In other words, to apply rules at the virtual machine level, you must enable the firewall at the datacenter level, the node level, and then the VM level.
Warning: if you enable the firewall without creating rules beforehand, you will lose access to your Proxmox VE server! By default, all incoming traffic is denied.
Before enabling the firewall as described below, you must first configure it.
Global activation (Datacenter)
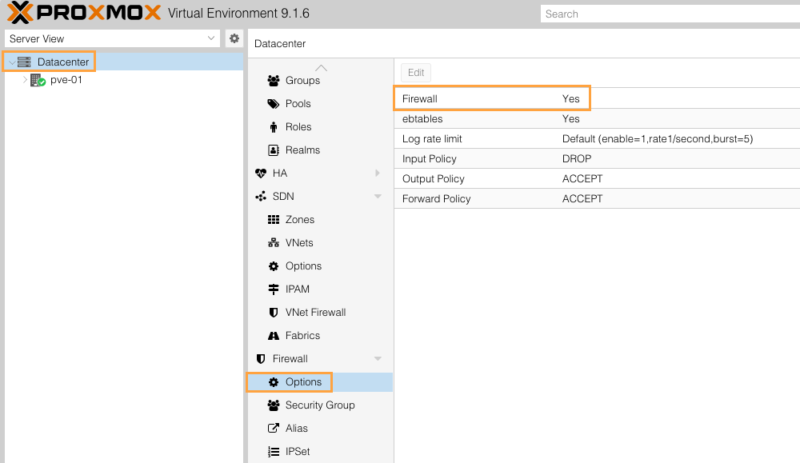
This is the prerequisite. In the web interface, select "Datacenter" in the left menu, then go to "Firewall" > "Options". Change the "Firewall" option from "No" to "Yes", as shown in the image below. Without this action, the associated firewall service remains inactive.
By default, the Input Policy is set to "DROP", which means any incoming traffic not explicitly allowed by a rule is blocked. The Output Policy is generally set to "ACCEPT", which means all outgoing traffic is allowed.
This type of operation can also be performed from the command line:
pvesh set /nodes/pve-01/firewall/options -enable 0In general, the entire configuration can be done via the command line and file editing.
Activation on a node (host)
Even after activation at the Datacenter level, each node has its own switch. Select your node (for example "pve-01"), go to "Firewall" > "Options" and make sure the "Firewall" setting is enabled, just like at the Datacenter level.

Activation on a VM or container
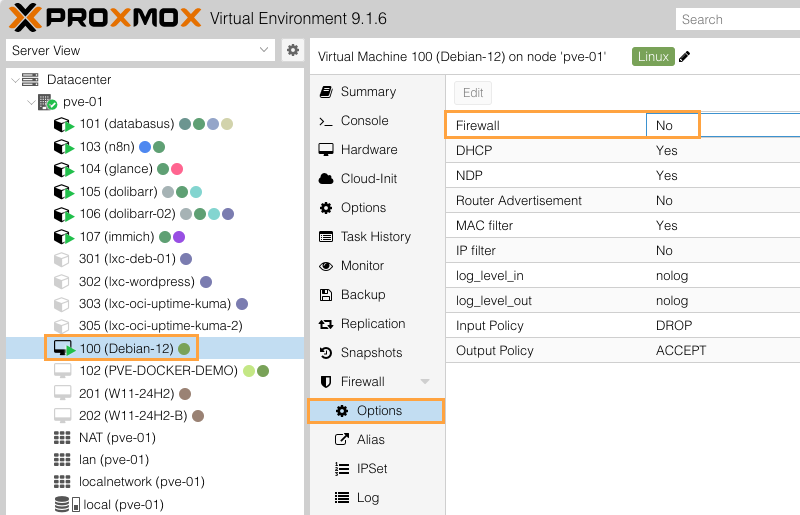
To filter incoming and outgoing traffic at the level of a virtual machine (or a container), two conditions must be met:
- In the VM "Firewall" > "Options" section, the firewall must be set to "Yes".
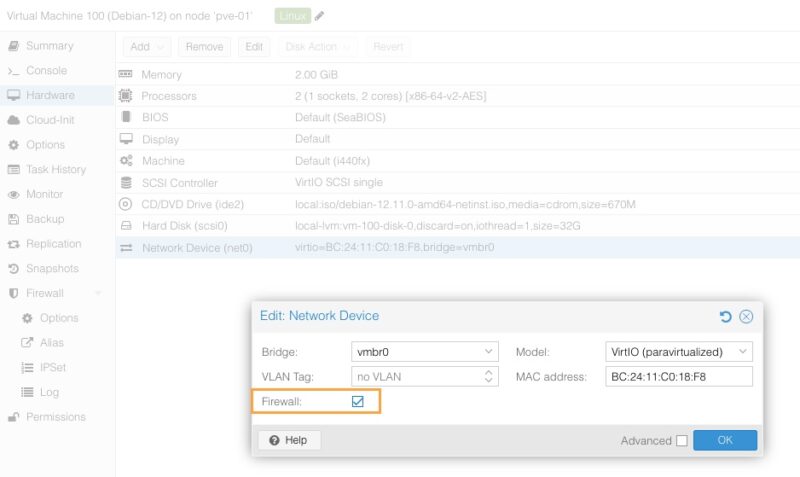
- At the virtual network card level (Hardware > Network Device), the "Firewall" box must be checked in the network interface settings. If this box is unchecked, the network card completely ignores filtering rules, even if the VM firewall is enabled.
Here is the option I am referring to in the VM network interface settings:
Using the three levels together provides great flexibility and follows the principle of defense in depth. Rules defined at the Datacenter level are evaluated before node rules. This makes it possible to create a global rule (for example: block a malicious IP address across the entire cluster) that will be inherited and applied everywhere, while still allowing each node or VM to have its own local rules.
Practical example with a real-world case
To better understand how this firewall works, let us configure two common scenarios.
Scenario 1: securing the Proxmox host
The goal is to protect the hypervisor itself. You could create a set of firewall rules to restrict access to the web management interface (port 8006) and SSH (port 22) to one or more trusted IP addresses only.
- Go to the targeted node, then "Firewall" > "Add" to create a rule.
- Direction:
in(incoming traffic) - Action:
ACCEPT(allow) - Interface: here I specify
vmbr0, which is the default bridge on Proxmox VE. Depending on your infrastructure, it may be useful to specify another interface name. - Source: if you leave it blank, everyone will be allowed, so you can restrict it to a host or machine if needed.
- Macro: select
SSH. Macros automatically fill in the protocol and destination port; they are like predefined rules for the most common services. The list of macros is available on this page. - Add a comment (important for documentation).
- Enable the rule by checking the "Enable" option.
- Add the rule with the "Add" button.
To also allow access to the web interface, repeat the operation this time by choosing the manual destination port 8006 (with the TCP protocol). Here is an example:
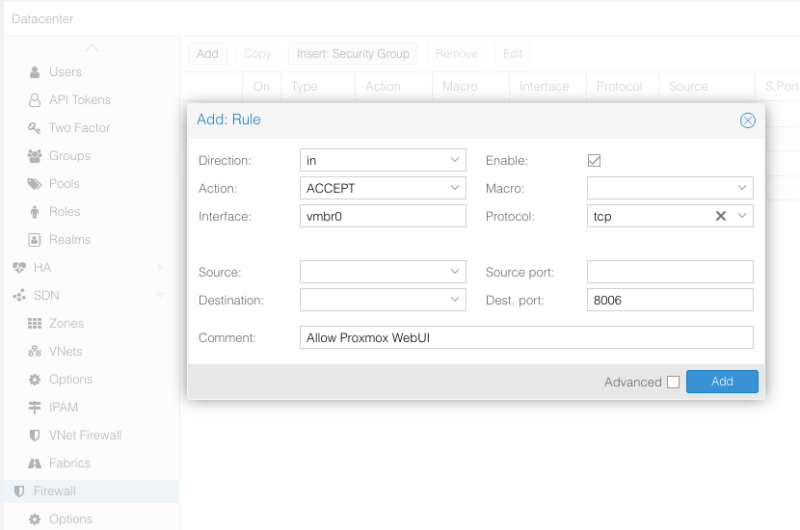
By defining these rules and leaving the default policy on DROP, any other IP address trying to connect to the management interface will be rejected. In fact, all other traffic destined for your host will generally be rejected as well (but not traffic destined for VMs).
I encourage you to refine this rule set, especially if you are in a cluster, because there are other ports that need to be allowed. The list of services and associated ports is available in the Proxmox VE documentation. For cluster-specific rules, you can adjust the source to allow traffic only between nodes.
- Web Interface: 8006 (TCP)
- Web VNC Console: 5900-5999 (TCP, WebSocket)
- SPICE proxy: 3128 (TCP)
- SSH: 22 (TCP)
- rpcbind: 111 (UDP)
- sendmail: 25 (TCP, outgoing)
- Corosync cluster traffic: 5405-5412 UDP
- Live Migration: 60000-60050 (TCP)
Scenario 2: securing a virtual machine
Let us take a VM (ID 100) hosting a Linux web server. We want to make the sites accessible over HTTP/HTTPS. Here is how to proceed.
- Go to VM 100, "Firewall" > "Add".
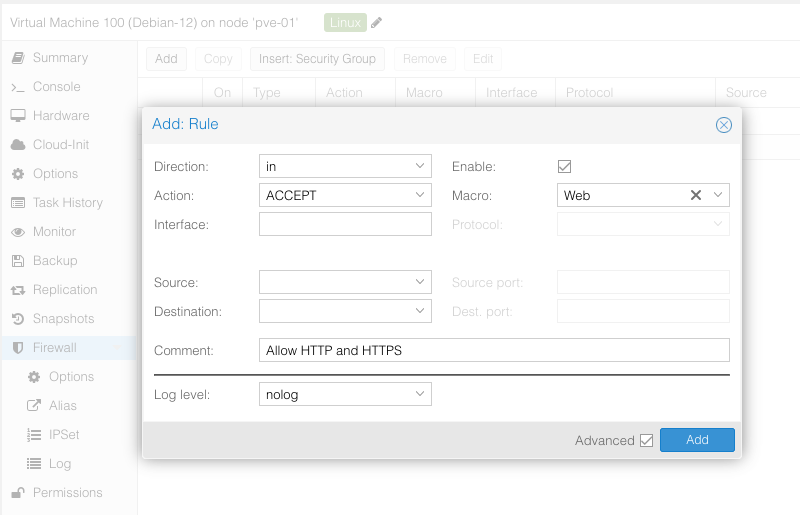
- Let's create the Web rule:
- Direction:
in - Action:
ACCEPT - Macro: Select the
Webmacro. It allows ports 80 and 443 in TCP, which matches our need. - Source: leave the source blank (which is equivalent to any address, or 0.0.0.0/0).
- Direction:
- Create the rule, but remember to enable it and add a comment.
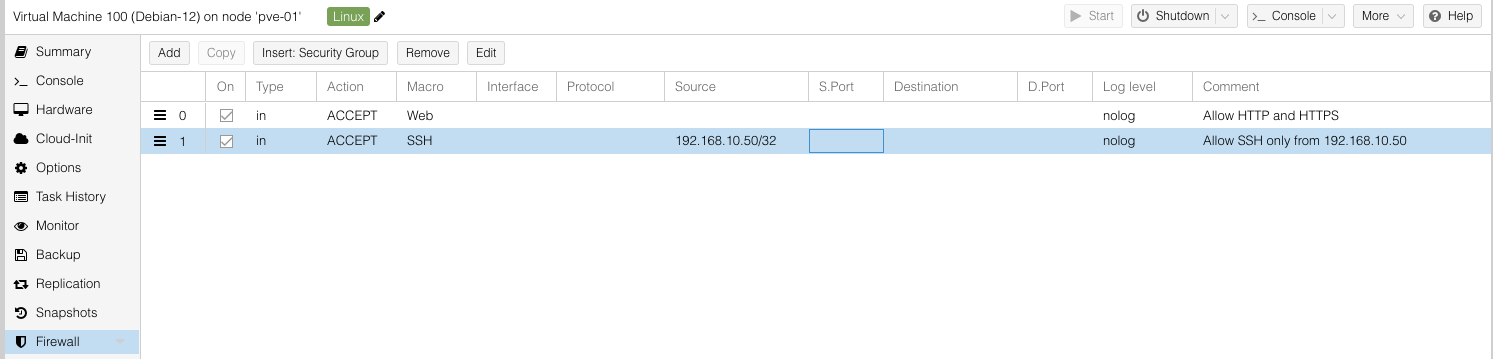
This results in:
You will notice that we did not specify an interface name: this is not necessary when the rule applies to a virtual machine. However, make sure to enable the firewall at the VM level and on its network interface.
From now on, this machine is reachable on two ports: 80 and 443. All other traffic is blocked (remember the default policy applied to incoming traffic). If you want to connect to this VM over SSH, create a second rule. In that case, it is a good idea to restrict the source addresses (a very specific subnet, the IP of an admin workstation, etc.).
Here is an example:
Now you know how to create firewall rules on your Proxmox VE server. But to be effective in administering and maintaining these firewall rules, it seems wise to look at some of the features offered by PVE.
Note: apply the principle of least privilege when designing your rule.
Security Groups in the Proxmox VE firewall
Proxmox VE allows you to create Security Groups at the Datacenter level. A Security Group in Proxmox VE works like a centralized, reusable firewall rule template.
Imagine you administer a dozen web servers: instead of manually opening ports 80 (HTTP) and 443 (HTTPS) on each virtual machine individually, you create a single group named "Web_Rules" at the global level (Datacenter). Then, all you need to do is "insert" this group into the firewall settings of each relevant machine.
The main advantage is simplified maintenance: if you ever need to allow a new port for your web applications, you only need to modify this Security Group once for the update to be instantly deployed to all virtual servers linked to it.
To create a new one: Datacenter > Firewall > Security Group > Create. Give it a name, for example "Web_Rules".
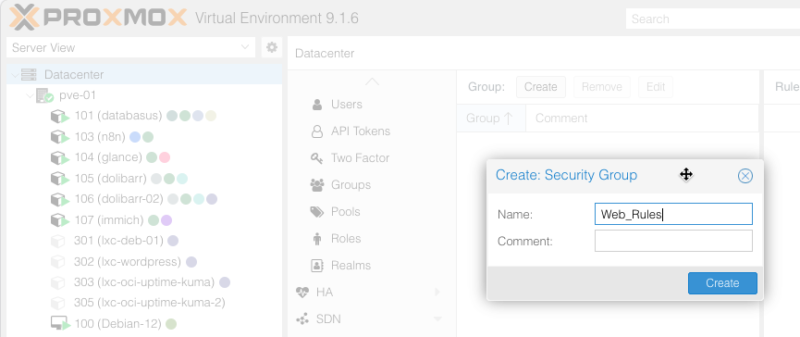
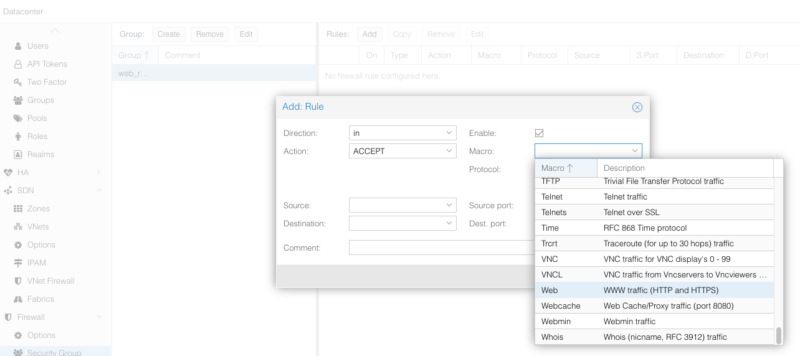
Then select it on the left to add a firewall rule to this group. Here, we create a very simple rule to allow incoming HTTP/HTTPS traffic by selecting the Web macro.
Once that is done, all that remains is to apply this Security Group to a resource. To do so, simply select the VM, click the "Firewall" tab, then choose "Insert: Security Group".
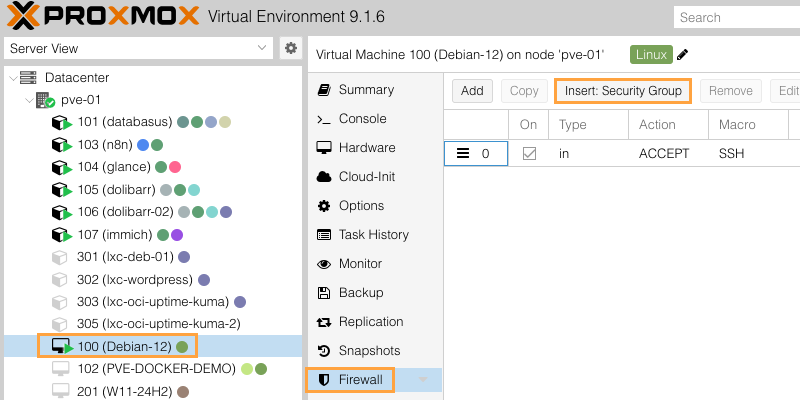
Here, you only need to select it to create a rule that reuses all the rules included in the Security Group. Remember to also check the "Enable" option.

If you later modify the rules in this Security Group, the resources that use it will inherit the changes. This makes it easier to keep configurations consistent.
Aliases with the Proxmox VE firewall
In the Proxmox VE firewall, Aliases and IPSets are two other tools designed to simplify the management of your network addresses, but they serve different purposes.
An Alias works like a contact in your phone book. Instead of manually entering an IP address (such as 192.168.1.50) in your firewall rules, you give it a user-friendly name, for example "PC_Florian". An Alias can contain only one IP address or one subnet. You can also create an alias to represent a subnet object (a VLAN, for example).
Its primary purpose is to improve readability and maintenance: if your administrator's IP address changes one day, you only need to update the Alias in one place for all rules using it to be updated automatically.
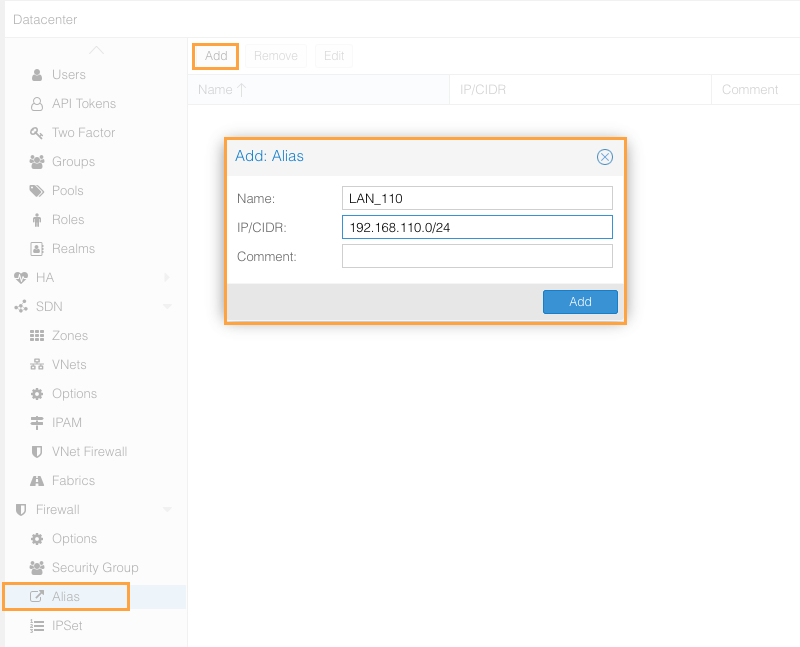
To create an alias: Datacenter > Firewall > Alias > Add. You must name the alias and specify the corresponding IP address (/32 for a single host).
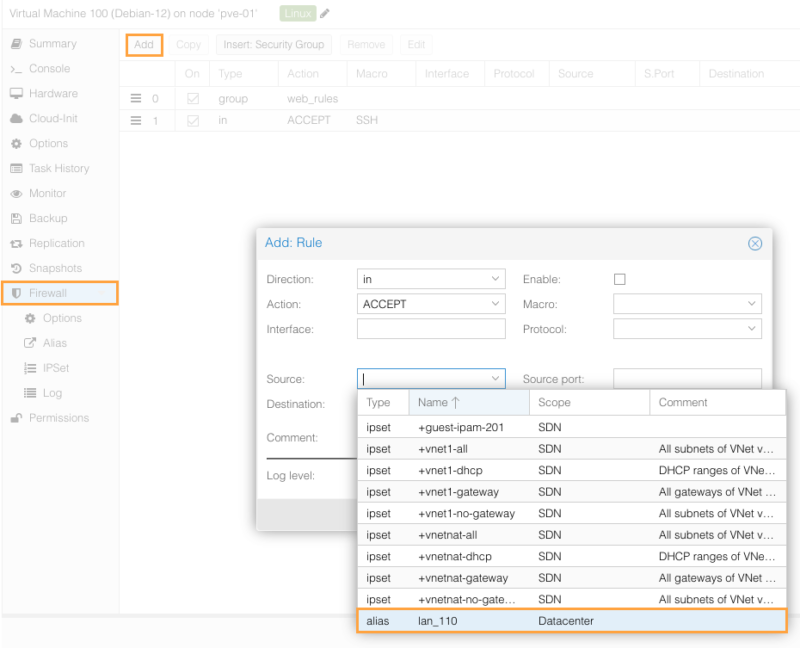
Afterwards, when you create a firewall rule, you can select this alias as the source or destination. For example:
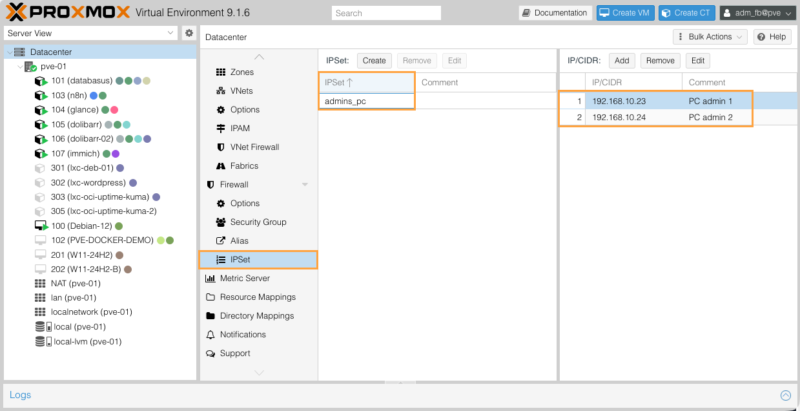
IPSets with the Proxmox VE firewall
An IPSet (IP set), on the other hand, is similar to a mailing list or a contact group. It is designed to group multiple IP addresses, multiple subnets, or even Aliases under a single label (for example "Admin_Workstations" or "IP_Blacklist").
Its advantage: the firewall uses a highly optimized data structure in the Linux kernel (hash table). As a result, checking whether incoming traffic matches one of the 10,000 IP addresses contained in an IPSet is done almost instantly, which would be impossible if you had to create 10,000 individual firewall rules.
You can then associate the IPSet with a firewall rule, in the same way as assigning an alias.
In summary:
- Use an Alias to identify a single resource whose IP may change in the future (you will update the Alias and all related rules will be updated).
- Use an IPSet whenever you need to apply the same network policy to a group, list, or heterogeneous range of multiple machines.
Firewall logging
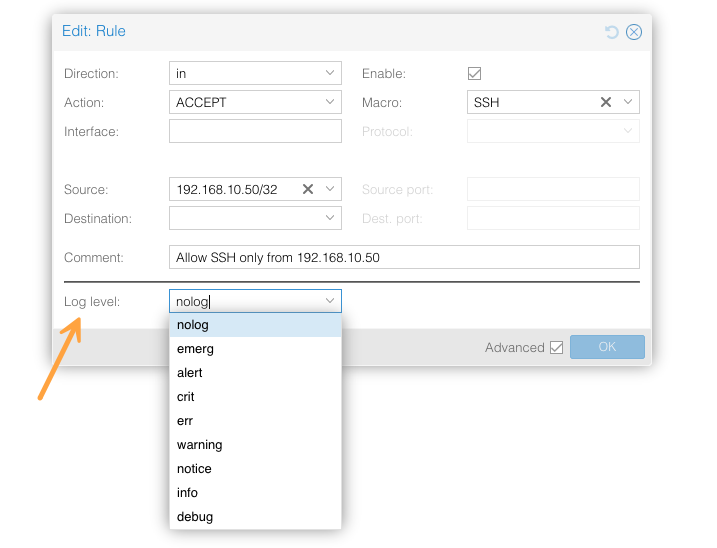
Logging is useful for debugging and security auditing. On each rule, you can define a log level (info, warning, err, etc.). It is a good idea to enable logs on "DROP" rules to identify potential issues. Be careful not to log all valid traffic, or you may fill up the disk space on your nodes.
The default log level is determined at the level of each node and each resource (VM/CT). You can define different log levels for incoming and outgoing traffic.
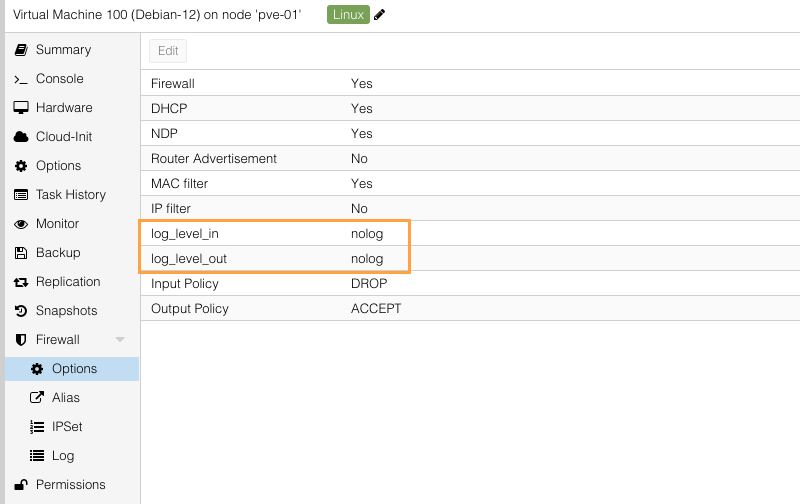
Then, at the level of each rule, you can also make a specific choice. You must check the "Advanced" box to reveal the option called "Log level".
To view firewall activity for a specific resource (here, virtual machine 100 (Debian-12)):
- Select the relevant resource in the left tree.
- Expand the "Firewall" menu.
- Click the "Log" subsection
At the top of the screen, Proxmox offers two buttons to manage log display:
- Live Mode: This is the default active mode. It displays traffic in real time. As soon as a new packet is processed and logged by the firewall, the line appears instantly on the screen.
- Select Timespan: this mode allows you to filter logs over a specific period using the
SinceandUntilfields.
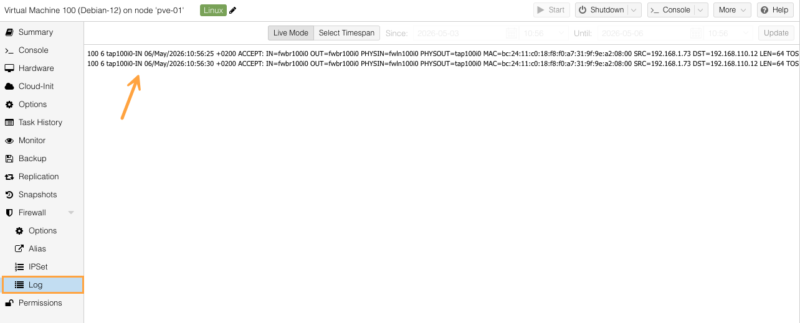
The main screen displays the raw logs generated by the firewall component (iptables or nftables). Let us take the time to break down the essential information contained in one line:
100 6 tap100i0-IN 06/May/2026:10:56:25 +0200 ACCEPT: IN=fwbr100i0 [...] SRC=192.168.1.73 DST=192.168.110.12Here are some explanations:
- 100 : the identifier (ID) of the virtual machine concerned.
- tap100i0-IN : indicates the virtual interface involved (network interface
0of VM100) and the traffic direction. HereINmeans it is an "incoming" traffic rule (toward the VM). - 06/May/2026:10:56:25 +0200 : the exact timestamp of the event.
- ACCEPT : this is the action taken by the firewall. Here, the traffic was allowed. (You might see
DROPfor traffic silently blocked orREJECTfor traffic denied). - IN=... OUT=... PHYSIN=... : these fields describe the packet's complex path through the various internal virtual bridges in Proxmox (
fwbr,fwln) before reaching the VM interface (tap). - MAC=... : the source and destination MAC address.
- SRC=192.168.1.73 : the source IP address (the computer or server that initiated the connection).
- DST=192.168.110.12 : the destination IP address (in principle, this is where you will see your virtual machine's IP address).
Force-disable the Proxmox VE firewall
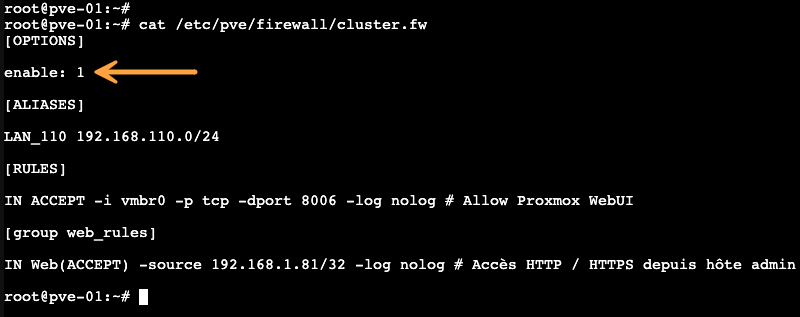
In the event of a mistake that blocks your access to the web interface (WebUI), you need to intervene directly from the server's local console using the command line (via KVM, a physical console connection, etc.). To disable the firewall at the Datacenter level, edit the main configuration file:
nano /etc/pve/firewall/cluster.fwInside this file, locate the [OPTIONS] section at the very top. Change the enable: 1 directive by replacing the 1 with a 0 (enable: 0), then save the file (with Ctrl+O then Ctrl+X in nano). Proxmox will automatically detect this change and disable the firewall, restoring your access!
The other solution is to temporarily stop the firewall by running this command:
pve-firewall stopThis command stops the firewall process on the active node. It is a practical emergency solution to regain access while you fix the faulty - or missing - rule in the graphical interface. Once your configuration is repaired, do not forget to restart the service with the pve-firewall start command or re-enable the firewall from the web interface.
Conclusion
The integrated Proxmox VE firewall is a complete, high-performance, distributed solution suited to protecting virtualized environments. Its three-level management (Datacenter, Node, VM) makes it possible to create fine-grained, highly maintainable security policies (remember IPSets, Aliases, and Security Groups), whether you are managing a standalone server or a cluster.
By applying a default-blocking policy, using security groups and macros, and targeting only the traffic required for your services to function properly, you get consistent filtering without touching the operating system firewall of your VMs or containers.