
Proxmox VE Network Configuration: A Beginner’s Guide
This tutorial covers network management with the Proxmox VE hypervisor, including interface types, creating and configuring an interface, as well as connecting a virtual network to a virtual machine (or a container). We’ll also look at VLAN management and briefly at Open vSwitch. The goal is to give you the basics so you can feel comfortable with network configuration on a Proxmox VE host.
You can also read my previous Proxmox VE tutorials:
- Getting Started with Proxmox VE: The Complete Guide
- Proxmox VE: How to Create a Windows 11 Virtual Machine?
- Proxmox VE: Snapshot Management
Table of Contents
Proxmox VE: Network Interface Types
For network configuration, Proxmox VE takes advantage of Linux network stack capabilities. First, it seems essential to mention the types of network interfaces you can create through the Proxmox VE web interface.
- Linux Bridge
The Linux Bridge interface, often called vmbrX (for example, vmbr0), is the default networking model in a fresh Proxmox VE installation. A Linux bridge is designed to work like a virtual network switch that connects VMs/containers to the physical network. In other words, a Linux Bridge bridges the gap between the Proxmox VE virtual network and the physical network to which a network interface is connected.
In practice, all guests (VMs and containers) can share a single bridge, acting as if their virtual network cables were plugged into the same physical switch. Within Proxmox VE, each physical network interface can be associated with only one Linux Bridge.
The "VLAN aware" option is very useful because it enables VLAN tag handling at the Linux Bridge level. This way, you can add a VLAN tag at the container or virtual machine level. Without it, the VLAN tag will be ignored.
Note : each Proxmox VE node can contain up to 4,094 Linux Bridges. In principle, you have plenty of room.
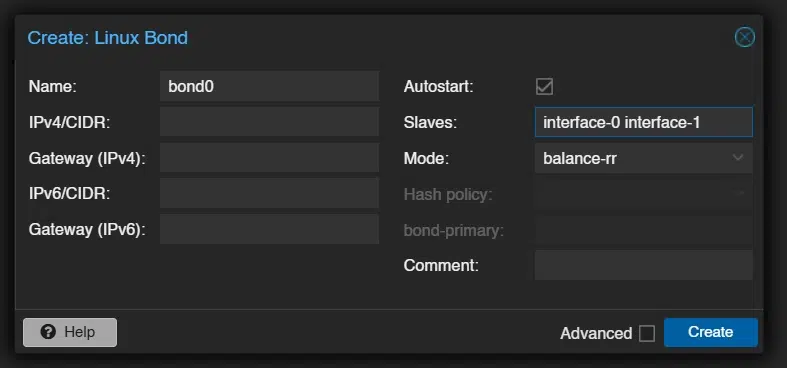
- Linux Bond
Bonding (also called NIC teaming or link aggregation) is a technique that links multiple physical network cards (NICs) into a single logical network interface (bondN). The goal is to provide fault tolerance (redundancy), increase performance by distributing traffic across multiple links, or both.
Proxmox VE supports all seven Linux kernel bonding modes, including Round-robin (balance-rr), fault tolerance in active/passive mode (active-backup), and even the LACP protocol (802.3ad), which requires switch-side configuration.
You can use a bond directly as a port to connect guests, thereby making the guest network fault tolerant.
- Linux VLAN
As a reminder, VLANs (Virtual LANs) let you segment and isolate a broadcast domain at Layer 2, making it possible to have multiple networks on the same physical network. You can therefore connect guests to a specific VLAN through a VLAN interface.
In the context of Proxmox VE, a Linux VLAN interface can be useful for assigning an IP address to the PVE host (for management, for example) on a specific VLAN. You can also use this mechanism to create already-tagged interfaces on a specific VLAN. For example, an interface with VLAN ID 10 so that all attached guests are directly connected to VLAN 10, without having to manage it at the guest level.
When creating the VLAN interface, you must specify the linked interface name: there is always a parent on each VLAN interface. The ideal naming pattern is: <interface name>.<VLAN ID>.

The VLAN number does not have to be specified on the PVE network interface itself. In fact, this information can be set independently in the virtual machine (or container) settings. This setup requires enabling the "VLAN aware" option in the Linux bridge settings.
Proxmox VE: Open vSwitch (OVS)
So far, we have covered the three types of interfaces supported by Proxmox VE through the Linux kernel: Linux Bridge, Linux Bond, Linux VLAN. They are easy to get started with and configure. However, they are not the only networking options offered by Proxmox VE.
If you want to create a new interface, you will notice three other options: OVS Bridge, OVS Bond, OVS IntPort. Indeed, PVE natively integrates Open vSwitch (OVS). It also includes more advanced and flexible network features in an SDN (Software Defined Network) spirit: VXLAN, RSTP, GRE tunnels, and more.

The advantage is that you can create zones that can span one or more Proxmox VE nodes (so the configuration is done at the Datacenter menu level).
Using Open vSwitch is not mandatory, and a Linux Bridge will be sufficient in most situations (especially for a Home Lab). But it is a way to go further with network management in Proxmox VE, including in enterprise environments. Another advantage of OVS is that it is used by other platforms, whether hypervisors or solutions like OpenStack.
Default Network Configuration
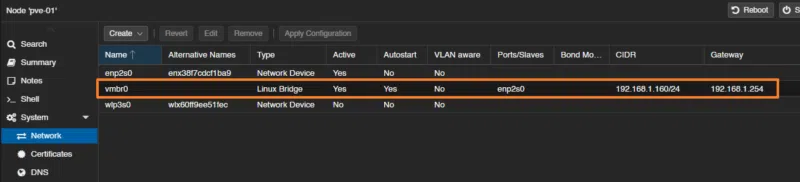
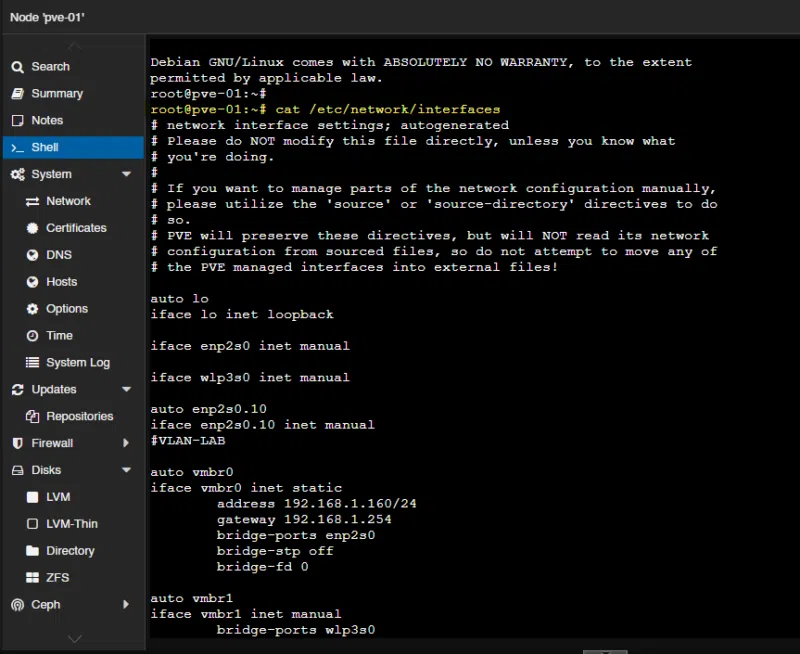
To view all interfaces on a Proxmox host, click its name in the tree, then select: System > Network. Here, you will see all interfaces, whether physical or logical.
The example below shows that this host has three interfaces:
enp2s0: this is a physical interface, because the type is specified as "Network Device".vmbr0: this is a logical interface, more specifically a bridge with the physical interface namedenp2s0. It has an IP address and a gateway: in reality, by default, the PVE server is reachable through this interface. All bridges are identified by the "Linux Bridge" type.wlp3s0: this is a physical interface, because once again, the type is specified as "Network Device". Thewlname indicates that this is a Wi-Fi (WLAN) interface.
From this very basic configuration, we can say that the virtual machines (and containers) attached to vmbr0 access the local network through the physical interface enp2s0.
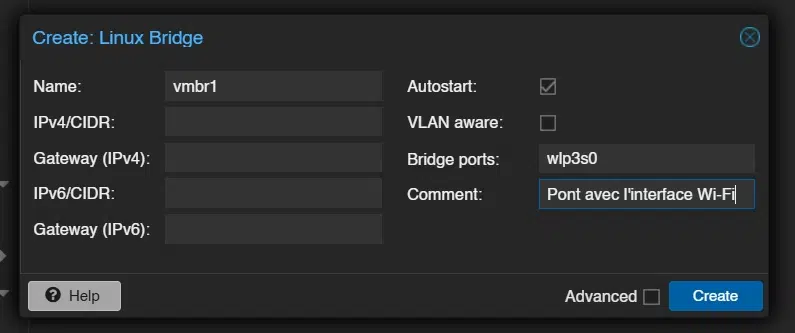
Add a Bridge Network Interface to Proxmox
A physical interface cannot be attached directly to a virtual machine or a container. So, if you simply want to connect a virtual machine to a network by associating it with a physical interface other than vmbr0, you need to create a new bridge.
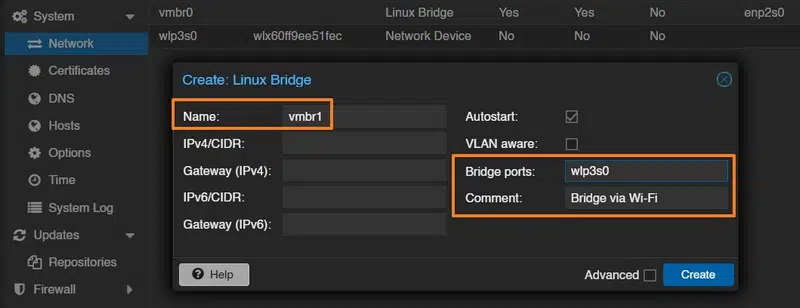
In the System > Network section, click the "Create" button, then select "Linux Bridge" (or "OVS Bridge").
Next, you need to complete the form:
Name: choose a name, you can leavevmbr1. Use theCommentfield to describe this interface precisely. Here, the name is generated automatically and incremented (vmbrX).Bridge ports: specify the name of the physical interface to bridge. Here, it will bewlp3s0.IPv4/CIDR: it is not necessary to assign an IP address to this interface unless you want the Proxmox host to be reachable from the underlying network.
Click "Create" to confirm, then click the "Apply Configuration" button to apply the changes. By the way, before clicking this button, you can view the changes that will be applied in the interfaces file (+ for added lines, - for deleted lines).
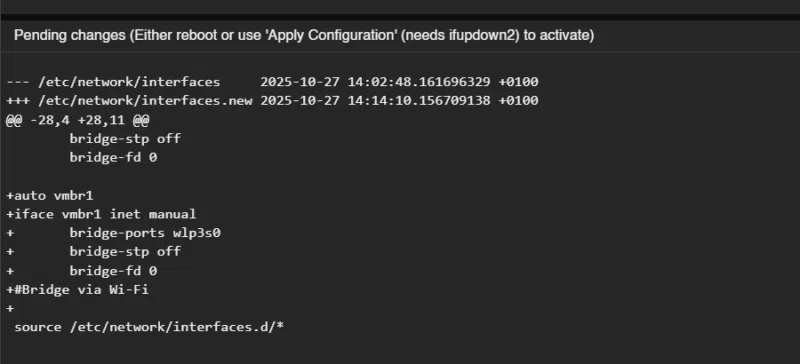
It is true that here we are configuring Proxmox VE networking through the Web interface. But we could just as well manually edit the /etc/network/interfaces file to apply our changes directly. You can also simply display the contents of this file to see how your web-based configuration is translated.
The vmbr1 Bridge interface is visible.
Connect a Proxmox VM to a VLAN
Using Proxmox VE Linux Bridge capabilities, there are two ways to connect a virtual machine (or a container) to a VLAN:
- Use the VLAN aware option (the method covered here)
- Use a Linux VLAN interface (the method covered in the next part of the article)
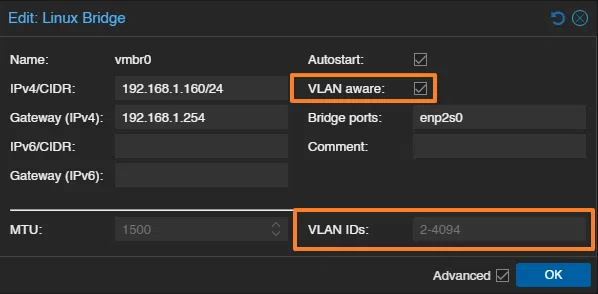
Before looking at the virtual machine configuration, check the Linux Bridge that provides access to the desired VLAN. Indeed, an option called "VLAN aware" is visible in the settings of each Linux Bridge. You must absolutely enable this option if you want to add VLAN tags at the guest level; otherwise, the traffic will leave untagged.
The Linux Bridge link then becomes a trunk port (so you must adapt the switch configuration on the other side). By default, all VLAN IDs between 2 and 4094 will be allowed; if you want to limit this, you can adjust the "VLAN IDs" option with your VLAN numbers.
This configuration will add 2 lines to the bridge configuration in the interfaces file.
bridge-vlan-aware yes
bridge-vids 2-4094
To allow only certain VLANs, we can modify this via the web or from the command line. Here, we allow VLAN IDs 10, 20, and 100.
bridge-vlan-aware yes
bridge-vids 10,20,100
Once this is done, edit the network settings of a VM. Click the VM, then go to: Hardware > Network Device > Edit.
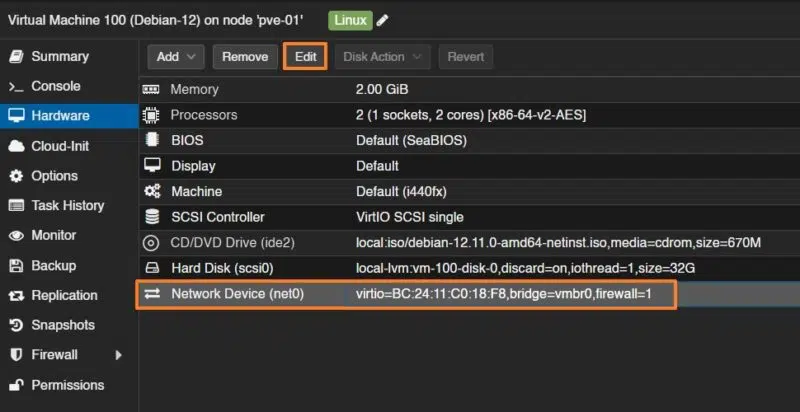
Beyond choosing the correct bridge, you mainly need to add a VLAN number in the "VLAN Tag" field. The example below will tag this VM’s frames on VLAN 10 (the 802.1Q principle). All that’s left is to confirm!
You cannot connect a Linux Bond interface directly to a guest. If that is your goal, you must create the bond, then create a bridge associated with that bond, and then connect the bridge to the virtual machine or container network interface.
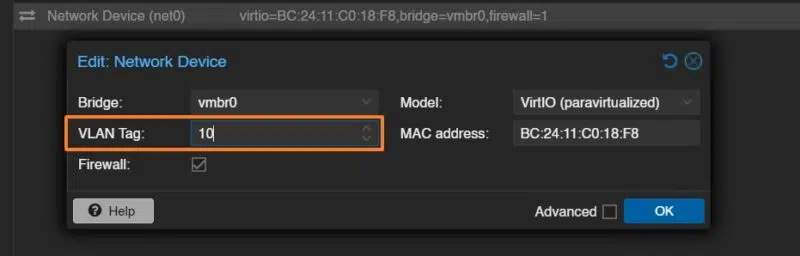
Note : you can assign a VLAN ID to a virtual machine when creating it, during the Network step.
Add a VLAN Interface to Proxmox
Adding a VLAN interface to Proxmox can be useful if you want to:
- Define a management interface for PVE on a specific VLAN
- Define multiple IP addresses for PVE on multiple VLANs
- Create a ready-to-use interface already "connected" to a VLAN and that you can associate with a VM (or a container). This is a different approach compared with the "VLAN aware" mode mentioned earlier and it can greatly increase the number of Linux Bridges on your server. In this case, you must create a Linux VLAN interface linked to the physical interface, then create a Linux Bridge linked to the previously created Linux VLAN interface. Then this interface must be associated with the virtual machines (untagged VM, in this case).
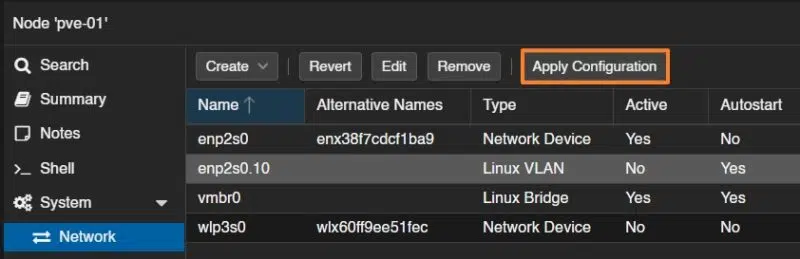
In the System > Network section, click the "Create" button, then select "Linux VLAN".
By specifying the physical interface name, a dot, and a VLAN number, the interface is automatically associated with the correct interface and the tag 10 is added. Beyond simplifying configuration, this method makes it easier to keep track of interfaces. Remember to use the comment field to add details about this VLAN.
Note : if you want to define a Proxmox VE management interface on a specific VLAN, it is a good idea to enter an IP address, subnet mask, and gateway right away. Otherwise, it is not necessary.
Here is an example:

If the idea is to create an interface that can be assigned to guests and directly tagged on a VLAN (here VLAN 10), it is necessary to create a Linux Bridge interface associated with enp2s0.10 obtained after the previous step.
And, as always, remember to apply the configuration.
In the interfaces file, this operation is translated as follows:
iface enp2s0 inet manual

auto enp2s0.10
iface enp2s0.10 inet manual

auto vmbr2
iface vmbr2 inet manual
        bridge-ports enp2s0.10
        bridge-stp off
        bridge-fd 0
A few explanations are needed...
These two lines create a tagged VLAN interface called enp2s0.10, associated with the physical interface enp2s0 and corresponding to VLAN ID 10. The inet manual mode indicates that no IP address is assigned: the interface is used only as a network support, for example for a bridge (which is our case). All outgoing or incoming traffic on enp2s0.10 will be tagged with VLAN 10.
auto enp2s0.10
iface enp2s0.10 inet manual
Next, this block defines a network bridge named vmbr2, linked to the VLAN interface enp2s0.10. It allows you to connect virtual machines to VLAN 10 through this bridge. The bridge-stp off and bridge-fd 0 options disable the Spanning Tree Protocol and the bridge forwarding delay respectively, for more direct forwarding behavior.
auto vmbr2
iface vmbr2 inet manual
        bridge-ports enp2s0.10
        bridge-stp off
        bridge-fd 0
Warning: when you create a VLAN interface, you must restart the hypervisor for it to be taken into account. This is an important point, because restarting a hypervisor in production is not an operation we particularly enjoy... unless you have a cluster.
Conclusion
After reading this tutorial, you should be able to create, configure, and assign network interfaces on your Proxmox VE server. It is essential to master this part of the configuration, since networking for the host, VMs, and containers is a critical step.
An article on SDN configuration with Proxmox VE will be published soon. This will be an opportunity to cover the concepts of zones, VNETs, and IPAM.