
How to Create a Private NAT Network on Proxmox VE
This tutorial explains how to create a NAT network on a Proxmox VE server, including a port forwarding rule to make a service hosted on a VM or container accessible from outside the NAT network.
It is worth noting that Proxmox VE no longer offers native support for creating a NAT network. This was available a few years ago, but it was removed by an update to Proxmox VE 5.1. Today, you need to perform a few manual steps to create a NAT network using Proxmox VE's Linux Bridge mechanism. That is what we will cover here.
The advantage of a NAT network is that it lets you create an isolated virtual network while still providing Internet access. This is a very useful setup for a lab environment.
Note : you can create a NAT network using Proxmox VE's SDN features by creating a Subnet with the SNAT option enabled. This method will be covered at the end of the article.
If you want to learn more about network management with Proxmox VE, check out this article:
- Proxmox VE Network Configuration: the Essential Beginner's Guide
Table of Contents
Creating a NAT Network on Proxmox
In the rest of this tutorial, we will see how to create a NAT network based on a Linux Bridge interface and a few iptables rules. We will also cover port forwarding, so that a service hosted on the NAT network can be made accessible.
Step 1: Create a Linux Bridge interface
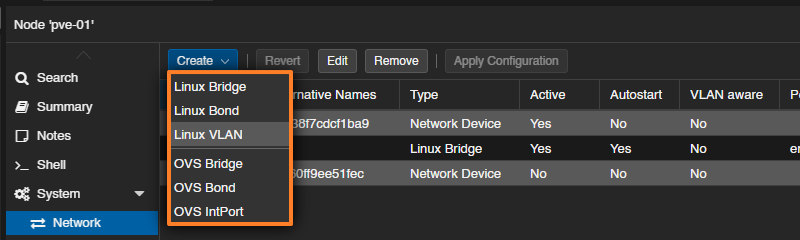
To begin, access the Proxmox web interface. Then select your hypervisor and go to the following menu: System > Network. When you're there, click the "Create" button and choose "Linux Bridge". Here, we will create the interface through the web UI and finish the configuration from the command line. You could also complete the entire configuration directly in the /etc/network/interfaces file.
Name this interface: you can enter NAT or simply keep the name vmbrX. Then add a comment to clarify the purpose of this network. You also need to assign an IP address to this interface, such as 10.10.10.1/24. It will be used as the default gateway by clients connected to this network, which means the subnet is addressed as 10.10.10.0/24.
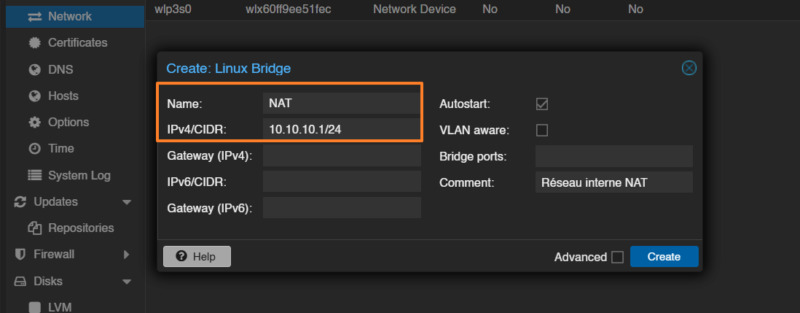
To confirm, click "Create" to create the new network bridge on your hypervisor. Click "Apply Configuration" now — this is important!
Note : you'll notice that this Linux Bridge is not attached to a physical interface, which is perfectly normal.
Step 2: Configure NAT on the network
Now we need to go a bit deeper into the Proxmox VE network configuration. In fact, we need to enable IP forwarding and use iptables rules to implement NAT through IP masquerading.
Connect to your Proxmox server via SSH or through the online "Shell". Then edit the network configuration file:
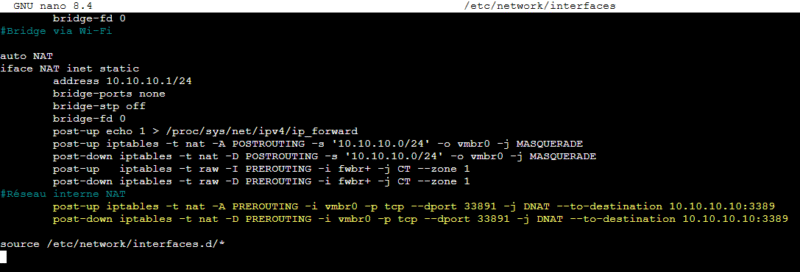
nano /etc/network/interfacesIn the section corresponding to the NAT interface created earlier, add these three lines:
post-up echo 1 > /proc/sys/net/ipv4/ip_forward
post-up iptables -t nat -A POSTROUTING -s '10.10.10.0/24' -o vmbr0 -j MASQUERADE
post-down iptables -t nat -D POSTROUTING -s '10.10.10.0/24' -o vmbr0 -j MASQUERADE
Here is what these three lines do, in order:
- Enables IPv4 routing on the Proxmox host to allow packet forwarding between network interfaces (IP forwarding).
- Adds a NAT rule that replaces the source address of packets coming from the
10.10.10.0/24network with the address of thevmbr0interface (NAT to the outside). - Removes the same NAT rule when the interface is brought down, keeping the configuration clean.
You must therefore adapt the IP network and the name of the vmbr0 interface according to your setup. In this example, I use vmbr0 because it provides Internet access on my Proxmox VE host.
Once the changes are made, save and close the file.
Step 3: Restart the network
To apply the new configuration, restart the networking service (which will interrupt networking across the entire Proxmox host):
systemctl restart networking.service
The configuration is complete. Now let's test it.
Step 4: Connect a VM to the NAT network
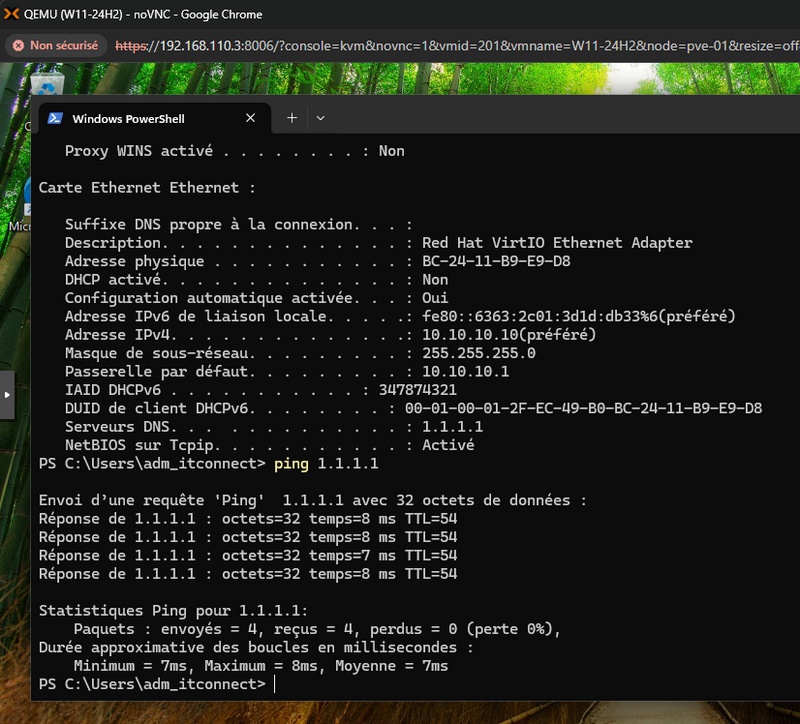
For testing, it's simple. You only need to modify the configuration of a VM or a container so that its network adapter is attached to the Linux Bridge interface created earlier, in my case NAT. Then you must configure a static IP address on the 10.10.10.0/24 network, because there is no DHCP server. You are free to deploy a DHCP server on a VM connected to this network, or even through an LXC container.
Network connectivity is working:
If the firewall is enabled on your VM / container, it is very likely that traffic will not be allowed. In that case, you need to apply the tip provided in the Proxmox VE documentation, namely add these two lines to the interfaces file (after the previous configuration):
post-up   iptables -t raw -I PREROUTING -i fwbr+ -j CT --zone 1
post-down iptables -t raw -D PREROUTING -i fwbr+ -j CT --zone 1
Save, close the file, and restart the networking service.
systemctl restart networking.serviceTest again.
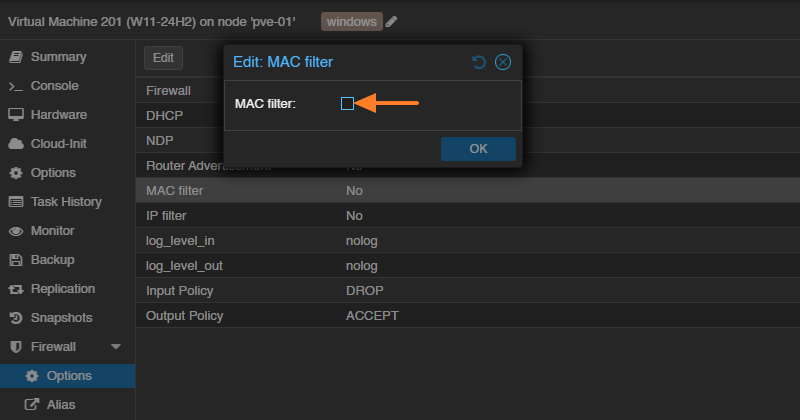
If it still doesn't work, it's probably because the "MAC filter" option is enabled in the guest firewall settings. It is used in particular to prevent MAC address spoofing, which is problematic in a NAT setup. Disable the option and it should work better.
Optional - Create a port forwarding rule
If you want to access the service hosted on a VM from outside the NAT network, you need to create a port forwarding rule. Once again, you need to edit the interfaces file to declare the rule.
Here is an example:
post-up iptables -t nat -A PREROUTING -i vmbr0 -p tcp --dport 33891 -j DNAT --to-destination 10.10.10.10:3389
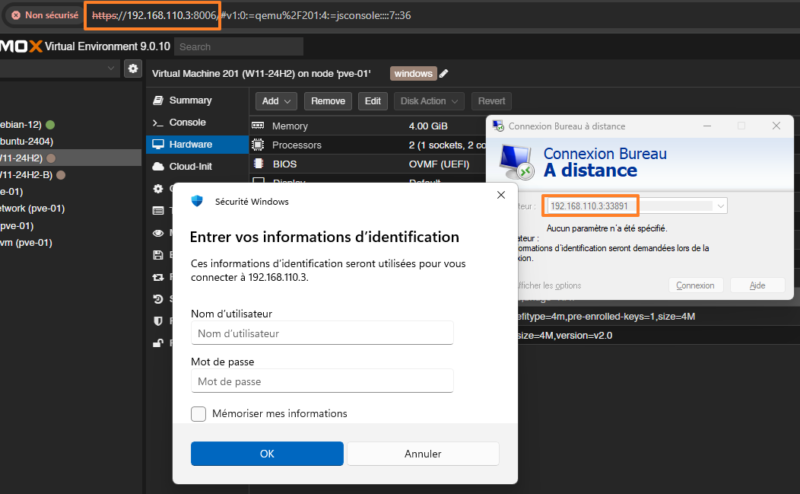
post-down iptables -t nat -D PREROUTING -i vmbr0 -p tcp --dport 33891 -j DNAT --to-destination 10.10.10.10:3389Here, the rule redirects all incoming TCP traffic on port 33891 of the vmbr0 interface (through which the node is exposed) to the internal machine 10.10.10.10 (the Windows VM configured on the NAT network) on port 3389, making the VM's Remote Desktop (RDP) service accessible from the outside.
This results in:
A connection is then possible from a remote machine:
NAT Network with Proxmox SDN
Creating a NAT network using Proxmox VE's SDN capabilities, and therefore Open vSwitch, is entirely possible. To be able to assign IP addresses to clients (DHCP) and resolve names (DNS), you need to install and configure the dnsmasq package on your hypervisor. These two commands are the first step to perform.
apt install dnsmasq
systemctl disable --now dnsmasq
The rest of the configuration is done from the Proxmox VE web interface.
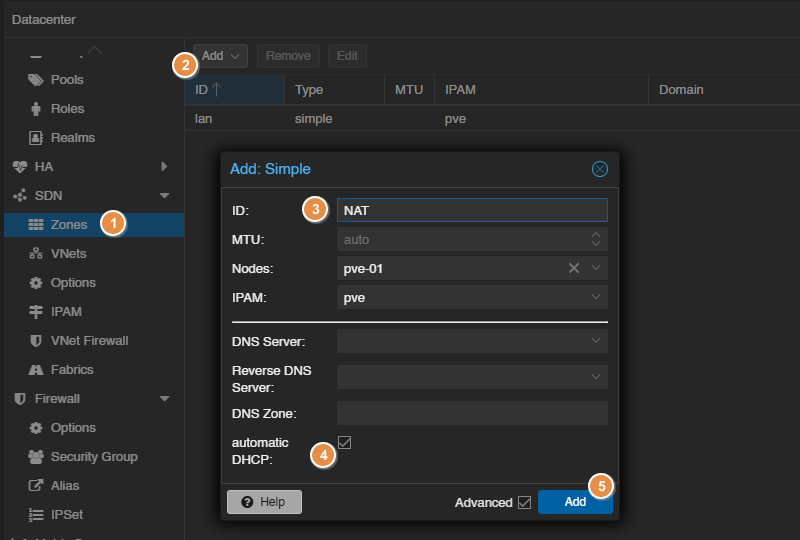
Start by creating a new simple zone: SDN > Zones > Add > Simple. Name this zone NAT, for example, and bind the zone to your node.
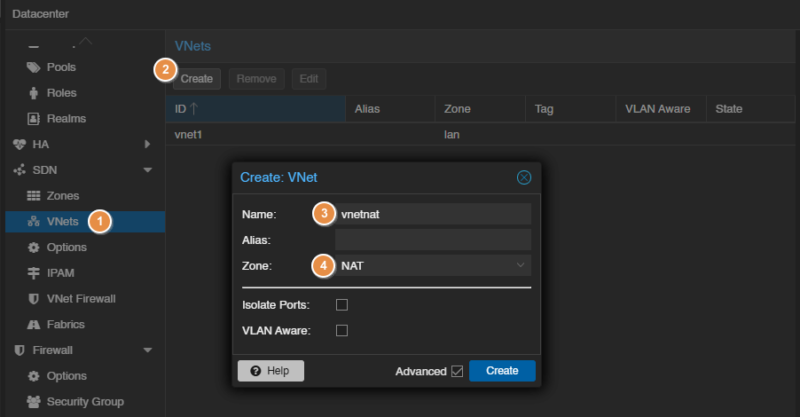
Switch to the virtual network section: SDN > VNets. There, create a new VNet that you can name vnetnat and attach it to the NAT zone.
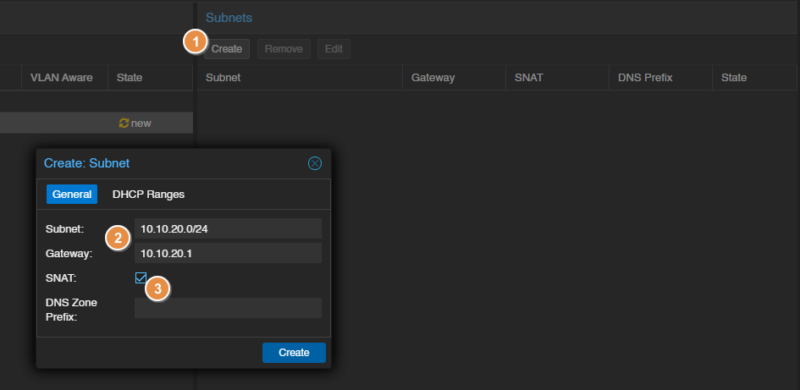
On the right, you can add a new subnet to this VNet. After selecting it, click "Create". Then define the network address and the gateway (this will be the exit IP address for clients on the NAT network). Here, I chose a subnet in 10.10.20.0/24. And, above all, check the "SNAT" option to enable Source NAT.
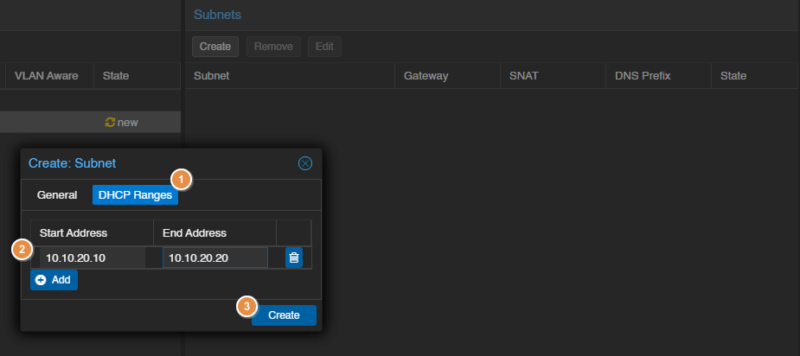
Switch to the "DHCP Ranges" tab to define the range of IP addresses to distribute. The built-in DHCP is a nice advantage compared to the Linux Bridge-based method.
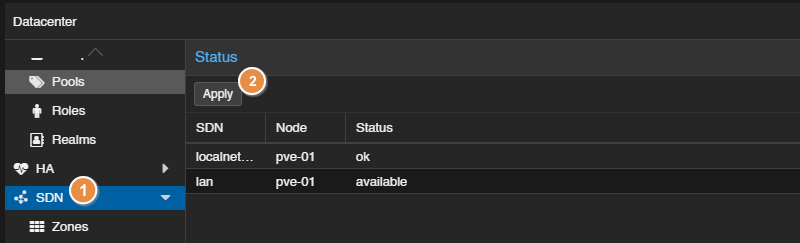
When the configuration is complete, validate it: SDN > Apply.
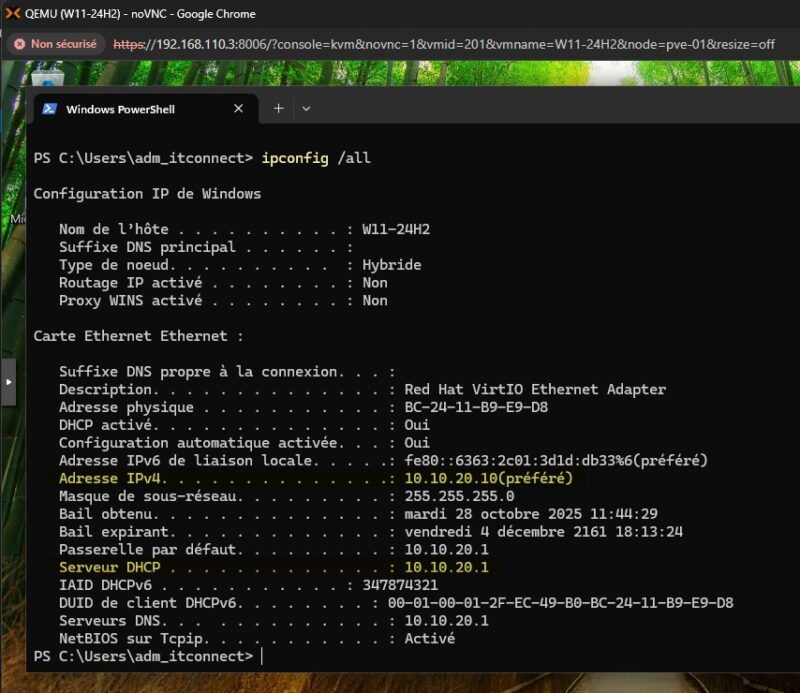
If you connect a VM network interface to the vnetnat network, it should obtain an IP address via DHCP. Here is an example:
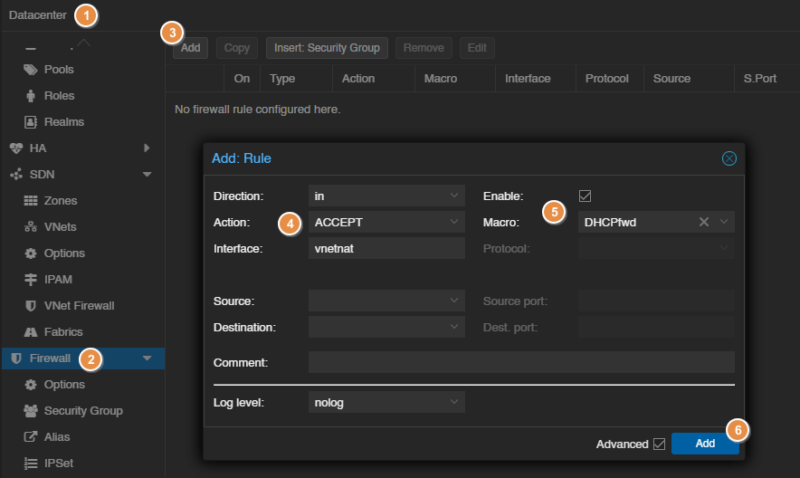
If the firewall is active in your Proxmox VE environment (which is preferable), you need to create two rules to allow DHCP and DNS traffic. Otherwise, the services will be blocked. To create a rule at the Datacenter level (recommended for SDN): Datacenter > Firewall > Add.
The first rule to create is for DHCP:
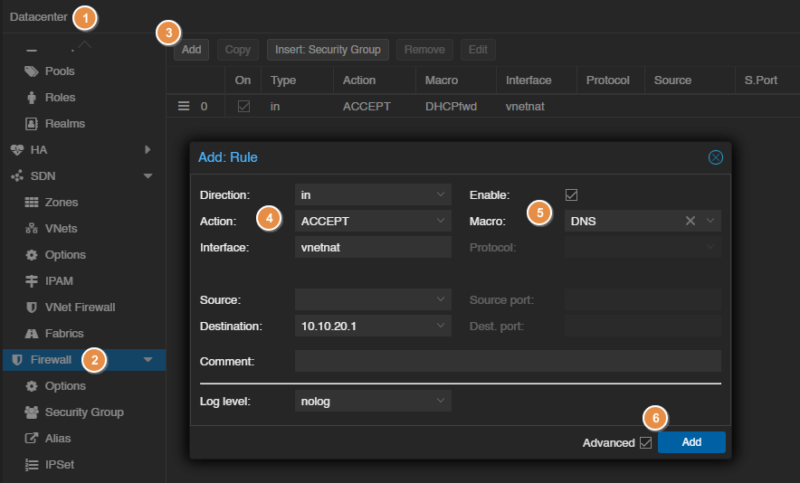
The second rule to create is for DNS:
I will soon publish a full article on configuring the Proxmox VE firewall.
Conclusion
By following this tutorial, you should be able to create a NAT network using either a Linux Bridge or Open vSwitch (SDN), depending on your preferences and habits. If you've never used the SDN module, it may be wise to start with a NAT network based on Linux Bridge.
If you're having trouble getting a configuration to work, don't hesitate to reboot the Proxmox node. Sometimes that is necessary to properly apply the changes and make the configuration take effect.