www.it-connect.fr

How to Scan an Isolated Network Through an SSH Tunnel with Nmap
In this tutorial, we will see how to perform a network scan with Nmap through an SSH tunnel. In other words, we will use a jump host to reach a network or a machine.
This method is useful when your scanning machine cannot directly reach a target network, but it does have access to an intermediate machine that can reach that network. This intermediate machine then acts as a pivot, also called a "jump host".
This situation can be found in the following cases:
- A penetration test, with a first compromised system;
- A check of network segmentation;
- An accessibility diagnosis;
- System administration on an isolated network ;
- Flow validation between network segments.
Rather than setting up full routing, a temporary VPN, or specific network rules, it is possible to use a lightweight mechanism that is easy to implement. In this tutorial, we will use a locally created SOCKS proxy through SSH, Proxychains to force certain tools to use this proxy, and then Nmap to run scans through this indirect path.
In this context, your Nmap traffic does not go directly to the target. It first goes through a local SOCKS proxy, encapsulated in an SSH tunnel, before being relayed by the pivot host to the target network. And most importantly, there is no need for tools on the jump host, nor for administrative rights.
Note: this technique should only be used in an authorized context (audit, authorized pentest, administration of your own systems). Scanning a network or a machine without authorization is illegal.
Why use an SSH SOCKS tunnel with Proxychains?
In this scenario, the SSH + Proxychains combination offers several advantages:
- We rely on SSH, a protocol that is generally already available;
- We avoid modifying the local machine's routing table;
- No need for advanced administrative rights across the environment, or for new tools to install;
What is an SSH tunnel?
We will use the ssh -D command to create a local SOCKS proxy on our jump host. This is a built-in SSH option that allows it to open a local port, for example 127.0.0.1:1080, and any SOCKS-compatible client can send its traffic to this port.
SSH then takes care of carrying this traffic to the remote machine connected through the SSH session. It is this remote machine that will establish the final connections to the hosts on the target network. In other words:
- Your tool talks to the local SOCKS proxy; it enters a “tunnel”.
- The proxy relies on the SSH session, so traffic passes from one machine to another inside the SSH protocol;
- The remote machine becomes the network exit point (the “tunnel” exit) toward the target.
From that point on, our "local" tools can communicate with all systems and services located behind our jump host (tunnel exit).
What is the role of Proxychains?
Not all tools natively support SOCKS proxies. That is where Proxychains becomes useful. It allows you to force an application to use one or more proxies defined in a configuration file. It intercepts the network calls made by the program and redirects them to the configured proxy.
In our case, this makes it possible to send Nmap traffic through the SOCKS proxy created by SSH.
Note: Proxychains does not turn Nmap into a “magical” tool capable of doing everything through a proxy. Some scan types remain unsuitable because they are not compatible with proxy use, especially those that rely on raw packets.
Lab and prerequisites
To illustrate this procedure, I am using the following lab, which represents a classic jump-host scenario:
- Kali (
192.168.57.3): the scanning machine on which SSH, Proxychains, and Nmap are run; - Debian1 (interface 1:
192.168.57.101, interface 2:192.168.56.101) pivot machine, reachable from Kali and connected to the target network; - Debian2 (
192.168.56.102) the target machine to scan, not directly reachable from Kali, but reachable from Debian1.
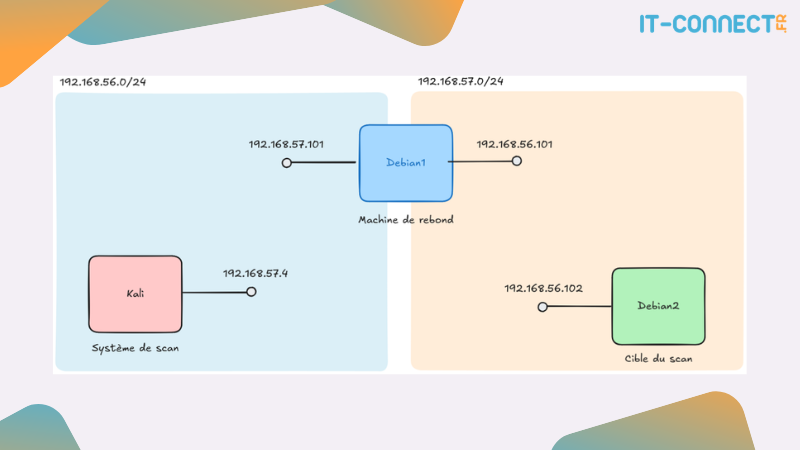
In this context, Kali can reach Debian1 on the 192.168.57.0/24 network, but has no direct access to Debian2 on the 192.168.56.0/24 network. Debian1, however, is connected to both networks. It can therefore serve as a jump host. The logical path will therefore be: Kali > local SOCKS proxy > SSH tunnel > Debian1 > Debian2
On your scanning system (in my case: Kali), you must have the following installed:
sudo apt update
sudo apt install -y openssh-client proxychains4 nmap
And on Debian1, you will of course need an SSH service listening on the interface connected to your scanning system. No nmap tool on Debian1, that is precisely the point!
Nmap scan through a jump host
Create the dynamic SSH tunnel
From our scanning system, we open the SOCKS tunnel with the following command:
ssh -D 1080 -N -f user@192.168.57.101After entering the password, nothing seems to happen, thanks to the -f option, which sends SSH to the background after authentication. The -N option prevents any remote command from being executed (the session is used only for the tunnel). Finally, it is the -D 1080 option that creates the local SOCKS proxy on the specified port.
Once this command has been executed, your system listens locally on 127.0.0.1:1080. To confirm this, let's look at the listening ports:
$ ss -lntp | grep 1080

LISTEN 0 128 127.0.0.1:1080 0.0.0.0:* users:(("ssh",pid=30152,fd=5))
LISTEN 0 128 [::1]:1080 [::]:* users:(("ssh",pid=30152,fd=4))
You should see an SSH process listening on this port. If nothing is listening on port 1080:
- Check that SSH authentication to the jump host works;
- Run the command again without
-fto see any error messages; - Make sure the local port
1080is not already in use.
Configure Proxychains
The configuration file is usually located here:
sudo nano /etc/proxychains4.conf
# or
sudo nano /etc/proxychains.conf
The most important thing is to verify that the last line correctly points to our proxy, namely the port 127.0.0.1:1080 :
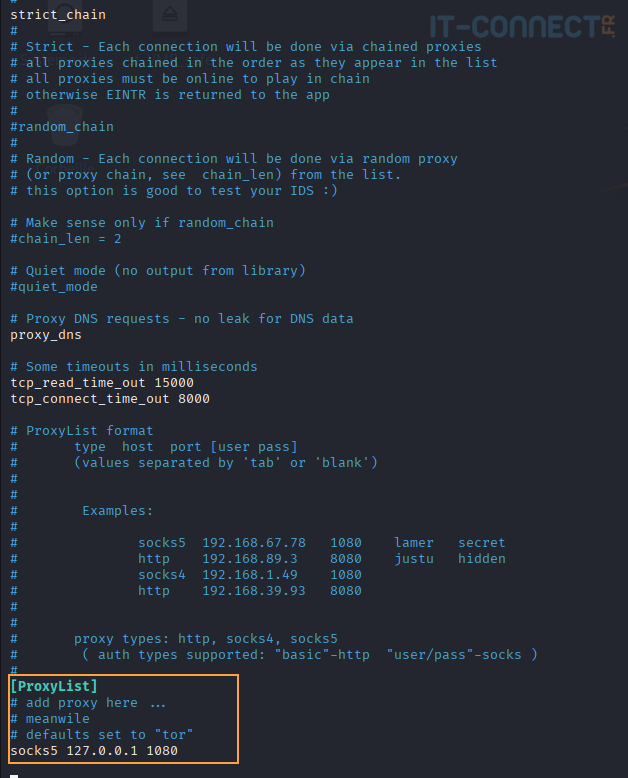
Very quickly, regarding the other options visible in this screenshot:
strict_chain: forces strict use of the declared proxiesproxy_dns: allows DNS resolutions to be sent through the proxy, useful to avoid DNS leakstcp_read_time_outandtcp_connect_time_out: indicate the delay after which proxychains abandons the connection. These will be useful to speed up your Nmap scans performed through this proxy.
In our lab, we will use IP addresses, so this point is less critical, but it is still recommended to keep it.
Validate the pivot before using Nmap
Before launching Nmap, it is strongly recommended to check that traffic is indeed going through the SOCKS proxy. For example, by testing the TCP/22 port of the target system located behind our jump host:
$ proxychains4 nc -vz 192.168.57.102 22
[proxychains] config file found: /etc/proxychains.conf
[proxychains] preloading /usr/lib/x86_64-linux-gnu/libproxychains.so.4
[proxychains] DLL init: proxychains-ng 4.17
[proxychains] Strict chain  ...  127.0.0.1:1080  ...  192.168.56.102:22  ...  OK
192.168.56.102 [192.168.56.102] 22 (ssh) open : Operation now in progress
As you can see, we need to prefix our nc command with proxychains4 so that all network traffic from the command goes through the SSH tunnel. If port 22 is open on Debian2, you should get a connection confirmation. The important line here is the one ending with "OK", which indicates that proxychains successfully reached the destination port. You can hide this logging line generated by proxychains using the -q option:
proxychains4 -q nc -vz 192.168.57.102 22This test is useful because it validates, in order: the SSH tunnel, the Proxychains configuration, network reachability between Debian1 and Debian2, and the presence of a service on the targeted port.
If the test fails, check:
- That the SSH tunnel is still active;
- That Proxychains is correctly pointing to
127.0.0.1:1080; - That Debian1 can reach Debian2;
- That the targeted service is actually listening on the destination host.
Run the Nmap scan
Before launching a scan, you should know that Nmap, when going through a SOCKS proxy, can use different techniques. Some rely on the system's standard network functions, such as connect(), to establish connections, while others send raw packets directly. Proxychains mainly acts at the level of connections established by these standard functions, which makes it especially suitable for scan modes that use these standard calls to communicate.
That is why, in this context, the recommended scan mode is -sT (TCP Connect Scan). It establishes a classic TCP connection (Three way Handshake) to the targeted ports. Proxychains can then redirect this connection to the SOCKS proxy.
By default, Nmap often starts with a host discovery phase to determine whether the target is "up". This phase may rely on mechanisms that behave poorly through a proxy (especially ping). The -Pn option tells Nmap to consider the host as up and to move directly to the port scan. When using proxychains, these two Nmap options are therefore mandatory, which can limit its use cases.
Let's now launch our scan using the options mentioned above:
$ proxychains4 -q nmap -sT -Pn 192.168.56.102

Starting Nmap 7.99 ( https://nmap.org ) at 2026-06-30 20:24 +0200
Nmap scan report for 192.168.56.102
Host is up (0.00s latency).
Not shown: 998 closed tcp ports (conn-refused)
PORT STATE SERVICE
22/tcp open ssh
8080/tcp open http-proxy
We have just performed a network scan via Nmap through our jump host, targeting an IP that was originally unreachable from our scanning system.
Note : if you find that communication via Proxychains works with other tools, but Nmap struggles to detect open ports, the issue may come from Nmap's dynamic dependencies, which can cause it to bypass Proxychains. One possible approach is to use a statically compiled version of Nmap. The sources are available on nmap.org/dist. After compiling, run the resulting binary through Proxychains (proxychains4 ./nmap ...).
Going further: learn to master Nmap
Using Nmap through an SSH tunnel and Proxychains is a powerful technique, but it represents only a tiny fraction of the tool's use cases. As we have seen, misconfiguration (scan choice, proxy handling, result interpretation) can lead to false negatives, unnecessary latency, or worse, network disruptions.
This tutorial covers a specific practical case, but to become operational with Nmap, whether for network mapping, vulnerability research, or penetration testing, structured training is essential.
I have written a 160-page book dedicated to advanced Nmap mastery, designed to:
- Master Nmap, understand how it works and its limits
- Make your scans more efficient (choice of options, interpretation of results).
- Improve your audits (avoid false positives, limit network impact).
- Automate your procedures (NSE scripts, integration with other tools).
- Cover all use cases.
The goal? To make you operational for effective, safe, and optimized use of this tool to secure your information system, whether you are a network administrator, systems administrator, pentester, or CISO.

If you are new to the tool or want to avoid these pitfalls, you can also read the complete course dedicated to network mapping and vulnerability scanning with Nmap, as well as our article on the common mistakes to avoid during an Nmap scan. To move toward exploitation, the article on the must-have NSE scripts extends this reading.
Conclusion
Using Nmap through a dynamic SSH tunnel and Proxychains is a simple and effective solution for performing scans in a segmented environment using a pivot host. This method does not replace full routing, but it works very well for a variety of needs such as one-off tests, network debugging, segmentation tests, and more.
However, the results obtained must be interpreted with caution. Scanning through an SSH SOCKS tunnel and Proxychains introduces an intermediate layer that can lead to more latency, greater dependence on SSH session stability, limitations on certain scan types, and possible behavior differences between a direct scan and a proxied scan.
FAQ
Can you scan an isolated network with Nmap without installing anything on the pivot host?
Yes. The pivot host only needs an SSH service listening. The SOCKS proxy is created on the scanning machine with the ssh -D option, and both Nmap and Proxychains remain installed only on that scanning machine. No tools or administrative rights are required on the pivot.
Why do you need the -sT and -Pn options with Nmap through Proxychains?
Proxychains only intercepts connections established via standard system network calls, such as connect(). The -sT option (TCP Connect Scan) uses this mechanism, unlike raw-packet scans. The -Pn option disables host discovery (often based on ping), which behaves poorly through a SOCKS proxy.
Do UDP scans (-sU) work through an SSH SOCKS tunnel?
No. Proxychains only supports the TCP protocol. UDP scans, as well as scans based on raw packets (SYN scan -sS, ICMP scan, etc.), do not pass correctly through the SOCKS proxy. For these needs, you should use routing or a VPN to the target network.
How can you speed up an Nmap scan performed through Proxychains?
A proxied scan is slower than a direct scan. To reduce this latency, adjust the tcp_connect_time_out and tcp_read_time_out parameters in the Proxychains configuration file, and reduce the scan scope on the Nmap side by targeting specific ports with -p rather than scanning all ports. The -q option also makes the output easier to read.