www.it-connect.fr

How to Secure SSH Access on Proxmox VE with Key-Based Authentication
On Proxmox VE, the SSH service is enabled right after installation and the root account can log in with a password: convenient, but not a configuration to keep. Whether your Proxmox VE server runs in a homelab or on a physical host in an enterprise environment, SSH access to your hypervisor represents a major attack surface. This is even more true when root access is involved, because it provides full root access to the machine and, by extension, to all the VMs and containers it hosts. Configuring and securing SSH access is one of the first steps to take after installing Proxmox VE.
In this tutorial, we will look at how to configure SSH access on Proxmox VE in a clean and secure way: generating a key pair, deploying the public key on the server, disabling password authentication, and then setting up a dedicated administration account. Even though Proxmox VE is based on Debian, there are a few subtleties worth knowing. The steps below were carried out on Proxmox VE 9.2, based on Debian 13.
How do you configure SSH key-based access on Proxmox VE?
Here is the quick method for those of you in a hurry. To enable SSH key-based authentication on a Proxmox VE server, the procedure comes down to five steps:
- Generate an SSH key pair on your workstation with
ssh-keygen -t ed25519. - Copy the public key to the Proxmox VE server with
ssh-copy-id root@<server-ip>, which adds it to the/etc/pve/priv/authorized_keysfile. - Check that the
ssh root@<server-ip>connection works without a password. - Create a hardening file in
/etc/ssh/sshd_config.d/withPermitRootLogin prohibit-passwordandPasswordAuthentication no, then reload the service withsystemctl reload ssh. - Test the new configuration from a second terminal before closing the current session.
The rest of the article details each step, along with the Proxmox VE specifics you need to know.
SSH on Proxmox VE: what you need to know before you begin
Proxmox VE is a Debian-based distribution, which means the SSH server is the usual implementation: OpenSSH Server. If you are used to configuring SSH access on a Linux server, you will not be lost, but there are differences to be aware of.
SSH is enabled by default, and root can log in with a password
First important difference: unlike a Debian installation, where root password login is refused over SSH, Proxmox VE allows SSH login as root (that is, in the SSH configuration: PermitRootLogin yes). In practice, as soon as installation is complete and your Proxmox VE server is connected to the network, you can open a terminal and connect:
ssh root@192.168.110.3During the initial setup of a Proxmox VE node, this can be useful, but it should be temporary. Keeping password-based root access exposed on the network is also an ideal target for attackers. As the admin of your server, you need to take back control of this configuration.
Linux accounts and Proxmox VE users: two separate worlds
Proxmox VE has its own user system, with several authentication domains called realms: pam for system Linux accounts, pve for Proxmox VE-specific accounts, as well as LDAP, Active Directory, or OpenID Connect. However, in the context of SSH, you need to know that:
- SSH access relies only on system Linux accounts (the
pamrealm), meaning those present in/etc/passwd. - A user created in the web interface in the
pverealm does not exist at the system level: it can never open an SSH session, even with the Administrator role. - Two-factor authentication (TOTP, WebAuthn) configured in the web interface protects only the web interface and the API, not SSH access.
Another point to know: the Proxmox VE web interface does not provide any menu to manage the host’s SSH keys. The SSH public key field you encounter in the virtual machine creation wizard applies to cloud-init, i.e. the guest VM, not the hypervisor. Host SSH key management must be done from the command line.
On a Proxmox VE node, the /root/.ssh/authorized_keys file is not an ordinary file, but a symbolic link to /etc/pve/priv/authorized_keys. This can easily be checked with the following command:
ls -l /root/.ssh/authorized_keys
What does this directory pointed to by the symbolic link correspond to? The /etc/pve directory is the mount point of Proxmox VE’s cluster file system (pmxcfs), replicated in real time across all nodes through Corosync. This mechanism exists because Proxmox VE uses SSH tunnels between nodes for several functions: VM and container migration, storage replication, or opening another node’s shell from the web interface. Each node therefore has its own key pair (/root/.ssh/id_rsa) and the public key of each node is added to this shared file.
In the context of SSH access management as discussed in this article, there are several consequences:
- A public key added to
/etc/pve/priv/authorized_keysgrants root access to all nodes in the cluster, immediately. - On a standalone node, the symbolic link is present as well, but it has no particular impact.
- You should never replace this link with a regular file: you would break inter-node operations.
Prerequisites
To follow this tutorial, you need:
- A Proxmox VE server installed and reachable on the network (here,
prox-01with IP address192.168.110.3). - The root password for this server, since the first connection will be made with a password.
- A workstation with an OpenSSH client: this is natively the case on Linux, macOS, and Windows 10/11.
- Optional - A backup access path to the server console: either the physical console, remote access (iDRAC, iLO, IPMI), or simply the Web interface (it provides access to the shell).
If you are working from Windows, the built-in Windows SSH client is sufficient. I’ll point you to this tutorial to get started: how to use the native Windows SSH client.
Generate an SSH key pair on your workstation
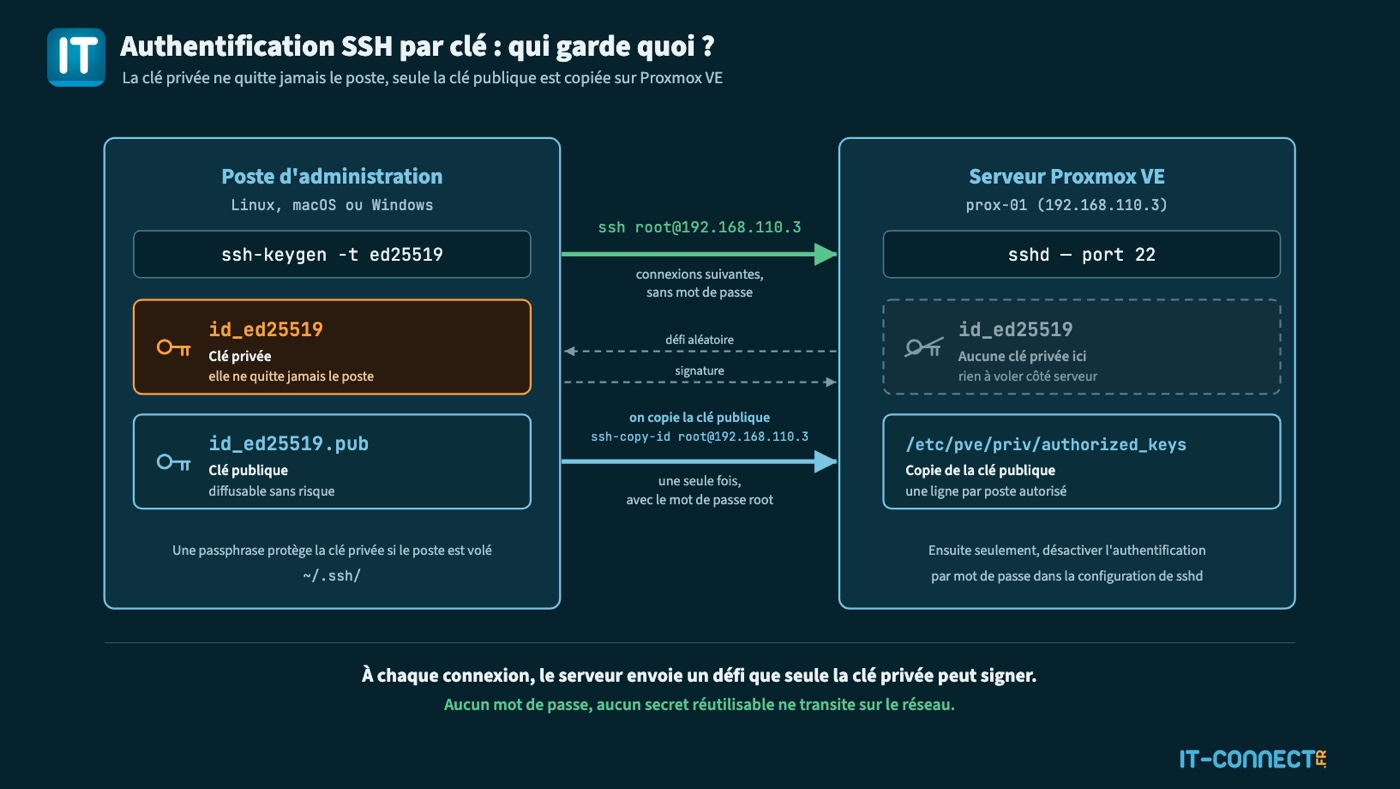
The key pair is generated on your workstation, never on the server. In fact, the private key must never leave the machine that created it: that is a golden rule. The command is the same on Linux, macOS, and Windows:
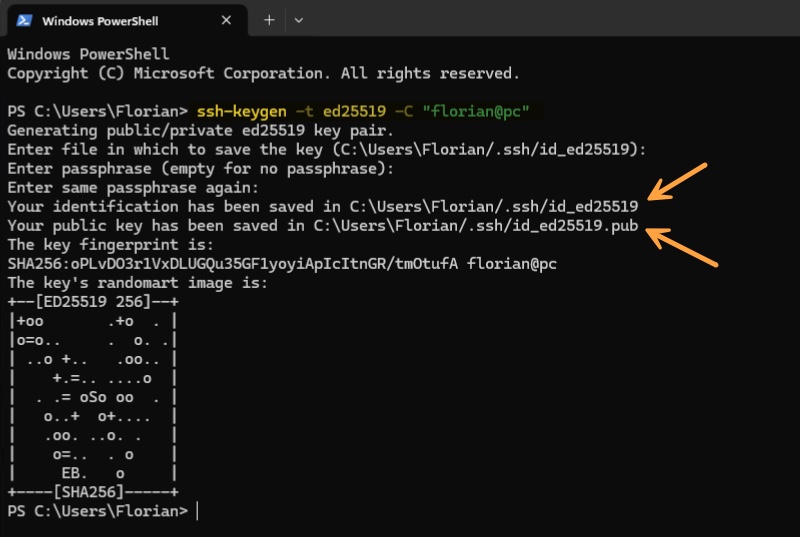
ssh-keygen -t ed25519 -C "florian@pc"A few details about the syntax of this command:
-t ed25519: the Ed25519 algorithm is now the recommended choice and is well suited to Proxmox VE.-C: a simple comment, appended to the end of the public key. It has no cryptographic role, but it makes keys easier to identify when there are several in anauthorized_keysfile. Specify who and which machine, so that it is useful information.- The passphrase:
ssh-keygenoffers to protect the private key with a passphrase. I recommend setting one. Without it, anyone who gets hold of the private key file can use it directly. To avoid typing it every time you connect, you can use an SSH agent, as explained in this tutorial: avoid entering your passphrase every time you use an SSH key.
Two files are created in the .ssh folder of your profile (~/.ssh/ on Linux and macOS, C:\Users\<Utilisateur>\.ssh\ on Windows):
id_ed25519: the private key, to be carefully kept and never shared.id_ed25519.pub: the public key, the one we are going to copy to the Proxmox VE server.
Deploy the public key on the Proxmox VE server
There are several ways to copy the public key to the server. Choose the one that matches your workstation.
Method 1: using ssh-copy-id (Linux and macOS)
The ssh-copy-id command does all the work: it connects to the server with the root password, creates the .ssh folder if needed, and adds the public key to the end of the authorized_keys file.
ssh-copy-id -i ~/.ssh/id_ed25519.pub root@192.168.110.3You will be asked for the root password to establish the connection. Since /root/.ssh/authorized_keys points to /etc/pve/priv/authorized_keys, the key is added directly to the shared cluster file.

Method 2: from Windows with PowerShell
The Windows OpenSSH client does not provide ssh-copy-id. The equivalent is to send the content of the public key to the server, which then adds it to the authorized_keys file itself. This gives a different command, but the result is the same:
type $env:USERPROFILE\.ssh\id_ed25519.pub | ssh root@192.168.110.3 "cat >> ~/.ssh/authorized_keys"Again, the root password is requested for this connection. If this command succeeds, it returns nothing.
Method 3: manually, from the Web interface shell
If you prefer not to go through a password-based SSH connection, even once, open the node shell from the Proxmox VE Web interface (Datacenter > prox-01 > Shell). Display the content of your public key on your workstation (cat C:\Users\Florian/.ssh/id_ed25519.pub), copy it, then add it to the shared file by entering the command from the Web shell:
echo "ssh-ed25519 AAAAC3NzaC1lZDI1NTE5AAAAIP4mwCAbYLr1yfi+654nZSythohxelZPpczIGIYK3tG8 florian@pc" >> /etc/pve/priv/authorized_keysObviously replace the string with your own public key, on a single line.
Special case: declare keys during automated installation
If you deploy your Proxmox VE servers using automated installation (answer file answer.toml), note that the root-ssh-keys option in the [global] section lets you provision root’s public keys directly, with no password-based login needed after installation:
[global]
root-password-hashed = "$y$j9T$..."
root-ssh-keys = [
    "ssh-ed25519 AAAAC3NzaC1lZDI1NTE5AAAAIP4mwCAbYLr1yfi+654nZSythohxelZPpczIGIYK3tG8 florian@pc"
]
This is not really the point if your server is already installed, but it is still good to know. For more information, this is documented on the Automated Installation page of the Proxmox wiki.
Test SSH key-based login
The configuration is ready, shall we test it? Whatever method you used to copy the public key, you can test it now.
ssh root@192.168.110.3If the server no longer asks for the root password (but possibly asks for your key’s passphrase), key-based authentication is working. If in doubt, the -v option displays the authentication flow thanks to verbose mode. Otherwise, check the SSH logs; you should see the key-based login.
journalctl -u ssh --since "10 minutes ago" | grep Accepted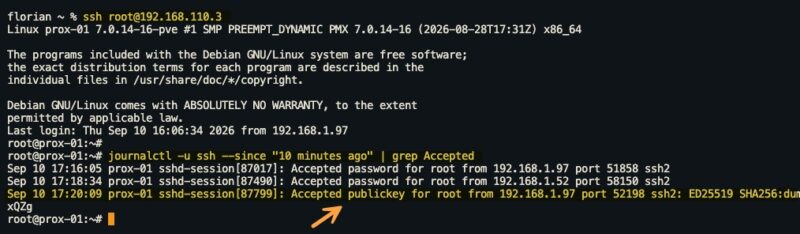
Also check that the shared file actually contains your key; that will confirm what I stated earlier.
cat /etc/pve/priv/authorized_keysIn the content, you should see this line:
ssh-ed25519 AAAAC3NzaC1lZDI1NTE5AAAAIP4mwCAbYLr1yfi+654nZSythohxelZPpczIGIYK3tG8 florian@pcDisable password authentication
Now that key-based authentication works, we can harden SSH access a little more by disabling password-based access. This is the step that brings a real security gain.
The sshd_config file and the sshd_config.d directory on Debian 13
On Proxmox VE 9 (Debian 13), OpenSSH configuration is not limited to the /etc/ssh/sshd_config file. Leaving comments aside, the first enabled directive is an Include directive. In practice, all .conf files present in /etc/ssh/sshd_config.d/ are loaded before the rest of the main file. And OpenSSH applies a simple rule: for each option, the first value encountered wins.
Create the hardening file
The directory mentioned above is empty by default. We are going to create our own configuration file, remembering to add a number as a prefix. It simply helps control the loading order if other files are added later.
nano /etc/ssh/sshd_config.d/10-proxmox-hardening.confFile content:
PermitRootLogin prohibit-password

PubkeyAuthentication yes
PasswordAuthentication no
KbdInteractiveAuthentication no

PermitEmptyPasswords no
A few explanations are needed:
PermitRootLogin prohibit-password: root can still log in, but only with a key. This is the value to keep on Proxmox VE. Thenovalue would block all root SSH logins, including with a key, which would break VM migration, replication, and access to other nodes’ shells in a cluster. On a standalone node,nois technically possible, but you would lose this compatibility if you later build a cluster.PubkeyAuthentication yes: this is the default value, but at least it is explicitly stated.PasswordAuthentication no: disables password authentication for all users.KbdInteractiveAuthentication no: disables keyboard-interactive authentication, which goes through PAM and can, in some configurations, ask for a password again even whenPasswordAuthenticationis set tono.PermitEmptyPasswords no: rejects accounts with empty passwords.
Validate and apply the configuration without disconnecting
Before reloading the service, validate the syntax:
sshd -tNo output means the configuration is valid. To apply the configuration, reload the SSH service.
systemctl reload sshDo not close your current session. Open a second terminal and try a new connection with the key. If it succeeds, also test that a connection without a key is properly refused:
ssh -o PubkeyAuthentication=no root@192.168.110.3
Going further: a dedicated administration account instead of root
Logging in directly as root, even with a key, is more than debatable. It is better to have a named account, especially if there are multiple administrators (it helps traceability). On a Proxmox VE server, it is perfectly possible to use another Linux account for SSH access, then elevate privileges with sudo. However, it is not possible to completely cut off root access over SSH, especially for clusters (unless I am mistaken).
Create the account and install sudo
The sudo package is not installed by default on Proxmox VE. From a root session:
apt update && apt install sudoThen create a user in your name and add it to the sudo group.
adduser adm_fb
usermod -aG sudo adm_fb
Then add your public key to that account’s authorized_keys file. Unlike root, this file is local to the node: in a cluster, you will need to repeat this on each node where access is desired. The easiest way is to use ssh-copy-id from your workstation, which creates the .ssh folder, adds the key, and applies the correct permissions:
ssh-copy-id -i ~/.ssh/id_ed25519.pub adm_fb@192.168.110.3This command authenticates with the password defined during adduser. It therefore only works if password authentication is still accepted by the server. If you create this account before the hardening step, that is the case. If you have already disabled it, use your root session, which already has the key, to place the file on behalf of the account. It is a relatively heavy command, but it works (the command returns nothing on success).
cat ~/.ssh/id_ed25519.pub | ssh root@192.168.110.3 "install -d -m 700 -o adm_fb -g adm_fb /home/adm_fb/.ssh && cat >> /home/adm_fb/.ssh/authorized_keys && chown adm_fb:adm_fb /home/adm_fb/.ssh/authorized_keys && chmod 600 /home/adm_fb/.ssh/authorized_keys"Permissions are important: OpenSSH silently ignores an authorized_keys file that is writable by group or others. Then test from your workstation:
ssh adm_fb@192.168.110.3
sudo -i
Give this same account access to the Web interface
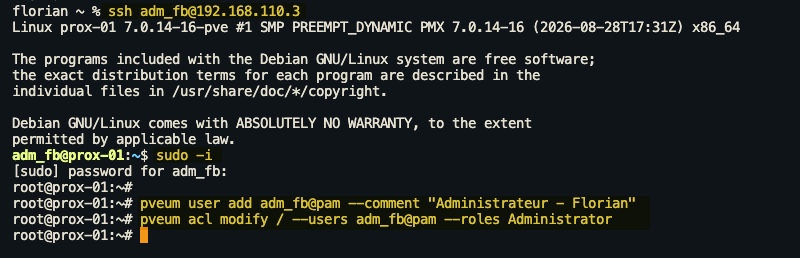
The Linux account exists, but Proxmox VE does not know it yet. If you want this new user to also be able to log in to the Web interface and the API, you must declare it in the pam realm and assign it a role. The example below associates the Administrator role at the root level (and therefore across everything).
pveum user add adm_fb@pam --comment "Administrateur - Florian"

pveum acl modify / --users adm_fb@pam --roles Administrator
Example:
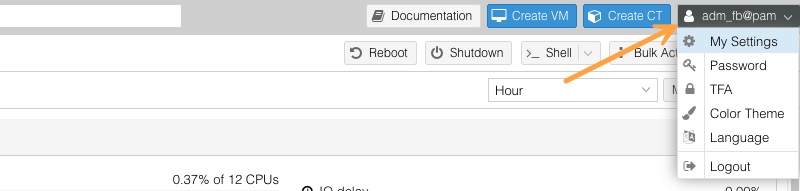
The password used to log in to the Web interface is the Linux account password (the one set with adduser). You can then enable two-factor authentication for this account from the Web interface (Datacenter > Permissions > Two Factor), which will protect Web access, while SSH access is already protected by the key.
Additional best practices
Key-based authentication is the foundation of access security. For those who want to go further, here are a few measures that complement it usefully on a Proxmox VE host.
Restrict SSH access with the Proxmox VE firewall
Proxmox VE includes a firewall that can be managed from the Web interface, at the datacenter, node, and VM levels. A rule limiting port 22 (and port 8006 for the Web interface) to the subnet or IP address of your admin workstation greatly reduces the exposure surface. The implementation is detailed in this tutorial: protect your Proxmox VE server and VMs with the native firewall. You could also choose to change the default SSH port.
Block repeated attempts with Fail2ban
Even without passwords being accepted, connection attempts will continue to arrive if the server is exposed to the web. This is a reality if it is a Proxmox VE installation on a dedicated server. A tool like Fail2ban makes it possible to temporarily ban overly persistent IP addresses, on SSH as well as on the Proxmox VE Web interface. To get started with this tool: first steps with Fail2ban.
Add a second factor to SSH, with caution
It is possible to add a TOTP code to SSH authentication via the libpam-google-authenticator PAM module, as explained in this article: enable MFA for SSH access on Linux. On Proxmox VE, this procedure requires three adjustments, otherwise you risk breaking things (especially on a cluster).
The first rule to apply: reserve the second factor for the named account, never for root. The SSH tunnels automatically opened between cluster nodes are non-interactive and will not be able to enter a TOTP code... In the configuration, the restriction is done with a Match User block, which we place in a configuration file, so that will be enough to apply SSH MFA only to certain accounts.
First enroll the account, while logged in as that user:
sudo apt install libpam-google-authenticator
google-authenticator
Then configure PAM for the SSH service. Two changes in /etc/pam.d/sshd:
# Disable password prompt (unnecessary with the key), by commenting out this line
#@include common-auth

# Add the TOTP second factor at the end of the file
auth required pam_google_authenticator.so
This file only applies to the SSH service. Authentication for the pam realm in the Proxmox VE Web interface goes through a separate PAM service (proxmox-ve-auth), which is therefore not affected. Finally, complete the hardening file created earlier to require both key and code for this one account only.
sudo nano /etc/ssh/sshd_config.d/10-proxmox-hardening.confThe Match block must be added at the very end of the file, after the global directives, because everything that follows in the same file falls under its scope (and therefore applies to the mentioned account):
Match User adm_fb
    KbdInteractiveAuthentication yes
    AuthenticationMethods publickey,keyboard-interactive
The KbdInteractiveAuthentication yes directive is required, because the TOTP code is passed through this mechanism, which our hardening file disables globally. Validate and reload, then check that root is not affected:
# Check the effective configuration for root, then for adm_fb
sudo sshd -t && sudo systemctl reload ssh
sshd -T -C user=root,host=prox-01,addr=192.168.110.5 | grep -Ei "^(authenticationmethods|kbdinteractiveauthentication)"
sshd -T -C user=adm_fb,host=prox-01,addr=192.168.110.5 | grep -Ei "^(authenticationmethods|kbdinteractiveauthentication)"
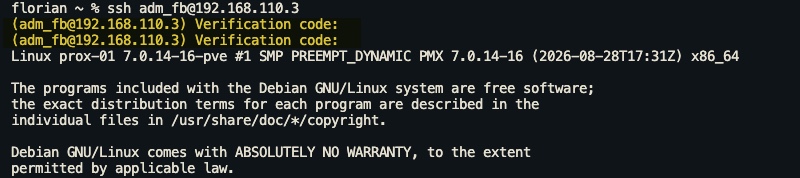
On the next login with adm_fb, the key is checked, then a Verification code: prompt appears. As always, test from a second terminal before closing the current session. As shown in the image below, it works.
Simplify connections with a client configuration file
On your workstation, the ~/.ssh/config file avoids retyping the IP address, username, and key path every time:
# Proxmox VE lab server
Host prox-01
    HostName 192.168.10.20
    User adm_fb
    IdentityFile ~/.ssh/id_ed25519
    IdentitiesOnly yes
The ssh prox-01 command is then enough to start a connection. Even better: use a connection manager, which is useful if you have several servers.
Bonus - Access the Web interface through an SSH tunnel
Since SSH access is now in place, it can serve as a single entry point. Let me explain. You can disable direct access to your Proxmox VE server’s Web interface. In that case, you reserve access to port 8006 through an SSH tunnel:
ssh -L 8006:127.0.0.1:8006 root@192.168.110.3You then just need to open https://localhost:8006 in your browser. The tunnel also works for noVNC consoles and the shell, since they use the same port.
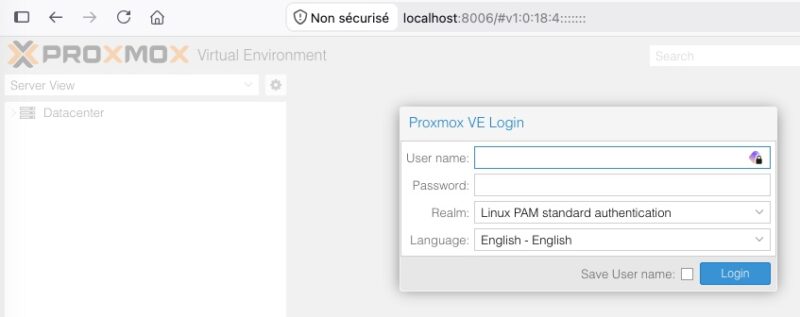
But be careful, the tunnel alone does not block anything: as long as pveproxy listens on all interfaces, direct access remains possible. To close it, the /etc/default/pveproxy file offers two mechanisms. On a standalone node, for example a server hosted with a provider where only port 22 is open, the most radical approach is to make pveproxy listen only on the loopback interface:
echo 'LISTEN_IP=127.0.0.1' >> /etc/default/pveproxy
systemctl restart pveproxy.service spiceproxy.service
To revert, remove the line and restart the same services. Since SSH access is not affected by this setting, you still keep control:
sed -i '/^LISTEN_IP=/d' /etc/default/pveproxy
systemctl restart pveproxy.service spiceproxy.serviceWarning: the documentation advises against using LISTEN_IP on a cluster, because nodes communicate with each other via pveproxy on port 8006. Also note that restarting pveproxy (unlike reloading it) interrupts open consoles and shells.
On a cluster, or if you want to keep direct access from a few addresses, use the built-in pveproxy ACL instead. The 127.0.0.1 source corresponds to traffic coming through the tunnel, and the addresses of the other nodes must be included in the list:
# /etc/default/pveproxy : access allowed via the SSH tunnel, from the admin workstation and other nodes
ALLOW_FROM="127.0.0.1,192.168.110.5,192.168.110.4"
DENY_FROM="all"
POLICY="allow"
Check the result from your workstation: https://192.168.110.3:8006 should fail, while https://localhost:8006 through the tunnel should work. These settings are detailed in the pveproxy documentation.
And what about the Proxmox VE firewall?
The Proxmox VE firewall behaves differently depending on the context. Its default rules accept ports 8006 and 22 from the management IP set, which automatically includes the detected local network, and these rules are evaluated before yours. In a homelab, that means the whole LAN keeps access to 8006, which is why the pveproxy settings above are useful. On a dedicated server with a public IP address, the opposite is true: the detected network may be the provider’s entire block, and the firewall becomes essential.
In that case, configure the firewall to block inbound connections and allow ports 22 and 8006 only from your administration addresses. One trap to be aware of: the local_network alias, detected automatically, must be forced to the server’s address in /etc/pve/firewall/cluster.fw, otherwise the provider’s address block remains allowed by the default rules. The implementation is detailed in the Proxmox VE firewall tutorial mentioned above.
Troubleshooting: the most common errors
Permission denied (publickey) even though the key is in place
This is the most common message after password authentication is disabled. Usual causes:
- The client is not using the right key. Check the list of keys offered with
ssh -v, or force it with-i ~/.ssh/id_ed25519. - The public key was pasted on multiple lines or with a stray newline in
authorized_keys. Each key must fit on a single line. - For a non-root account, the permissions on the
.sshdirectory (700) or theauthorized_keysfile (600) are too open, or the owner is incorrect. - On the server side,
journalctl -u sshusually indicates the exact reason for the refusal.
I’m locked out
If no SSH connection works anymore, the Web interface is still accessible: open the node shell (Datacenter > prox-01 > Shell), then adjust the SSH configuration. You can simply rename the /etc/ssh/sshd_config.d/10-proxmox-hardening.conf file by adding .bak, for example, and reload the service.
If the Web interface is inaccessible too, you still have the physical console. That is precisely why testing from a second terminal before closing the session is not optional.
PermitRootLogin has been set back to yes
If you placed the directive directly in /etc/ssh/sshd_config and have just created or joined a cluster, Proxmox VE may have rewritten it. Move it into a file under /etc/ssh/sshd_config.d/ as described above, and check the result with sshd -T.
Conclusion
Configuring SSH key-based access on Proxmox VE only takes a few minutes, but the gain is real: no more brute-force attempts against your server’s SSH access. But be careful, remember the golden rule: the private key never leaves your workstation.
To go further:
- Official Proxmox VE documentation: Cluster Manager, the role of SSH in a cluster
- Official Proxmox VE documentation: automated installation
- How to harden your SSH server configuration
FAQ
Is SSH enabled by default on Proxmox VE?
Yes. The OpenSSH server is installed and started as soon as Proxmox VE is installed, and the installer sets the PermitRootLogin directive to yes in /etc/ssh/sshd_config. The root account can therefore connect over SSH with its password immediately after installation, on port 22.
How do you connect over SSH to a Proxmox VE server?
From a Linux, macOS, or Windows terminal, run ssh root@<server-ip-address> and enter the root password defined during installation. Once an SSH key has been deployed, the password is no longer requested. You can also open a shell directly from the Web interface, in the node menu.
Where should you add an SSH key for root on Proxmox VE?
In the /etc/pve/priv/authorized_keys file. The /root/.ssh/authorized_keys file is only a symbolic link to it. It is replicated to all nodes in a cluster via pmxcfs, so a key added on one node grants root access to the entire cluster. The ssh-copy-id command works normally and writes to the right place. However, this file is only valid for SSH connections with the root user, because each user has its own authorized_keys file (as explained in the article).
Can you manage the Proxmox VE host’s SSH keys from the Web interface?
No. The Web interface does not provide SSH key management for the hypervisor. The public key field in the VM creation wizard is for cloud-init, meaning the guest virtual machine. Host keys are managed from the command line, or via the answer file during an automated installation.
Should PermitRootLogin be set to no on Proxmox VE?
No, you should prefer prohibit-password. This value allows root only by key and blocks password login. The no value would forbid all root SSH logins, including key-based access, which would break VM migration, storage replication, and access to shells on other nodes in a Proxmox VE cluster.
How do you disable SSH password authentication on Proxmox VE?
After checking that key-based login works, create a file in /etc/ssh/sshd_config.d/ containing PasswordAuthentication no, KbdInteractiveAuthentication no, and PermitRootLogin prohibit-password. Validate with sshd -t, reload with systemctl reload ssh, then test from a second terminal before closing your session.
How do you copy an SSH key to Proxmox VE from Windows?
Windows does not provide ssh-copy-id. From PowerShell, send the content of the public key to the server: type $env:USERPROFILE\.ssh\id_ed25519.pub | ssh root@<ip> "cat >> ~/.ssh/authorized_keys". The root password is requested for that last connection. You can also paste the key manually from the Web interface shell. You have a more detailed example in the article.
Can a user created in the Proxmox VE Web interface connect over SSH?
Only if it is a Linux account in the pam realm, created beforehand on the system with adduser. A pve realm user exists only inside Proxmox VE and cannot open an SSH session, regardless of role. Conversely, a Linux account must be declared with pveum user add to access the Web interface.
Does Proxmox VE Web MFA also protect SSH?
No. Two-factor authentication configured in Proxmox VE (TOTP, WebAuthn) applies only to the Web interface and the API. SSH access is handled by OpenSSH and PAM. A second factor on SSH is possible through PAM, but it must be reserved for named accounts, never root, so that automatic cluster SSH tunnels are not blocked.