www.it-connect.fr


How to Create Valid Local HTTPS Certificates with mkcert on Debian
When testing a web application locally under proper conditions, it makes sense to use an HTTPS connection. The problem is that a self-signed certificate does not make this easy. This is where the open source tool mkcert comes in: it creates a local certificate authority, installs it into your machine's trust stores, then generates certificates that are recognized with no warning at all.
In this article, I offer a practical guide to installing and using mkcert on a Debian machine. We will see how to set up the certificate authority, generate a certificate for your services, use it with Nginx or Apache, and extend trust to another machine.
What Is mkcert?
mkcert is a command-line utility that generates TLS certificates for development and local environments. It creates a local certificate authority, adds it to the system trust store and the browser trust stores, then signs the certificates you request with it. The result: your HTTPS services are accepted without alerts, for the names you choose, including localhost, an IP address, or an internal domain.
This tool is completely free and published on GitHub: github.com/FiloSottile/mkcert
Why a Self-Signed Certificate Is Not Enough
A self-signed certificate is signed by itself: no authority known to the system vouches for it, so the browser displays an error. You can add an exception, but you have to repeat it on every workstation, every browser, and at every renewal. That is not clean for proper testing conditions.
mkcert approaches the problem from the other side. It generates a real certificate authority (a root CA), installs it once into the trust stores, then signs as many certificates as needed with that CA. All certificates derived from it are accepted immediately, with no exception to approve. All of this happens locally, with no connection to an external service.
What mkcert Does Not Do
Let's be clear about the scope of the tool, to avoid any unpleasant surprises:
- It does not configure your servers. mkcert produces a certificate/key pair, and you must integrate it into Nginx, Apache, Traefik, or your application.
- It does not handle any automatic renewal. There is no agent, no scheduled task, and no ACME protocol.
- It is not intended for production or for end-user workstations. It is a tool for dev or lab use.
Prerequisites
To follow this tutorial, you need:
- A Debian machine with
sudoaccess. - The
libnss3-toolspackage, which is required for mkcert to populate the trust store used by Firefox and by Chrome or Chromium. - Working DNS resolution for the names you plan to use, via
/etc/hostsor an internal DNS server. On that point, our tutorial on Technitium DNS Server to host your own DNS server will be useful if you manage an internal domain in your homelab.
Installing mkcert on Debian
Two methods are available. I recommend the first one, which is simpler.
From the Official Debian Repositories
mkcert is available as a ready-to-use package for Debian. Installation therefore comes down to two packages:
sudo apt update
sudo apt install mkcert libnss3-tools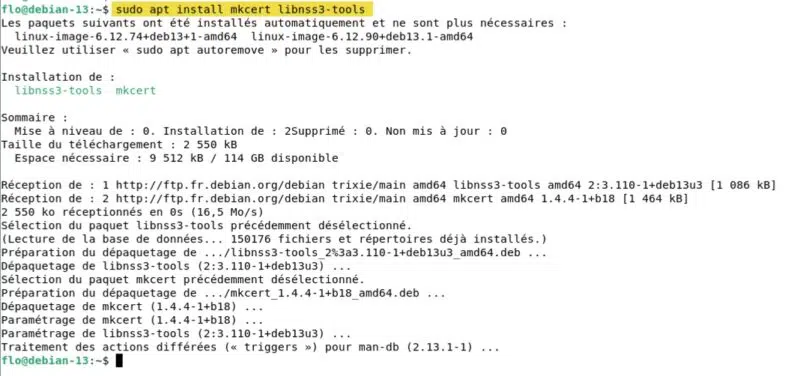
Let's check the installed version:
mkcert -version
v1.4.4
From the Official Binary
If you prefer to use the binary directly, download the version published on GitHub:
curl -L -o mkcert https://github.com/FiloSottile/mkcert/releases/download/v1.4.4/mkcert-v1.4.4-linux-amd64

chmod +x mkcert
sudo mv mkcert /usr/local/bin/mkcert
Binaries are also available for arm64, which covers Raspberry Pi and ARM VMs. Once again, do not forget sudo apt install libnss3-tools.
Creating the Local Certificate Authority
We now need to call mkcert with the -install option in order to create the root CA and add it to the detected trust stores. This is a step you only need to perform once on this machine.
mkcert -installOn a Debian workstation with Firefox installed, the output looks like this:

A few details about what just happened:
- Run this command without
sudo. mkcert will elevate its privileges itself when it needs to write to the system store, which ensures that the CA files stay in your home directory. - On Debian, the CA is placed in
/usr/local/share/ca-certificates/as a.crtfile, thenupdate-ca-certificatesis run to refresh the system store. - The browser-related line appears only if
certutilis present and a Firefox or Chromium profile already exists. If you have just installed the browser, launch it once first, then runmkcert -installagain. This point will be covered just below. - Restart your browsers so they take the new local certificate authority into account.
The Case of Recent Browsers
On an up-to-date machine, mkcert -install may fail with the error shown below, even though the system store was correctly populated:
The local CA is now installed in the system trust store! ⚡️
ERROR: no Firefox and/or Chrome/Chromium security databases found
And yet, Mozilla Firefox was indeed present on my machine. The explanation lies in a broader shift on the browser side: Mozilla and Google have both aligned their directories with the XDG Base Directory specification, with a few versions in between. The historic paths, known to mkcert 1.4.4 released in 2022, are therefore no longer the ones used by default.
| Browser | Path known to mkcert | Path now used |
|---|---|---|
| Firefox, recent versions | ~/.mozilla/firefox/<profile> | ~/.config/mozilla/firefox/<profile> |
| Chrome and Chromium, recent versions | ~/.pki/nssdb | ~/.local/share/pki/nssdb |
In both cases, the old path is still used if it already exists. Only recent installations, with no history, switch to the new location. That is why the problem mainly affects freshly installed machines.
You may have noticed that the output shown earlier, on the contrary, indicates a successful installation in the Firefox store. There is no contradiction: Debian ships Firefox ESR, an extended-support branch that stays several versions behind the fast release branch and therefore keeps the old location. However, this is going to change, since Firefox 153 is now the new ESR version (since July 2026).
The issue is more common on distributions that follow the fast Firefox branch, or as soon as a recent Chromium browser creates its database. I ran into this on a Linux Mint machine used as a second machine to later use the mkcert certificate (this point will be covered later).
I first had to locate the NSS databases:
find ~ -name "cert9.db" 2>/dev/nullWhich returned these paths:
/home/flo/.config/mozilla/firefox/7xfvgrng.default-release/cert9.db
/home/flo/.local/share/pki/nssdb/cert9.db
You then simply need to import the CA manually with certutil, which is exactly what mkcert would have done. For Firefox, adapting the profile identifier to your own:
# Import the CA into the Firefox profile
certutil -A -d sql:$HOME/.config/mozilla/firefox/7xfvgrng.default-release -t "C,," -n "mkcert development CA" -i "$(mkcert -CAROOT)/rootCA.pem"

# Check that the authority is present
certutil -L -d sql:$HOME/.config/mozilla/firefox/7xfvgrng.default-release | grep mkcert
For Chrome and Chromium, the database is shared and the path does not vary:
# Import the CA into Chrome's shared NSS database
certutil -A -d sql:$HOME/.local/share/pki/nssdb -t "C,," -n "mkcert development CA" -i "$(mkcert -CAROOT)/rootCA.pem"
The -t "C,," option declares the certificate as a trusted authority for TLS server authentication. Restart the browser in question and the HTTPS connection warning will disappear. Note that Chrome's database is created only at the browser's first launch, so open it once before running the command.
Where the CA Files Are Stored
The CA directory location is given by the -CAROOT option:
mkcert -CAROOT
This directory contains two files:
rootCA.pem, the authority certificate, valid for 10 years. This is the one you will distribute to other machines (if this is only for local dev, it will not be necessary).rootCA-key.pem, the private key of the authority, protected as read-only for its owner.
Warning: anyone who gets hold of rootCA-key.pem can issue a valid certificate for any domain and intercept the TLS traffic of any machine that trusts this CA. This file must never be shared or copied to a third-party system. Here, it is a local CA with no real importance, but it is always worth stating.
Note: the CAROOT environment variable lets you point to another directory, which makes it possible to keep several CAs in parallel (one per project, for example).
Generating a Certificate for Your Services
With the CA in place, we can generate a first certificate. In the command, you list all the names the certificate must cover. Domains, subdomains, wildcard entries, localhost, and IP addresses can all be mixed in the same command.
Here is an example where everything is mixed together:
mkcert app.it-connect.local "*.it-connect.local" localhost 127.0.0.1 ::1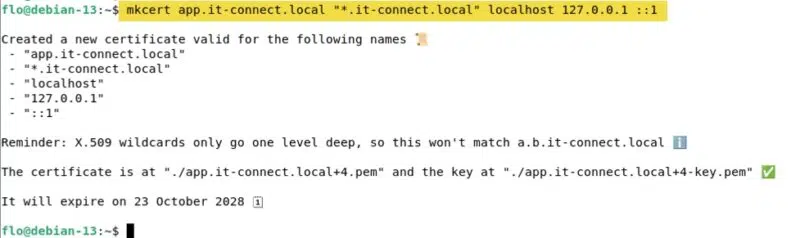
In the previous command, I protected the wildcard character with quotation marks, otherwise the shell would try to interpret it before mkcert even receives it. And keep in mind the warning displayed by the tool: an X.509 wildcard only covers one subdomain level.
Two files are created in the current directory. The +4 suffix simply indicates that four additional names accompany the first one. The issued certificates are valid for 2 years and 3 months. If the generated filenames do not suit you, specify your own paths with -cert-file and -key-file. These options must absolutely come before the list of names:
mkcert -cert-file /etc/ssl/mkcert/app.pem -key-file /etc/ssl/mkcert/app-key.pem app.it-connect.localChecking the Certificate Contents
Before going any further, and although it is optional, you can check what the certificate actually contains, especially the subject alternative names (SANs), which are what the browser effectively checks.
openssl x509 -in app.it-connect.local+4.pem -noout -subject -issuer -dates -ext subjectAltName
If we analyze the screenshot above, we see that the OU field contains the username and hostname of the machine that created the CA, which makes it easy to identify the origin of a certificate. For more on certificate analysis, our dedicated tutorial explains how to retrieve and read the contents of an x.509 certificate with OpenSSL.
Using the Certificate with Nginx or Apache
mkcert's role is to create the CA and issue certificates. That certificate then needs to be tied to an application, and most often that means configuring a web server. Here's how to integrate them with the two most common web servers on Debian: Nginx (sudo apt update && sudo apt install nginx) and Apache2 (sudo apt update && sudo apt install apache2).
Let's start by moving the files to a suitable location and securing the private key.
Create the destination directory:
sudo mkdir -p /etc/ssl/mkcertMove the certificate and key:
sudo mv app.it-connect.local+4.pem app.it-connect.local+4-key.pem /etc/ssl/mkcert/Finally, you must restrict access to the private key to the root account only:
sudo chown root:root /etc/ssl/mkcert/app.it-connect.local+4-key.pem
sudo chmod 600 /etc/ssl/mkcert/app.it-connect.local+4-key.pem
On the Nginx side, create a dedicated site file instead of modifying /etc/nginx/nginx.conf. On Debian, virtual hosts are declared in /etc/nginx/sites-available/ and then enabled through a symbolic link in /etc/nginx/sites-enabled/. Create the configuration file:
sudo nano /etc/nginx/sites-available/app.it-connect.localThen add the configuration below. It defines a basic host, accessible over HTTPS (with HTTP redirected to HTTPS) and with the declared certificates. The web application root is tied to the /var/www/app directory and to the name app.it-connect.local. For this demonstration, I also take the opportunity to create a basic file in the web root.
server {
    listen 80;
    listen [::]:80;
    server_name app.it-connect.local;
    return 301 https://$host$request_uri;
}

server {
    listen 443 ssl;
    listen [::]:443 ssl;
    http2 on;
    server_name app.it-connect.local;

    ssl_certificate     /etc/ssl/mkcert/app.it-connect.local+4.pem;
    ssl_certificate_key /etc/ssl/mkcert/app.it-connect.local+4-key.pem;

    root /var/www/app;
    index index.html;
}
All that remains is to enable the site, check the syntax, and reload the service.
Enable the site by creating the symbolic link:
sudo ln -s /etc/nginx/sites-available/app.it-connect.local /etc/nginx/sites-enabled/Verify the configuration before applying it and reload the service:
sudo nginx -t
sudo systemctl reload nginx
The default site shipped with the installation also listens on port 80, but it does not interfere with our virtual host because the domain name is correctly matched by the server_name directive. Once that is done, you can test it!
On the Apache side, first enable the SSL module, then declare the virtual host in a file whose .conf extension is mandatory:
sudo a2enmod ssl
sudo nano /etc/apache2/sites-available/app.it-connect.local.conf
Add this to the configuration file:
<VirtualHost *:443>
    ServerName app.it-connect.local
    DocumentRoot /var/www/app

    SSLEngine on
    SSLCertificateFile    /etc/ssl/mkcert/app.it-connect.local+4.pem
    SSLCertificateKeyFile /etc/ssl/mkcert/app.it-connect.local+4-key.pem
</VirtualHost>
Save it. Enable the site, then check the configuration before reloading the service.
sudo a2ensite app.it-connect.local
sudo apache2ctl configtest
sudo systemctl reload apache2
Port 443 is listened to by the ports.conf file as soon as the SSL module is active, so nothing needs to be added on that side.
Finally, create the site root if it does not exist (and create a basic index for the website if needed):
sudo mkdir -p /var/www/app
echo "<h1>IT-Connect - mkcert Demo</h1>" | sudo tee /var/www/app/index.html
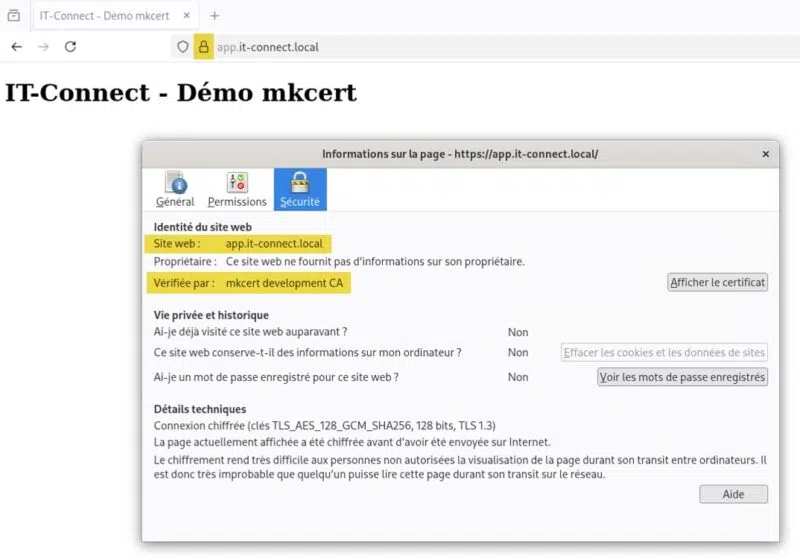
Now that your web server is configured, all that remains is to test it! To do so, access your site, for example: https://app.it-connect.local. For now, do this locally, meaning with a browser installed on the workstation where the CA was installed. The padlock should appear without the slightest warning! Here is an example:
Trusting the CA on Your Other Machines
This is where mkcert becomes truly interesting in a homelab: a single root certificate to distribute, and all of your internal services move to clean HTTPS across all your machines. That said, there are other ways to do this too. This is just one example, just as using mkcert to get a valid certificate while developing is another.
In principle, installing into a trust store does not require the CA private key. So you only need to copy rootCA.pem.
Transfer works very well over SCP, from the machine hosting the CA. In this example, the CA was created on the Debian server (192.168.220.128) and we are deploying it to a client machine on the same network (192.168.220.134):
scp "$(mkcert -CAROOT)/rootCA.pem" flo@192.168.220.134:~/mkcert-ca/Using $(mkcert -CAROOT) avoids having to remember the exact path to the directory. Note carefully that we transfer only rootCA.pem. I want to stress this: rootCA-key.pem stays on the original machine, and there is no reason for it to travel over the network.
Once the file has been copied, two options are available on the destination machine.
The first is to reuse mkcert, which means installing it on that machine as well:
sudo apt install mkcert libnss3-toolsThen you need to point CAROOT to the folder containing rootCA.pem, and then install the CA:
export CAROOT=~/mkcert-ca
mkcert -install
This is a bit heavier, but this method covers the system store, Firefox's store, Chrome or Chromium's store, and Java's store in one go. On a workstation, that is what you want.
Note: if mkcert returns ERROR: no Firefox and/or Chrome/Chromium security databases found, refer to the previous section where I mentioned the directory mismatches searched by mkcert. The system store, on the other hand, will already have been populated correctly.
The second method does not use mkcert at all and relies on tools already present on any Debian machine:
sudo cp ~/mkcert-ca/rootCA.pem /usr/local/share/ca-certificates/mkcert-homelab.crt
sudo update-ca-certificates
Nothing needs to be installed, but only the system store is populated. This is perfect for a server without a graphical interface or a container, where no browser is involved. Keep in mind that on Linux, Chrome and Chromium rely on NSS rather than the system store: this method is therefore not enough for a workstation.
A quick check confirms that the authority is properly recognized by the system:
openssl s_client -connect app.it-connect.local:443 -brief </dev/null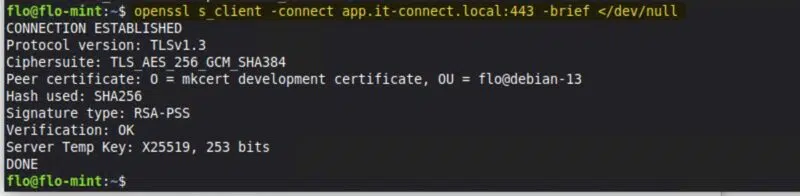
The Verification: OK line confirms that the CA was successfully taken into account. If it shows a verification error, the root certificate was not properly installed in the system store.
The Options You Will Use Day to Day
mkcert remains intentionally minimalist, but a few options are worth knowing. Remember that they must always be placed before the list of names.
| Option | Use |
|---|---|
-ecdsa | Generates an ECDSA key (P-256 curve) instead of the default 2048-bit RSA key |
-client | Produces a client authentication certificate, useful for testing mTLS |
-pkcs12 | Creates a .p12 file containing the certificate and key, expected by some Java or Windows applications |
-csr | Signs an existing certificate request, without mkcert generating the private key |
-uninstall | Removes the CA from the trust stores without deleting the files |
Conclusion
mkcert does one thing and does it well: it removes the friction from local HTTPS. Two commands are enough to get a working certificate authority and a certificate recognized both by the system and by browsers. It is easy and fast.
Even though there have been no updates for several years, the tool still works very well and remains stable today. For local testing, it can still be very useful.
To go further:
- The mkcert GitHub repository
- The mkcert Debian man page
- Our tutorial on reading the contents of an x.509 certificate with OpenSSL
- Our tutorial on getting started with Traefik and exposing your Docker services