www.it-connect.fr

Portabase: How to Centralize Database Backups with an Open Source Platform
When backing up a MySQL database, the usual reflex is to use mysqldump or a similar tool run from a script tied to a crontab. In this article, I’m going to show you a different approach based on Portabase, an open source solution. Portabase offers another model, with a centralized web interface, agents deployed as close as possible to the databases, and full management of scheduling, retention, and alerts.
Beyond the overall presentation of Portabase and its features, we’ll also see how to deploy Portabase with Docker so it can back up multiple instances. For this test, we’ll back up three different databases: a containerized MariaDB database, a containerized PostgreSQL database, and a MariaDB database hosted on a remote server.
If you’re ready, read on.
Portabase in a few words
Portabase is an open source solution for database and Docker volume backup and restore. It relies on two separate components: a dashboard that centralizes configuration and one or more agents that actually perform the operations. The dashboard never connects directly to your databases; the agents handle that part.
To install it, the best approach is to deploy the dashboard with Docker Compose (a web application with its PostgreSQL database). Then you can create an agent in the interface, retrieve its registration key, and deploy the agent container on the server that needs access to the databases. The databases declared in the agent configuration file are then automatically pulled into the dashboard. The alternative is to configure the agent directly from the web interface, which is more user-friendly.
What is Portabase?
Portabase is a backup tool specialized in databases, even though a recent update also added Docker volume backup. This open source solution is an alternative to another open source solution: Databasus. Beyond that, Portabase is a project led by Killian Larcher and Charles Gauthereau through a non-profit association, although they also manage the French company Soluce Technologies.
Portabase does not use its own backup engine. Instead, it creates logical, consistent backups by relying on each database engine’s native tools, mariadb-dump for MariaDB, pg_dump for PostgreSQL, mongodump for MongoDB, and so on.
Portabase is based on two main components:
- The dashboard for global administration and centralized information. It stores the list of agents, known databases, schedules, retention policies, storage and notification channels, as well as the job history. This application also has its own PostgreSQL database.
- The agent is a binary written in Rust. It runs on a server that has access to the databases to be backed up (or can access them) and it executes backup and restore commands.
Where there are agents, there is communication between the main server and the agents. In other words, from the agents to the dashboard. Keep in mind that the dashboard never contacts the agent. The agent regularly sends an outbound request to the dashboard, every five seconds by default (like a heartbeat). This request transmits the agent status, the list of visible databases, and the result of ongoing operations. The dashboard responds with the instructions to execute. This is a smart design, because it means there is no inbound port to open on the servers hosting your databases.
Here are a few useful links:
- Official website: portabase.io
- Documentation: portabase.io/docs
- Dashboard repository: github.com/Portabase/portabase
Supported database engines
In its current version, Portabase supports the following engines and services:
- PostgreSQL, versions 12 to 18
- MySQL, versions 5.7, 8 and 9
- MariaDB, versions 10 and 11
- MongoDB, versions 4 to 8
- SQLite 3.x
- Redis 2.8 and later
- Valkey 7.2 and later
- Firebird 3.0, 4.0 and 5.0
- Microsoft SQL Server 2017, 2019, 2022 and Azure SQL
- Docker volumes, with Docker Engine 20.10 and later
One limitation to be aware of: restore is not available for Redis and Valkey. These two engines can be backed up, but restoration must be done manually. Note the support for Microsoft SQL Server (which can also run outside Windows) and Docker volumes.
Object hierarchy
The way data is organized in Portabase follows a very specific logic that I wanted to highlight. It shows that Portabase can be used to manage backups for multiple organizations from a single instance.
- Organization is the top-level container. It groups agents, users, and channels.
- The agent belongs to an organization. It carries the databases it manages.
- The database appears automatically as soon as the agent declares it.
- The project is a logical grouping of databases. It contains the settings to apply to the databases associated with it: backup policy, retention, alerting, and storage.
Installing the Portabase dashboard with Docker Compose
For the rest of this tutorial, I’ll use a Linux server running Debian 13 with Docker and Docker Compose installed. There is also a Traefik reverse proxy that I’ll use to publish the application with a TLS certificate, but that’s optional. Ideally, if you want to test this, have at least one database available to back up.
Preparing the directory structure and the .env file
Start by creating the project directory (under /opt/docker-compose/) :
sudo mkdir -p /opt/docker-compose/portabase-dashboard
cd /opt/docker-compose/portabase-dashboard
Then create the .env file that will hold all the configuration:
# Internal PostgreSQL database for the dashboard
POSTGRES_USER=portabase
POSTGRES_PASSWORD=UnMotDePasseSolide
POSTGRES_HOST=db
POSTGRES_PORT=5432
POSTGRES_DB=portabase

# Connection string used by the application
DATABASE_URL=postgresql://${POSTGRES_USER}:${POSTGRES_PASSWORD}@${POSTGRES_HOST}:${POSTGRES_PORT}/${POSTGRES_DB}?schema=public

# Main URL
PROJECT_URL=https://portabase.it-connectlab.fr

# Application secret, used to sign authentication sessions
# Generate it with: openssl rand -hex 32
PROJECT_SECRET=3b136de224248c1671a2885db2b6e1e98e4bf39c81e733eff63fb7a541f04e8e

# Disable open signup once your account is created, so afterward
#AUTH_SIGNUP_ENABLED=false

# Logging level: debug, info, warn or error
LOG_LEVEL=info
A few explanations about these variables:
- The PostgreSQL parameters are declared separately, then assembled into
DATABASE_URL. This means the password only appears once, which helps avoid mistakes. The host name is the service name in the Docker Compose file,db, notlocalhost. PROJECT_URLmust contain the exact public URL you will use to access the interface, protocol included. This value is reused in several places, notably to generate agent registration keys.PROJECT_SECRETis used for encryption. Generate a random value with this command:openssl rand -hex 32.AUTH_SIGNUP_ENABLED=falseprevents anyone from creating an account. The line is intentionally commented out for the first start, because the registration form is what allows you to create the administrator account. We’ll uncomment it right after.
Protect this file, it contains secrets:
sudo chmod 600 .envThe docker-compose.yml file
Here is the complete Docker Compose file with publication through Traefik. Portabase needs two containers: the Portabase application itself and the PostgreSQL database.
name: portabase-dashboard

services:
    portabase:
        container_name: portabase-app
        image: portabase/portabase:latest
        restart: unless-stopped
        env_file: .env
        environment:
            - TZ=Europe/Paris
        volumes:
            # Persistent dashboard data, including locally stored backups
            - ./portabase-data:/data
        depends_on:
            db:
                condition: service_healthy
        healthcheck:
            test: ["CMD-SHELL", "curl -f http://localhost/api/health"]
            interval: 30s
            timeout: 5s
            retries: 3
            start_period: 60s
        networks:
            - frontend
            - portabase-backend
        labels:
            - traefik.enable=true
            - traefik.http.routers.portabase.rule=Host(`portabase.it-connectlab.fr`)
            - traefik.http.routers.portabase.entrypoints=websecure
            - traefik.http.routers.portabase.tls=true
            - traefik.http.routers.portabase.tls.certresolver=ovhcloud
            - traefik.http.services.portabase.loadbalancer.server.port=80

    db:
        container_name: portabase-pg
        image: postgres:17-alpine
        restart: unless-stopped
        volumes:
            - ./postgres-data:/var/lib/postgresql/data
        environment:
            - POSTGRES_DB=${POSTGRES_DB}
            - POSTGRES_USER=${POSTGRES_USER}
            - POSTGRES_PASSWORD=${POSTGRES_PASSWORD}
        healthcheck:
            test: ["CMD-SHELL", "pg_isready -U ${POSTGRES_USER} -d ${POSTGRES_DB}"]
            interval: 10s
            timeout: 5s
            retries: 5
        networks:
            - portabase-backend

networks:
    frontend:
        external: true
    portabase-backend:
        internal: true
Since Traefik is being used, no port is exposed directly on the Portabase container. The dashboard container listens on port 80 internally, hence the loadbalancer.server.port=80 in the Traefik labels. If you prefer to expose the application directly, without a reverse proxy, replace the labels with ports: - "8887:80", which is the port used in the official documentation (use whatever you want on the left side).
The portabase-backend network is declared internal: true. Docker then assigns it neither a default route nor a masquerade rule, which fully isolates portabase-pg: the database has no Internet access and can only be reached from containers on the same network. The dashboard, however, is attached to both networks, so it keeps outbound access through frontend.
But what if I’m not using Traefik?
Here is the Docker Compose file without the Traefik labels and with the port exposed instead. You can use it as a base.
name: portabase-dashboard

services:
    portabase:
        container_name: portabase-app
        image: portabase/portabase:latest
        restart: unless-stopped
        env_file: .env
        environment:
            - TZ=Europe/Paris
        ports:
            # The container listens on port 80 internally
            - "8887:80"
        volumes:
            # Persistent dashboard data, including locally stored backups
            - ./portabase-data:/data
        depends_on:
            db:
                condition: service_healthy
        healthcheck:
            test: ["CMD-SHELL", "curl -f http://localhost/api/health"]
            interval: 30s
            timeout: 5s
            retries: 3
            start_period: 60s
        networks:
            - default
            - portabase-backend

    db:
        container_name: portabase-pg
        image: postgres:17-alpine
        restart: unless-stopped
        volumes:
            - ./postgres-data:/var/lib/postgresql/data
        environment:
            - POSTGRES_DB=${POSTGRES_DB}
            - POSTGRES_USER=${POSTGRES_USER}
            - POSTGRES_PASSWORD=${POSTGRES_PASSWORD}
        healthcheck:
            test: ["CMD-SHELL", "pg_isready -U ${POSTGRES_USER} -d ${POSTGRES_DB}"]
            interval: 10s
            timeout: 5s
            retries: 5
        networks:
            - portabase-backend

networks:
    portabase-backend:
        internal: true
When you’re ready, save the file.
Starting the Docker Compose stack
All that’s left is to bring up the Docker Compose stack, then immediately view the logs.
docker compose up -d

docker compose logs -f
Wait one or two minutes, then check the container status:
docker compose psNext, browse to your Portabase dashboard address. For me: https://portabase.it-connectlab.fr. Portabase welcomes you with a setup wizard that starts by creating the first account, which automatically receives the superadmin role. Follow the steps one by one, but you can also skip this wizard quickly and do all the configuration later.
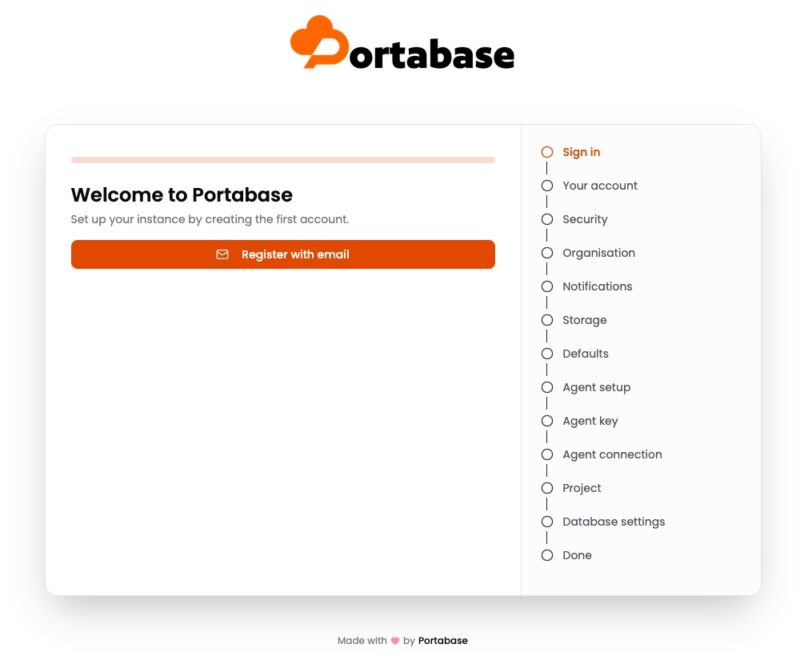
This wizard is well designed because it walks through all the steps needed to get an instance operational: account, security, organization, notification channels, storage, defaults, agent creation with its key and connection check, then a first project and database settings. If you’re not ready to do everything now, that’s fine.
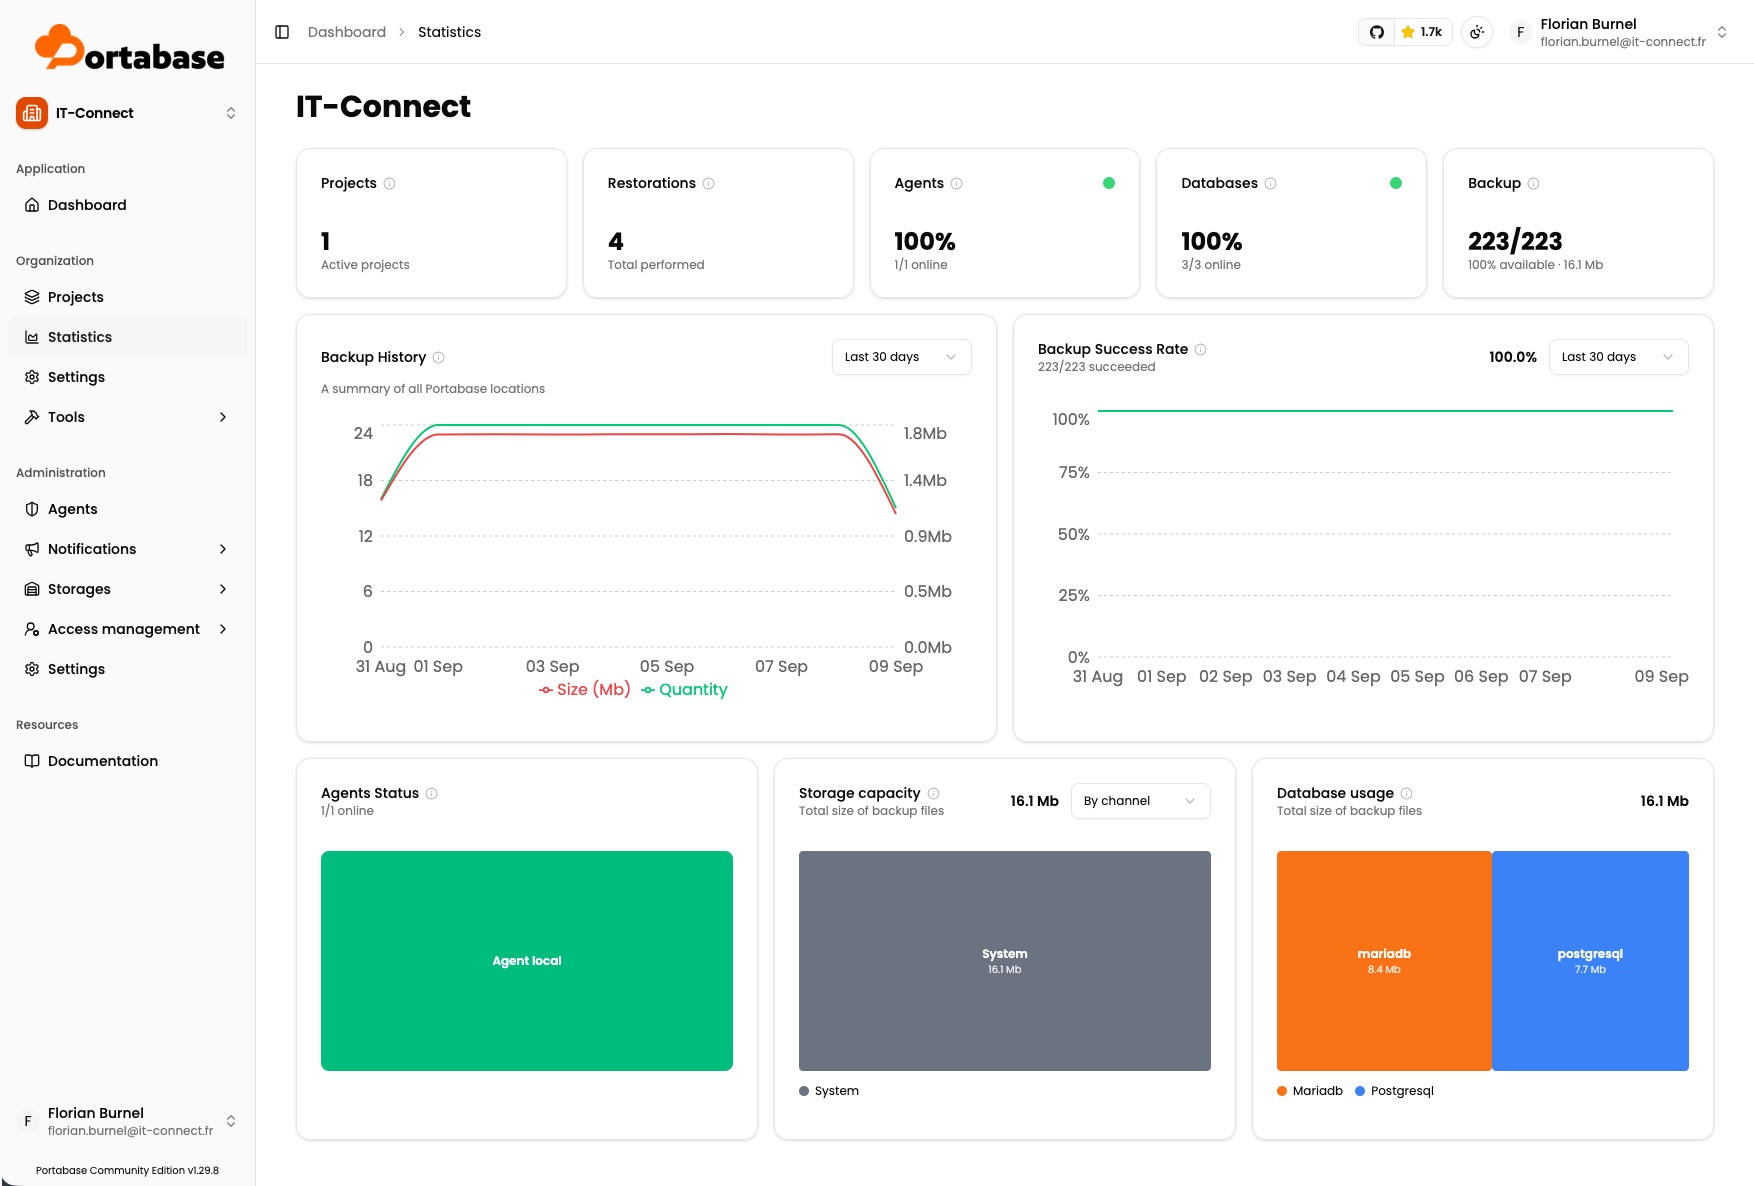
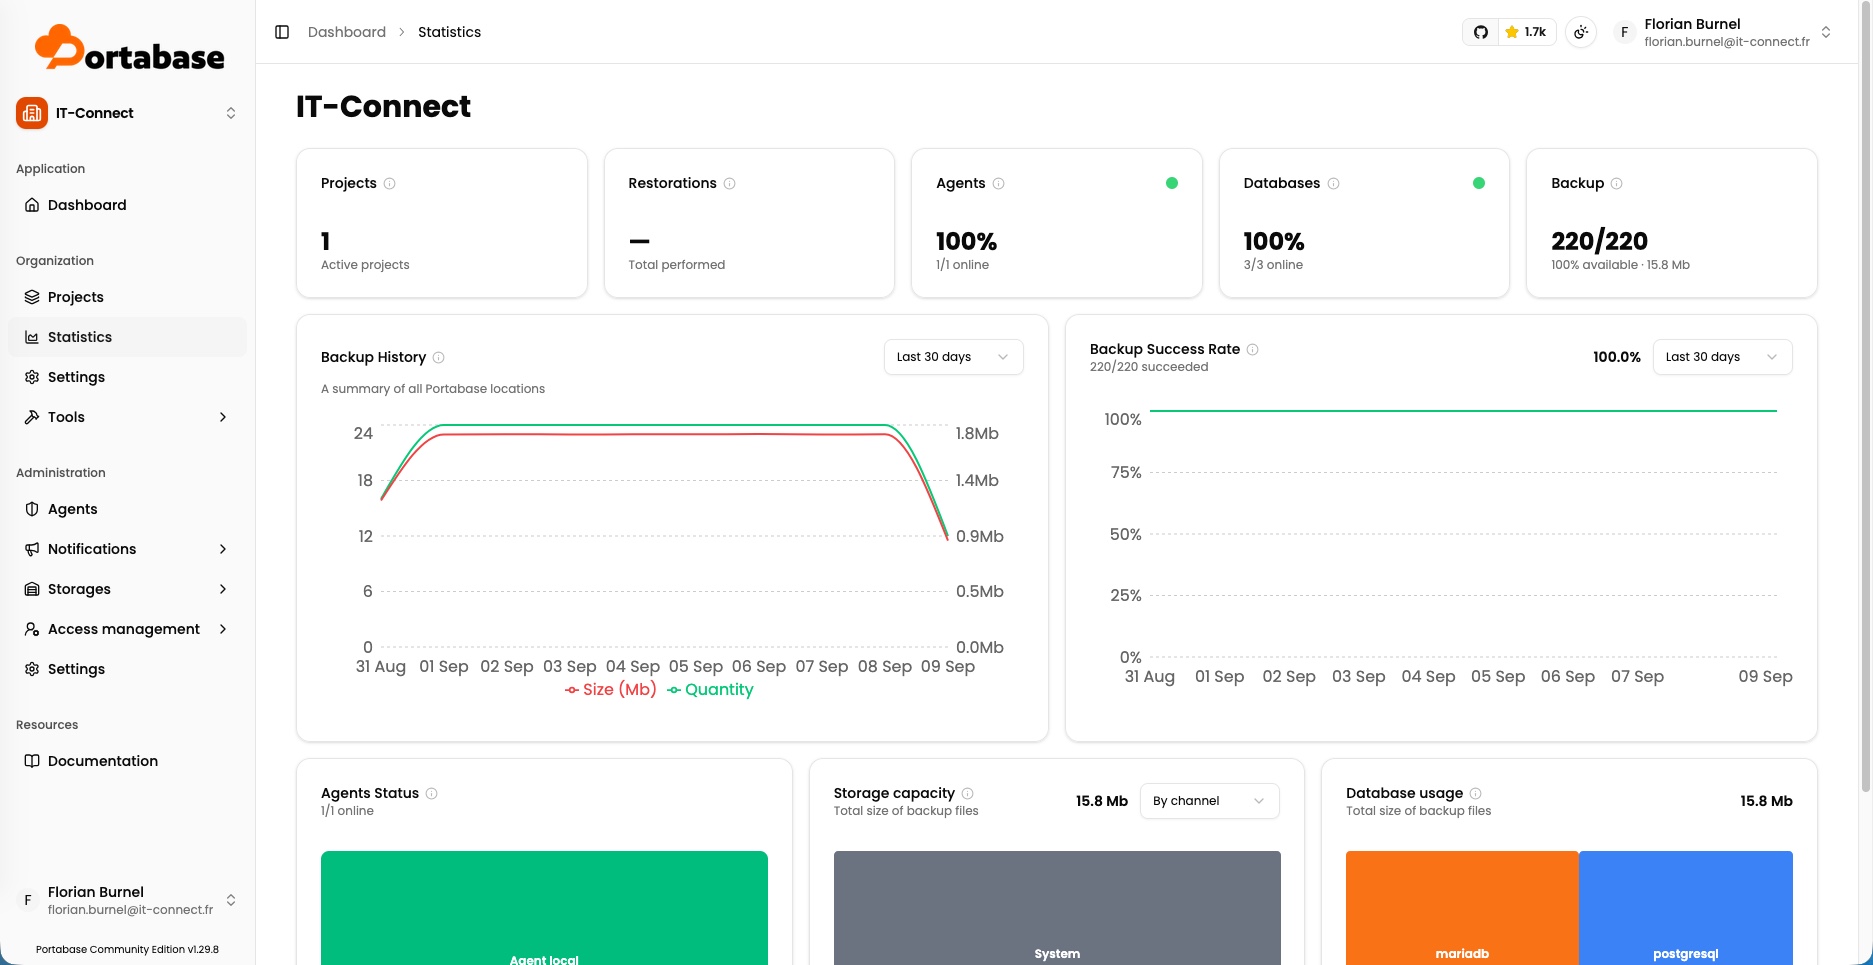
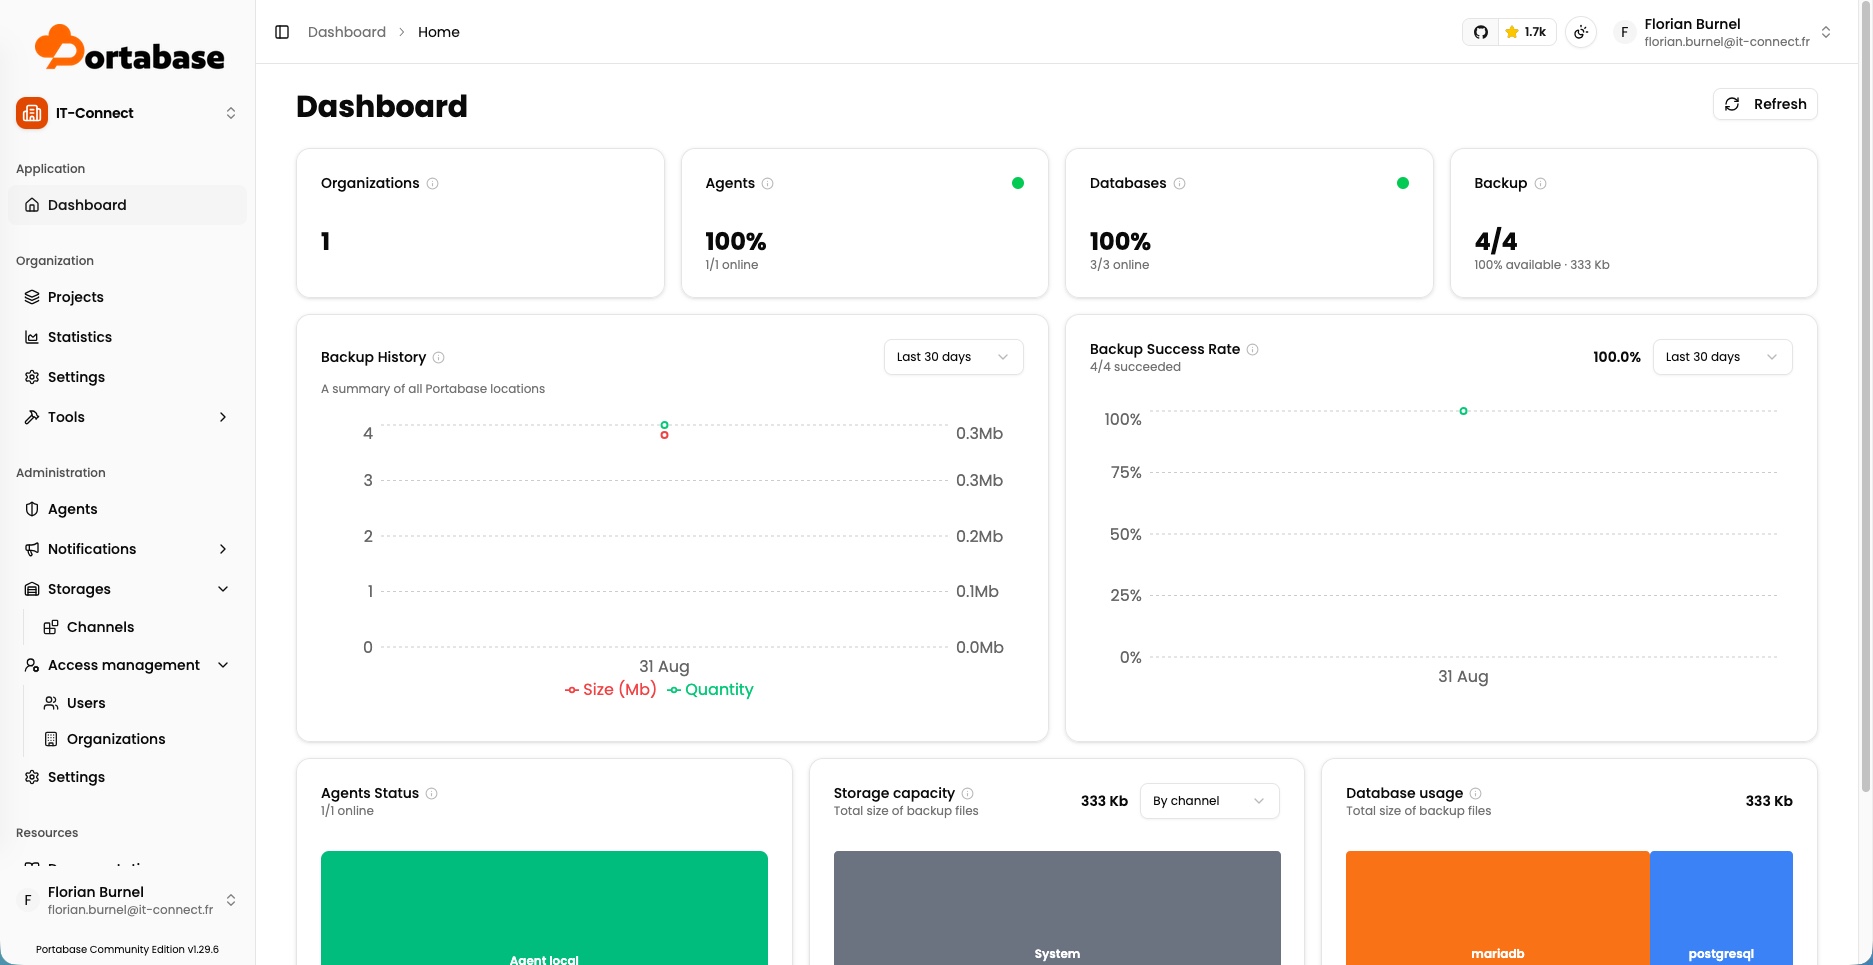
You can go through it and skip the steps that require information you don’t have yet. In any case, you eventually land on the application dashboard. The sidebar on the left lets you navigate through the different sections of the solution. At the top left, you can also select which organization to manage: each organization has its own agents, and so on. It is properly segmented.
Deploying a Portabase agent
The dashboard alone is useless. You need at least one agent, because backup and restore operations go through it. For the agent, there are several possible approaches, and they are compatible with each other since you can deploy multiple agents:
- A local agent to back up the volumes of other Docker containers or containerized databases.
- A local agent to back up remote databases.
- A remote agent that backs up a local database (it is as close as possible to the data) and communicates with the dashboard.
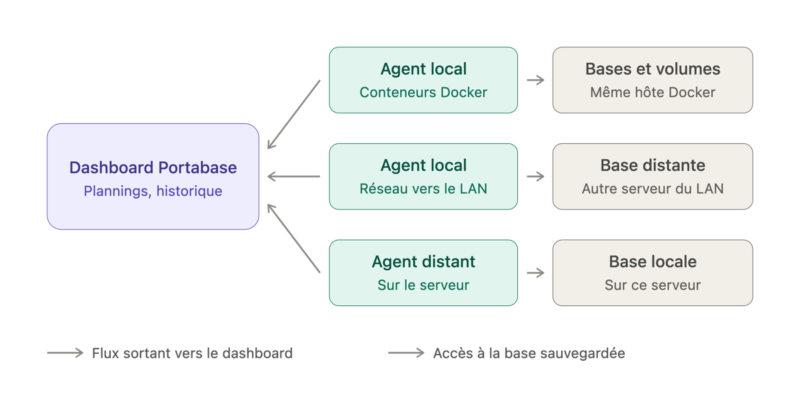
So, it is perfectly possible to deploy an agent on the same server where the Portabase dashboard is deployed. That’s exactly what I’m going to do here. This agent will be used to back up:
- A containerized MySQL database,
- A containerized PostgreSQL database,
- A MySQL database running on a remote Linux server.
Create the agent and retrieve its key
In the Portabase interface, go to Agents and create a new agent using the Create Agent button. Give it a clear name, for example the name of the server that will host it, and confirm.
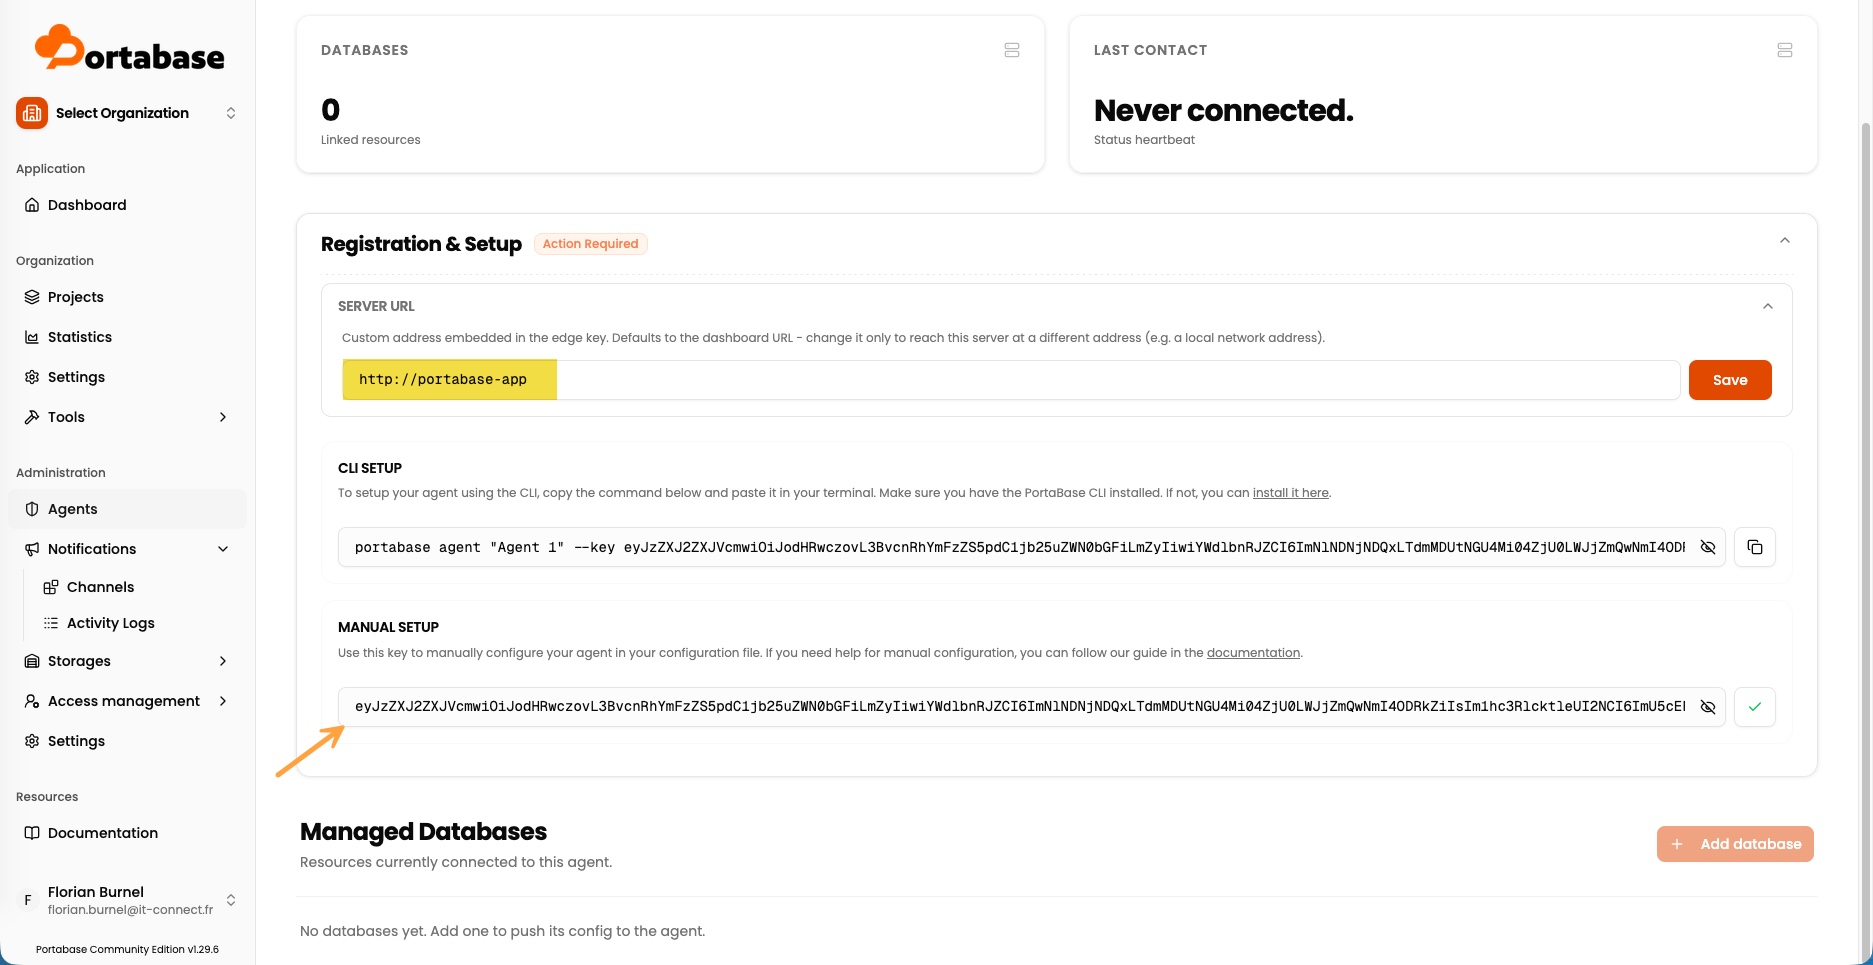
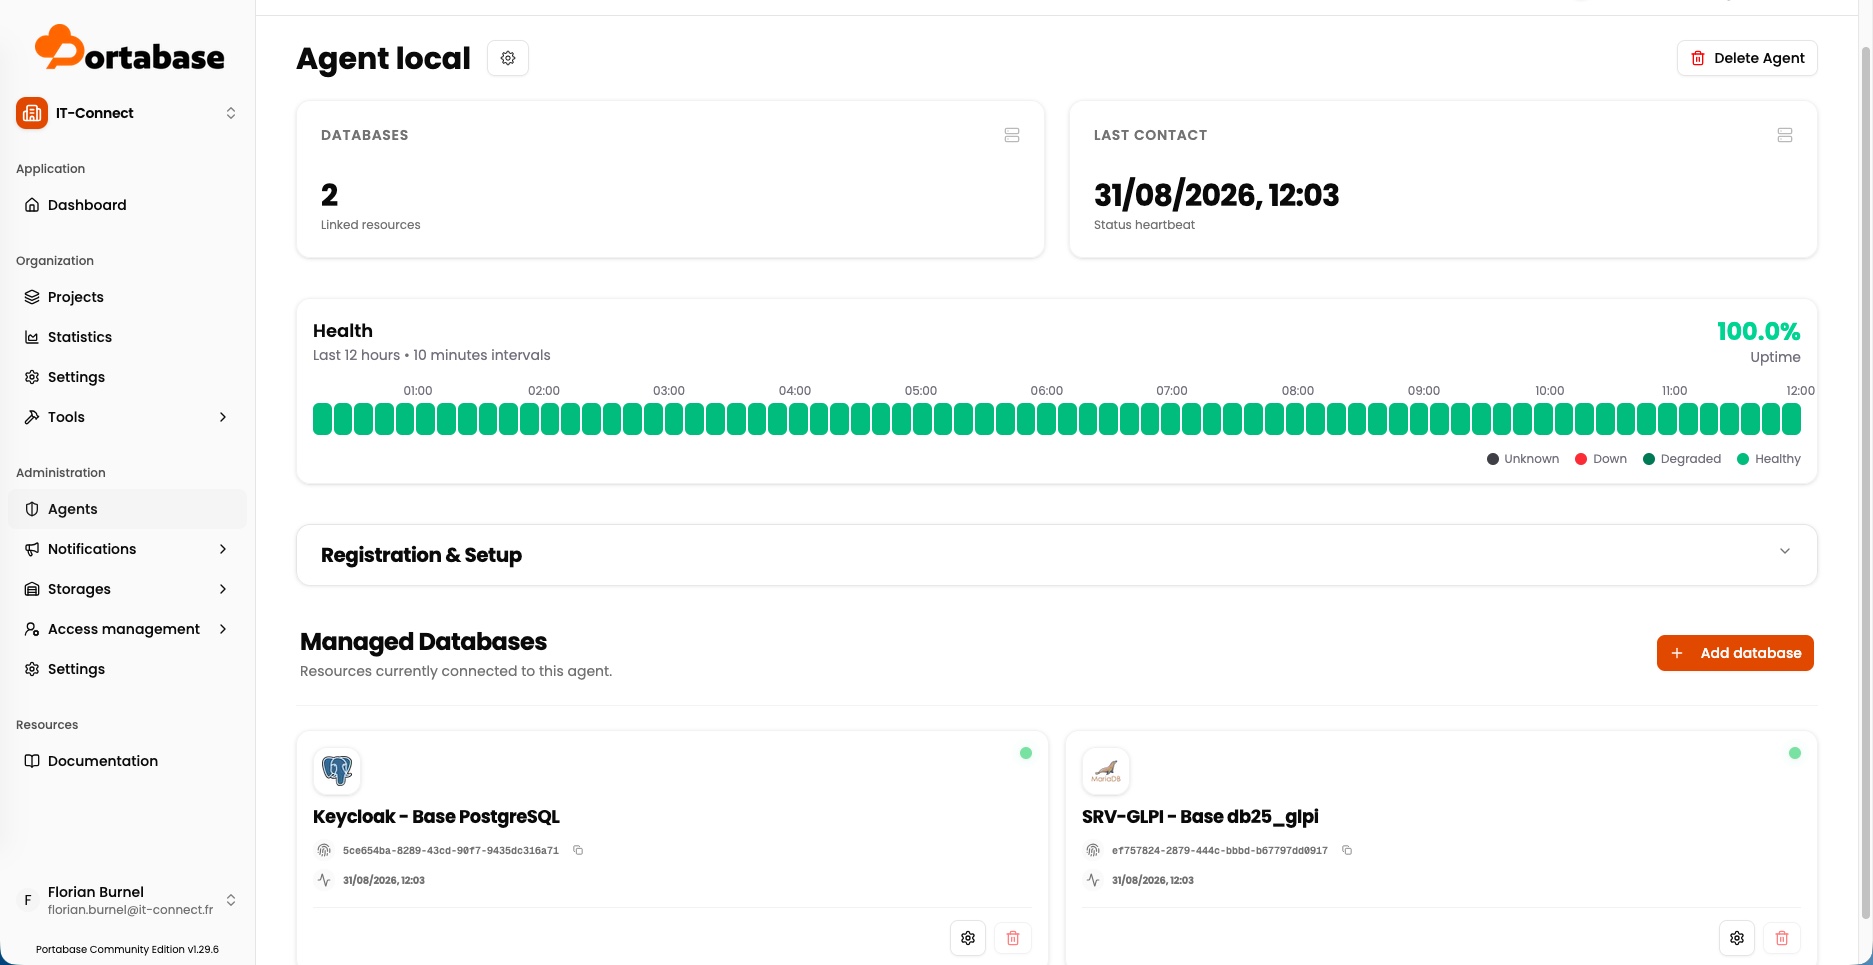
Once the agent is created, open its details page by clicking it. As long as no agent has checked in, the last contact indicator shows “Never connected” and the Registration & Setup section displays “Action Required ”. That’s normal; our agent is just an empty shell for now.
There are two registration modes:
- CLI Setup provides a ready-made command like
portabase agent "Agent 1" --key <key>, to be run on the target server after installing the Portabase CLI. It generates the configuration files for you. - Manual Setup displays the Edge Key directly, an encoded string that contains the agent ID, its encryption key, and the dashboard URL to contact. This is the value we’ll place in the
EDGE_KEYvariable of the agent container.
We’ll use the second approach, which is more explicit about what is really happening and fits a Docker Compose deployment. But before copying the value, ask yourself this question: should I adjust the SERVER URL value? In this case, the agent will be deployed on the same server as the dashboard, also via Docker, so it is valid (it matches the container name). But if the agent is remote from this server, it may be necessary to specify the full HTTPS address. That affects the key value to retrieve, so it must be adjusted beforehand.
The dedicated network for databases
If the Portabase agent needs to back up containerized databases, a networking issue now comes into play. A containerized database is almost always placed on a private network, with no port published on the host, which is good practice. The agent, which lives in its own Docker Compose project, therefore cannot reach it: two containers only see each other if they share at least one Docker network.
The obvious answer would be to attach the agent to the network of every application to be backed up. But I don’t like that... Imagine the mess if you had many applications to protect. So we are going to create a single Docker network dedicated to communication between the agent and database containers:
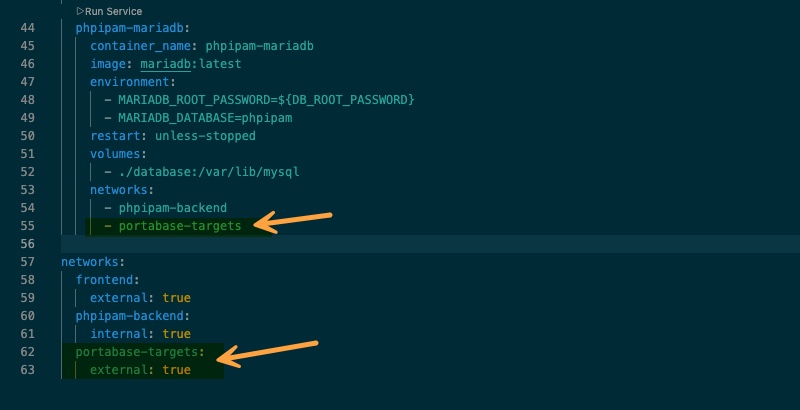
docker network create --subnet 10.200.2.0/24 portabase-targetsThis shared network avoids having to attach the agent to each application’s network. You only need to connect each database container to portabase-targets, without ever modifying the agent’s Docker Compose file.
The agent Docker Compose file
We’ll now move on to installing the agent with Docker. Create the project directory:
sudo mkdir -p /opt/docker-compose/portabase-agent
cd /opt/docker-compose/portabase-agent
The .env file contains only one line. Enter the key retrieved from the Portabase web interface here.
EDGE_KEY=eyJhZ2VudElkIjoi...And here is the docker-compose.yml file:
name: portabase-agent

services:
    agent:
        container_name: portabase-agent
        image: portabase/agent:latest
        restart: unless-stopped
        env_file: .env
        environment:
            - TZ=Europe/Paris
            - APP_ENV=production
            - LOG=info
        volumes:
            # Declaration of databases to back up
            - ./databases.json:/config/config.json
            # Only needed for Docker volume backup (up to you)
            - /var/run/docker.sock:/var/run/docker.sock
        networks:
            - frontend
            - portabase-targets

networks:
    frontend:
        external: true
    portabase-targets:
        external: true
What you need to understand:
- Mounting the Docker socket is only necessary if you plan to back up Docker volumes.
- The agent is attached to two Docker networks: the
frontendnetwork, which is my Traefik network. That is where it finds its default route and can therefore access remote servers (useful if you have remote databases to back up). It is also connected to theportabase-targetsnetwork, which is an internal network where the other database containers to be backed up will be connected.
Finally, create an empty databases.json file before the first start, otherwise the agent will stop with a configuration error:
{
  "databases": []
}
Launch the stack:
docker compose up -d
docker compose logs -f
The agent should appear online in the Portabase dashboard. If so, everything is fine. Below is an example, a little ahead of time because you can also see the attached databases. By the way, how do you attach databases to an agent?
Declaring the databases to back up
You have two options for declaring a database to back up. The agent page offers an Add database button that pushes the configuration to the agent from the web interface. You can also write the databases.json file directly on the agent server, in which case the declared databases are automatically pulled into the dashboard.
There’s nothing complicated about the first method; it’s just a web form. Here, I’ll focus on the JSON method instead. It has the advantage of being versionable, reproducible, and consistent with an infrastructure described in files.
First thing: each entry needs a unique UUID identifier, which you generate yourself:
cat /proc/sys/kernel/random/uuid

# Example:
ae6632a1-30fd-4363-a40d-fbdc648ca7b4
Assign a unique identifier to each database. This identifier must remain stable over time. It is used as the matching key with the dashboard and as the file name for archives. Changing it would make the dashboard treat it as a new database, abandoning the history and policies of the old one.
Backing up a containerized MariaDB database
Let’s take phpIPAM as an example, whose database runs in a MariaDB container on my Docker server.
First step: connect this container to the shared network. In the phpIPAM Docker Compose file, we therefore add the portabase-targets network for the MariaDB container (and only that one). That gives us:
Second step: create a dedicated backup account. Portabase’s agent must be able to authenticate against the database engine. Otherwise, it cannot back up the data. You must therefore open a MariaDB shell inside the container:
docker exec -it phpipam-mariadb mariadb -u root -pThen create a Portabase-specific account (named portabase here) and assign it a password. We also restrict access to the subnet corresponding to our Docker network.
-- Account restricted to the shared network subnet
CREATE USER 'portabase'@'10.200.2.%' IDENTIFIED BY 'MotDePasseSolide';

-- Sufficient privileges for backup
GRANT SELECT, SHOW VIEW, TRIGGER, EVENT ON phpipam.* TO 'portabase'@'10.200.2.%';

FLUSH PRIVILEGES;
Deliberately, this account can only read. Restoring from the dashboard requires additional privileges, and especially a security decision that we’ll cover in the restore section. Let’s start by getting backup working.
Third step: the entry in databases.json:
{
    "databases": [
        {
        "name": "phpIPAM - Base MariaDB",
        "type": "mariadb",
        "database": "phpipam",
        "host": "phpipam-mariadb",
        "port": 3306,
        "username": "portabase",
        "password": "MotDePasseSolide",
        "generated_id": "ae6632a1-30fd-4363-a40d-fbdc648ca7b4"
        }
    ]
}
The host field contains the container name, and port is the internal port. No port needs to be published on the host. You’ll also notice that I specified the MariaDB username created earlier as well as the unique UUID (generated_id).
You can verify the connection before restarting the agent by using the client bundled in its image:
docker exec -it portabase-agent mariadb-admin \
  --host phpipam-mariadb --port 3306 --user portabase --password ping
Restart the agent so it loads the new version of the JSON file:
cd /opt/docker-compose/portabase-agent
docker compose restart agent
Backing up a containerized PostgreSQL database
The principle is the same for Keycloak, with a few PostgreSQL-specific details. The goal here is to back up a second database, but one based on a different engine.
After connecting the keycloak_postgres container to the portabase-targets network, create the role:
docker exec -it keycloak_postgres psql -U postgres-- Account dedicated to Portabase
CREATE ROLE portabase WITH LOGIN PASSWORD 'MotDePasseSolide2';
-- The predefined pg_read_all_data role is enough for pg_dump
GRANT pg_read_all_data TO portabase;
-- Permission to connect to the target database
GRANT CONNECT ON DATABASE keycloak TO portabase;Then add the corresponding entry in the agent’s JSON file. Here is the complete file with both databases.
{
    "databases": [
        {
        "name": "Keycloak - Base PostgreSQL",
        "type": "postgresql",
        "database": "keycloak",
        "host": "keycloak_postgres",
        "port": 5432,
        "username": "portabase",
        "password": "MotDePasseSolide2",
        "generated_id": "5ce654ba-8289-43cd-90f7-9435dc316a71"
        },
        {
        "name": "phpIPAM - Base MariaDB",
        "type": "mariadb",
        "database": "phpipam",
        "host": "phpipam-mariadb",
        "port": 3306,
        "username": "portabase",
        "password": "MotDePasseSolide",
        "generated_id": "ae6632a1-30fd-4363-a40d-fbdc648ca7b4"
        }
    ]
}
Restart the Portabase agent or wait for the next step to complete.
Backing up a database on a remote server
The Portabase agent does not need to be installed on the machine hosting the database. For all network-accessible engines, it can work remotely. Only SQLite, which requires file access, and Docker volumes, which require access to the local daemon, require installation on the host itself.
However, where the agent runs has an impact on connections and their source addresses. If the agent is local to the host running the database engine, the connection will be made via localhost. If it is remote, as here, that means two things: your database instance must accept remote connections and the connection must be allowed through the local firewall. If you choose in production a scenario like the one shown in this article (remote agent relative to the database), prefer a secure TLS connection between the agent and the database engine.
In this example, we use a GLPI database hosted on a Debian server at 172.18.0.4. This is a remote server relative to the agent.
On the GLPI server side, MariaDB must first listen beyond the loopback interface:
sudo nano /etc/mysql/mariadb.conf.d/50-server.cnfYou must adjust the following directive:
# Listen on the internal network interface, not on all interfaces
bind-address = 172.18.0.4
Restart and verify the configuration:
sudo systemctl restart mariadb
sudo ss -tlnp | grep 3306
Then restrict access in the local firewall (optional — depends on whether you have one in place or not). The address to allow is the Docker host that runs the agent, because outbound traffic from containers is masked behind the host’s address:
sudo ufw allow from 172.16.0.4 to any port 3306 proto tcp
sudo ufw status numbered
Then create the MySQL account, restricted to that same address (mysql -u root -p to open a shell):
CREATE USER 'portabase'@'172.16.0.4' IDENTIFIED BY 'MotDePasseSolide3';
GRANT SELECT, SHOW VIEW, TRIGGER, EVENT ON db25_glpi.* TO 'portabase'@'172.16.0.4';
FLUSH PRIVILEGES;
And we finish with the entry in the agent’s databases.json file. Here is the complete file with the three databases.
{
    "databases": [
        {
        "name": "SRV-GLPI - Base db25_glpi",
        "type": "mariadb",
        "database": "db25_glpi",
        "host": "172.18.0.4",
        "port": 3306,
        "username": "portabase",
        "password": "MotDePasseSolide3",
        "generated_id": "ef757824-2879-444c-bbbd-b67797dd0917"
        },
        {
        "name": "Keycloak - Base PostgreSQL",
        "type": "postgresql",
        "database": "keycloak",
        "host": "keycloak_postgres",
        "port": 5432,
        "username": "portabase",
        "password": "MotDePasseSolide2",
        "generated_id": "5ce654ba-8289-43cd-90f7-9435dc316a71"
        },
        {
        "name": "phpIPAM - Base MariaDB",
        "type": "mariadb",
        "database": "phpipam",
        "host": "phpipam-mariadb",
        "port": 3306,
        "username": "portabase",
        "password": "MotDePasseSolide",
        "generated_id": "ae6632a1-30fd-4363-a40d-fbdc648ca7b4"
        }
    ]
}
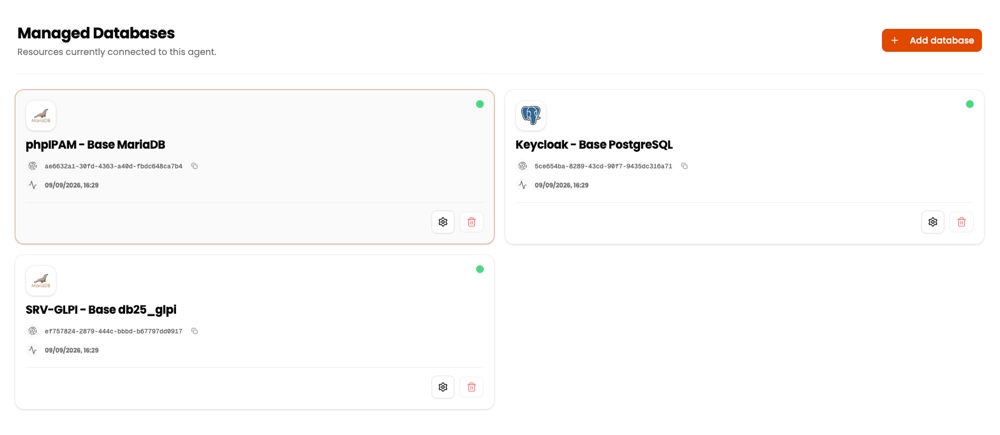
Restart the agent. The databases should now appear at the agent level:
Configuring backup storage
Backups need a destination. I’m not teaching you anything by saying that. Portabase handles this through storage channels, defined at organization level and then linked to databases. A default System channel of type local exists out of the box. Archives are then sent to the dashboard and stored in its /data volume, under uploads/backups/YYYY-MM-DD/<backup ID>. This channel has the advantage of working immediately, but it stores backups on the same server as the tool that orchestrates them.
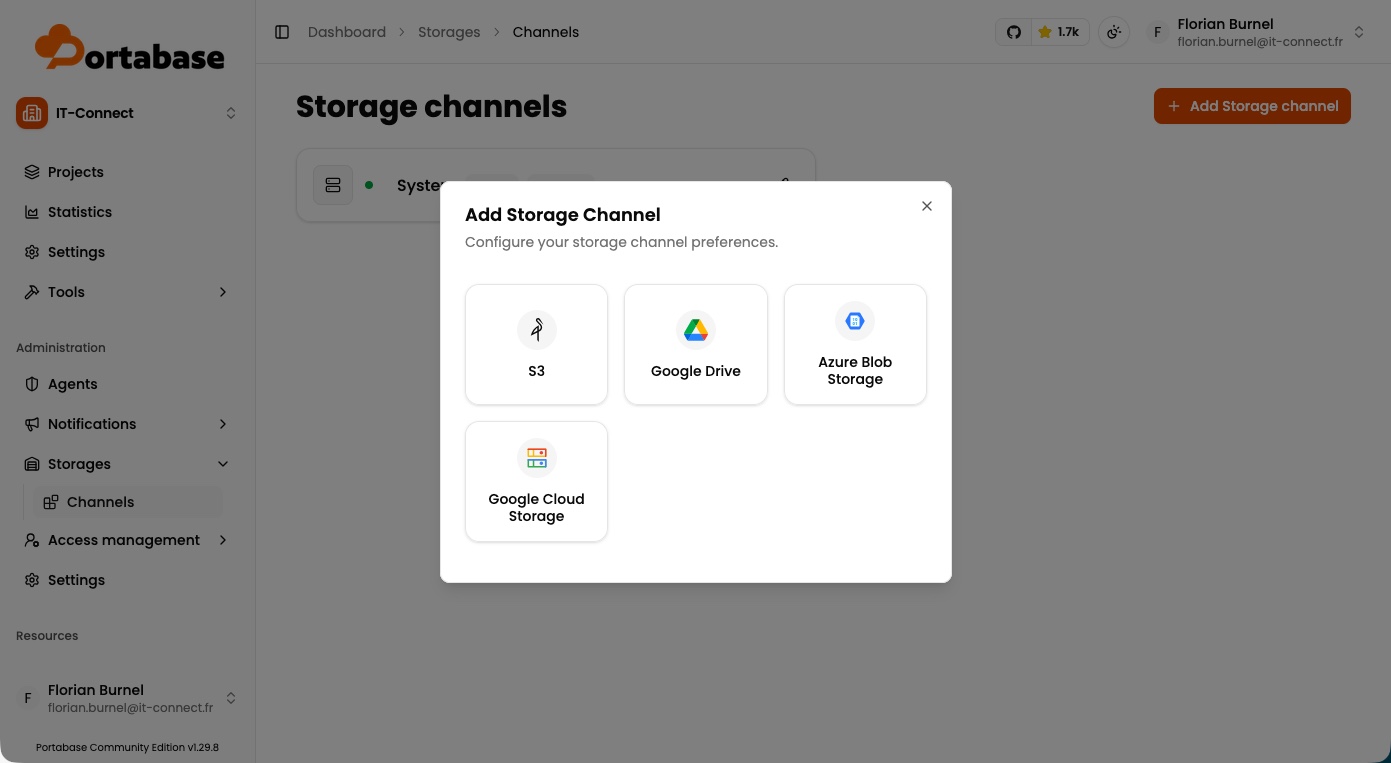
To add an external destination, go to Storages then Channels. Four types are available:
- S3, compatible with Amazon S3, Scaleway, Wasabi, and other implementations of the protocol
- Google Drive
- Azure Blob Storage
- Google Cloud Storage
You also decide which storage spaces are available to each organization.
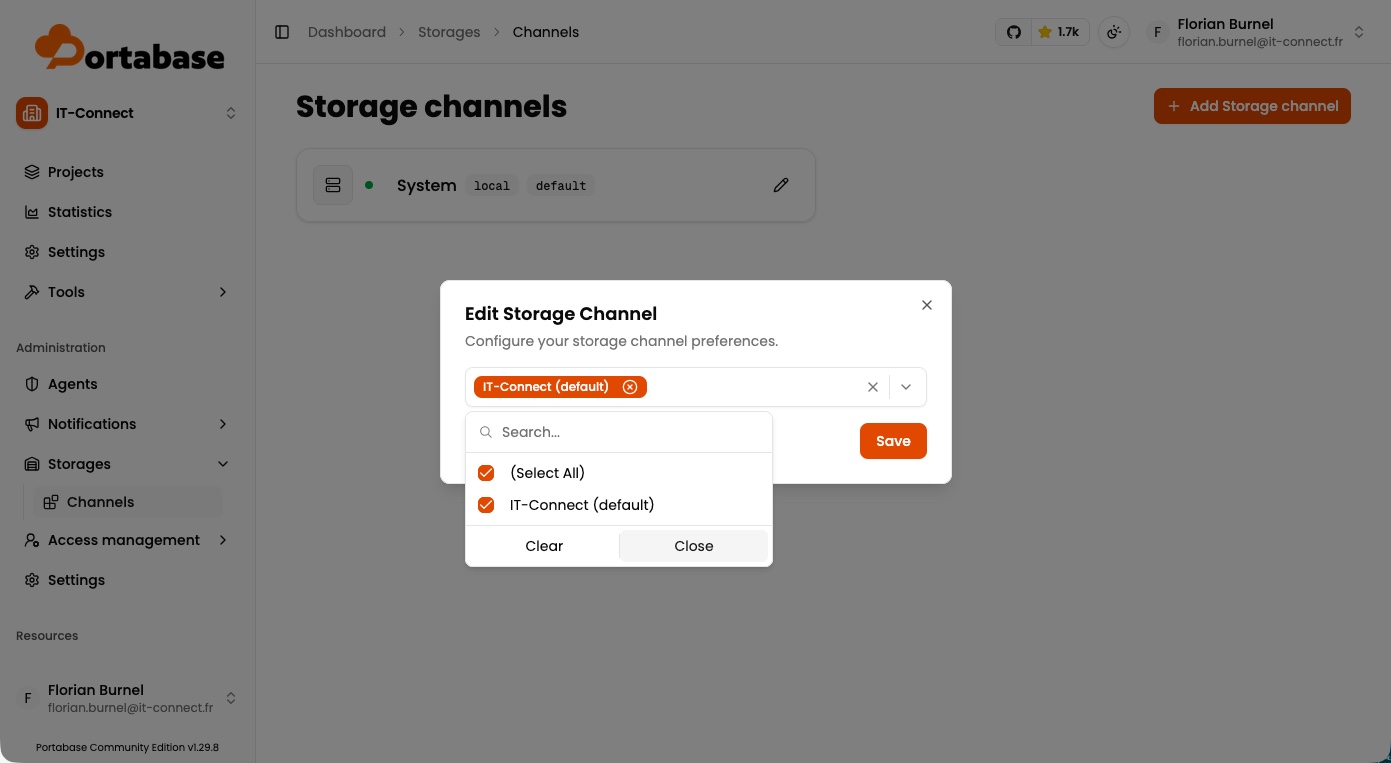
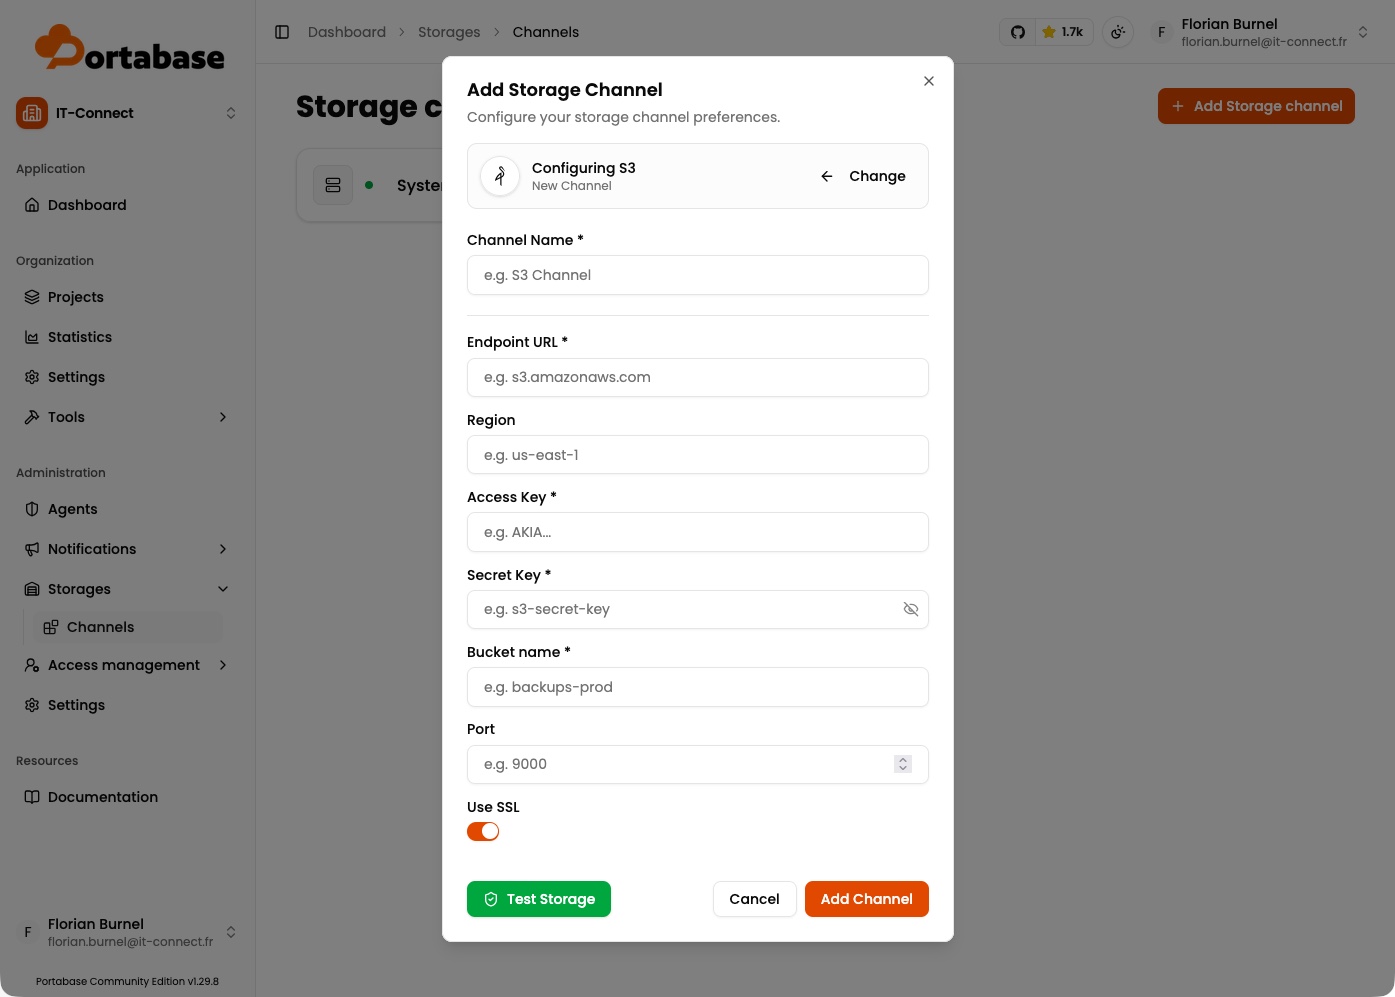
S3 storage gives you a lot of freedom, since you can target Amazon as well as any compatible implementation, including a self-hosted S3 solution. It requires a channel name, endpoint URL, region, access key, secret key, bucket name, port, and TLS encryption handling.
Once the channel is created, associate it with your databases through a storage policy. Without that association, the backup has nowhere to write. To implement a 3-2-1 backup rule, nothing stops you from attaching several channels to the same database, for example local storage for quick restores and a remote S3 bucket for an off-site copy.
Scheduling backups and defining retention
Do not look for a menu item explicitly mentioning scheduling. There isn’t one. You need to go through projects, via the Projects section. Create a project and associate one or more databases with it: they will inherit the settings that follow.
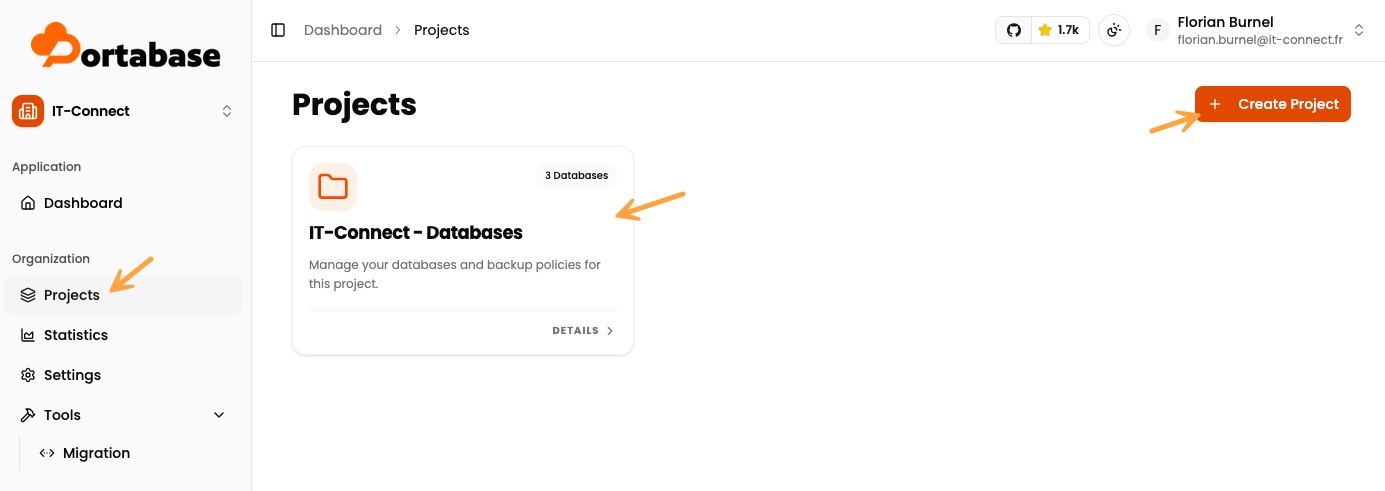
You then have several buttons to configure everything: scheduling, retention, storage, notifications, and so on.
Scheduling with cron expressions
Scheduling is configured in the Backup method window, accessible from the icon bar on the project page. A Manual / Automatic switch enables automation, then a form provides one field per cron expression component: minute, hour, day of month, month, and day of week. The resulting expression is displayed at the bottom of the window as you type, which helps avoid mistakes.
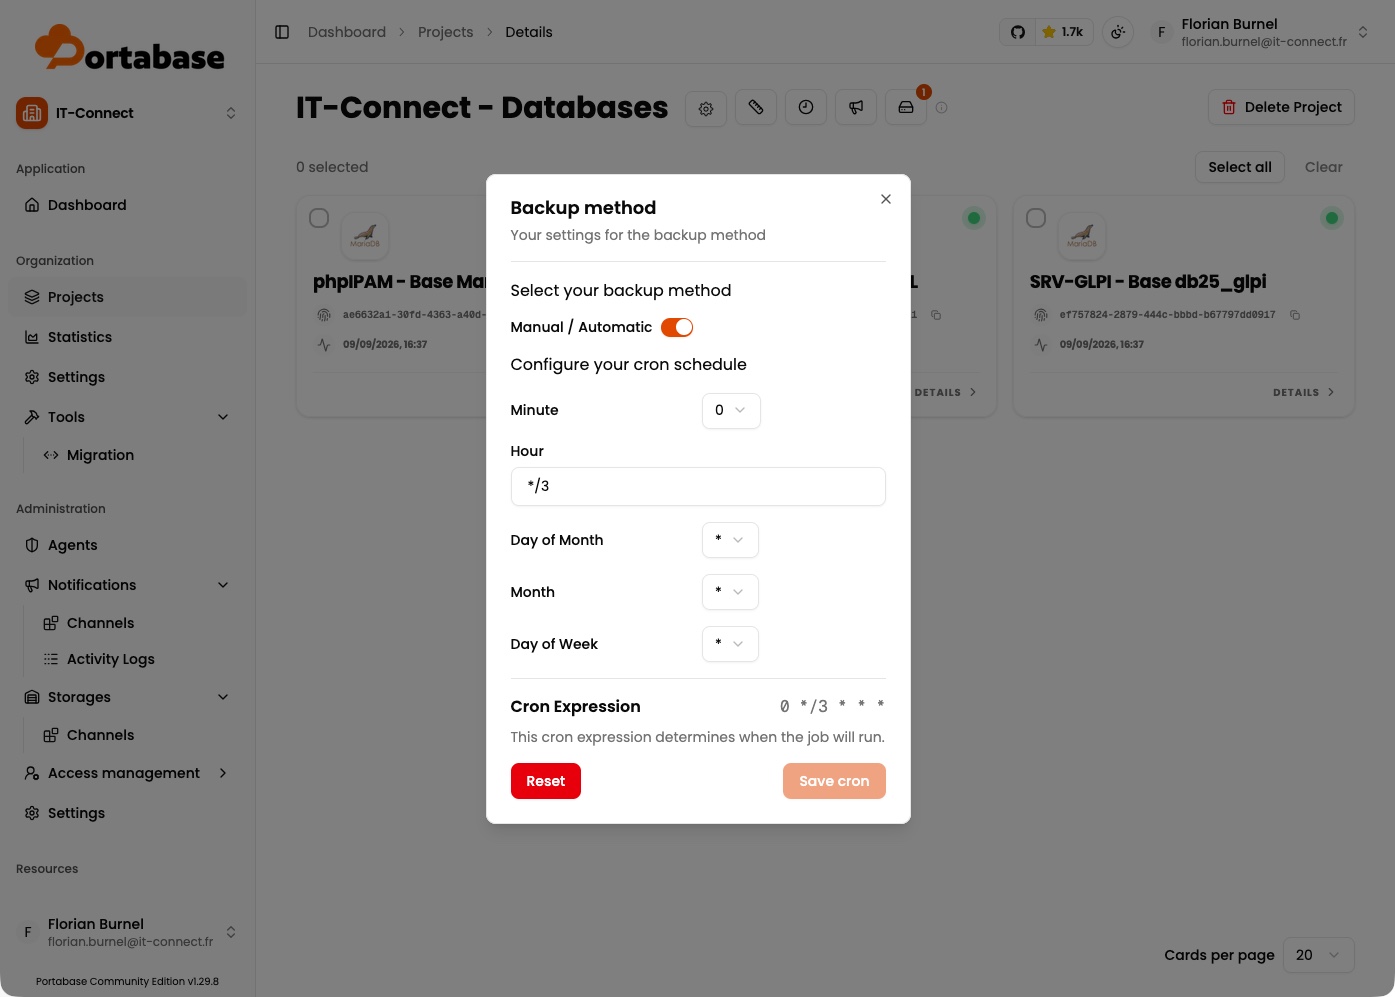
This is standard cron syntax. Here are a few examples for reference:
| Expression | Frequency |
|---|---|
0 2 * * * | Every day at 2:00 AM |
0 */3 * * * | Every 3 hours |
30 1-23/3 * * * | Every 3 hours, starting at 1:30 AM |
0 2 * * 1 | Every Monday at 2:00 AM |
0 2 1 * * | At 2:00 AM on the first day of every month |
Note: the applied time zone is the one from the dashboard container, set by the
TZvariable.
The three retention strategies
Retention is configured in the Backup Retention Policy panel, accessible from the same icon bar. Three strategies are available and they cover many needs:
- Keep last N backups keeps the N most recent backups.
- Keep backups for X days keeps all backups from the last N days, with 30 by default.
- GFS Rotation applies a grandfather-father-son rotation, with configurable daily, weekly, monthly, and yearly backups. This is recommended in production for critical databases.
A Storage Impact Summary section estimates the number of files retained per database and estimates the expected consumption (without giving an exact size).
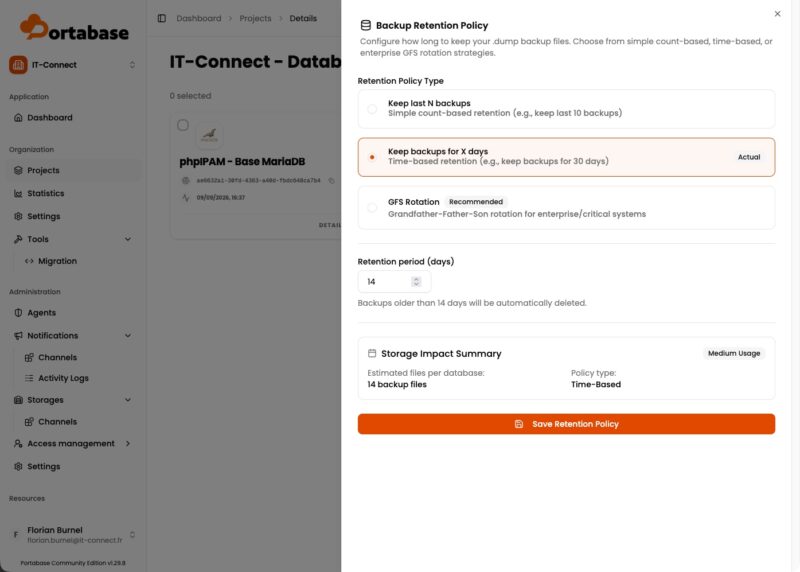
Only one retention policy can be active per database. Creating a new one replaces the previous policy.
Receiving alerts
A backup that fails silently for three weeks is worse than having no backup at all, because it creates a false sense of security. Alert configuration is therefore not optional.
Go to Notifications then Channels. Portabase offers a fairly wide range:
- Email, via the dashboard SMTP configuration
- Slack, Discord, Microsoft Teams, Nextcloud Talk
- Telegram, Gotify, ntfy.sh, Pushover
- Generic webhook and Apprise
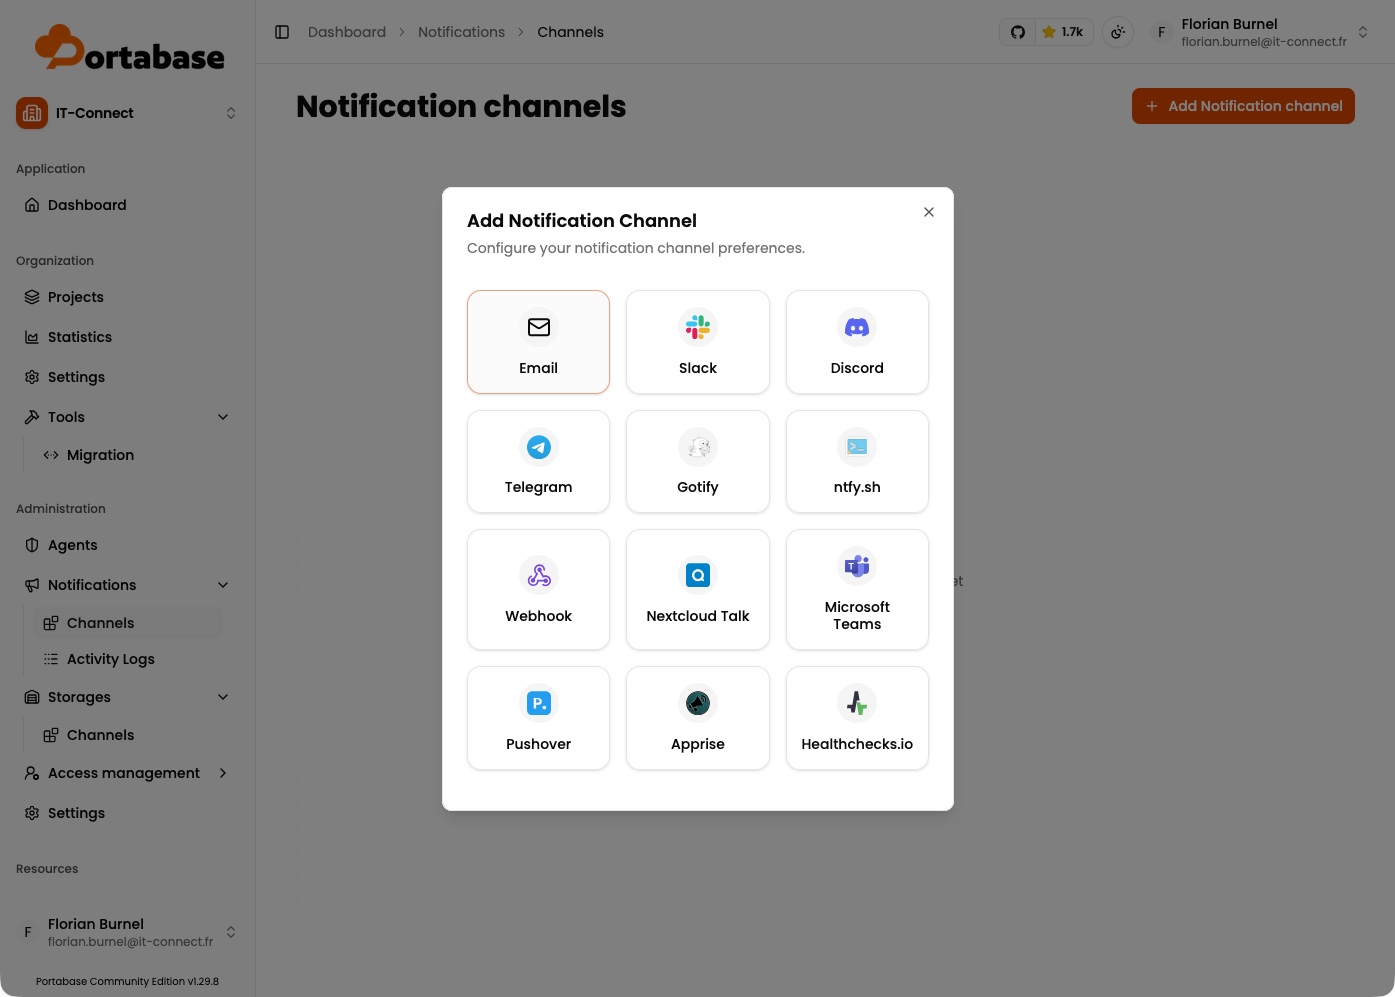
Once the channel is created, associate it with your databases through an alert policy (in a project), targeting at least the backup failure event. An Activity Logs section also keeps the history of sent notifications. Ideally, this should be done before you start configuring the project so you can set everything up at once. But the configuration can be edited at any time.
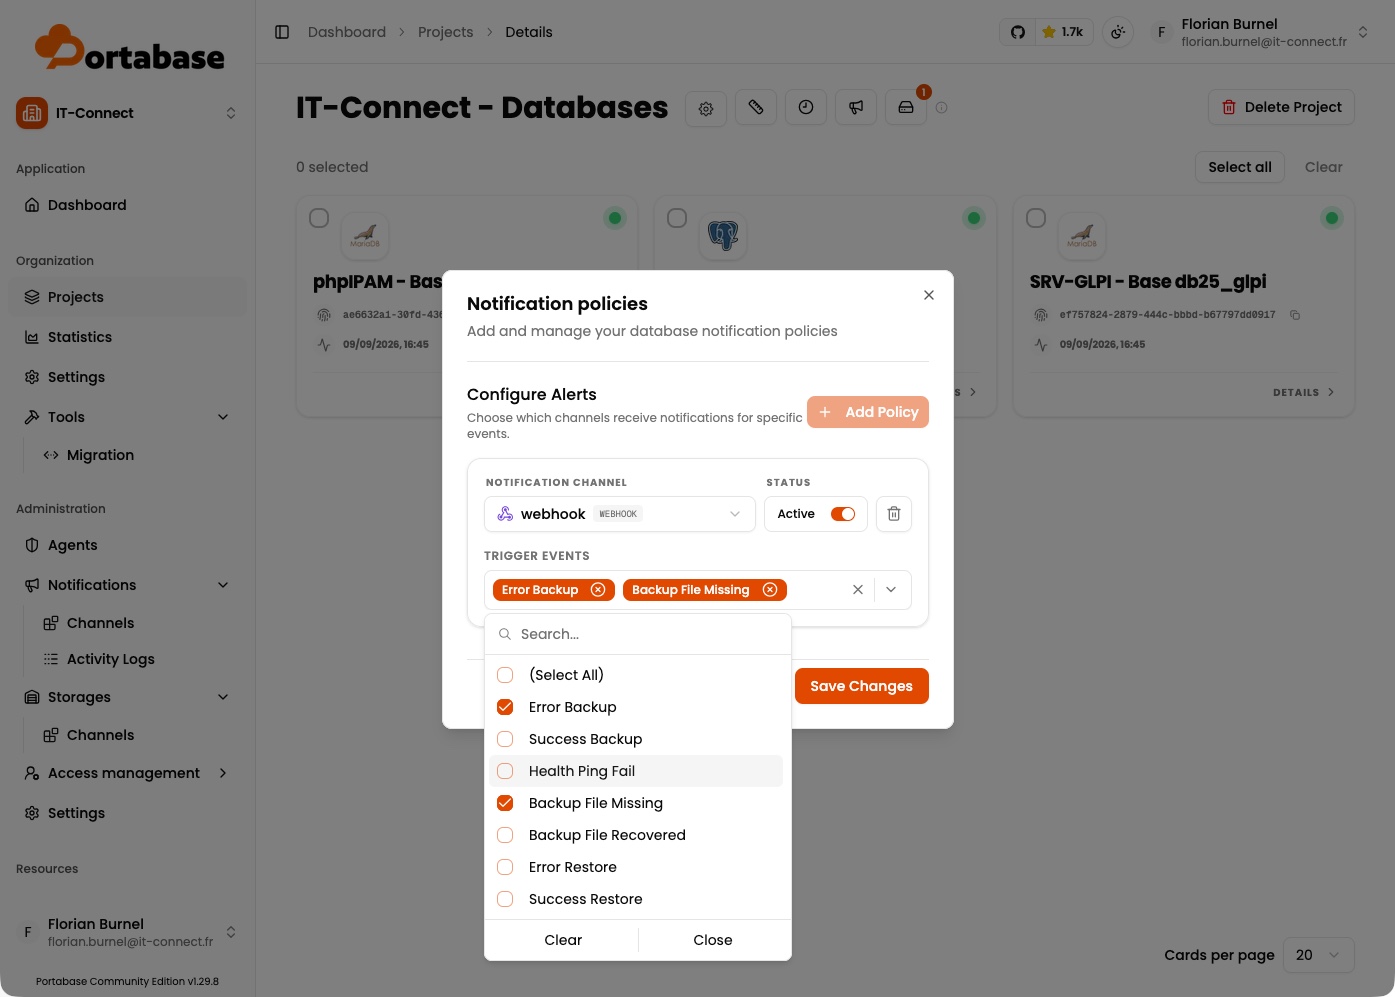
Finally, in the project, remember to also associate a destination for backup storage.
Monitoring and verifying backups
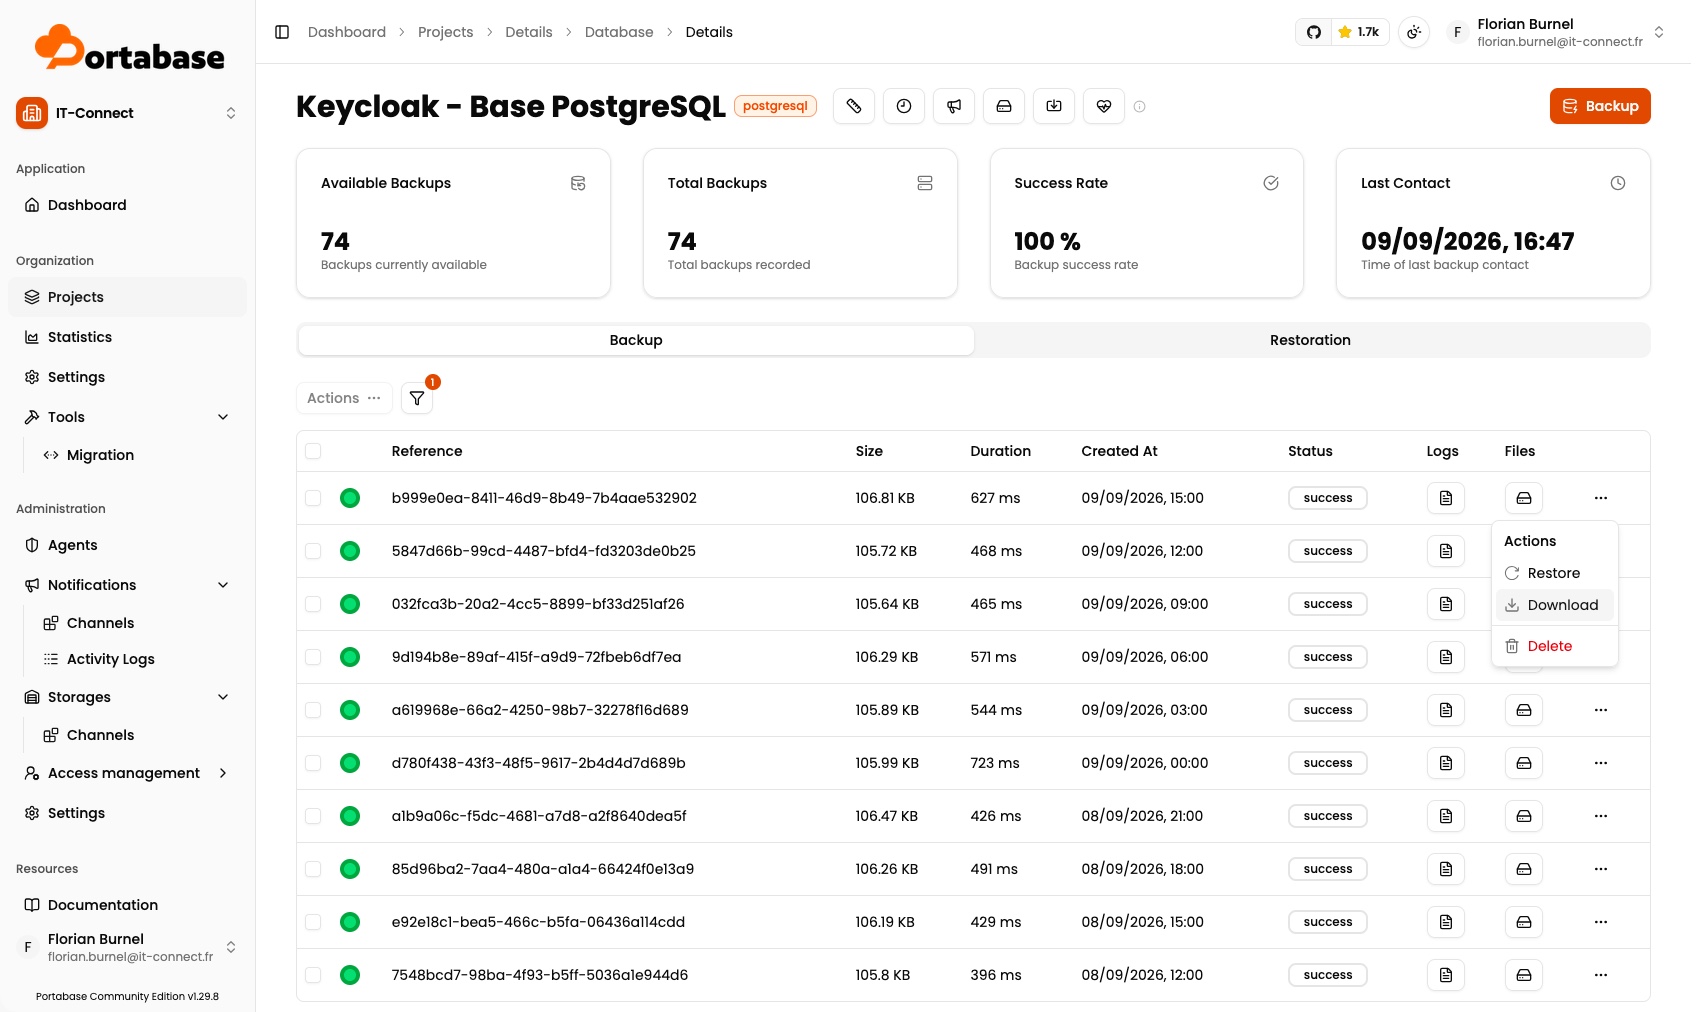
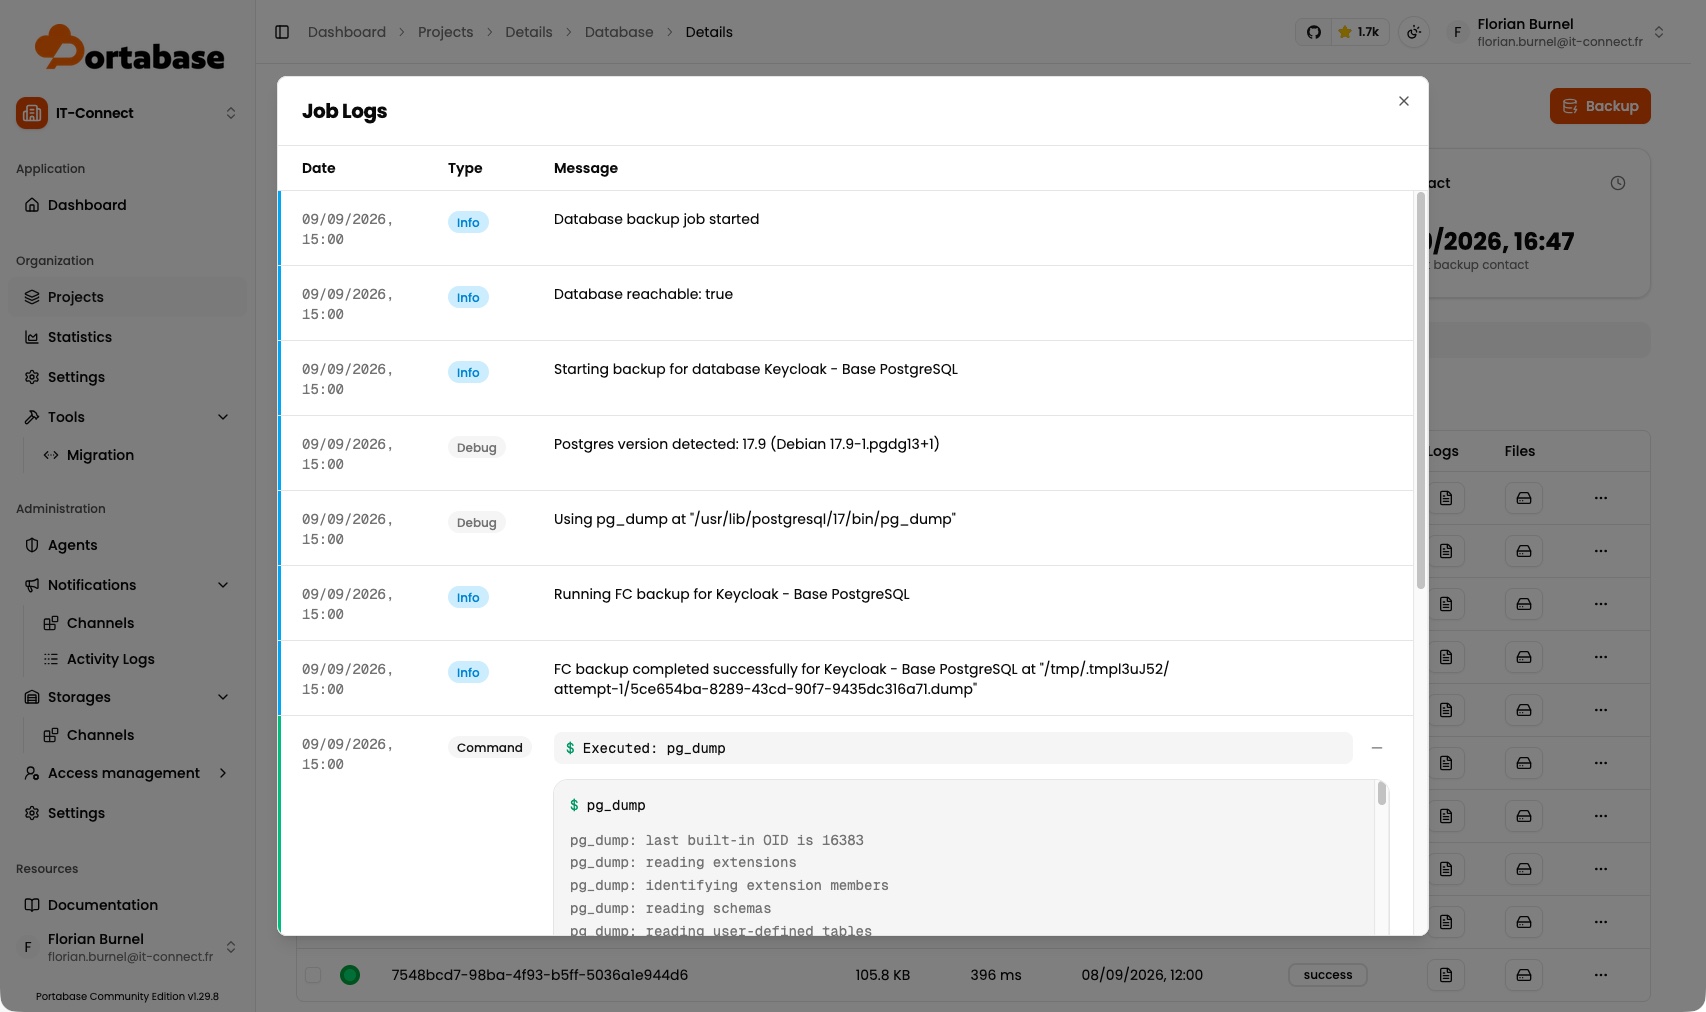
Each database has a detailed view listing all of its backups, with their reference, size, execution time, date, and status.
The log access button opens the execution details, and Portabase shows exactly what was run. It’s really good. You can see the actual command executed, its full output, its return code and duration, then each subsequent step. Essential for troubleshooting.
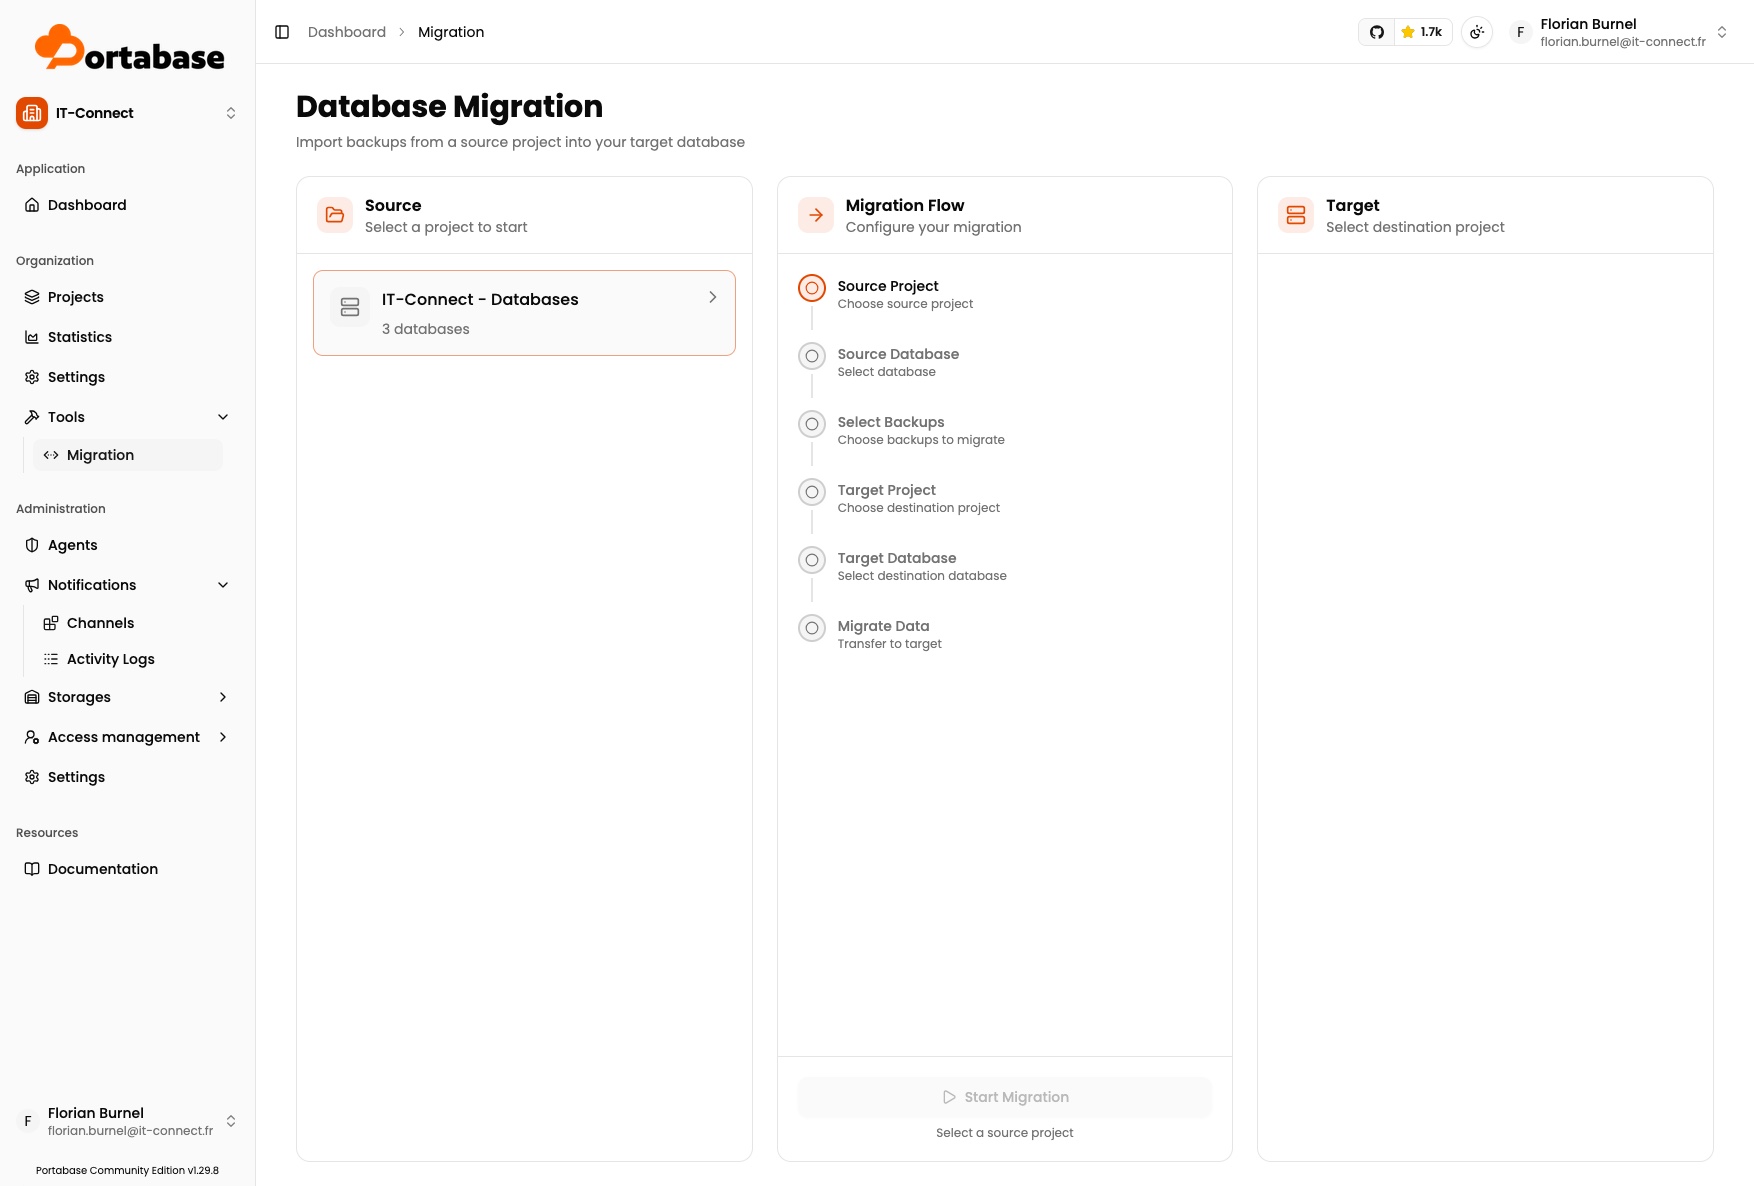
A database migration tool
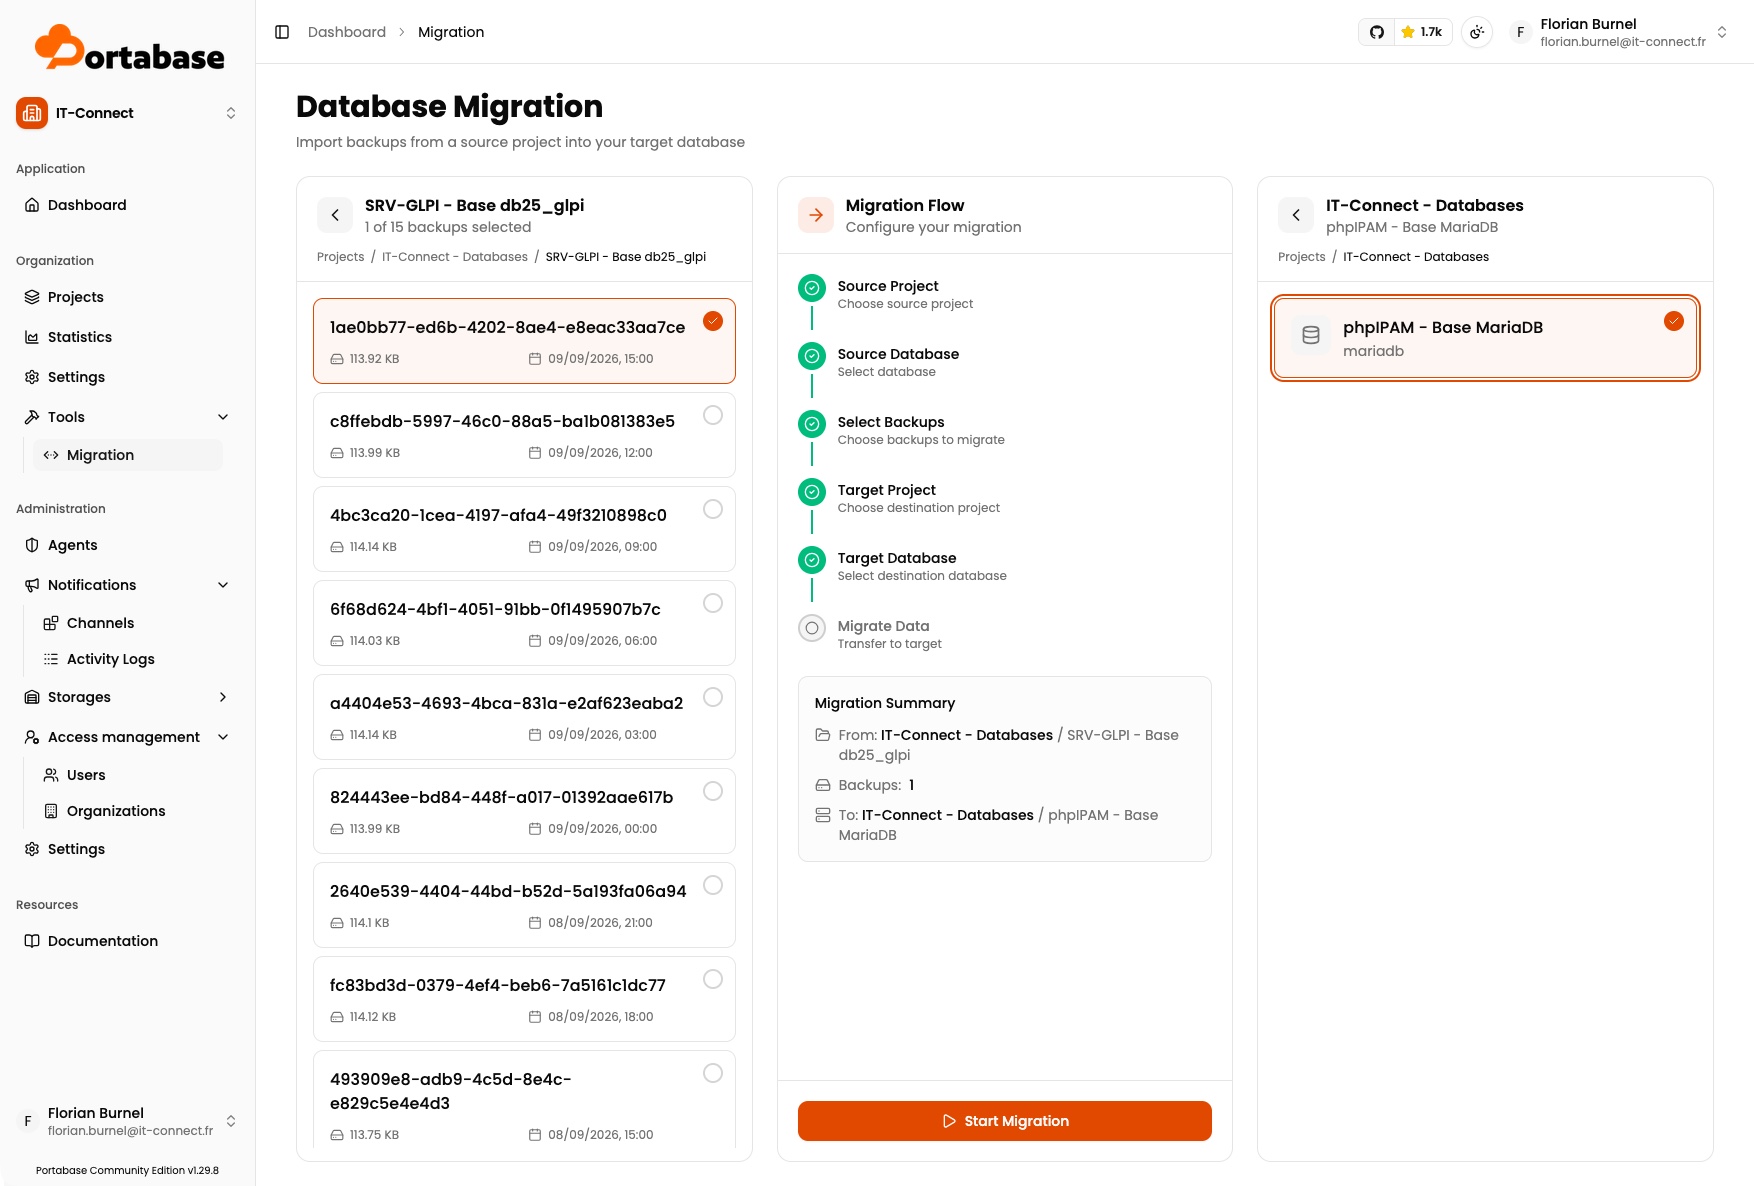
I haven’t tested it in practice, but Portabase includes a migration assistant for databases. It lets you select a source database in a project, choose one or more backups, and then inject them into a target database belonging to another project (or the same one).
Restoring a database
To finish, shall we test restoring a backup? Let’s do it. First of all, you should know that the account used by Portabase must have database creation and deletion privileges (especially DROP). If we take the example of the phpIPAM database, that would look like this (create the account properly from the start if you want restore support).
GRANT ALL PRIVILEGES ON phpipam.* TO 'portabase'@'10.200.2.%';
GRANT CREATE, DROP ON *.* TO 'portabase'@'10.200.2.%';
FLUSH PRIVILEGES;
However, MySQL cannot restrict CREATE DATABASE to a specific database name; it is a global privilege. The backup account therefore becomes capable of deleting any database in the instance, and its password is stored in clear text in the databases.json file. That has to be taken into account.
You need to make a trade-off:
- Read-only account: automated backups work, but restores are done manually.
- Account with restore rights: the dashboard button works, at the cost of a privileged account whose secret lives in clear text on the agent server.
To test this feature, I triggered the restore of a GLPI database backup from the web interface. And then nothing happened. By checking the agent logs (docker compose logs --tail 300 portabase-agent | grep -i "error|restore"), I was able to identify an access error on the address https:///portabase.it-connectlab.fr when downloading the backup, whereas my agent should be using http://portabase-app.
WARN Backup download attempt 2/3 failed: error sending request for url
(https://portabase.it-connectlab.fr/api/files/backups/...)
This is where the extra_hosts directive in the agent’s Docker Compose file comes into play. To retrieve an archive, the agent uses a download link generated by the dashboard from its PROJECT_URL, not from the custom address defined in the Server URL field. It therefore receives a public URL that it cannot resolve from its Docker network.
By mapping the public name to the host gateway, the traffic exits again through Traefik, which presents the expected certificate, and the download succeeds. If you deployed the dashboard without a reverse proxy, this line is unnecessary.
Otherwise, add these lines to the agent Docker Compose file:
name: portabase-agent

services:
    agent:
        container_name: portabase-agent
        image: portabase/agent:latest
        restart: unless-stopped
        env_file: .env
        environment:
            - TZ=Europe/Paris
            - APP_ENV=production
            - LOG=info
        volumes:
            # Declaration des bases a sauvegarder
            - ./databases.json:/config/config.json
            # Necessaire uniquement pour la sauvegarde de volumes Docker
            - /var/run/docker.sock:/var/run/docker.sock
        extra_hosts:
            - "portabase.it-connectlab.fr:host-gateway"
        networks:
            - frontend
            - portabase-targets

networks:
    frontend:
        external: true
    portabase-targets:
        external: true
The agent logs show that the restore was triggered. And most importantly, the database was successfully restored!
portabase-agent  | 2026-09-09T17:11:22  INFO Preparing restore for database SRV-GLPI - Base db25_glpi
portabase-agent  | 2026-09-09T17:11:22  INFO Starting restore for database SRV-GLPI - Base db25_glpi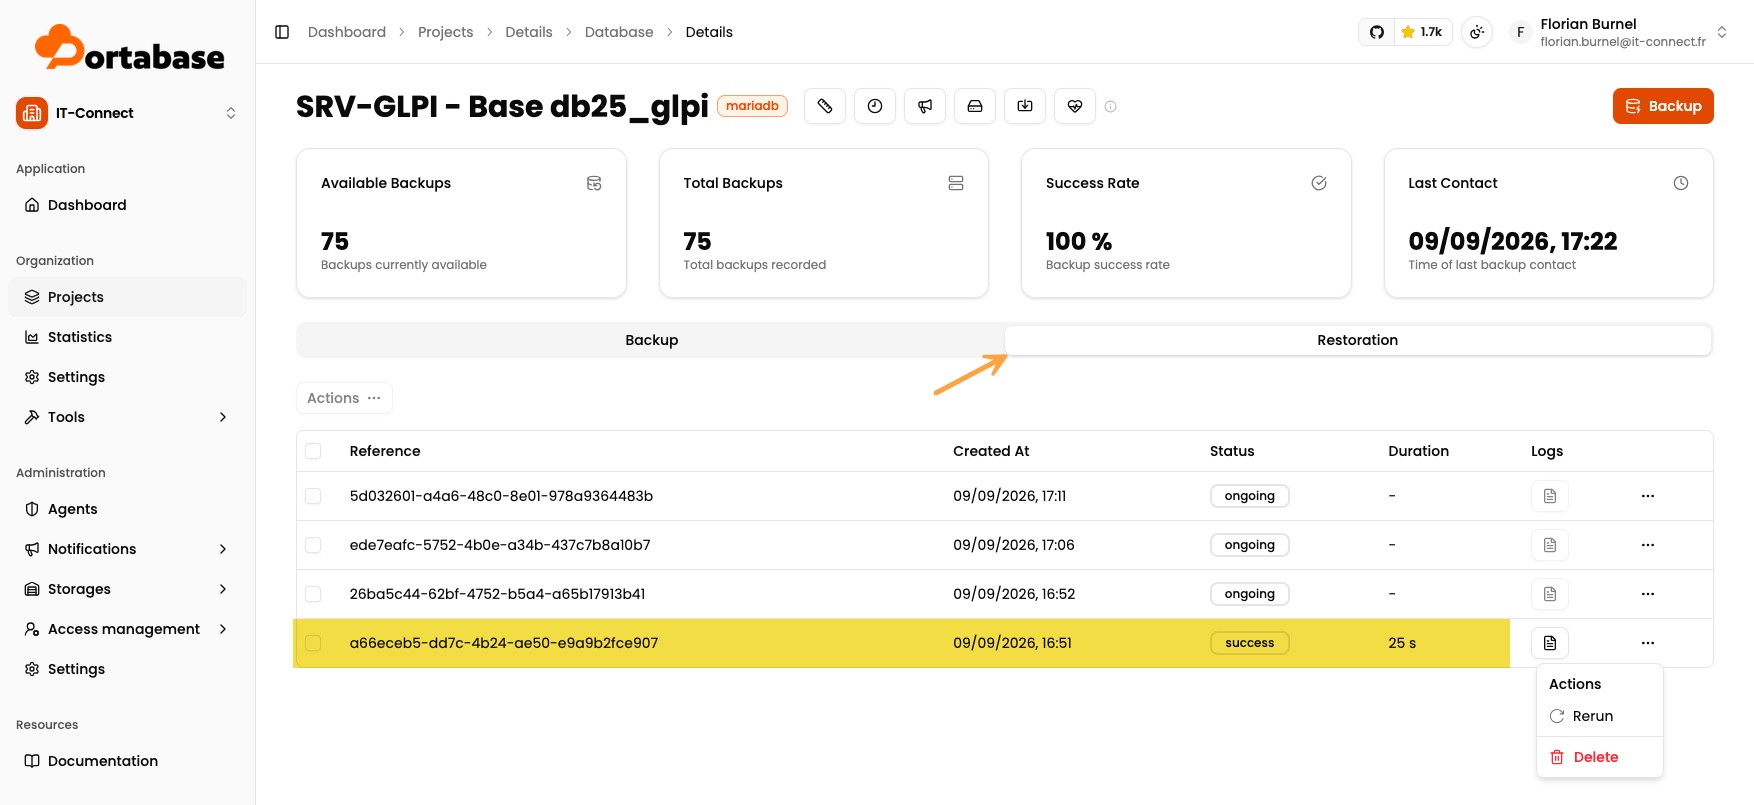
Conclusion
An open source solution we like: effective and able to meet a real need, namely centralizing database backups. Best of all, the dashboard lets you manage everything and keep an eye on the different tasks. The icing on the cake: restoring a database in just a few clicks from the Portabase interface. It’s an interesting solution that deserved to be highlighted on IT-Connect!
How do you back up your databases today?