www.it-connect.fr

How to Manage Traefik from a Web Interface with Traefik Manager
Traefik Manager is a web interface that lets you create, edit, and monitor the routes, middlewares, and certificates of your Traefik reverse proxy, without manually editing YAML files. This open source solution makes Traefik reverse proxy configuration much easier.
Traefik has become one of the most widely used reverse proxies for exposing containerized services, especially thanks to its automatic discovery through Docker labels and its TLS certificate management with Let's Encrypt. The tradeoff is that all configuration relies on files and labels. In a homelab as well as on a production server, you may sometimes need to expose an application that is not a Docker container, track certificate expiration, or get a quick overview of all your routes: this is exactly what Traefik Manager provides.
In this tutorial, we will install Traefik Manager with Docker Compose, first with a minimal version to discover it, then with a more complete setup including HTTPS access, static configuration editing, and automatic Traefik restarts. We will also review its main features: dashboard, route management, certificate tracking, route mapping, and backups.
What Is Traefik Manager?
Traefik Manager is an open source web application that sits alongside your existing Traefik instance. It does not replace Traefik or act as a substitute for it: it relies on the Traefik API to read the proxy state in real time, and it reads and writes directly to your dynamic configuration files to manage your routes.
This is the key point to understand from the start, because it affects everything else. Traefik knows several "providers": the Docker provider (routes defined by labels on your containers), the file provider (routes written in a file such as dynamic.yml), and a few others. In its current version, Traefik Manager handles the file provider.
The routes you create from its interface are written to your dynamic configuration file. Conversely, routes declared through Docker labels continue to be managed in each service's docker-compose.yml.
Traefik Manager really comes into its own when you want to expose a service that is not a Docker container (a virtual machine, a bare-metal server, a NAS, etc.), since labels are not possible in that case. For a classic Docker container, labels are still often the most direct approach.
As for features, the interface covers management of HTTP, TCP, and UDP routes, middlewares (with a very handy template system), tracking of TLS certificates generated by ACME, the list of Traefik plugins, access log reading, a Route Map, an editor for the static traefik.yml configuration, and an automatic backup system (with optional Git integration).
Requirements
Before getting started, you need the following:
- An existing Traefik instance (version 3 is used in this tutorial), with its API enabled. Traefik Manager queries this API, usually reachable at
http://traefik:8080when both containers share the same Docker network. If you are new to this reverse proxy, our complete guide to getting started with Traefik explains the setup in detail. - Docker and Docker Compose installed on the host.
- A dynamic configuration file for Traefik, even an empty one at first: this is the file Traefik Manager will manage.
- A domain name and, ideally, a certificate resolver configured in Traefik (Let's Encrypt via a DNS challenge with OVHcloud, Cloudflare, etc.) if you want to expose the interface over HTTPS.
Also prepare the directory structure under /opt/docker-compose/ (or elsewhere depending on your preference):
mkdir -p /opt/docker-compose/traefik-manager/{backups,config}Installing Traefik Manager with Docker Compose (minimal configuration)
To discover the tool without breaking anything, we start with the minimal configuration provided in the documentation. It exposes Traefik Manager directly on a host port, over HTTP, without going through Traefik. This is really the bare minimum and not suitable for production use (see the second configuration instead).
Here is the content of the docker-compose.yml file created under /opt/docker-compose/traefik-manager/:
services:
  traefik-manager:
    image: ghcr.io/chr0nzz/traefik-manager:latest
    container_name: traefik-manager
    restart: unless-stopped
    ports:
      - "5000:5000"
    environment:
      - COOKIE_SECURE=false
    volumes:
      - /path/to/traefik/dynamic.yml:/app/config/dynamic.yml
      - /path/to/traefik-manager/config:/app/config
      - /path/to/traefik-manager/backups:/app/backups
This is a good opportunity to mention a few initial parameters:
- The
5000:5000port mapping makes the interface available athttp://<SERVER_IP>:5000. This is convenient for local testing. COOKIE_SECURE=falsetells the application that it is served over HTTP. This setting must be changed totrueas soon as the interface is placed behind Traefik over HTTPS, otherwise the session cookie will not be passed.- The first volume mounts your Traefik dynamic configuration file at
/app/config/dynamic.yml. This is the file that Traefik Manager will read and modify to manage your routes. Since it is mounted at this default location, you do not need to define an additional variable to locate it. - The second volume (
/app/config) stores the configuration specific to Traefik Manager: itsmanager.ymlfile, the session secret, and application settings. - The third volume (
/app/backups) stores the automatically generated backups (for static and dynamic configurations).
Start the installation with the usual command:
docker compose up -dThis configuration is enough to start and explore the interface. However, it leaves out several useful features: HTTPS access through Traefik, static configuration editing, and restarting Traefik from the interface. We will therefore build a more complete version.
A complete configuration: HTTPS, static configuration, and automatic restart
Here is the configuration we will use for the rest of this guide. It places Traefik Manager behind Traefik over HTTPS, gives it access to the static configuration, and allows it to restart Traefik through a dedicated Docker socket proxy. Traefik Manager will be available at this address: https://traefik-manager.it-connectlab.fr.
Here is the content of the docker-compose.yml file created under /opt/docker-compose/traefik-manager/:
services:
  traefik-manager-socket-proxy:
    image: ghcr.io/tecnativa/docker-socket-proxy:latest
    container_name: traefik-manager-socket-proxy
    restart: unless-stopped
    environment:
      - CONTAINERS=1
      - POST=1
    volumes:
      - /var/run/docker.sock:/var/run/docker.sock:ro
    networks:
      - tm-socketproxy

  traefik-manager:
    image: ghcr.io/chr0nzz/traefik-manager:latest
    container_name: traefik-manager
    restart: unless-stopped
    environment:
      - COOKIE_SECURE=true
      - STATIC_CONFIG_PATH=/app/traefik.yml
      - RESTART_METHOD=proxy
      - DOCKER_HOST=tcp://traefik-manager-socket-proxy:2375
      - TRAEFIK_CONTAINER=traefik
    volumes:
      - /opt/docker-compose/traefik/config.yml:/app/config/dynamic.yml
      - /opt/docker-compose/traefik-manager/config:/app/config
      - /opt/docker-compose/traefik-manager/backups:/app/backups
      - /opt/docker-compose/traefik/traefik.yml:/app/traefik.yml
      - /opt/docker-compose/traefik/certs/ovh-acme.json:/app/acme.json:ro
      - /opt/docker-compose/traefik/logs/traefik.log:/app/logs/access.log:ro
    networks:
      - frontend
      - tm-socketproxy
    labels:
      - traefik.enable=true
      - traefik.docker.network=frontend
      - traefik.http.routers.traefik-manager-https.rule=Host(`traefik-manager.it-connectlab.fr`)
      - traefik.http.routers.traefik-manager-https.entrypoints=websecure
      - traefik.http.routers.traefik-manager-https.tls=true
      - traefik.http.routers.traefik-manager-https.tls.certresolver=ovhcloud
      - traefik.http.services.traefik-manager-https.loadbalancer.server.port=5000

networks:
  frontend:
    external: true
  tm-socketproxy:
    internal: true
Let's break down what has been added compared with the minimal version.
HTTPS exposure through Traefik. We remove the 5000:5000 port mapping in favor of Traefik labels. The router listens on the websecure entrypoint (port 443), with a certificate issued by the ACME resolver (here ovhcloud, meaning Let's Encrypt via OVH DNS challenge). The service points to the container's internal port 5000. Since access is now over HTTPS, COOKIE_SECURE is set to true.
Access to the static configuration. The volume that mounts traefik.yml into the container is paired with the variable STATIC_CONFIG_PATH=/app/traefik.yml. This is important: mounting the file alone is not enough. Without this variable, those features will not be available in the Traefik web interface. It tells Traefik Manager where to find your static configuration. Note that traefik.yml is mounted read-write (no :ro), so that the file can be edited later.
Restarting Traefik through a Docker socket proxy. The static configuration editor can restart Traefik after a change, provided it has a way to act on the container. Instead of exposing the Docker socket directly to Traefik Manager, we insert a dedicated docker-socket-proxy. Its CONTAINERS=1 and POST=1 variables allow only the bare minimum at the API level: listing containers and sending a restart request. It has no access to images, exec, or volumes. Traefik Manager reaches it via DOCKER_HOST=tcp://traefik-manager-socket-proxy:2375, and the RESTART_METHOD=proxy variable enables this method. Finally, TRAEFIK_CONTAINER=traefik must exactly match the name of your Traefik container, otherwise the connection will not be properly established between the two services.
Important reminder: this proxy-based approach limits Docker socket exposure: even if the interface were compromised, an attacker would not gain full control over the Docker daemon. The tm-socketproxy network is declared internal: true, which cuts it off from the Internet and reserves it for communication between the two containers. The Docker socket proxy principle and its security benefits are explained in more detail in our article Docker: Improve Security with a Docker Socket Proxy.
Monitoring volumes. Three additional mounts feed the monitoring tabs: the acme.json file (read-only) for certificate tracking, and the access log (access.log) for the Logs tab. Make sure the file you mount as access.log is indeed Traefik's access log (declared through accessLog: in your traefik.yml) and not the application log. For deeper analysis of these access logs, a dedicated open source tool such as Traefik Log Dashboard can complement Traefik Manager (see our article Traefik Log Dashboard).
This architecture, based on three containers if we also count Traefik, works as follows:

Save the file and start the installation with the usual command:
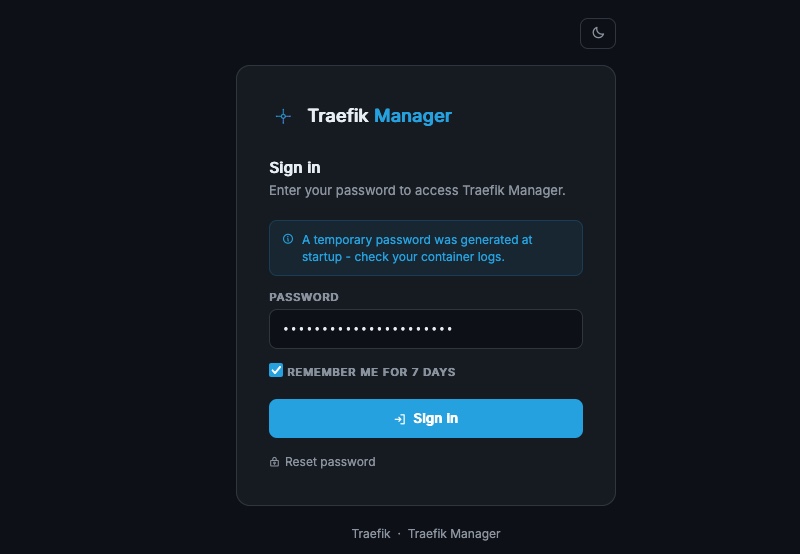
docker compose up -dConnect to the Traefik Manager web interface (for example https://traefik-manager.it-connectlab.fr), and you should land on this page:
First Start and Setup Wizard
Once the stack is started, Traefik Manager generates a temporary password on first launch. You can retrieve it from the container logs:
docker logs traefik-managerThe logs display the temporary password to use for the first login. Here is an example:
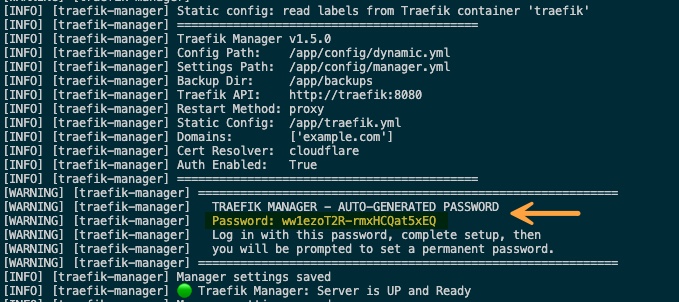
Enter the password to authenticate and access the setup wizard.
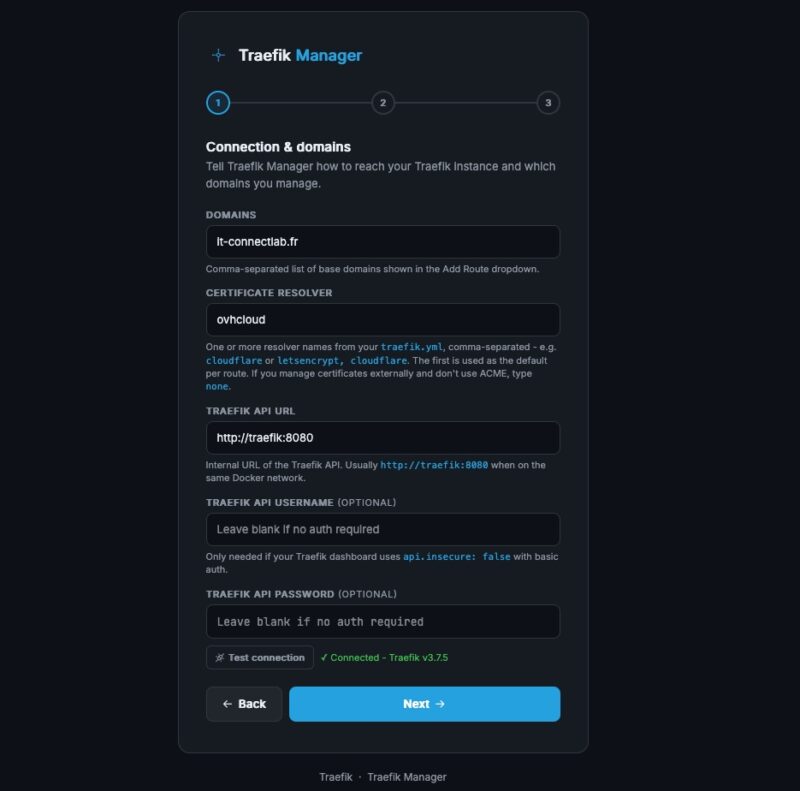
The first step, Connection & domains, asks for the information required for Traefik Manager to communicate with Traefik: the list of base domains (later suggested in the route creation form), the certificate resolver or resolvers (here ovhcloud), and the internal Traefik API URL (http://traefik:8080). A Test connection button validates the communication and displays the detected Traefik version.
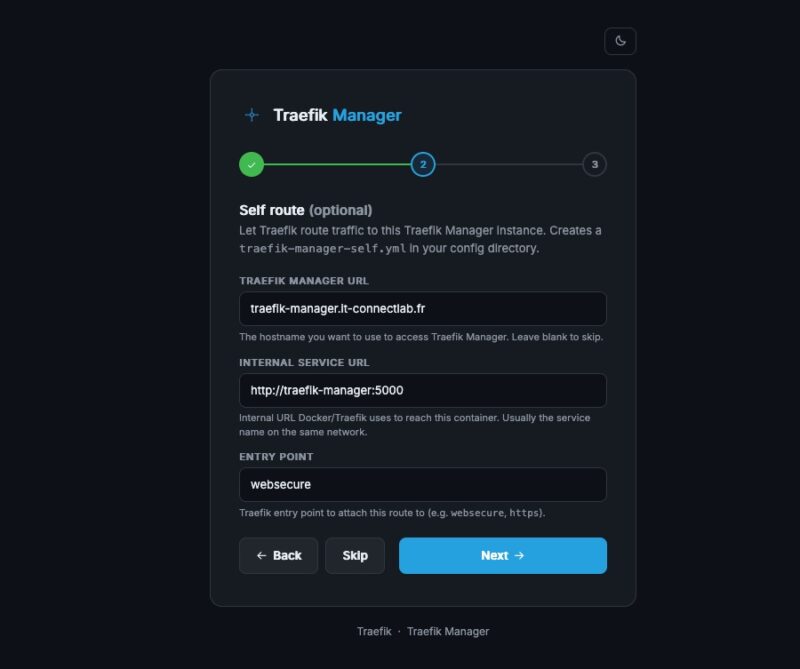
The second step, Self route, is optional. It offers to automatically create a route to expose Traefik Manager itself by entering the desired domain name, the internal container URL (http://traefik-manager:5000), and the entrypoint to use (websecure). If you have already defined this route through Docker labels (as in our configuration), you can skip this step. Otherwise, it will also be declared in the dynamic configuration (which is not a problem in itself).
The Traefik Manager Dashboard
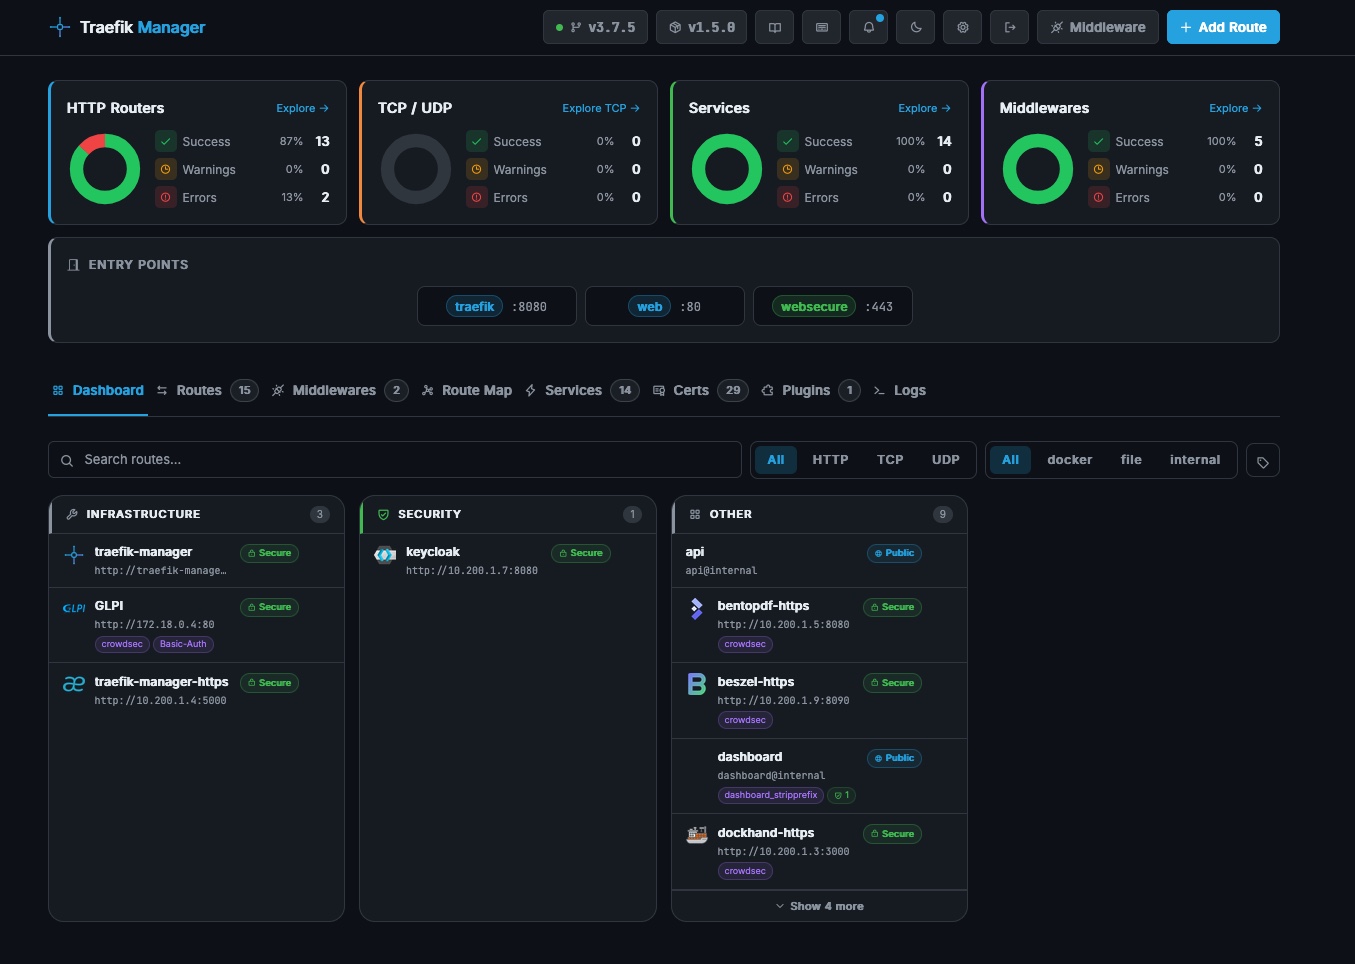
Once the wizard is complete, you arrive at the dashboard. It provides a summary view of the reverse proxy state: four cards summarize the health of HTTP routers, TCP/UDP routers, services, and middlewares, with a percentage of successes, warnings, and errors. This is similar to what you can find on Traefik's native dashboard.
Just below, a section lists the detected entrypoints (for example traefik on port 8080, web on port 80, and websecure on port 443), as Traefik exposes them. Further down, routes are shown as cards, grouped by category, with their target and any middlewares applied.
This is also where you find the provider distinction mentioned earlier. A filter lets you display all routes, or only those from the docker, file, or internal providers. From the settings, you can enable monitoring of other providers, including Docker, so that routes declared through Docker labels become visible in Traefik Manager (but they cannot be edited there).
Creating and Managing Routes
Adding a route is done through the Add Route button, which opens a complete form. This is probably the most useful feature in daily use, especially for exposing a service that is not a Docker container.
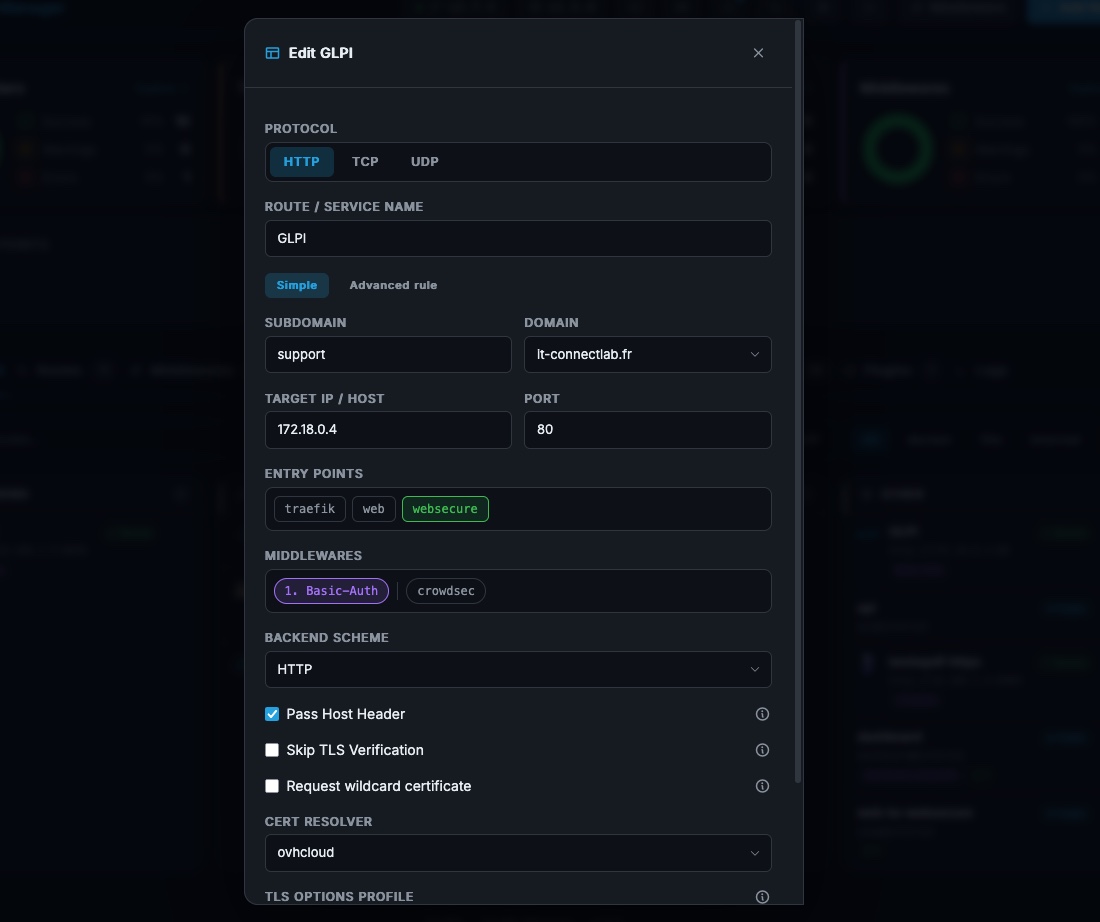
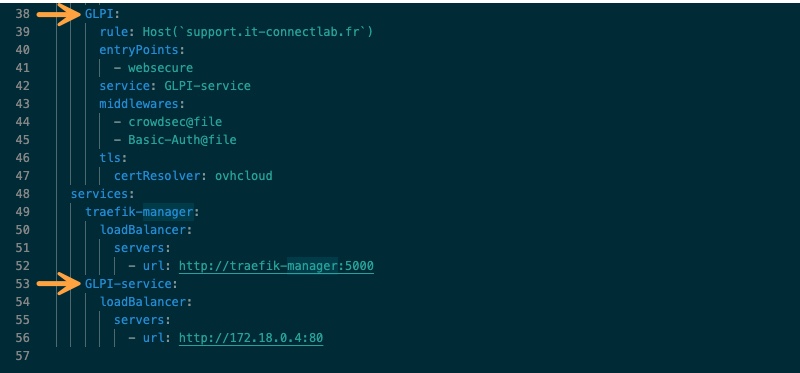
Let's take a concrete example: exposing a GLPI instance hosted on a separate web server. We choose the HTTP protocol, name the route, and then build the rule using the form: a subdomain (support) associated with a domain (it-connectlab.fr), which automatically generates the corresponding Host() rule. By the way, through the advanced options, you can specify specific paths if needed (requests targeting a specific endpoint, such as /api).
Next, you enter the backend address and port, the entrypoint (websecure), and you can attach middlewares: here, a CrowdSec middleware and Basic-Auth authentication, for example to protect access to the application. For centralized authentication that is more complete than simple Basic-Auth, you can also use a solution such as Tinyauth (see our tutorial Traefik + Tinyauth).
The form also offers several options that avoid having to write YAML by hand:
- Backend Scheme: specifies whether Traefik should reach the backend over HTTP or HTTPS (here, the GLPI server). Adjust it according to what the target server actually serves.
- Pass Host Header: forwards or does not forward the original
Hostheader to the backend. - Skip TLS Verification: check this when the backend presents a self-signed certificate (a common case for internal administration interfaces). This adds a
serversTransportwithinsecureSkipVerify. - Cert Resolver: lets you request an ACME certificate (here
ovhcloud), with an option to request a wildcard certificate via DNS challenge.
This results in the following:
After validation, the route is written to your dynamic configuration file. Routes defined through Docker labels are not editable here: they remain managed in each service's docker-compose.yml.
Monitoring TLS Certificates
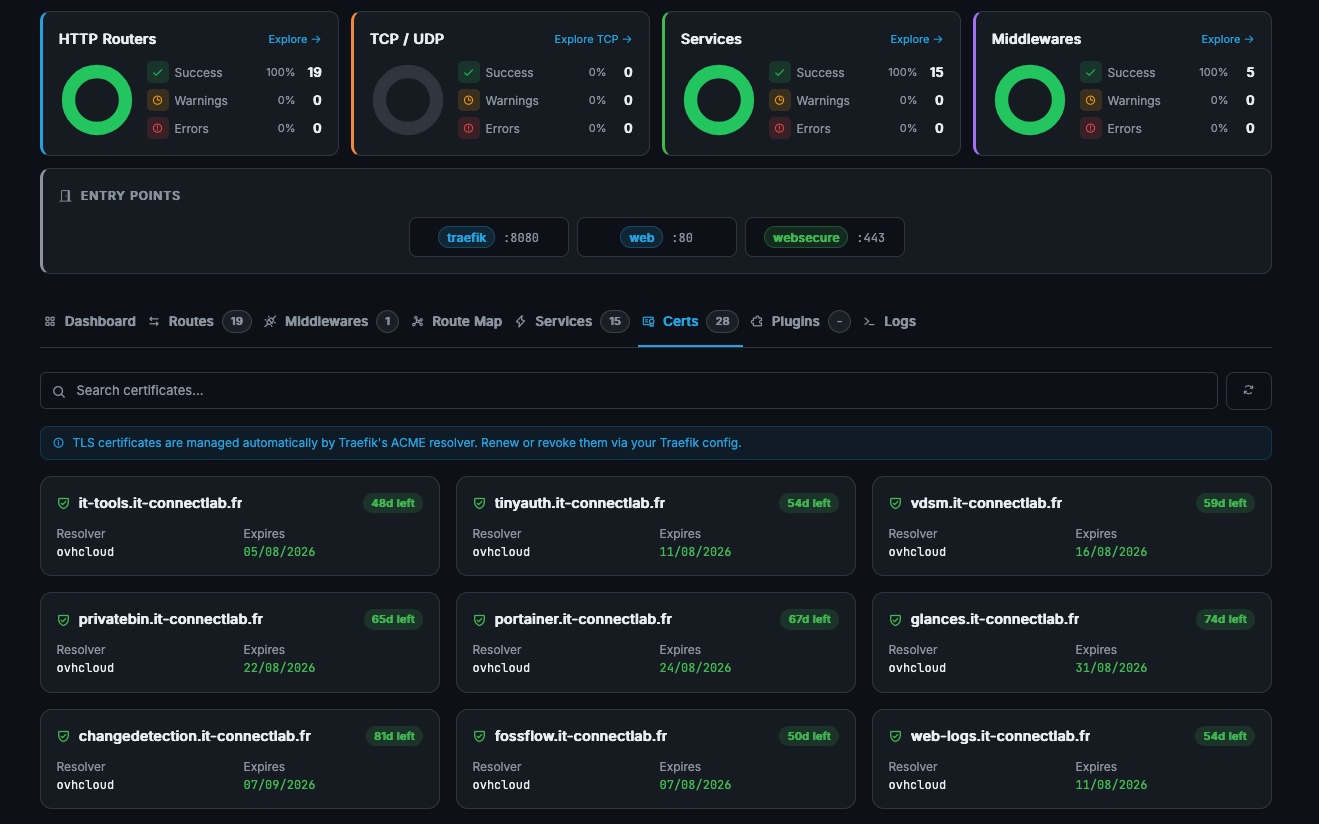
The Certs tab queries Traefik and reads Traefik's acme.json file to present all certificates automatically managed by the ACME resolver as cards. For each domain, you can see the resolver used, the expiration date, and the number of days remaining before renewal.
This view is read-only: certificates remain managed by Traefik's ACME mechanism, which takes care of renewal.
Visualizing the Infrastructure with Route Map
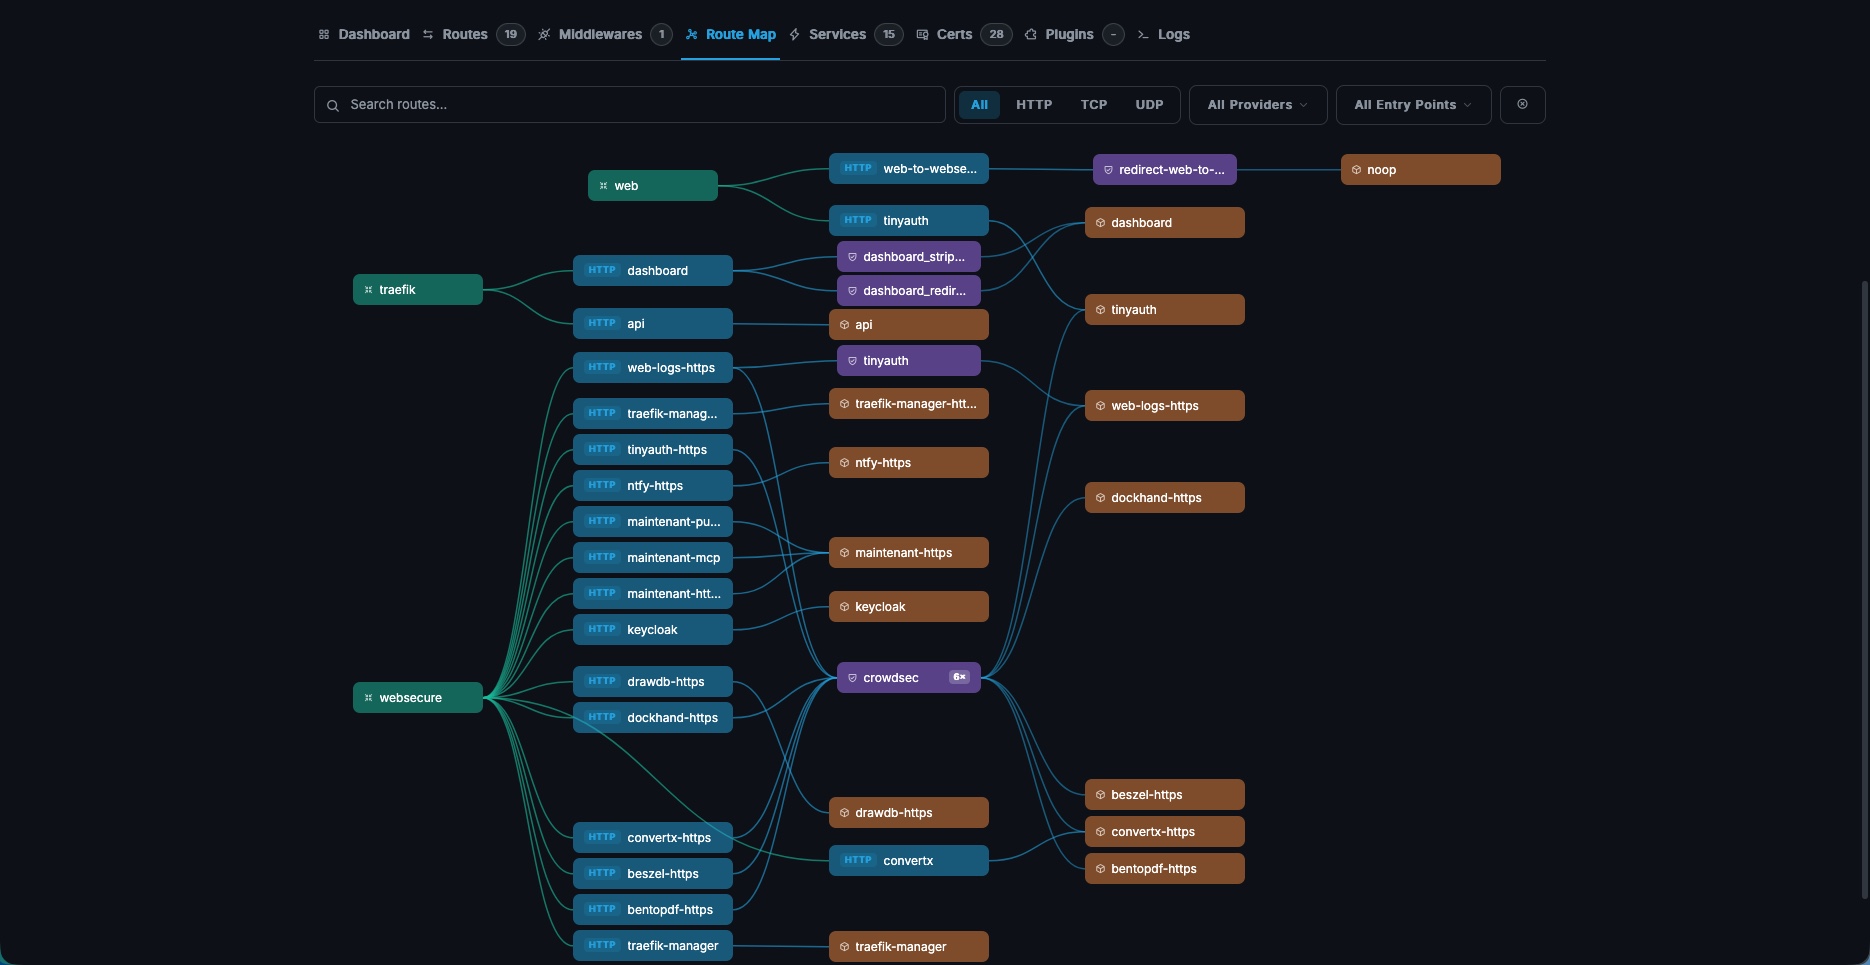
The Route Map tab is especially interesting because it provides a flow map in graph form: entrypoints on the left (web, traefik, websecure), routers and middlewares in the middle, and destination services on the right. Filters let you narrow it down by protocol, provider, or entrypoint.
This representation helps you understand how a request travels from the entrypoint to the backend, and to verify that a middleware is applied where you expect it. For example, you can immediately see that a CrowdSec middleware is shared by multiple routers, or that an HTTP-to-HTTPS redirect is in place. On an infrastructure with many services, this is a fast way to spot a miswired route.
Editing Traefik Static Configuration
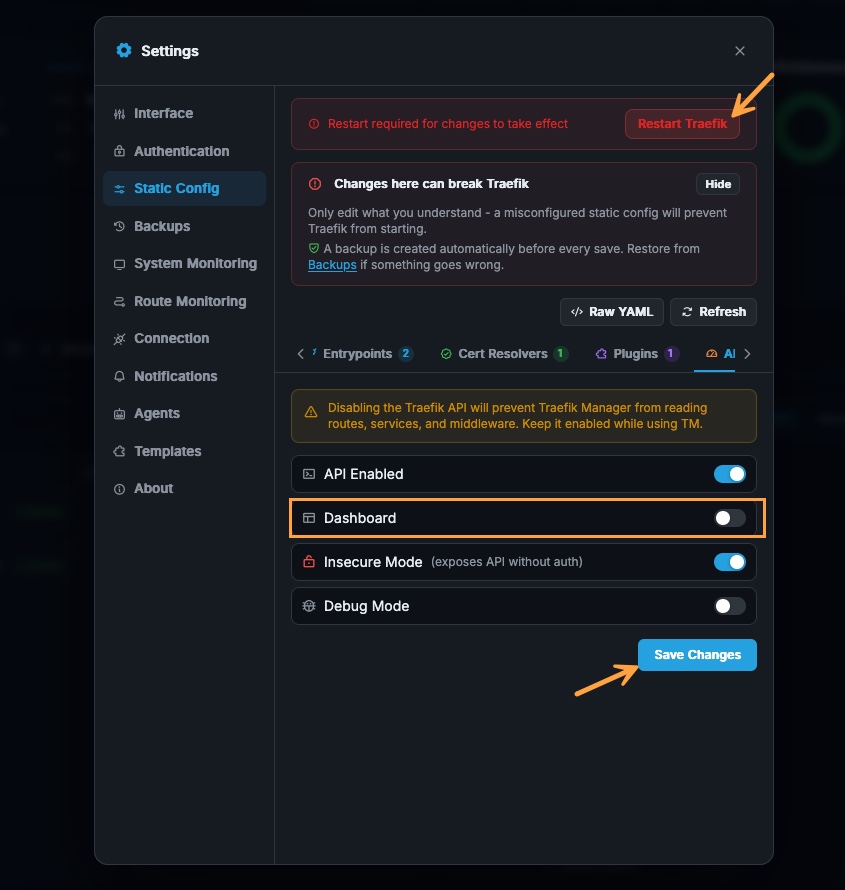
The static configuration editor lets you modify traefik.yml directly from the web interface. Settings are organized into tabs, so you do not have to deal with the raw file, even though a Raw YAML button is still available for advanced users.
Be careful when editing the static configuration. On the one hand, the interface clearly warns that a malformed static configuration can prevent Traefik from starting, so you should only change what you understand. On the other hand, a backup is created automatically before each save, which provides a safety net.
After a change, a banner appears with a Restart Traefik button. This is where the configuration described earlier comes into play: thanks to RESTART_METHOD=proxy and the Docker socket proxy, Traefik Manager can restart the Traefik container to apply the changes, without any command-line intervention. Remember that this feature is only available if the STATIC_CONFIG_PATH variable is defined and traefik.yml is mounted read-write. By contrast, dynamic configuration is handled without restarting the service.
Automatic Backups and Restoration
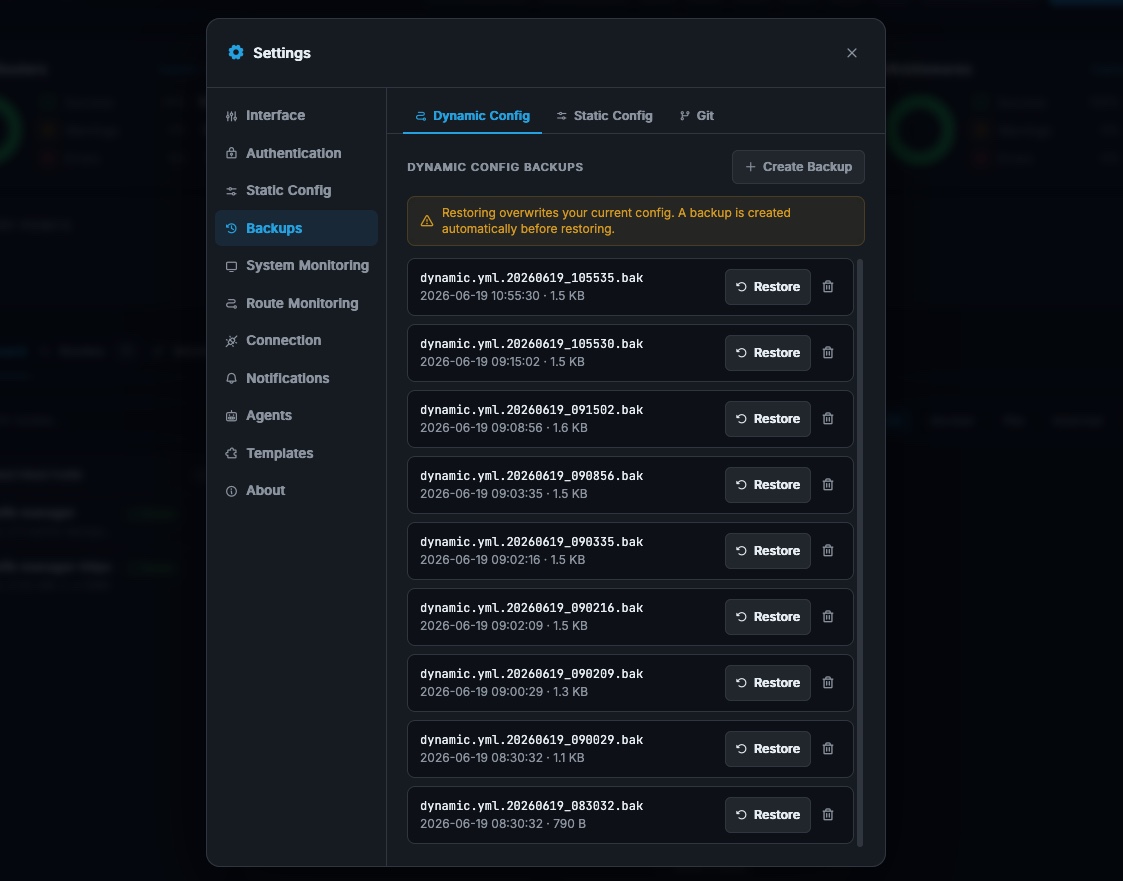
Traefik Manager creates a backup of the dynamic configuration before each create, update, delete, or enable/disable route operation. These timestamped backups are available under Settings > Backups and can be restored with a single click.
In practice, a restore overwrites the current configuration, but a backup is also created just before the restore operation. So you can roll back even if you chose the wrong restore point. For a production infrastructure, this versioning of the configuration brings real comfort when testing changes. To go further, Git integration is also possible!
Other Features Worth Knowing
This tutorial focuses on installation and everyday use of Traefik Manager, but the tool includes other features that can complement your deployment:
- Two-factor authentication (MFA): access to the interface can be protected by a second factor based on TOTP, in addition to the password.
- OIDC / SSO login: Traefik Manager integrates with an OpenID Connect-compatible identity provider, making it possible to centralize authentication and reuse an existing SSO instead of a local password. This can be useful with an IAM solution such as Keycloack.
- Notifications: the tool can send alerts through different channels (Discord, Ntfy, webhooks, etc.), for example to be notified of a configuration change or another event.
- Multi-server management via agents: a lightweight agent installed alongside a remote Traefik instance makes it manageable from a single Traefik Manager interface, so you can administer several Traefik servers from one place.
- Git backup of the configuration: in addition to local backups, the configuration can be versioned and pushed automatically to a Git repository, with commit history.
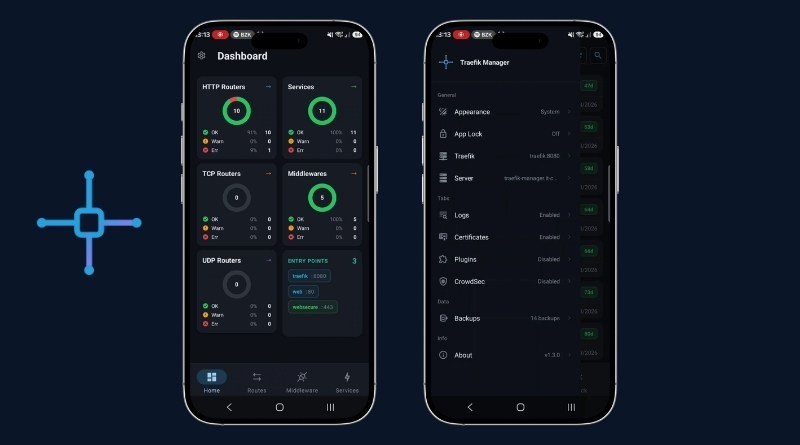
- Mobile application: a companion Android app lets you view and manage your routes and middlewares from a smartphone.
Conclusion
Traefik Manager adds a web administration layer on top of Traefik without changing how it works. It is aimed both at people who are new to Traefik and prefer a form instead of YAML editing, and at administrators who want to centralize the management of their file-based routes, track their certificates, or visualize their traffic flows.
The tool really shows its value as soon as you move beyond Docker containers alone: exposing a bare-metal service, a virtual machine, or an internal administration interface can then be done in just a few clicks, where labels are of no help.
FAQ
Does Traefik Manager replace Traefik's native dashboard?
No. Traefik's native dashboard remains read-only and is used to observe the proxy state. Traefik Manager relies on the same API for real-time information, but adds creation and modification of file provider routes, static configuration editing, and several monitoring views. Both can coexist.
Do you need to expose the Docker socket to Traefik Manager?
Not directly. The Docker socket is only needed to restart Traefik after a static configuration change. The recommended method is to go through a dedicated Docker socket proxy, configured with the minimum permissions (CONTAINERS=1 and POST=1), rather than mounting /var/run/docker.sock directly into the container. Direct use of the Docker socket is possible, but not recommended.
Is Traefik Manager compatible with CrowdSec?
Yes. CrowdSec middlewares (via the Traefik bouncer plugin) appear in the middleware list and can be attached to the routes you create. The Plugins tab also lists the plugins declared in your static configuration, provided that STATIC_CONFIG_PATH is defined. Setting up the CrowdSec bouncer on the Traefik side is covered in our Traefik + CrowdSec tutorial. A direct integration between Traefik Manager and CrowdSec is also possible.
The Plugins tab is empty, why?
This is the most common symptom of a missing STATIC_CONFIG_PATH variable. Mounting traefik.yml into the container is not enough: you must specify its path through this variable for the Plugins and Static Config tabs to read the static configuration.