Maintenant: Monitor Containers, Endpoints, and Certificates Without Tool Sprawl
One Docker image to monitor your containers, HTTP endpoints, TLS certificates, and scheduled jobs: that is the promise of Maintenant, an open source, self-hosted monitoring tool that brings together in one interface what would usually require three or four separate applications.
If you manage a Docker server, you probably know the routine: Uptime Kuma for HTTP checks and TLS certificate monitoring, Portainer and Dozzle to keep an eye on containers and their logs. Each of these tools works well, but that means stacking building blocks, which in turn means more containers to maintain and, above all, several interfaces to check.
Maintenant takes a different approach. Whether you run a homelab, a production VPS hosting a few web services, or a small fleet of Docker servers for a client, the goal is the same: get a unified view of your infrastructure without piling up tools.
In this article, I invite you to discover Maintenant. Then we will see how to install it with Docker Compose in a simple version, then behind a Traefik reverse proxy, and it will also be an opportunity to review its main features.
Table of Contents
What is Maintenant, this open source monitoring solution?
Maintenant is a monitoring tool designed for Docker and Kubernetes environments. It is developed by Benjamin Touchard (alias kOlapsis), an independent developer based in Bordeaux. This open source project is released under the AGPL-3.0 free software license, and comes in two versions: a free version (with limits) and a paid Pro edition with advanced features (priced at €29 per month or €290 per year).
Technically, the application is written in Go and relies on an SQLite database for data persistence. There are no dependencies to worry about: no Redis, no PostgreSQL, no message queue to deploy alongside it. Maintenant fits in a single container.
It is also a lightweight project with very modest resource usage. I found that it used less than 30 MB of RAM on my machine.
It is also worth knowing that Maintenant follows a read-only monitoring model. It observes and monitors your containers and HTTP checks, but it does not control them: it does not restart them, delete them, or modify your stack. It does not perform Docker image updates either, but it guides you through doing so. This is an important difference from a tool like Portainer or Dockhand, which is primarily used to administer Docker. Here, we stay on observability.
Here are two useful links for Maintenant:
Maintenant features
Before we get to the installation, let’s review the main building blocks you will find in the interface.
- Automatic container discovery: both Docker and Kubernetes are supported. As soon as a container starts, it is tracked (status, health checks, restart loops, logs). Docker Compose projects are grouped automatically.
- HTTP / TCP checks: you define probes that measure response time, status code, and availability over time. Configuration is done through the web UI or via Docker labels.
- Heartbeats and cron jobs: each monitor has its own unique ping URL. You add a
curlcall to your scheduled task, and Maintenant alerts you if the job does not run within the expected timeframe. In other words, your tasks contact Maintenant to prove they are alive. - SSL/TLS certificates: automatic detection on your HTTPS endpoints, with expiration alerts at 30, 14, 7, 3, and 1 day, plus full chain validation.
- System metrics: CPU, memory, network, and disk I/O, per container, with real-time graphs and configurable alert thresholds.
- Update detection: Maintenant compares image digests through OCI registries to report available updates.
- Alert engine: webhook and Discord are included in the Community edition, while Slack, Teams, and email are part of the Pro edition.
- Public status page: a real-time page to keep your users informed about the status of your services (like Uptime Kuma).
- REST API and MCP server: a full API under
/api/v1/as well as an MCP server to query your Maintenant instance from a compatible AI assistant.
The Community edition includes a few limits: 10 endpoints, 5 heartbeats, 5 certificates, and a status page with 3 components. For a homelab or a very small infrastructure, these quotas may be enough. The Pro edition removes those limits and adds extra alert channels, incident escalation, maintenance windows, and CVE enrichment.
Maintenant prerequisites
To follow this tutorial, you will need a host with:
- Docker Engine 20.10 or later and Docker Compose. amd64 and arm64 architectures are supported.
- Access to the Docker socket (
/var/run/docker.sock), which we will mount read-only. - A user account belonging to the
dockergroup, or sufficient privileges to run Docker commands.
A Linux machine will do, as will a Raspberry Pi (the project is very lightweight) or even a macOS or Windows machine with Docker. If needed, see my tutorial for installing Docker on Linux.
In addition, you must also identify the Docker group ID (GID) on your machine. You will need to specify it in the Docker Compose file later on. This is required for security reasons, because the Maintenant container does not run as root but as the nobody user (uid 65534). The Docker socket, however, belongs to root:docker. Without membership in the right group, the kernel denies access to the socket, even when it is mounted read-only.
We will therefore retrieve this GID on the host before starting the container.
Run the following command on the host:
getent group docker | cut -d: -f3For my part, the ID is 990. Note the returned number: it is the GID of the docker group on your machine.
Installing Maintenant with Docker Compose
To begin, we will start with the simple version, directly inspired by the one provided in the project’s GitHub repository. This configuration exposes Maintenant on port 8080 of the host and applies several security best practices right away.
Before configuring Docker Compose, let’s prepare the storage layout. If you have been following me, you know I usually store my projects under /opt/docker-compose/.
Without further ado, create a dedicated working directory for this tool, then move into it:
cd /opt/docker-compose/
mkdir -p maintenant && cd maintenant
Our future Docker Compose file will use a bind mount (./maintenant-data:/data), which places the SQLite database directly on the host (in the directory of your choice). Since the container runs as the nobody user (uid/gid 65534), this directory must belong to it; otherwise the application will not be able to create its database at startup (you will encounter a database open error).
Create it under /opt/docker-compose/maintenant and adjust its ownership:
mkdir -p maintenant-data
sudo chown -R 65534:65534 maintenant-data
Then create a .env file in the maintenant directory to store the Docker group GID retrieved earlier. This allows Docker Compose to inject it and avoids having to modify the Docker Compose file itself:
DOCKER_GID=990Next, at the root of the project directory, create the docker-compose.yml file with the following content:
services:
  maintenant:
    image: ghcr.io/kolapsis/maintenant:latest
    ports:
      - "8080:8080"
    read_only: true
    security_opt:
      - no-new-privileges:true
    group_add:
      - "${DOCKER_GID:-983}"
    tmpfs:
      - /tmp:noexec,nosuid,size=64m
    volumes:
      - /var/run/docker.sock:/var/run/docker.sock:ro
      - /proc:/host/proc:ro
      - maintenant-data:/data
    environment:
      MAINTENANT_ADDR: "0.0.0.0:8080"
      MAINTENANT_DB: "/data/maintenant.db"
    restart: unless-stopped
To help you understand what we are doing, let’s take the time to detail some of the options:
read_only: truemounts the container filesystem read-only, which reduces the attack surface.security_opt: no-new-privileges:trueprevents the process from acquiring new privileges at runtime.group_addinjects the GID of the Docker group retrieved earlier. The983value is only a fallback if the variable is not defined: the correct value is the one from your.env.tmpfsprovides a temporary/tmpin memory, mounted without exec or setuid, since the rest of the filesystem is read-only.- Mounting
/var/run/docker.sockread-only (:ro) allows container discovery without authorizing any action on them. - Mounting
/proc(/host/proc) read-only provides access to the host system metrics. - The named volume
maintenant-dataensures data persistence (SQLite database).
Once everything is ready, save the Docker Compose file and get ready to launch the container!
Note: Maintenant automatically connects to the local Docker engine via the link made through the socket. To extend monitoring to multiple hosts, you need to deploy an agent, but that capability is reserved for the Pro plan.
Run this command:
docker compose up -dCheck that the container has started properly:
docker compose ps

NAME             IMAGE                                COMMAND                  SERVICE      CREATED       STATUS                 PORTS
maintenant-app   ghcr.io/kolapsis/maintenant:latest   "/docker-entrypoint.…"   maintenant   8 hours ago   Up 8 hours (healthy)   8080/tcp
You can also follow the startup logs to make sure no errors appear, especially regarding access to the Docker socket:
docker compose logs -f maintenantOnce the container is up, open your browser at http://<SERVER IP>:8080. The interface appears, and your already running containers should show up automatically, with no additional configuration required. That is normal: it is Maintenant’s automatic discovery mechanism at work.
Managing telemetry
By default, Maintenant sends anonymous usage information once per hour about your use of the solution (edition used, number of containers, endpoints, etc.). This operation does not transmit hostnames, IP addresses, container names, or URLs. This telemetry is opt-out: if you want to disable it, add the MAINTENANT_DISABLE_TELEMETRY environment variable in the environment section of your Docker Compose file, then restart the container:
    environment:
      MAINTENANT_ADDR: "0.0.0.0:8080"
      MAINTENANT_DB: "/data/maintenant.db"
      MAINTENANT_DISABLE_TELEMETRY: "1"
Installing Maintenant behind Traefik
On the other hand, the simple version exposes Maintenant directly on port 8080, which is fine for testing or for an internal network. In production, it is better to place the application behind a reverse proxy such as Traefik to manage the domain name, TLS certificate, and authentication layer. In fact, the Maintenant interface is not protected by an authentication page: this must be handled through an external solution (TinyAuth, Authelia, Authentik...).
I honestly think the lack of an authentication system is intentional. What you need to know, and what will drive the rest of the configuration, is that:
- The dashboard and the
/api/v1/*routes must never be exposed without protection. - Two route families must remain public for the tool to work:
/ping/(heartbeat delivery) and/status/(status page).
Our Traefik configuration therefore needs to handle both cases. In this example, the instance will be reachable at https://maintenant.it-connectlab.fr.
Before starting, create the directory tree with the right permissions as specified for the first installation method.
Traefik prerequisites
I will not cover Traefik installation and configuration here. This has already been covered in my Traefik installation guide. For context, here is information about my setup:
- An HTTPS entrypoint named
websecure(port 443), - A configured certificate resolver: in our example, it is an OVHcloud resolver (DNS challenge) named
ovhcloud, but any other resolver, such as Let's Encrypt, works just as well, - The Docker provider enabled, and an external Docker network shared between Traefik and the services it serves. It is named
frontendhere, - The protection and authentication middlewares you want to apply. In this example, we combine CrowdSec with Traefik (declared as
crowdsec@file) for attack protection and TinyAuth for authentication, but these components can be swapped out.
Adjust the names websecure, ovhcloud, frontend, as well as the middlewares, to match your own configuration.
The .env file
For a production setup, parameters are moved into a .env file placed next to the docker-compose.yml. If you followed the first part of this tutorial, you already have one! Otherwise, you should create it. This avoids editing the Docker Compose file every time you make an adjustment and keeps environment-specific values in one place:
# Docker group GID on the host
DOCKER_GID=990

# Public address of the instance.
# Used for heartbeat ping URLs and status page links.
MAINTENANT_BASE_URL=https://maintenant.it-connectlab.fr

# Organization name displayed on the public status page
MAINTENANT_ORGANISATION_NAME=IT-Connect Lab

# Telemetry disabled
MAINTENANT_DISABLE_TELEMETRY=1
A few notes on these variables:
MAINTENANT_BASE_URLdeserves special attention. It determines the ping URLs provided for heartbeats and the links on the status page. If it does not match the actual URL in use, your cron jobs will point to the wrong address. So set it to the public HTTPS URL.MAINTENANT_ORGANISATION_NAMEsimply customizes the header of the public status page.- We intentionally leave
MAINTENANT_CORS_ORIGINSundefined: in production, we keep the default policy (same origin) rather than allowing a wildcard*.
If you have a Pro license and want to use email notifications, you will add the variables MAINTENANT_SMTP_HOST, MAINTENANT_SMTP_PORT, MAINTENANT_SMTP_USERNAME, MAINTENANT_SMTP_PASSWORD and MAINTENANT_SMTP_FROM here, as well as MAINTENANT_LICENSE_KEY to activate your Pro license.
The docker-compose.yml file
Here is the full Docker Compose file used for this deployment behind Traefik. Its distinctive feature is that it includes the Traefik labels, including the crowdsec@file,tinyauth middleware chain applied to the main router:
services:
  maintenant:
    image: ghcr.io/kolapsis/maintenant:latest
    container_name: maintenant-app
    read_only: true
    security_opt:
      - no-new-privileges:true
    group_add:
      - "${DOCKER_GID:-983}"
    tmpfs:
      - /tmp:noexec,nosuid,size=64m
    volumes:
      - /var/run/docker.sock:/var/run/docker.sock:ro
      - /proc:/host/proc:ro
      - ./maintenant-data:/data
    environment:
      MAINTENANT_ADDR: "0.0.0.0:8080"
      MAINTENANT_DB: "/data/maintenant.db"
      MAINTENANT_BASE_URL: "${MAINTENANT_BASE_URL}"
      MAINTENANT_ORGANISATION_NAME: "${MAINTENANT_ORGANISATION_NAME}"
      MAINTENANT_DISABLE_TELEMETRY: "${MAINTENANT_DISABLE_TELEMETRY:-}"
    restart: unless-stopped
    networks:
      - frontend
    labels:
      - traefik.enable=true
      - traefik.docker.network=frontend
      # Main router (dashboard + API) with authentication
      - traefik.http.routers.maintenant-https.rule=Host(`maintenant.it-connectlab.fr`)
      - traefik.http.routers.maintenant-https.entrypoints=websecure
      - traefik.http.routers.maintenant-https.tls=true
      - traefik.http.routers.maintenant-https.tls.certresolver=ovhcloud
      - traefik.http.services.maintenant-https.loadbalancer.server.port=8080
      - traefik.http.routers.maintenant-https.middlewares=crowdsec@file,tinyauth
      - tinyauth.apps.maintenant.config.domain=maintenant.it-connectlab.fr
      - tinyauth.apps.maintenant.users.allow=mon-utilisateur
      # Public router (ping/status) without authentication
      - traefik.http.routers.maintenant-public.rule=Host(`maintenant.it-connectlab.fr`) && (PathPrefix(`/ping/`) || PathPrefix(`/status/`))
      - traefik.http.routers.maintenant-public.entrypoints=websecure
      - traefik.http.routers.maintenant-public.tls=true
      - traefik.http.routers.maintenant-public.tls.certresolver=ovhcloud
      - traefik.http.routers.maintenant-public.priority=100

networks:
  frontend:
    external: true
The key point of this setup is the coexistence of two Traefik routers (which matches the developer’s recommendations):
- The main router (
maintenant-https) captures all traffic tomaintenant.it-connectlab.frand applies thecrowdsec@file,tinyauthmiddleware chain. It therefore protects the dashboard and the/api/v1/*API. - The public router (
maintenant-public) only captures the/ping/and/status/paths, without authentication. It is given a high priority (100) so it wins over the main router when both rules match. This way, your cron jobs can send their pings and your users can access the status page without facing an authentication prompt.
If you later enable the MCP server (MAINTENANT_MCP=true), you will need to add a third router for the /mcp, /oauth/, and /.well-known/ paths, which MCP authenticates itself. I will cover that later in this article.
Starting and checking
Then start the container:
docker compose up -dFollow the logs while Traefik obtains the certificate and Maintenant finishes initializing:
docker compose logs -f maintenantThen open https://maintenant.it-connectlab.fr in your browser: you are redirected to the TinyAuth sign-in page, then, once authenticated, to the dashboard. To confirm that route separation is working, check that the URL https://maintenant.it-connectlab.fr/status/ remains accessible without authentication.
Exploring the Maintenant monitoring tool
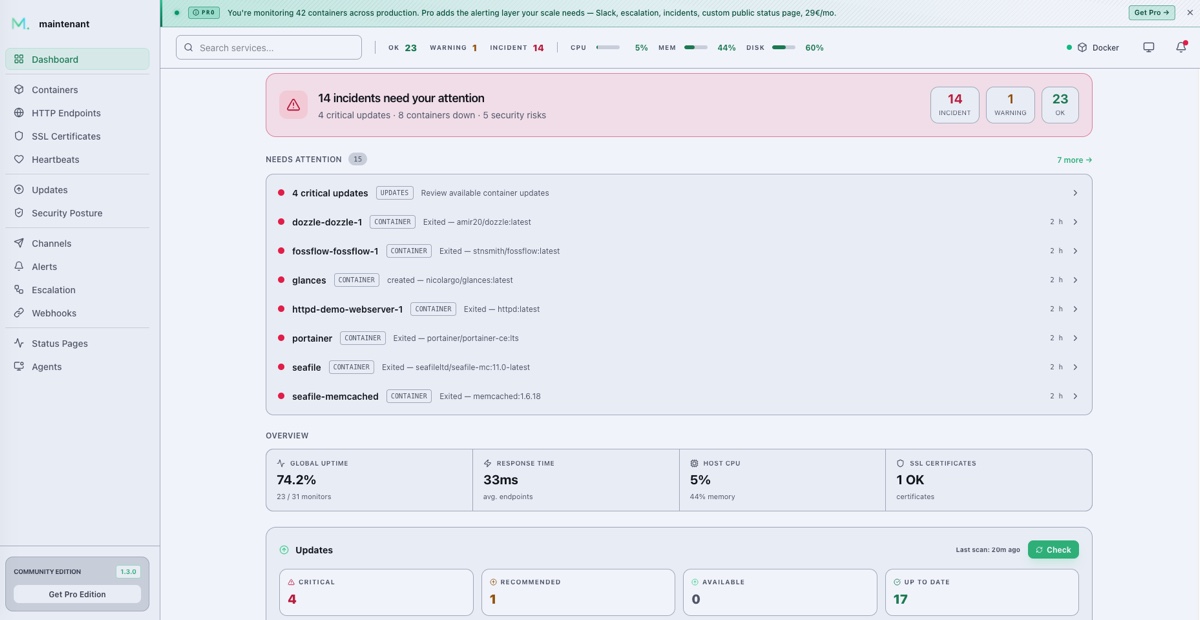
Once connected, the home screen displays the main dashboard. It includes a summary of availability, resource usage, visibility into key alerts, and an overall view of container status.
Monitoring containers and their logs
Container monitoring requires no configuration: that is the strength of auto-discovery. As soon as a container starts on the host, it appears in the list. Maintenant tracks status changes and lets you view logs in real time.
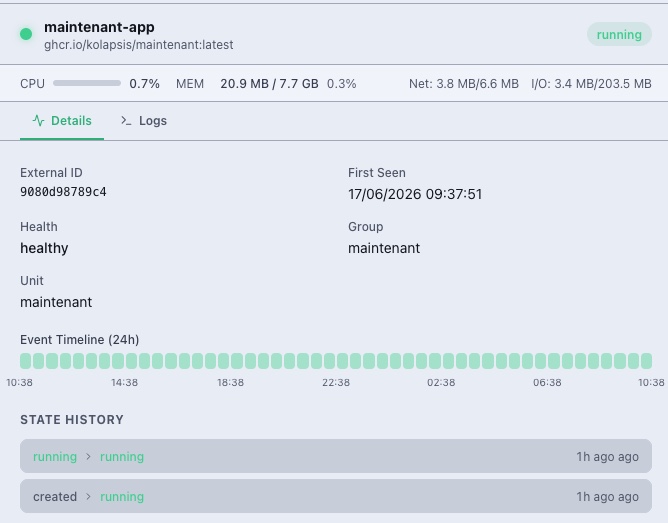
The Containers section in the side menu lists everything Maintenant has discovered on the host. For each container, you can see its status, its resources, and whether an update is available. Docker Compose projects are grouped together, which makes things easier to read when several services belong to the same stack.
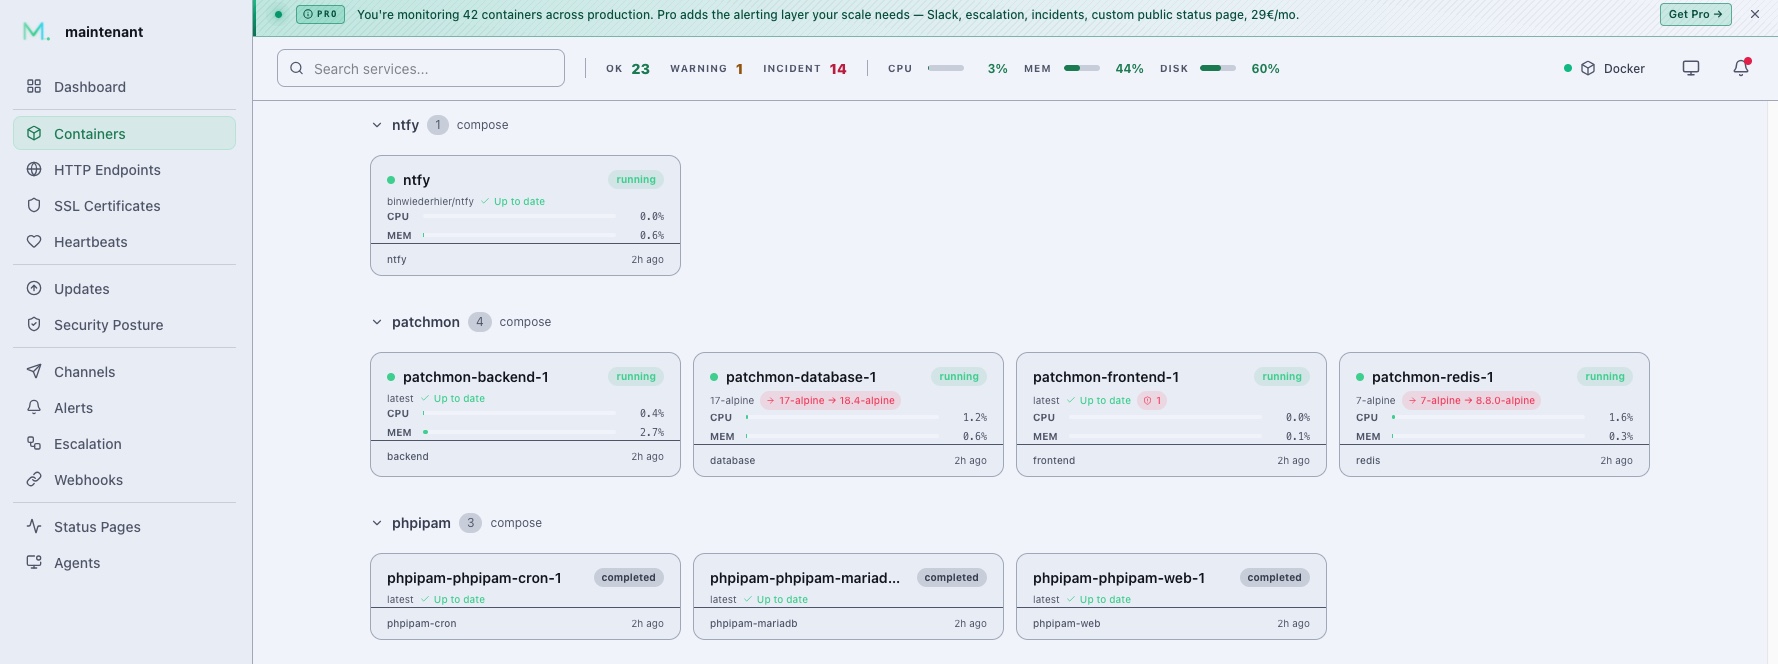
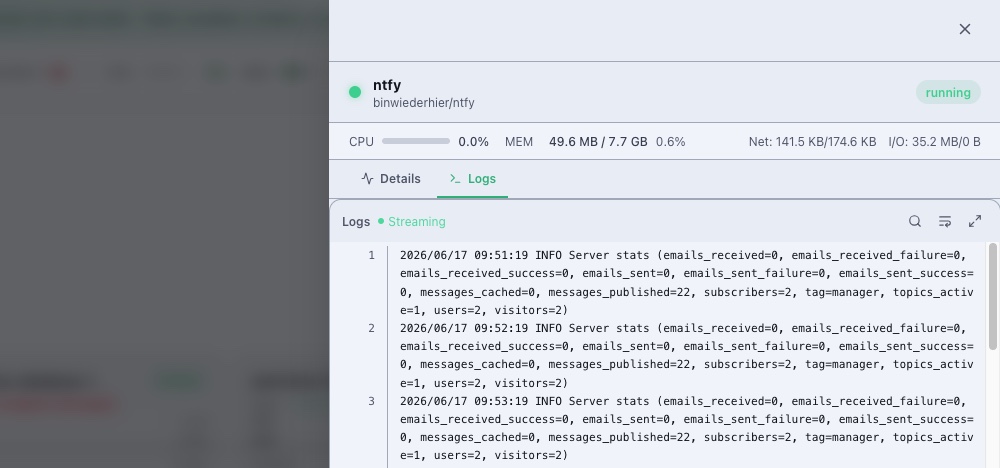
By clicking on a container, you get an overview of its uptime history and can access real-time logs, just like Dozzle offers. A search field lets you filter logs in real time, including with regular expressions.
You can customize this behavior using Docker labels added directly to your services (to be applied per project). Some useful examples:
labels:
  maintenant.ignore: "true"                  # Exclude this container from monitoring
  maintenant.group: "backend"                # Group under a custom name
  maintenant.alert.severity: "critical"      # Severity level: critical | warning | info
  maintenant.alert.restart_threshold: "5"    # Threshold for detecting restart loops
The maintenant.ignore label is useful if you do not want certain containers to appear in the dashboard.
Adding HTTP and TCP checks
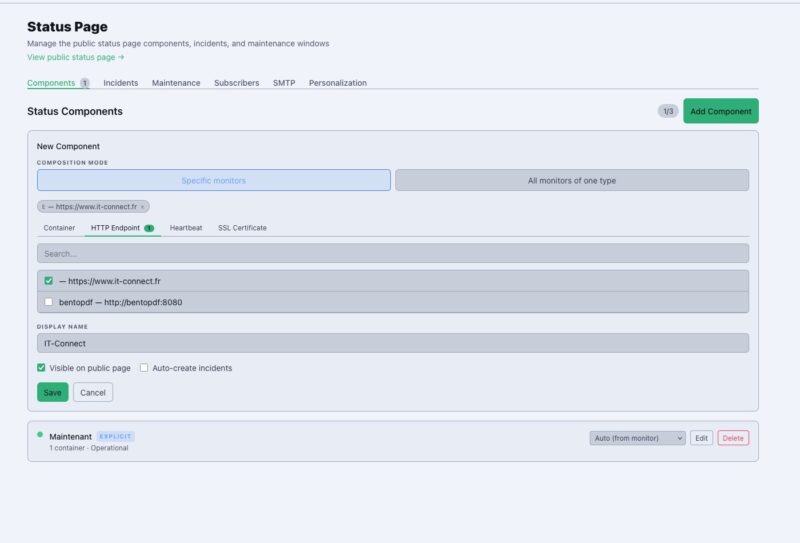
This is where Maintenant overlaps with Uptime Kuma. It can monitor the status of services over HTTP or TCP, whether it is an external service (the IT-Connect website, for example) or a container. To declare a check, you have two options:
- Create the check through the Maintenant graphical interface,
- Declare the check via labels in the target container configuration.
Configuration is done in the HTTP Endpoints section. This is also where you will see the status of your monitored endpoints. The example below shows two checks: one added via the web form, the other via Docker labels (for BentoPDF).
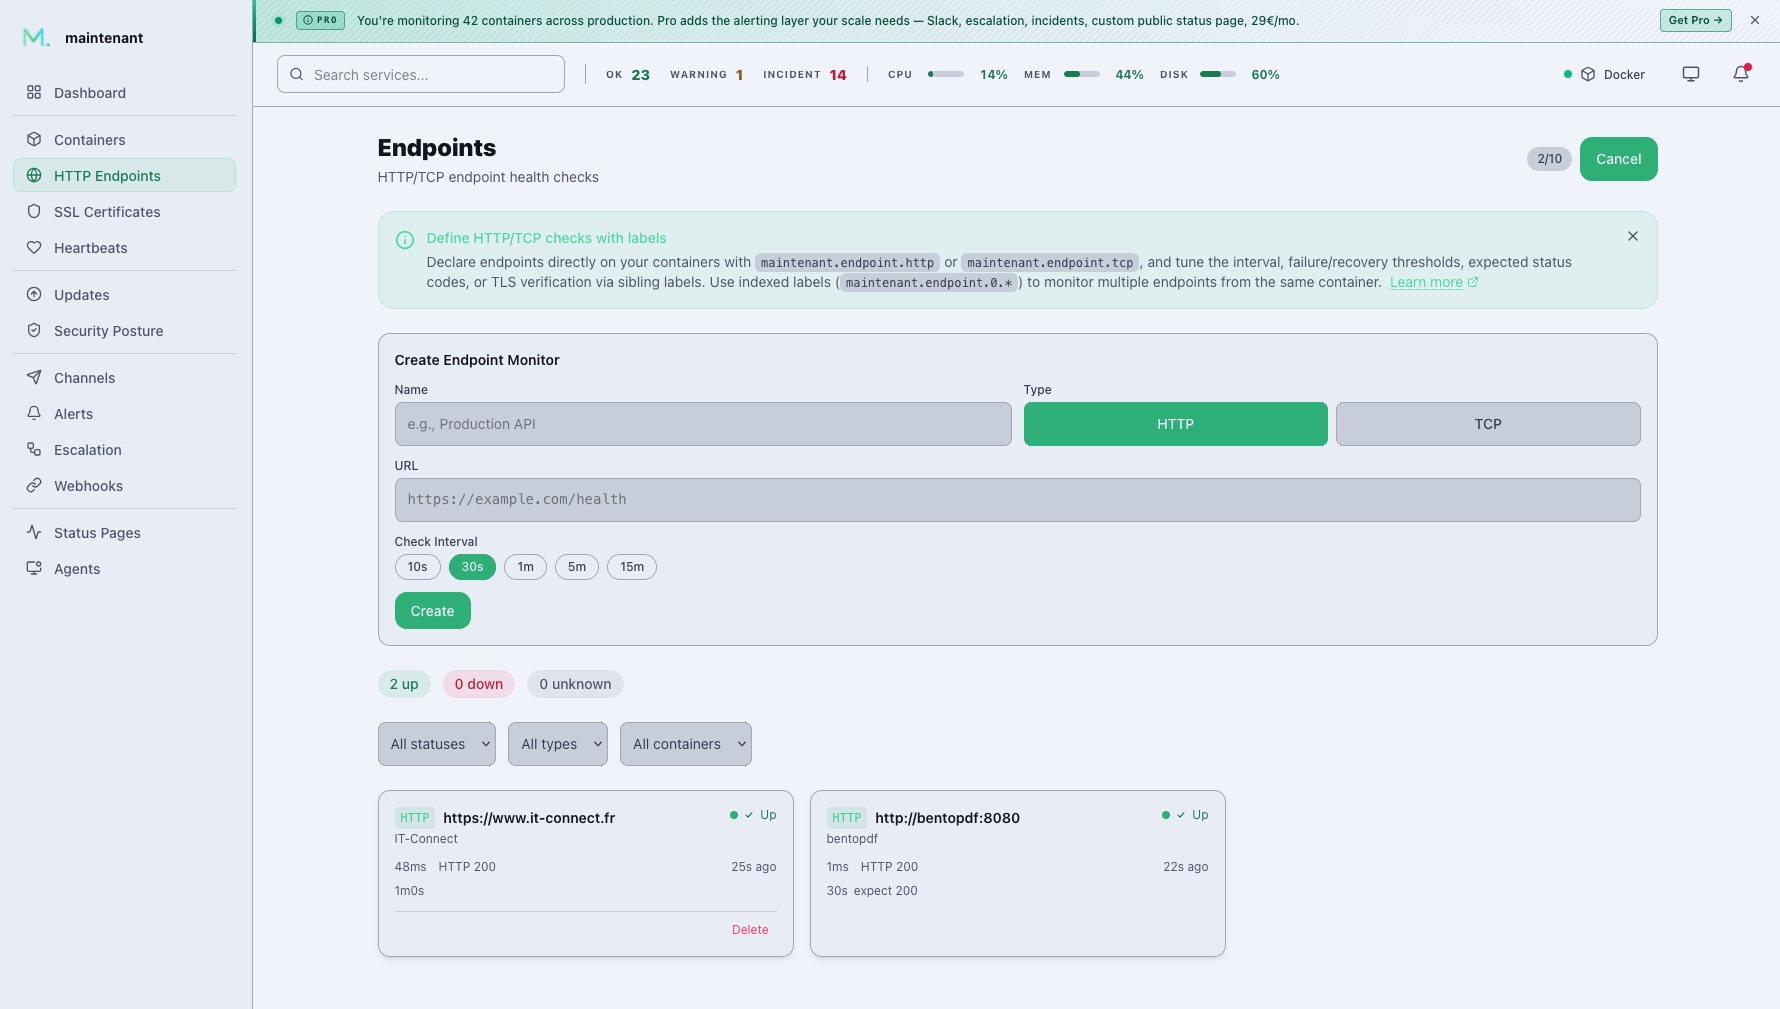
For BentoPDF monitoring, here are the labels added to that project’s Docker Compose file:
    labels:
      - maintenant.endpoint.http=http://bentopdf:8080
      - maintenant.endpoint.interval=30s
      - maintenant.endpoint.http.expected-status=200
      - maintenant.endpoint.failure-threshold=2
Every 30 seconds, Maintenant will make sure that the BentoPDF web interface returns HTTP 200. If there are two consecutive failures, an alert will be triggered.
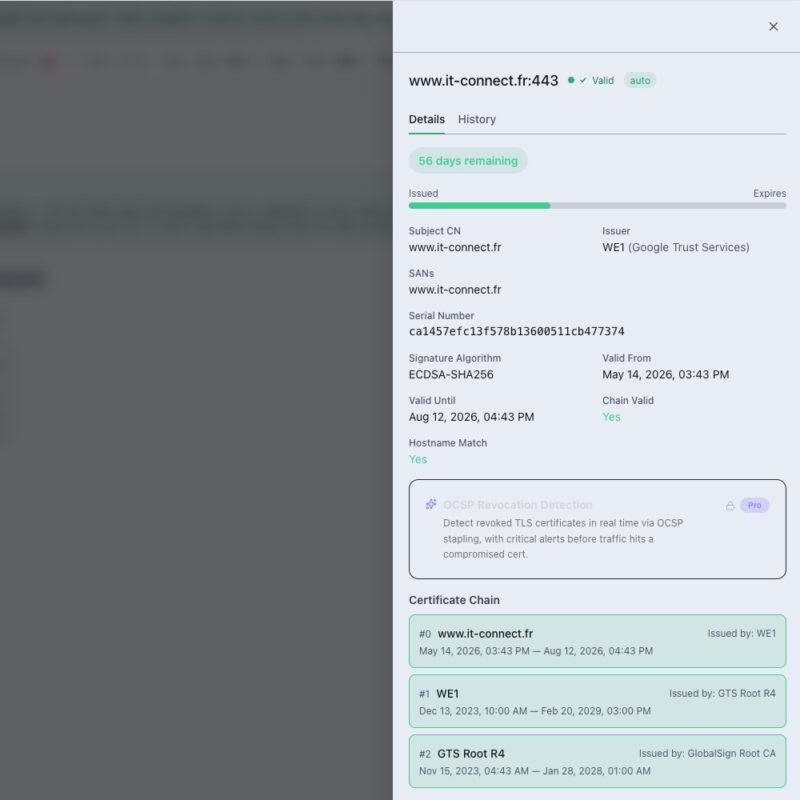
In the SSL Certificates section, monitoring is configured automatically to track certificate expiration. Note that there is also a label to declare domains to monitor (maintenant.tls.certificates).
Several tuning parameters are available: check interval, expiration delay, HTTP method, expected status codes, custom headers, and failure/recovery thresholds. To declare multiple endpoints on the same container, you use an indexed syntax:
labels:
  maintenant.endpoint.0.http: "https://app:8443/health"
  maintenant.endpoint.1.tcp: "redis:6379"
  maintenant.endpoint.interval: "30s"
  maintenant.endpoint.timeout: "10s"
  maintenant.endpoint.http.expected-status: "200,201"
As a reminder, the Community edition allows up to 10 endpoints.
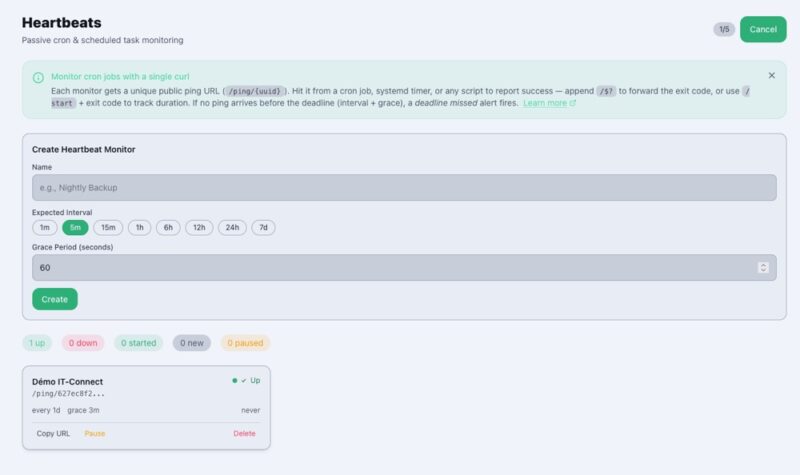
Monitoring scheduled jobs with heartbeats
HTTP checks verify that a service responds, but they say nothing about a nightly backup or a cleanup script that never ran. That is the role of heartbeats, which follow the same principle as a service like Healthchecks.io.
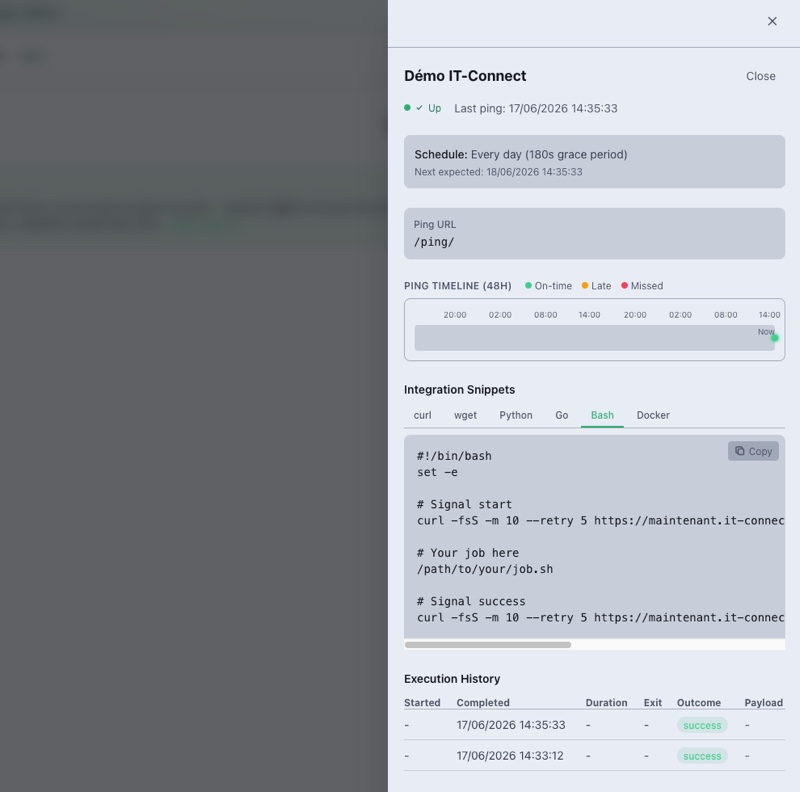
The workflow is simple: you create a heartbeat monitoring item in Maintenant, which generates a unique ping URL. All you then need to do is add a call to that URL at the end of your scheduled task (in a Bash script, for example). Maintenant then records each ping sent by your script, and even the start and end times. Most importantly, Maintenant alerts you if a job fails to show up.
Then a call to the Maintenant address, with a specific GUID, lets the script or scheduled task show a sign of life.
curl -fsS -m 10 --retry 5 https://maintenant.it-connectlab.fr/ping/627ec8f2-100d-42df-be54-165198a7a0dcEach ping is recorded in the application activity log:
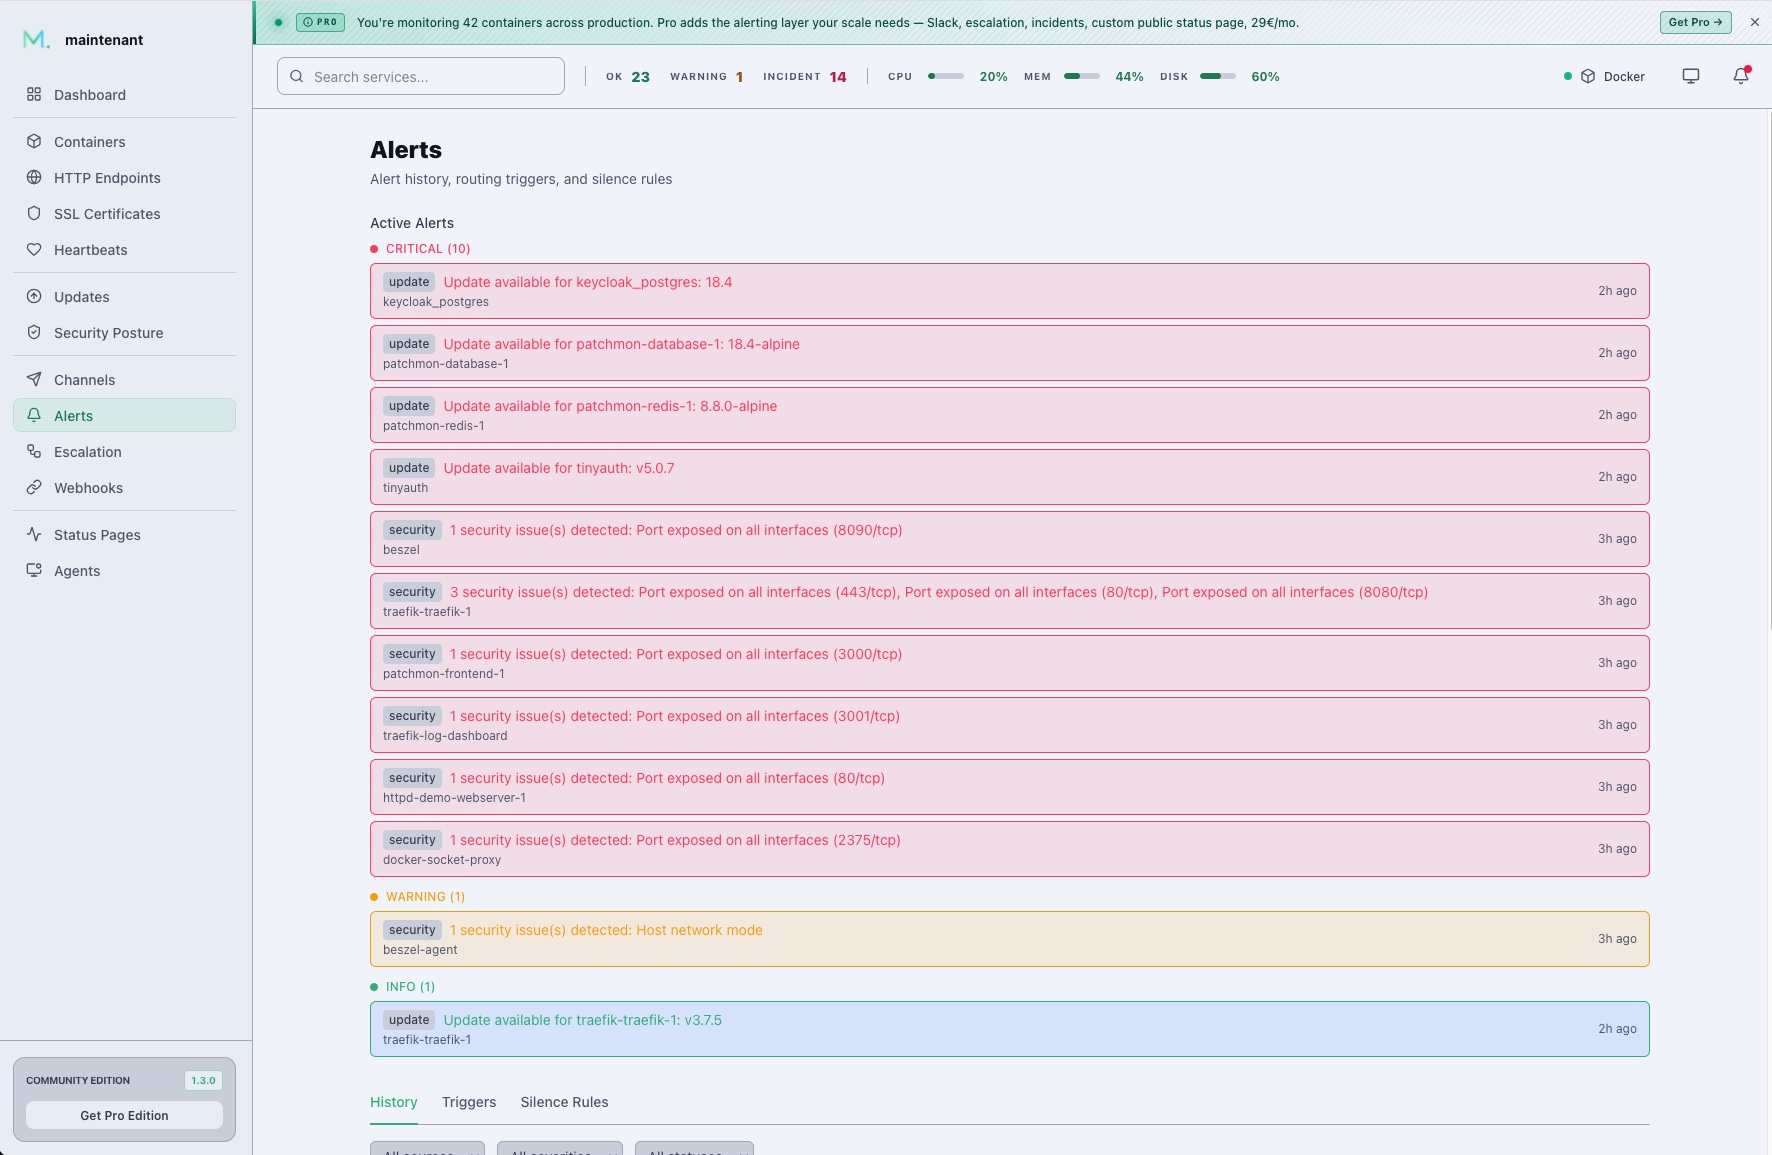
Configuring alerts
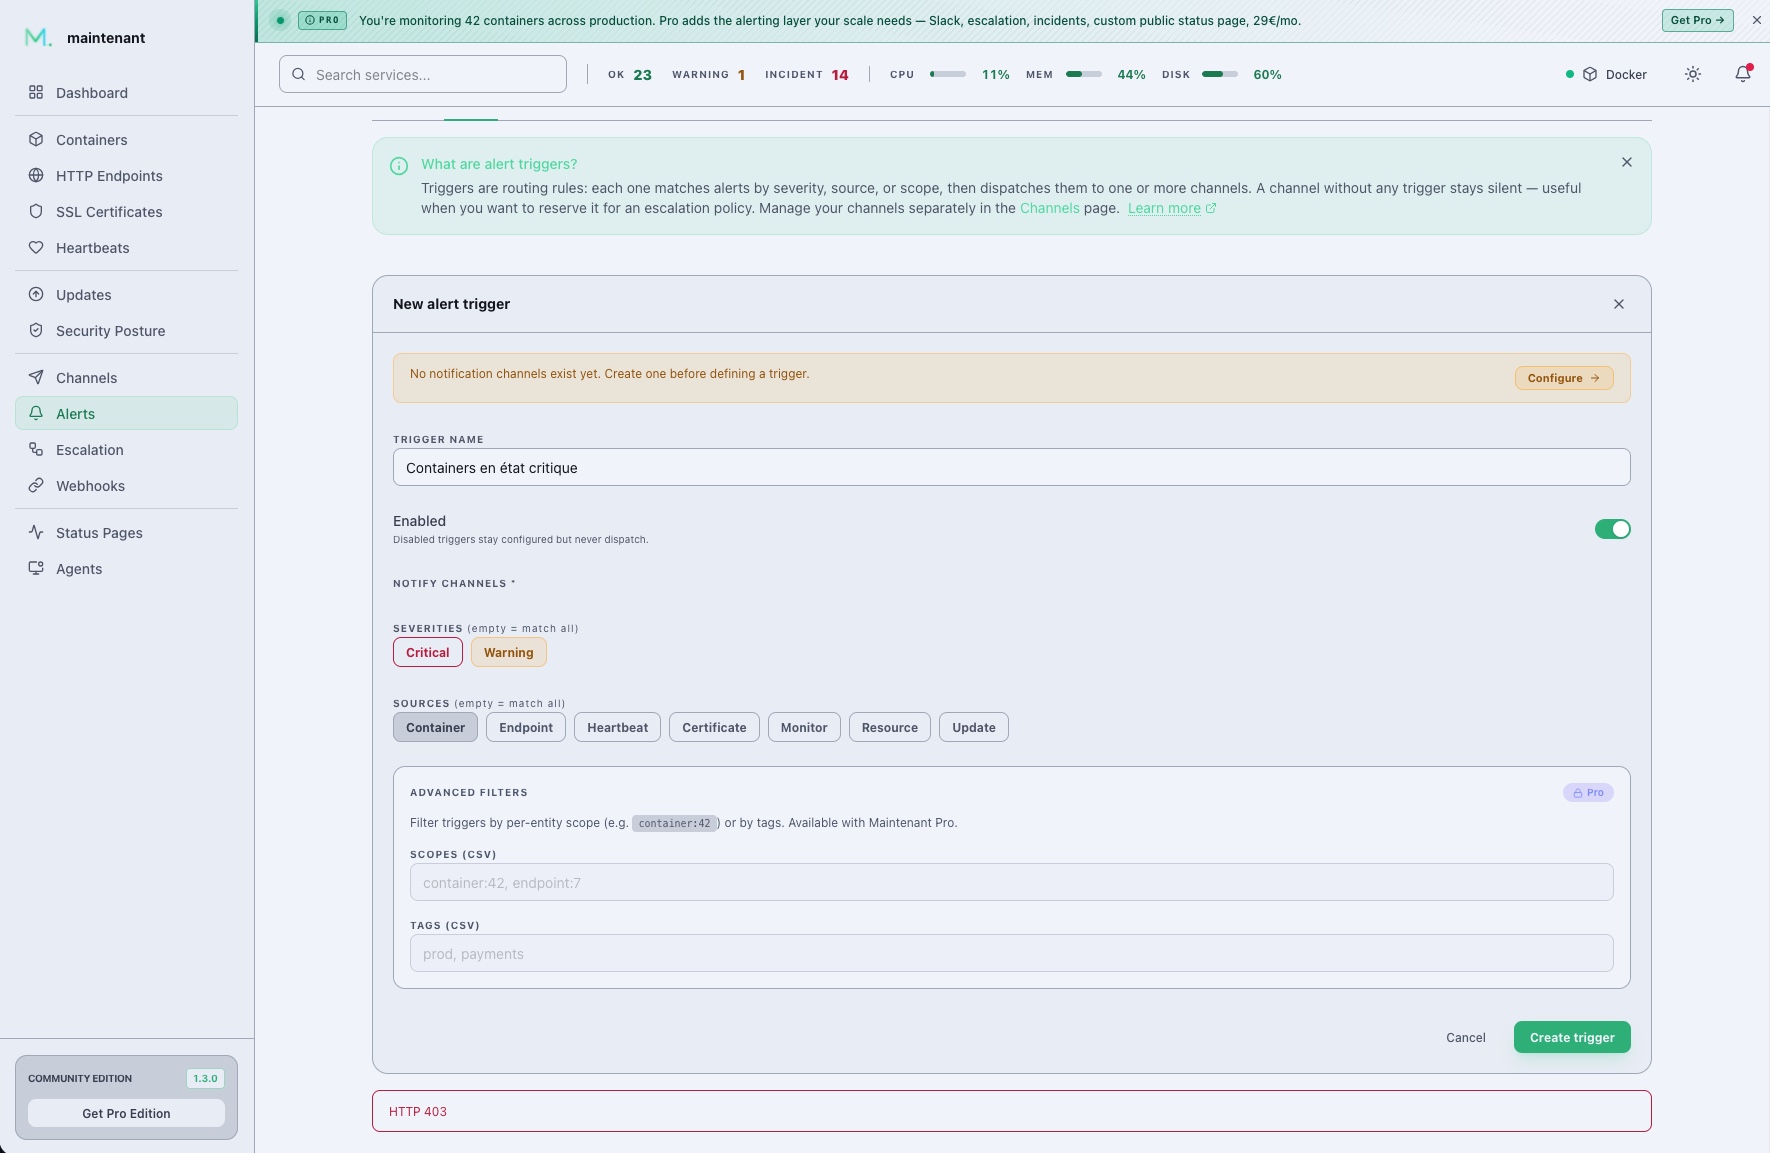
Monitoring is only useful if it alerts you at the right time. Maintenant centralizes alerts from all its sources: containers, endpoints, heartbeats, certificates, resources, and updates, all in one place.
Channels are silent by default and are enabled through triggers that you filter by severity or source. You can create an alert when a specific container has an associated critical alert, for example. This is true for the different source types, even if the ability to create an alert based on log analysis is missing (as Dozzle offers).
In the Community edition, two channels are available: generic HTTP webhook and Discord. The webhook is especially useful because it can relay alerts to many services (and even trigger side actions through another tool). Maintenance windows can be defined to pause alerts for a specific period of time (very handy during planned maintenance).
This presentation is well thought out and provides a complete overview of infrastructure status. It is a pity that you cannot acknowledge an issue to remove it from the active alerts list.
As a reminder, the Pro edition adds Slack, Microsoft Teams, and email, as well as finer filtering rules and escalation policies.
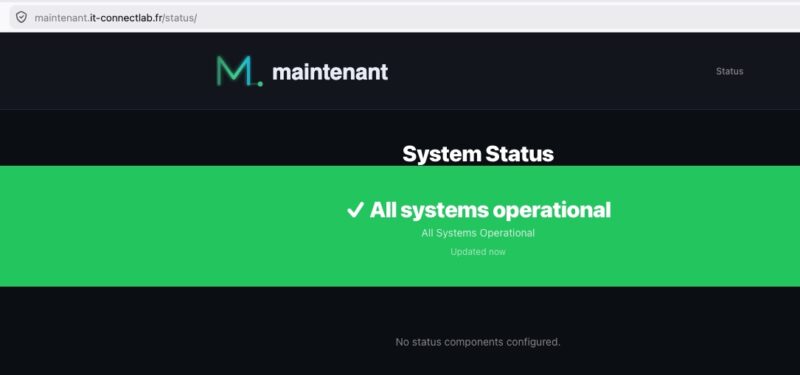
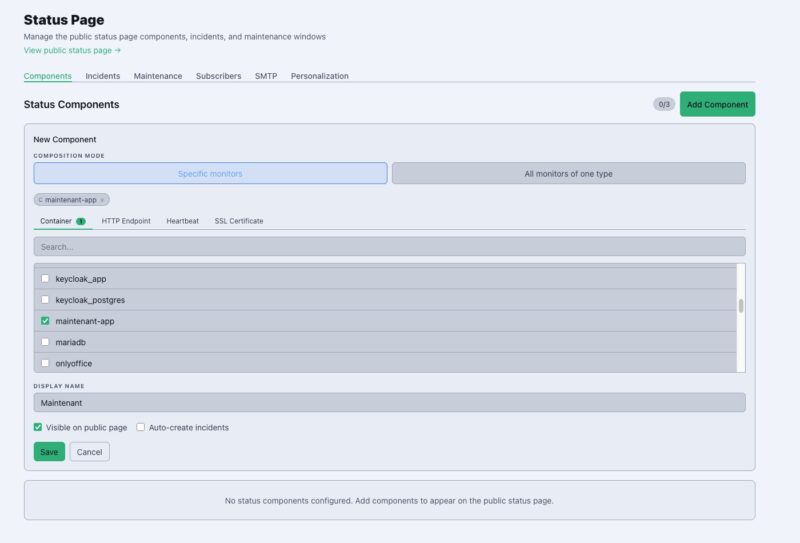
Publishing a status page
Maintenant can expose a public status page for your users or customers. This page aggregates the status of your services and updates in real time via SSE (Server-Sent Events). In the event of an incident, your visitors immediately see which services are affected.
The Community edition lets you publish a page with up to 3 components. The Pro edition adds incident management with a public timeline, maintenance windows, and subscriber notifications.
You can create grouped or individual components for your status page. You can also make the status change dynamically if an alert is detected on an endpoint linked to the status page (incident mode).
Here is an example:
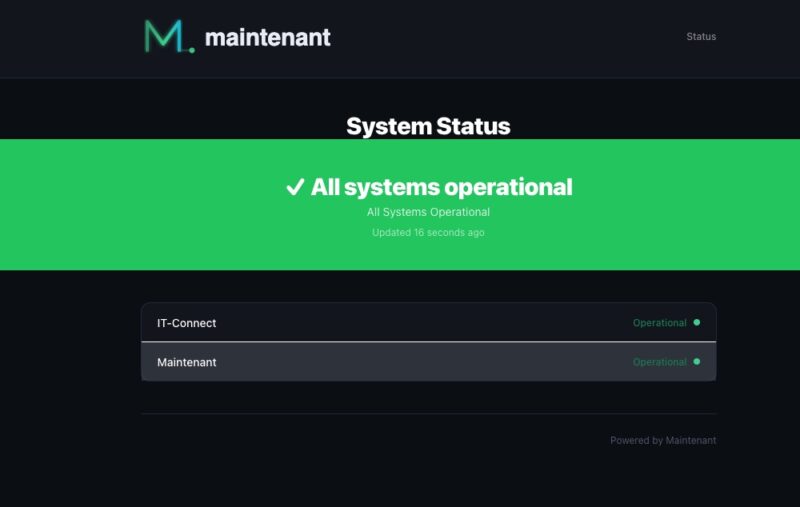
From the Maintenant interface, you can change a service status yourself. You can specify whether it is a major incident or simply scheduled maintenance.

Connecting an AI assistant via MCP
Maintenant includes an MCP server, a standard that allows an AI assistant to query an application through the tools it exposes. Once connected, you can ask in natural language for the status of your containers, the list of certificates nearing expiration, or pending updates, and the assistant queries your instance to answer. It is a modern way to get information without opening the dashboard (which is what will let you show off to your colleagues).
We use Claude Desktop as the example here, but the principle applies to any MCP-compatible client. The setup happens in three steps: enable the MCP server on the Maintenant side, open the corresponding routes in Traefik, then declare the connector in the AI client.
Enabling the MCP server on the Maintenant side
The MCP server is enabled through environment variables. Since the client connects remotely, we use the HTTP transport with OAuth2 authentication. Add these lines to your .env file:
# Enable the MCP server
MAINTENANT_MCP=true
MAINTENANT_MCP_CLIENT_ID=maintenant-mcp
MAINTENANT_MCP_CLIENT_SECRET=<votre secret>

# Allowed OAuth2 callback URLs (required as soon as MCP credentials are defined)
MAINTENANT_MCP_ALLOWED_REDIRECT_URIS=https://claude.ai/api/mcp/auth_callback,https://claude.com/api/mcp/auth_callback
Generate the secret with the following command (or another method) and insert it as the value of MAINTENANT_MCP_CLIENT_SECRET.
openssl rand -hex 32The MAINTENANT_MCP_ALLOWED_REDIRECT_URIS variable deserves an explanation: it is required as soon as a client ID and secret are defined, and it must contain the client’s OAuth callback URL. For Claude, that is https://claude.ai/api/mcp/auth_callback. Defining these credentials protects the MCP server with OAuth2: without them, the /mcp endpoint would be open to everyone. Better to avoid that.
Then copy these variables into the environment: block of docker-compose.yml:
      MAINTENANT_MCP: "${MAINTENANT_MCP:-false}"
      MAINTENANT_MCP_CLIENT_ID: "${MAINTENANT_MCP_CLIENT_ID:-}"
      MAINTENANT_MCP_CLIENT_SECRET: "${MAINTENANT_MCP_CLIENT_SECRET:-}"
      MAINTENANT_MCP_ALLOWED_REDIRECT_URIS: "${MAINTENANT_MCP_ALLOWED_REDIRECT_URIS:-}"
Opening MCP routes in Traefik
The MCP server handles its own OAuth2 authentication. The /mcp, /oauth/, and /.well-known/ routes therefore must not pass through TinyAuth, otherwise the authentication portal would intercept the client’s OAuth flow.
To do this, we add a third router, modeled after the public router, but without the authentication middleware. Add the following labels to your Maintenant Docker Compose file:
      # MCP + OAuth router — MCP handles its own authentication (no TinyAuth)
      - traefik.http.routers.maintenant-mcp.rule=Host(`maintenant.it-connectlab.fr`) && (PathPrefix(`/mcp`) || PathPrefix(`/oauth/`) || PathPrefix(`/.well-known/`))
      - traefik.http.routers.maintenant-mcp.entrypoints=websecure
      - traefik.http.routers.maintenant-mcp.tls=true
      - traefik.http.routers.maintenant-mcp.tls.certresolver=ovhcloud
      - traefik.http.routers.maintenant-mcp.middlewares=crowdsec@file
      - traefik.http.routers.maintenant-mcp.priority=100
After the change, recreate the container so Traefik reloads its configuration.
Declaring the connector in Claude Desktop
In Claude Desktop, open Settings, then the Connectors section (you will be redirected to the customization area) to add a custom connector. Enter a name, the MCP server URL (https://maintenant.it-connectlab.fr/mcp), then expand the advanced settings to enter the client ID and secret defined above. Here, you must use the values declared in the .env file.
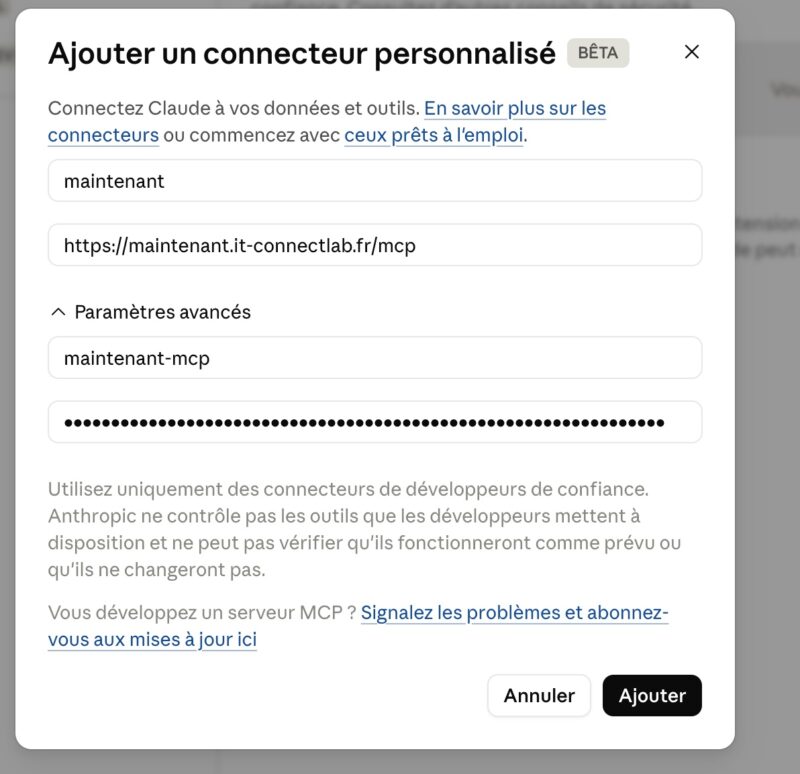
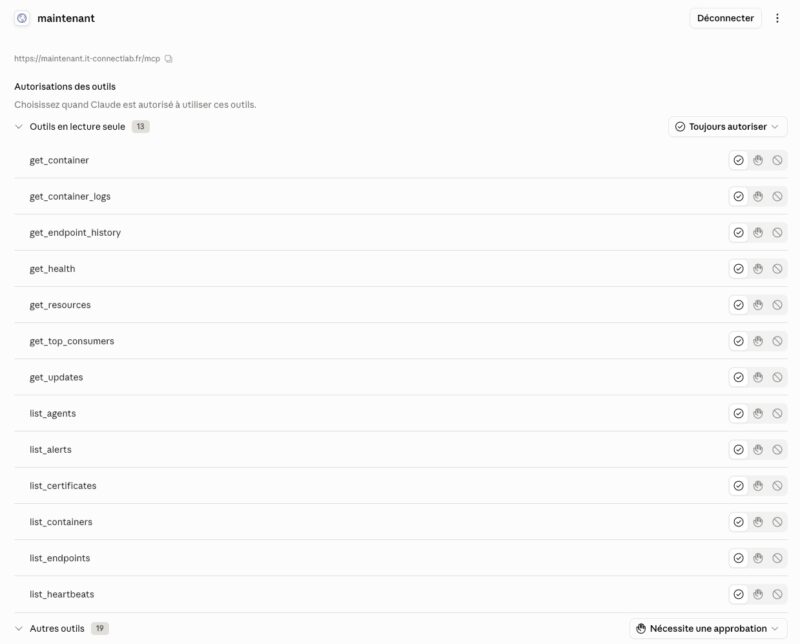
Confirm with Add, then launch the connection (button on the right). Claude then automatically discovers the OAuth2 endpoints, opens an authorization window, and establishes the connection without any manual token exchange. Once connected, the client displays the tools exposed by Maintenant and lets you choose the authorization level for each one.
They are grouped into two categories: read-only tools and tools that can perform actions. You can manage permissions per tool, which makes it possible to allow read tools by default while handling sensitive tools more strictly.
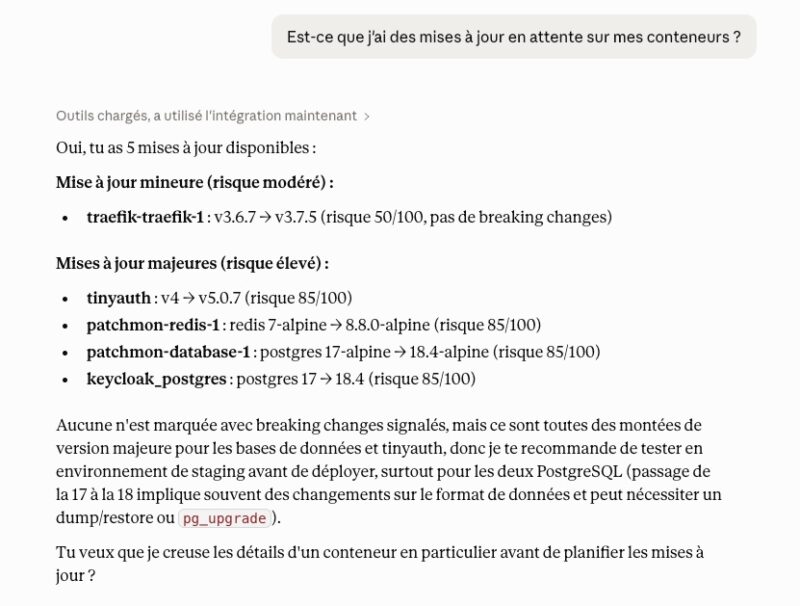
Once connected, you can query your Maintenant instance in natural language about your infrastructure. For example, by asking about pending updates, the assistant queries Maintenant and returns the list of affected images:
Conclusion
Maintenant takes an interesting approach to monitoring because it combines in a single Docker image capabilities that are usually spread across multiple tools (Uptime Kuma and Dozzle, and even Beszel on some points). Everything in one interface (containers, checks, heartbeats, certificates), with unified management features, is appealing if you want to avoid multiplying tools. That is even more true given how unnecessary it can feel to deploy Uptime Kuma just to monitor two URLs; here, at least, it is built in and native.
I am curious to see how this open source solution will evolve in the years ahead: will it eventually let you administer containers by offering image updates, for example? The question remains open. Still, it is a monitoring solution, so that is not its primary purpose.
What do you think?