www.it-connect.fr


How to Rename Proxmox VE Network Interfaces with pve-network-interface-pinning
On Proxmox VE 9, your network cards may be called nic0, nic1, and nic2. That’s the case on my machine, but the problem is that these names don’t let me tell at a glance which one is the 10 GbE card. Here’s how to rename network interfaces.
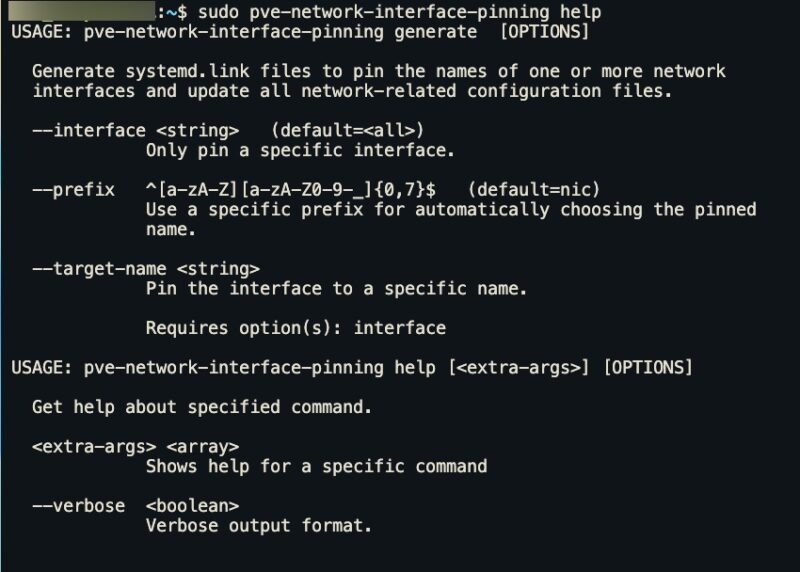
On a hypervisor equipped with multiple network cards, interface names are everywhere: bridges, bonds, VLANs, and firewall rules all refer to them. Since Proxmox VE 9.1, the installer offers the option to pin these names so they no longer change with updates. This results in generic names such as nicN.
In this article, I’ll show you how to rename Proxmox VE network interfaces with the pve-network-interface-pinning tool, using my prox-01 server as an example.
Renaming a Proxmox network interface: the short version
To rename an interface that has already been pinned on Proxmox VE 9:
- Delete its
50-pmx-<name>.linkfile in/usr/local/lib/systemd/network/. - Run
pve-network-interface-pinning generate --interface <current-name> --target-name <new-name>. - Review the generated
/etc/network/interfaces.newfile. - Reboot the server directly.
Why change interface names?
By default, Linux assigns so-called “predictable” names, calculated by systemd from the hardware location: enp96s0, for example, refers to the device located on PCI bus 96, slot 0. However, this name can change after a systemd, kernel, or driver update, typically during a migration from Proxmox VE 8 to Proxmox VE 9. If /etc/network/interfaces still refers to the old name, the server will reboot without network access.
Pinning solves this problem thanks to a .link file that maps a MAC address to a fixed name. Proxmox VE offers two ways to set this up: the installer option introduced with Proxmox VE 9.1, and the pve-network-interface-pinning tool, which generates the .link files and updates the network configuration.
Initial configuration
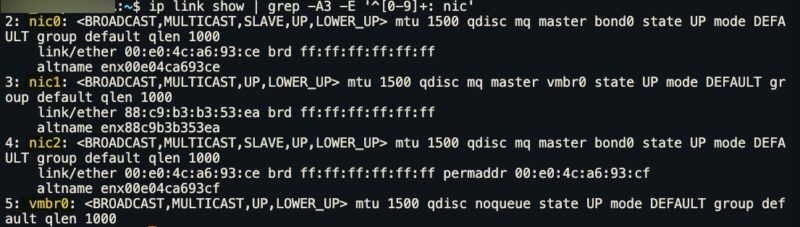
My prox-01 server is running Proxmox VE 9.2.18 and has two network cards: a 10 GbE card and a dual-port 2.5 GbE card. The two 2.5 GbE ports form an LACP bond (bond0) used by the VMs, while the 10 GbE card carries the management bridge vmbr0. All the server interfaces are connected to 2.5 GbE ports (switch limitation).
The goal is to replace generic names with names that indicate each card’s capacity:
| Current name | Predictable name | Card | New name |
|---|---|---|---|
nic1 | enp96s0 | 10 GbE | en10g0 |
nic0 | enp94s0 | 2.5 GbE, port 1 | en2g5p0 |
nic2 | enp95s0 | 2.5 GbE, port 2 | en2g5p1 |
Why name by hardware rather than by role (enmgmt0, for example)? Because the pin follows the card, via its MAC address. The role belongs to the bridge and may change the day you reorganize your network. Here, I chose to include the card’s maximum speed in the name, not the negotiated speed. But of course, you’re free to name your cards however you prefer.
Taking stock of the current setup
Let’s start by looking at the current configuration so we can clearly see where we’re starting from. Connect to your Proxmox server over SSH or through the web console.
First step: list the .link files present on the server, which correspond to the pinning files.
ls -l /usr/local/lib/systemd/network/

-rw-r--r-- 1 root root 100 Jul 27 21:43 50-pmx-nic0.link
-rw-r--r-- 1 root root 100 Jul 27 21:43 50-pmx-nic1.link
-rw-r--r-- 1 root root 100 Jul 27 21:43 50-pmx-nic2.link
Then display the contents of the file associated with nic1.
sudo cat /usr/local/lib/systemd/network/50-pmx-nic1.link

# setup by the Proxmox installer.
[Match]
MACAddress=88:c9:b3:b3:53:ea
Type=ether
[Link]
Name=nic1
The comment confirms it: these files were created by the installer.
Warning: on a bond, the ip -br link command shows the same MAC address for both members, because the bond assigns them the MAC of the first one. The real MAC appears in the permaddr field of the ip link show command. Rest assured, the tool does use the original MAC, as we’ll see later.
Choosing a valid interface name
Earlier, I mentioned the names I was going to use for my interfaces, while also saying that you can name them however you like. However, you’re not completely free to do so. Here are the rules to follow, according to the documentation:
- Length: 15 characters maximum (kernel limit).
- Disallowed characters: control characters,
:,/, and%. A fully numeric name is also rejected. - No dot: in
/etc/network/interfaces,name.10refers to VLAN 10 on interfacename. - Room for VLANs:
name.4094must also fit within 15 characters, so aim for 10 characters maximum. enprefix: Proxmox documentation recommends it so the web interface recognizes the interface as physical.- No kernel- or systemd-assigned name:
eth0,eno1,enp3s0, etc. Otherwise, udev and the kernel will compete, so let’s avoid trouble.
Renaming the Proxmox VE 10 GbE interface
Back up the configuration
Before making any changes, keep a copy of the files involved:
sudo mkdir -p /root/backup-pinning
sudo cp -a /usr/local/lib/systemd/network /etc/network/interfaces /root/backup-pinning/
Removing the existing pin lock
Once this backup was done, I figured I only had to test the rename on nic1 using the pve-network-interface-pinning command. I specified the current name and the new name like this:
sudo pve-network-interface-pinning generate --interface nic1 --target-name en10g0When you use this command, you must confirm with y. Except that here, an error occurred.
This will generate name pinning configuration for the interface 'nic1' - continue (y/N)?
y
There already exists a pin for NIC 'nic1' - aborting.
The tool refuses to re-pin an interface that already has a matching 50-pmx-*.link file corresponding to its MAC address. This is the case for any installation where the installer option was enabled. The solution is simple, because all you have to do is delete that file and run the operation again:
sudo rm /usr/local/lib/systemd/network/50-pmx-nic1.link
sudo pve-network-interface-pinning generate --interface nic1 --target-name en10g0
We confirm, and this time it works!
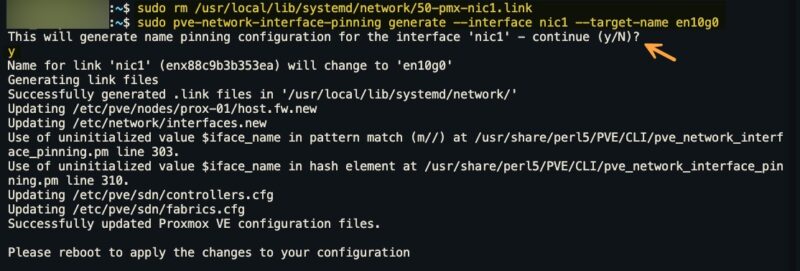
Note - Updated files: the new name is applied in the network configuration, the node firewall, and the SDN. However, the datacenter firewall (cluster.fw) is not modified. Check it if your rules reference interfaces (see our tutorial on Proxmox VE’s native firewall).
Reviewing the changes
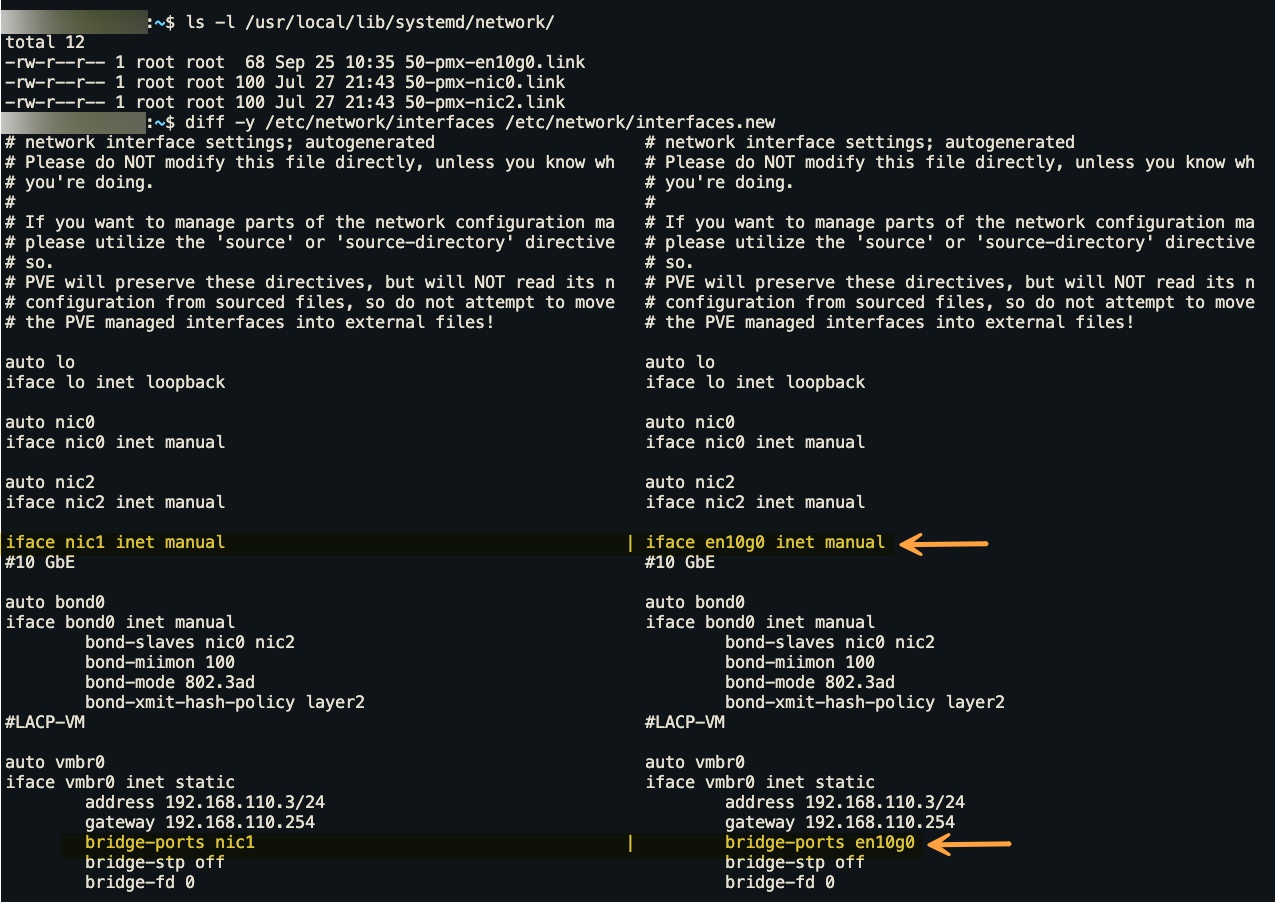
The network configuration is not modified directly: the tool writes an interfaces.new file, which you can compare with the original.
diff -y /etc/network/interfaces /etc/network/interfaces.newOnly two lines change: iface nic1 inet manual becomes iface en10g0 inet manual, and bridge-ports nic1 becomes bridge-ports en10g0 in the definition of vmbr0.
In the web interface, the change appears as pending in prox-01 > System > Network: en10g0 is listed but inactive, while nic1 remains active.
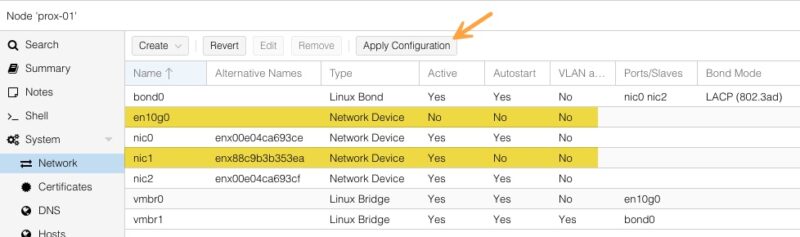
Warning: do not click Apply Configuration or Revert. The first applies the configuration live while the card is still called nic1: vmbr0 would lose its port, and you would lose access to the server. The second deletes interfaces.new but leaves the new .link file in place, with the same result at the next reboot.
You must reboot the Proxmox VE server (now or later, depending on whether you have other interfaces to rename).
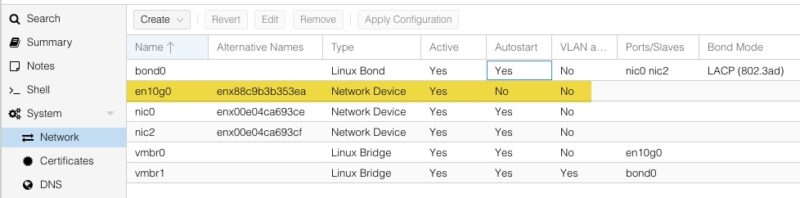
sudo rebootAfter the reboot, everything is in order in the Proxmox VE interface:
Renaming bond members
The method is identical for the two 2.5 GbE ports, with the command run once for each interface:
sudo rm /usr/local/lib/systemd/network/50-pmx-nic0.link /usr/local/lib/systemd/network/50-pmx-nic2.link
sudo pve-network-interface-pinning generate --interface nic0 --target-name en2g5p0
sudo pve-network-interface-pinning generate --interface nic2 --target-name en2g5p1
In each .link file, the tool correctly specified the real MAC address of each interface.
sudo grep -H MACAddress /usr/local/lib/systemd/network/*.link

/usr/local/lib/systemd/network/50-pmx-en10g0.link:MACAddress=88:c9:b3:b3:53:ea
/usr/local/lib/systemd/network/50-pmx-en2g5p0.link:MACAddress=00:e0:4c:a6:93:ce
/usr/local/lib/systemd/network/50-pmx-en2g5p1.link:MACAddress=00:e0:4c:a6:93:cf
The en2g5p1 file contains the port’s original MAC address (...:cf), not the one imposed by the bond (...:ce). As for the interfaces.new file, it correctly takes into account the two successive runs of the pve-network-interface-pinning command. So the bond line becomes bond-slaves en2g5p0 en2g5p1.
Applying and verifying
Reboot the server, ideally with console access nearby in case of trouble:
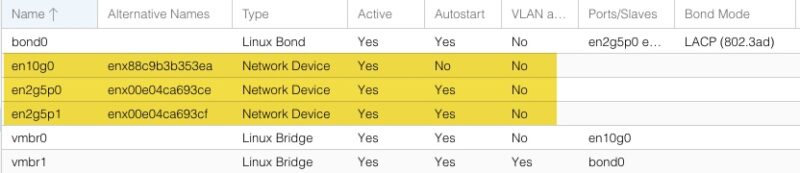
sudo rebootOnce you’re back in, check the active names of your interfaces, either from the command line or in the web interface.
ip -br linkEverything is correct:
Rolling back
The pve-network-interface-pinning tool offers no subcommand to undo changes. As long as the server has not been rebooted, simply delete what it generated and restore the old file (example for nic1):
# Delete the new pin and the pending configuration
sudo rm -f /usr/local/lib/systemd/network/50-pmx-en10g0.link /etc/network/interfaces.new

# Restore the original pin (thanks to our previous backup)
sudo cp -a /root/backup-pinning/network/50-pmx-nic1.link /usr/local/lib/systemd/network/
Conclusion
With pve-network-interface-pinning, renaming a network interface in Proxmox VE takes just a few minutes, and the tool does most of the work: generating the .link files, updating the network configuration, firewall, and SDN. It also handles bond members correctly. Once the change is made, remember this rule: reboot, don’t apply it live.
To go further, consider securing Proxmox VE SSH access with key-based authentication, since these changes are made from the command line.