PowerBgInfo: Customize Server Wallpapers with PowerShell
Do you like Microsoft’s SysInternals BgInfo tool? Then you’ll love PowerBgInfo. The idea is the same: customize the Windows wallpaper by displaying information about the local system. The big plus: it’s a PowerShell module, so you can display whatever you want thanks to the power of PowerShell and the PowerBgInfo tile system.
PowerBgInfo is yet another gem developed by Evotec IT, like other must-have modules such as PsWriteHtml, GPOZaurr, and many more. It can display basic information on your server desktop, such as the system name, the OS, the IP address, or the name of the logged-in user. It can also display many other pieces of information, depending on your needs: there is no real limit. The advantage lies in native PowerShell usage: any metric that can be retrieved by a script (via WMI, CIM, local files, or network requests) can be injected into the wallpaper GUI through an overlay on the image.
In the example below, I display the status of Windows Update, storage space, and CPU/RAM load. The principle is simple: you retrieve the information with PowerShell, prepare the output (expected format), associate it with a tile, and PowerBgInfo overlays it on the machine wallpaper.
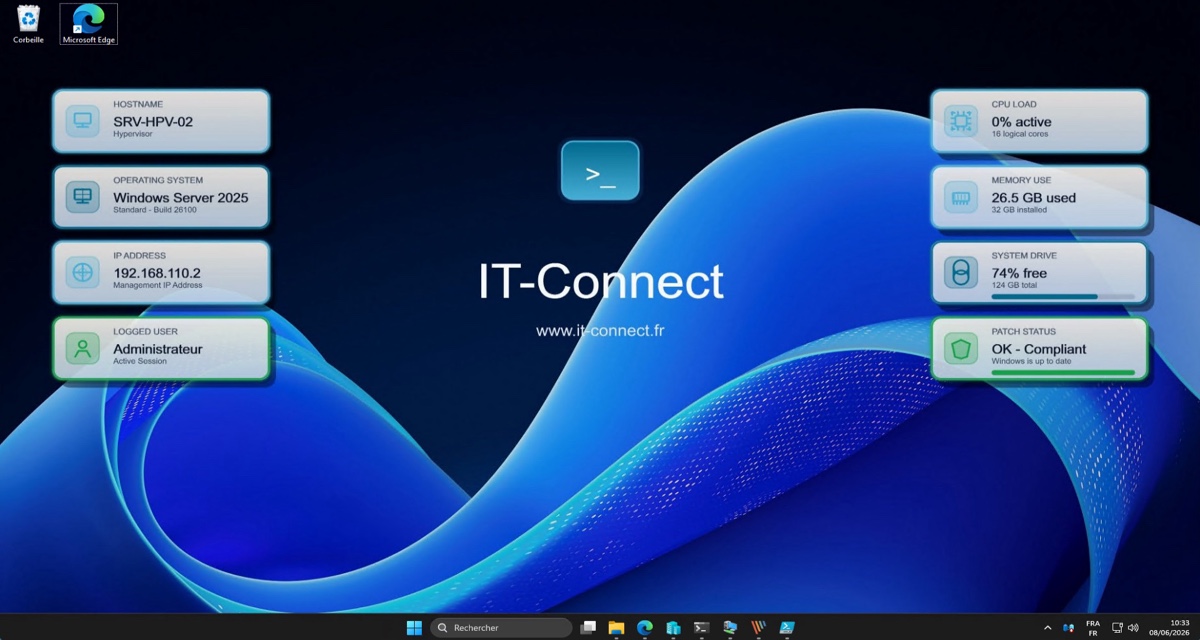
PowerBgInfo delivers a very clean and customizable result. You can keep things very simple (like BgInfo), but also go much further thanks to the addition of charts, service status indicators, and more... You can find code examples and rendered output on the PowerBgInfo project GitHub.
Whatever you choose to display, the principle remains the same: the final image is generated and then applied as the desktop or lock screen wallpaper (or both). Nothing keeps running in the background as a service.
Table of Contents
A Complete Introduction to PowerBgInfo
If you want to learn how to use PowerBgInfo, from installation to building your first script, I invite you to watch my YouTube video. I also explain how to deploy and configure PowerBgInfo across multiple machines using a Group Policy.
Find all the PowerShell scripts on GitHub:

Installing the PowerBgInfo Module
To start using PowerBGInfo, you need to install the module on your Windows machine. The most direct method is to install it from the PowerShell Gallery using the following command:
Install-Module -Name PowerBGInfo -ForceFor an automated deployment across a server farm or client workstations, I recommend creating a local copy of the module with the Save-Module command:
Save-Module -Name PowerBGInfo -Path "C:\Scripts\PowerBGInfo\Modules"This method stores the module and its dependencies in a local folder. Then move this folder to a share, such as \\votre-domaine.local\NETLOGON\PowerBGInfo\Modules to copy the module to the machines where you want to use it (Robocopy is your friend).
Creating a PowerBgInfo Script
The strength of PowerBGInfo lies in the PowerShell script that orchestrates data collection and the visual generation of the wallpaper. This script is usually split into three distinct sections.
1. Collecting system metrics
Using PowerShell cmdlets (notably CIM management cmdlets), the script queries the system to retrieve static and dynamic data. For example, to get the operating system version, the free space on the C drive, RAM usage, or pending Windows Update status. This data is stored in variables to be injected into PowerBgInfo commands later.
2. Defining the visual identity and tiles
The module lets you define a custom color palette to match your organization’s branding. Each collected piece of information is then associated with a tile through specific commands. For each tile, you can configure:
- Alignment: placement on the left or right side of the screen.
- Icon: selection from around ten predefined icons (system, network, processor, storage, user).
- Text: the main label, the dynamic value, and a text detail line.
- Visual indicators: adding a gauge or progress bar (useful for showing disk usage or RAM usage).
Here is an example of how to define a tile:
New-BGInfoVisualCanvasTile -Side Left -IconKind Computer -SurfaceStyle Raised -Label HOSTNAME -Value '{{HostName}}' -Detail 'Hypervisor' -Accent '#49b1d7FF' Here is the result:

3. Applying the wallpaper
The final command New-BGInfo handles assembling all these elements. It requires a default background image (for example, a corporate background that the marketing team will send you with a smile) or the default Windows Server image. The script applies the tiles over this reference image, then saves the result in a local folder, such as C:\ProgramData\PowerBGInfo.
You get a single output image that combines all the elements.
New-BGInfo -MonitorIndex 0 -Target Both {

    New-BGInfoVisualCanvas -Title 'IT-Connect' -Subtitle 'www.it-connect.fr' -FeatureAnchor BottomRight -FeatureWidth 400 -FeatureOffsetX 120 -FeatureOffsetY 120 -Tile $tiles @palette

} -FilePath "C:\Windows\Web\Wallpaper\Windows\img19b.jpg" `
  -WallpaperFit Fill `
  -ConfigurationDirectory "C:\ProgramData\PowerBGInfo"
The command parameters also let you specify:
-Target: where should this wallpaper be applied? On the user desktop, the lock screen, or both, or should it only be exported as an image.-MonitorIndex 0: the number of the screen on which to display the wallpaper.-WallpaperFit: how to fit the wallpaper image on the desktop (stretch, center, or fill).-FilePath: the base wallpaper image on which to overlay the PowerBgInfo elements.-ConfigurationDirectory: the directory where PowerBgInfo can store its files, including the generated wallpaper (required).
Dynamic Information Updates
If you display static information, you do not need to launch PowerBgInfo at regular intervals. However, if you use it to display dynamic information, you need to relaunch it every X minutes to refresh the wallpaper (depending on the required level of accuracy).
The PowerShell script is used to create a scheduled task to run PowerBgInfo at regular intervals. More specifically, this scheduled task will launch the script C:\Scripts\Set-WallpaperPowerBGInfo.ps1 at logon and it will then run every minute. This is an example that I encourage you to customize.
# 1. Action : launch the PowerShell script
$Action = New-ScheduledTaskAction -Execute "powershell.exe" `
    -Argument "-WindowStyle Hidden -NoProfile -ExecutionPolicy Bypass -File `"C:\Scripts\Set-WallpaperPowerBGInfo.ps1`""

# 2. Trigger : at logon + repeat every minute
$Trigger = New-ScheduledTaskTrigger -AtLogOn

# Manage trigger repetition, here every minute
$Repetition = New-CimInstance -ClassName MSFT_TaskRepetitionPattern `
    -Namespace Root/Microsoft/Windows/TaskScheduler `
    -Property @{ Interval = "PT1M" } `
    -ClientOnly

$Trigger = New-ScheduledTaskTrigger -AtLogOn
$Trigger.Repetition = $Repetition

# 3. Settings
$Settings = New-ScheduledTaskSettingsSet -AllowStartIfOnBatteries -DontStopIfGoingOnBatteries `
    -StartWhenAvailable -MultipleInstances IgnoreNew

# 4. User context ("Users" group via SID)
$Principal = New-ScheduledTaskPrincipal -GroupId "S-1-5-32-545" -RunLevel Limited

# 5. Registration
Register-ScheduledTask -TaskName "IT-Connect_PowerBGInfo_Refresh" `
    -Description "Refreshes the dynamic wallpaper every minute" `
    -Action $Action `
    -Trigger $Trigger `
    -Settings $Settings `
    -Principal $Principal `
-ForceNote: choosing the execution context for the scheduled task is an important point. By default, a standard user has the right to change their own wallpaper. Running the task with the privileges of the logged-on user is therefore sufficient for most displays.
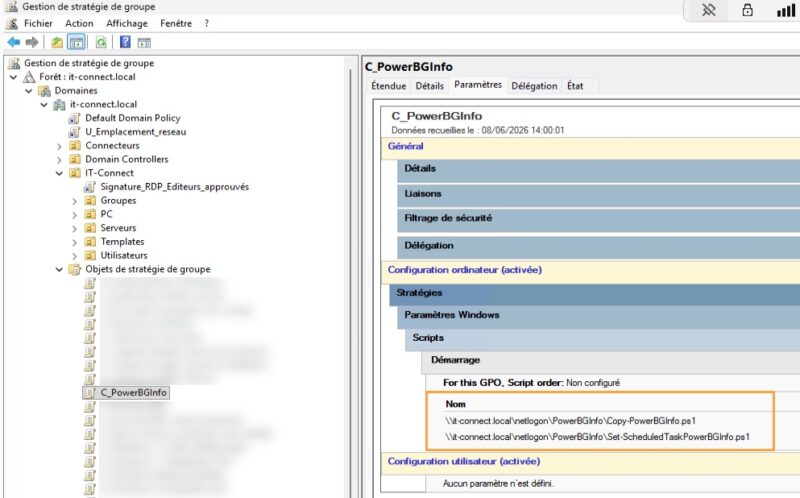
Automated PowerBgInfo Deployment via GPO
To apply this configuration across a set of servers in a centralized way, using an Active Directory Group Policy Object (GPO) is a good approach. For my part, I configured a Group Policy that launches two PowerShell scripts at machine startup.
Script 1 - Copying Source Files
The first configuration script runs at the computer configuration level during system boot. Its role is to copy the files from the NETLOGON network share to the local machine. It uses the command-line tool robocopy to copy the PowerBGInfo module directory from the NETLOGON folder to the local system modules directory: C:\Program Files\WindowsPowerShell\Modules. Here, we are using the output of the Save-Module command presented earlier.
At the same time, this script ensures that the local application folder (C:\ProgramData\PowerBGInfo) is created and drops the custom generation script as well as the reference wallpaper image there.
Here is the code for the Copy-PowerBGInfo.ps1 script:
# 1. Copy the PowerBGInfo module to the machine via Robocopy
$SourceModule = "\\it-connect.local\netlogon\PowerBGInfo\Module"
$DestModule   = "$Env:ProgramFiles\WindowsPowerShell\Modules"

robocopy $SourceModule $DestModule /E /XO /R:2 /W:5 /NFL /NDL /NJH /NJS

# Create the directory in ProgramData for data
if(! (Test-Path "C:\ProgramData\PowerBGInfo")){
    New-Item -Path "C:\ProgramData\PowerBGInfo" -ItemType Directory -Force
}

# 2. Copy the wallpaper customization script
$SourceScript = "\\it-connect.local\netlogon\PowerBGInfo\Set-WallpaperPowerBGInfo.ps1"
$DestScript   = "C:\ProgramData\PowerBGInfo"

Copy-Item -Path $SourceScript -Destination $DestScript -Force

# 3. Copy the wallpaper
$SourceWallpaper = "\\it-connect.local\netlogon\PowerBGInfo\img19-resize.jpg"
$DestWallpaper   = "C:\Windows\Web\Wallpaper\Windows"

Copy-Item -Path $SourceWallpaper -Destination $DestWallpaper -Force
Script 2: Creating the Scheduled Task
The second script, also executed when the computer starts, is responsible for configuring a local scheduled task on the target system.
Reminder: since some data such as RAM usage or disk space evolves continuously, the wallpaper must be regenerated at regular intervals to remain relevant. The scheduled task is configured to trigger at logon for any user, then repeat cyclically (for example, every minute or every 5 minutes). It calls the PowerShell script stored locally in C:\ProgramData\PowerBGInfo.
The content of the Set-ScheduledTaskPowerBGInfo.ps1 script was presented in the section titled Dynamic Information Updates.
Conclusion
PowerBGInfo is a modern and more customizable alternative to the classic BgInfo solution. By combining the flexibility of PowerShell with a tile-based graphical rendering engine, this tool makes it possible to design clear and useful backgrounds! It can be used on Windows and Windows Server, but it is not impossible that it could also work on Linux, provided that PowerShell 7 is installed (if you test it, I’d love to hear your feedback).