How to Configure DNS-over-HTTPS on Windows Server 2025 DNS Server
With the June 2026 security update, the DNS Server role in Windows Server 2025 gains a new feature: it can finally answer queries over DNS-over-HTTPS (DoH), making it possible to encrypt traffic between clients and the DNS server, especially for internal records.
DNS traffic travels in clear text on a network. That is how the DNS protocol was designed; it is not a flaw in the DNS implementation on Windows. DNS was built to be fast, not secure. But of course, that creates a risk and makes it vulnerable to several attack techniques, including spoofing.
DNS-over-HTTPS addresses this security issue by encapsulating DNS queries inside HTTPS connections, which makes them unreadable when capturing network traffic. They are encrypted through HTTPS. This is not the only valid method for encrypting DNS queries; DNS-over-TLS (DoT) and DNS-over-QUIC (DoQ) are also worth mentioning.
In this tutorial, we will first observe clear-text DNS traffic with Wireshark, then enable DoH on the DNS server under Windows Server. Here is the environment used throughout this article:
- Active Directory domain name :
it-connect.local - Domain controller and DNS server :
SRV-ADDS-01 - Enterprise Certification Authority (AD CS) :
SRV-CA-ROOT - Client workstation :
W11-01(Windows 11)
Before we begin, note that the server-side DoH support for DNS Server requires Windows Server 2025 with the June 2026 security update (KB5094125) or a later version. Without this patch, the Set-DnsServerEncryptionProtocol cmdlet we will use later will not expose the parameter required to enable encryption.
Table of Contents
- Understanding why DNS is not encrypted by default
- Observing clear-text DNS with Wireshark
- Checking prerequisites on the DNS server
- Obtaining a TLS certificate with AD CS
- Requesting the certificate from each DNS server
- Binding the certificate to the HTTPS port
- Enabling DNS-over-HTTPS on the DNS server
- Verifying that DoH works correctly
- Testing DoH from a Windows 11 client
- Conclusion
- FAQ - DoH Windows Server 2025
Understanding why DNS is not encrypted by default
The DNS protocol was designed at a time when privacy was not a priority. Classic DNS relies on port 53, mostly over UDP and over TCP for large responses or zone transfers. In both cases, the content of the query and the response is transmitted without any encryption.
This means that resolving a name such as srv-fichiers-01.it-connect.local or intranet.it-connect.local is visible in clear text on the network. An attacker who manages to position themselves between the client and the server can not only read these queries, but also modify them. This is the principle behind a DNS spoofing attack, where a forged response redirects the user to a server controlled by the attacker.
DoH, standardized by RFC 8484, changes the game by carrying DNS queries inside an HTTPS session, usually over TCP port 443. The traffic then becomes indistinguishable from standard encrypted web browsing: traffic analysis would show a TLS connection to an address, without revealing which domain names are being resolved.
Observing clear-text DNS with Wireshark
Before encrypting anything, it is useful to see for yourself that DNS travels in clear text. This step serves as a starting point: we will compare before and after to confirm that DoH is really working.
On the W11-01 workstation, install Wireshark (or use Pktmon, the built-in Windows capture tool, if you do not want to install third-party software). Start a capture on the network interface that communicates with SRV-ADDS-01.
To isolate DNS traffic, apply the following display filter in Wireshark:
dnsIf you want to filter only traffic with your DNS server, combine the filter with the domain controller IP address:
dns && ip.addr == 192.168.10.201While the capture is running, generate a DNS query from the client. Open a PowerShell console and run:
Resolve-DnsName -Name www.it-connect.fr -Type ABack in Wireshark, you will see two characteristic packets appear: a query (Standard query) and its response (Standard query response). If you select the query packet and expand the "Domain Name System" section, the queried name appears in plain text in the request. That is precisely the information that DoH will hide.
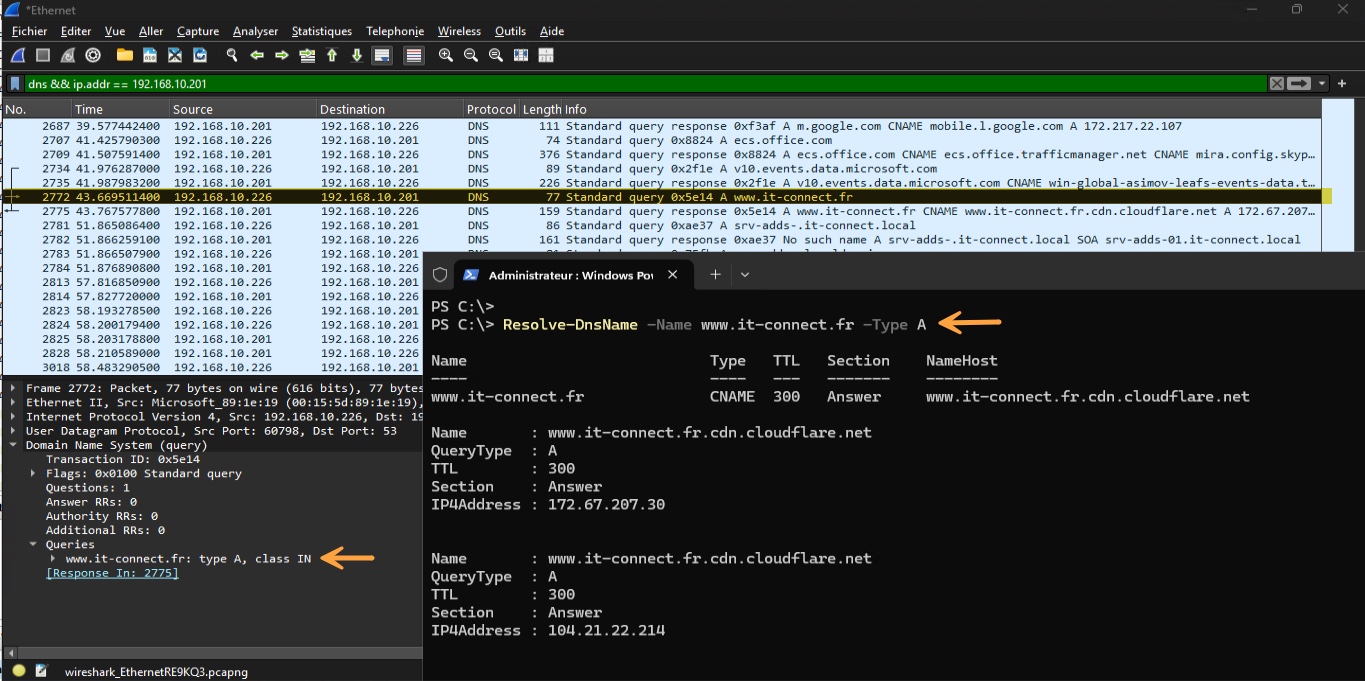
Keep this observation in mind, because after enabling DoH, port 53 will no longer be used by compatible clients and traffic will switch to port 443 over TLS. Most importantly, the traffic will be encrypted!
Checking prerequisites on the DNS server
Before working with certificates, let’s verify that the SRV-ADDS-01 server is ready. Three conditions must be met.
First, the June 2026 security update (KB5094125) must be installed. You can check this quickly in PowerShell:
Get-HotFix -Id KB5094125

Source        Description      HotFixID      InstalledBy          InstalledOn
------        -----------      --------      -----------          -----------
SRV-ADDS-01   Security Update  KB5094125     AUTORITE NT\Système  15/06/2026 00:00:00
If the command returns nothing, install the latest Windows updates before continuing. The result above is the expected output before going on.
Second, you must have a trusted certification authority capable of issuing a server authentication certificate. In our case, this is the role of SRV-CA-ROOT, an Enterprise Certification Authority integrated with Active Directory.
Third, the port used by DoH (by default TCP 443) must be allowed inbound on the server. The rule can be created through the graphical interface or with PowerShell using the following command:
New-NetFirewallRule `
    -DisplayName "DNS over HTTPS" `
    -Direction Inbound `
    -Protocol TCP `
    -LocalPort 443 `
    -Action Allow
Verify that the rule has been created successfully:
Get-NetFirewallRule -DisplayName "DNS over HTTPS"Note : also remember any "hardware" firewalls placed between the clients and the server: they must also allow TCP traffic on this port, otherwise clients will not be able to establish the DoH session.
Obtaining a TLS certificate with AD CS
DoH relies on TLS, and therefore on a certificate. The DNS server presents this certificate to clients to prove its identity and establish the encrypted session. The certificate must meet several requirements, otherwise the connection will fail.
Here are the expected characteristics:
- Enhanced Key Usage (EKU) : the certificate must include the object identifier for "Server Authentication" (
1.3.6.1.5.5.7.3.1). - Subject Alternative Name (SAN) : it must contain the fully qualified domain name (FQDN) or IP address that clients will use in their DoH URI template. In our case, this will be
srv-adds-01.it-connect.local. I am using the DNS server FQDN here again (which is also an AD domain controller, a classic setup). - Private key : it must be present in the local computer store, associated with the certificate, and strong private key protection must not be enabled.
- Trust chain : the certificate must be issued by a CA trusted by both the DNS server and the clients.
The default "Web Server" template does include the Server Authentication EKU, but it does not allow autoenrollment and requires the subject to be entered manually for every request. It will serve as the starting point for creating our custom template aligned with DoH requirements.
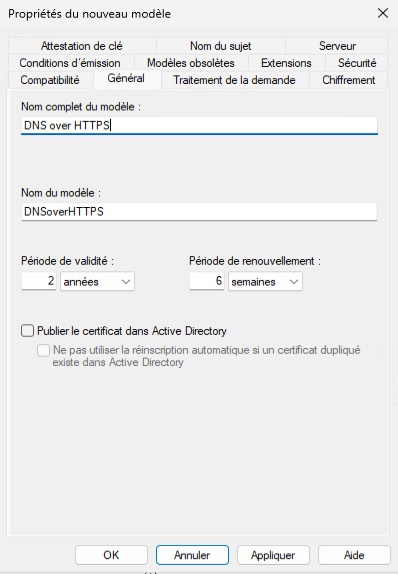
On SRV-CA-ROOT, open the certificate templates console (certtmpl.msc) and duplicate the "Web Server" template.

Then adjust the following tabs:
- General : display name "DNS over HTTPS", 2-year validity with renewal 6 weeks before expiration. Leave certificate publishing to Active Directory unchecked, as it is not needed for a server authentication certificate.
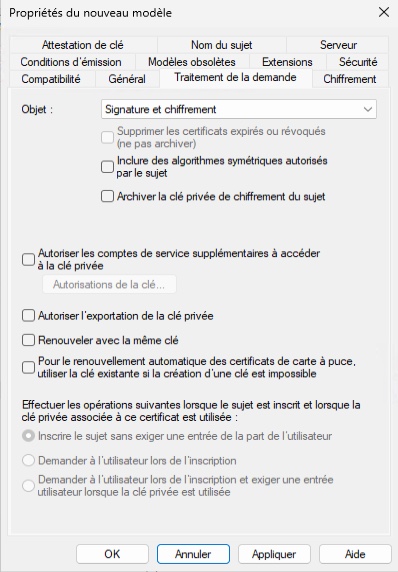
- Request Handling : keep "Signature and encryption". Leave the "Allow private key to be exported" option unchecked so the key remains on the server. The certificate will be requested directly from the DNS server, so we do not need to export the key (if that is not the case, you must enable the option). Do not check "Require strong private key protection": this protection is incompatible with DoH and would cause the binding to fail.
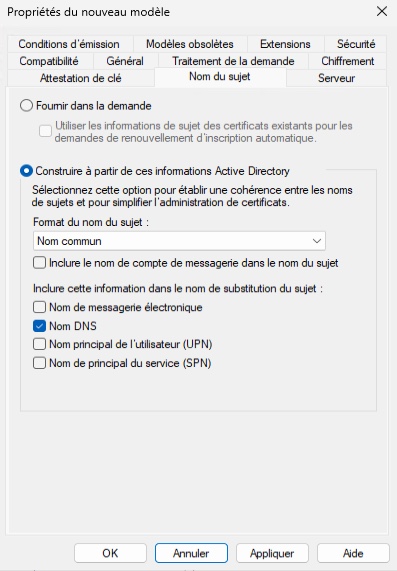
- Subject Name : select "Build from this Active Directory information", with the "Common name" format, and check "DNS name" under alternative names. The SAN will then be filled in automatically with the server FQDN, avoiding typos and preventing a requester from claiming an arbitrary name.
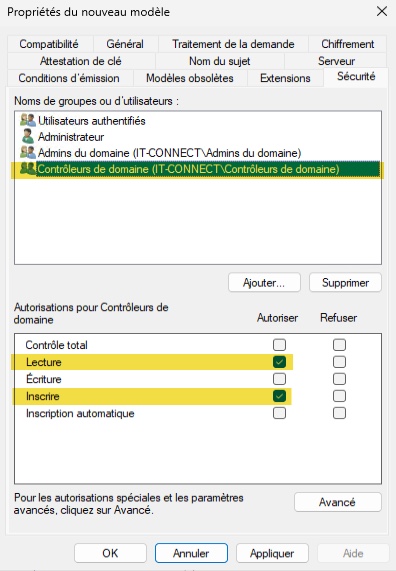
- Security : add the "Domain Controllers" security group that exists by default in Active Directory. I am using it here because all my DCs are DNS servers and they are the only ones that need this certificate. Adjust as needed. This group must be able to read and enroll certificates.
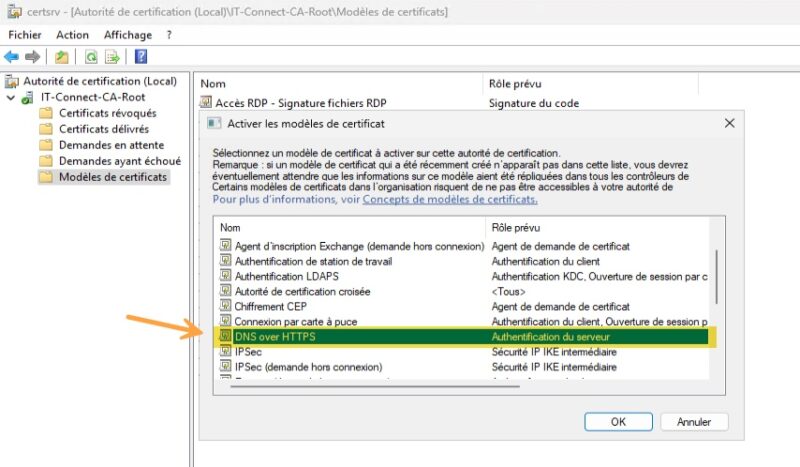
Once the template is saved, publish it on the AD CS authority. Then, using the certsrv.msc console, under "Certificate Templates", right-click > New > Certificate Template to Issue, then select the template we just created, namely "DNS over HTTPS".
Requesting the certificate from each DNS server
Because autoenrollment is not used, each DNS server requests its own certificate manually. This choice of a distinct certificate per server has a practical advantage: the private key is generated locally and never needs to be exported or moved. There is therefore no .pfx file to copy, and no PFX password to manage.
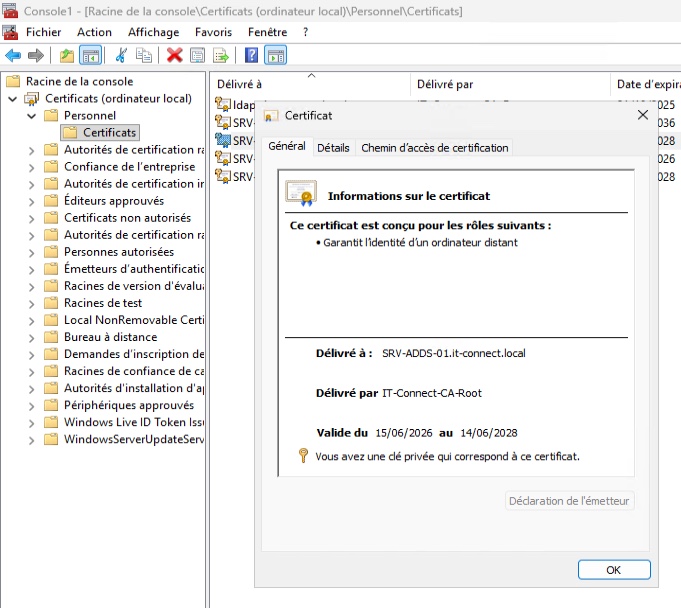
On SRV-ADDS-01, and then on any other DNS server such as SRV-ADDS-02 (which is my second server), open the local computer certificate store (certlm.msc), then do the following: Personal > Certificates, right-click > All Tasks > Request New Certificate, and choose the "DNS over HTTPS" template. Because the subject is built from Active Directory, no additional input is required.
For those in a hurry, here is the PowerShell equivalent to run as administrator on each server (use the internal template name, without spaces):
Get-Certificate `
    -Template "DNSoverHTTPS" `
    -CertStoreLocation "Cert:\LocalMachine\My"
The certificate and its private key are placed directly into the Cert:\LocalMachine\My store. Each server will then use its own FQDN in its DoH URI template. The certificate is indeed present on the server!
Note that this separate-certificate approach works well when clients query each server by name. If you prefer a shared name across multiple servers (behind a load balancer, for example), you would need a shared certificate containing that name in the SAN, with an exportable key to deploy it on each machine, at the cost of slightly lower protection.
Note: if you retrieve a certificate generated on another machine (or issued by a public CA), you will have a .pfx file to import with Import-PfxCertificate -CertStoreLocation Cert:\LocalMachine\My. In that case, the private key must have been marked as exportable when created so that it can be moved, which means adjusting the template.
Binding the certificate to the HTTPS port
With the certificate in place, it is now necessary to associate it with the port on which the DNS server will listen for DoH connections. This binding is performed at the Windows HTTP stack level, using the netsh utility.
Start by generating a unique identifier (GUID) that will be used to identify the application owning the binding. The PowerShell New-Guid command is used to generate a random GUID.
$guid = New-GuidNext, retrieve the certificate. On a domain controller, there may already be several server authentication certificates whose subject or SAN contains the server FQDN. A filter based only on the subject would therefore return several of them, and $cert would become an array, which would cause the next configuration step to fail.
So, start by listing the candidate certificates to identify the correct one, displaying their thumbprint, expiration date (remember that the validity period is 2 years), and intended usage:
Get-ChildItem Cert:\LocalMachine\My |
    Where-Object { $_.Subject -match "srv-adds-01" } |
    Format-List Subject, Thumbprint, NotAfter, EnhancedKeyUsageList
Here is the certificate I am interested in:
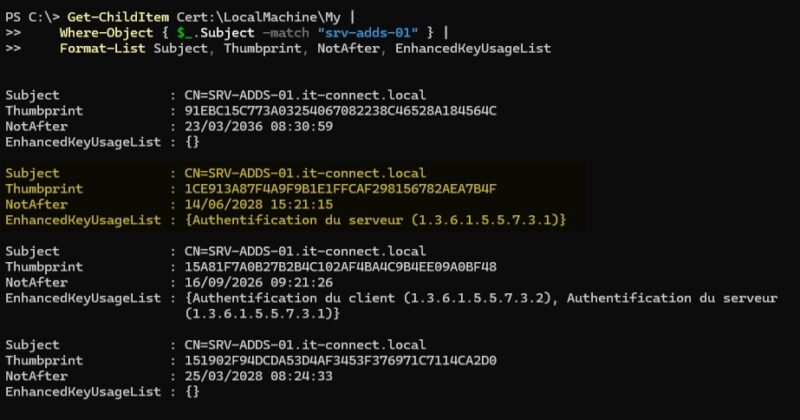
Copy the certificate thumbprint (Thumbprint) and retrieve it in PowerShell:
$cert = Get-Item -Path "Cert:\LocalMachine\My\<doh-certificate-thumbprint>"
$cert = Get-Item -Path "Cert:\LocalMachine\My\1CE913A87F4A9F9B1E1FFCAF298156782AEA7B4F"
Before continuing, verify that the variable contains only one certificate. The following command should return 1:
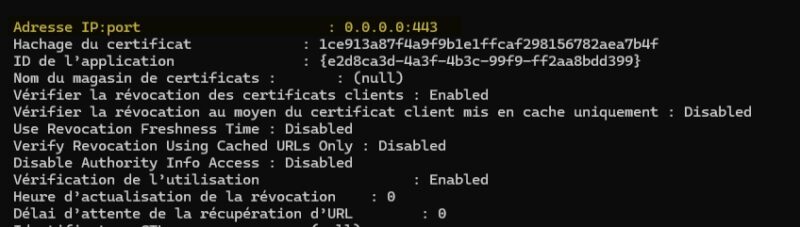
$cert.CountFinally bind the certificate to port 443 for all server IP addresses:
netsh http add sslcert ipport=0.0.0.0:443 certhash=$($cert.Thumbprint) appid="{$guid}"
Note : if your server hosts multiple IP addresses and you want DoH to respond only on one of them, replace 0.0.0.0 with the desired IP address. That address must match the name or IP present in the certificate SAN. Likewise, you can replace 443 with another port if 443 is already used by another service on the machine, which is rare on a domain controller (unless you install random software on it).
To confirm that the binding was registered successfully, display the existing SSL associations:
netsh http show sslcertLook for the entry corresponding to 0.0.0.0:443 (or your IP address) and verify that the "Certificate Hash" line matches the thumbprint you noted earlier.
Enabling DNS-over-HTTPS on the DNS server
Everything is now in place to enable encryption! Activation is done with the Set-DnsServerEncryptionProtocol cmdlet, specifying the URI template clients will use to reach the service.
The URI template follows the form https://<host>:<port>/dns-query. The host must match the name present in the certificate SAN, and the port must be the same as the binding port. In my case, the command looks like this:
Set-DnsServerEncryptionProtocol `
    -EnableDoh $true `
    -UriTemplate "https://srv-adds-01.it-connect.local:443/dns-query"
Then restart the DNS Server service to apply the configuration:
Restart-Service -Name DNSThe DNS server now responds to DoH traffic on port 443, while continuing to listen for classic DNS on port 53 for clients that are not configured for DoH. This coexistence allows a gradual migration: you can move your machines to DoH in batches without disrupting resolution for systems that have not yet been configured.
Verifying that DoH works correctly
Before touching the client, check the status of the DoH configuration on Windows Server 2025. First, this command should return the DoH endpoint declaration:
Get-DnsServerEncryptionProtocol
EnableDoh : True
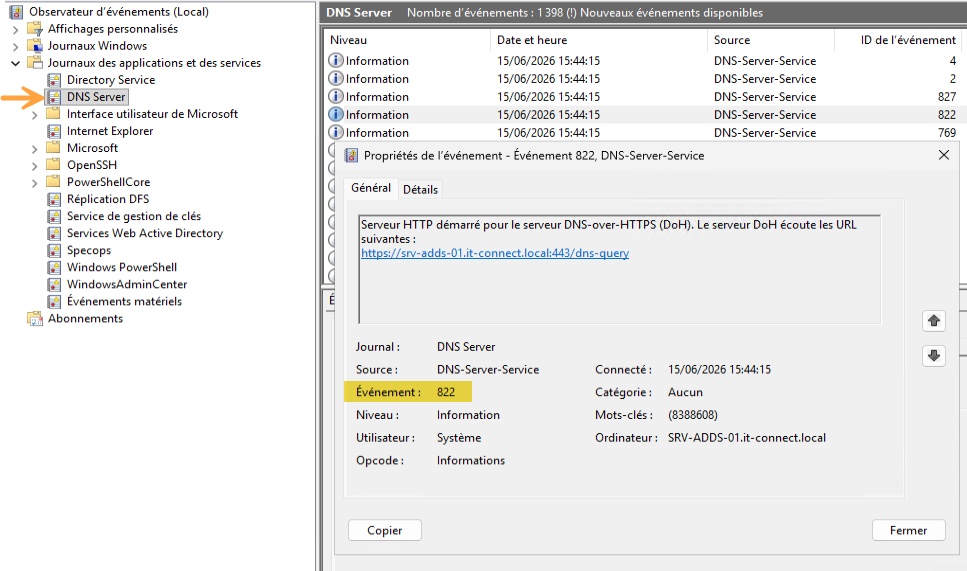
UriTemplate : https://srv-adds-01.it-connect.local:443/dns-queryThen open Event Viewer on SRV-ADDS-01 and go to: Applications and Services Logs > DNS Server. Look for event ID 822. Its presence confirms that the DoH service started correctly.
Here is an example:
Testing DoH from a Windows 11 client
The DNS server is ready to receive DNS queries on port 443. However, a client workstation still needs to be configured to verify that everything works properly. Here, I will reuse my W11-01 client so that it queries the DNS server over DoH. This will also let us validate the result with a new network capture.
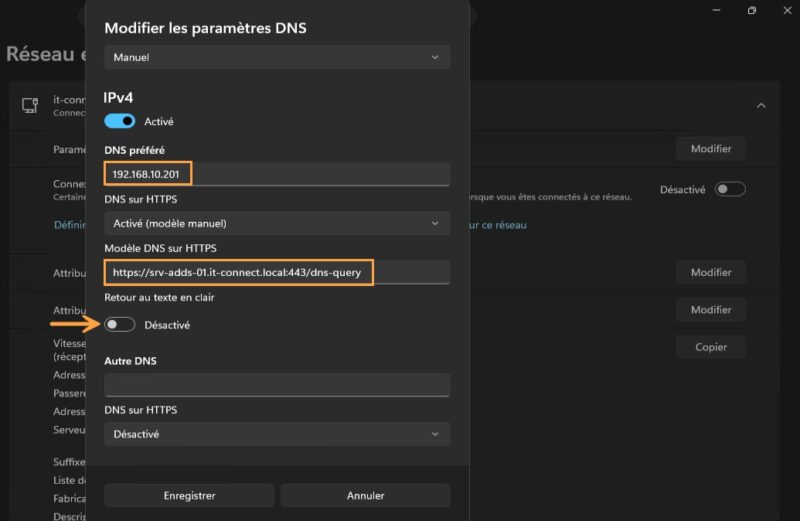
On Windows 11, the client-side DoH is configured through network adapter settings or in PowerShell. Declare the DNS server as supporting encryption with an URI template identical to the server's. Here is an example in PowerShell, using 192.168.10.201, since that is the IP address of SRV-ADDS-01:
Add-DnsClientDohServerAddress `
    -ServerAddress "192.168.10.201" `
    -DohTemplate "https://srv-adds-01.it-connect.local:443/dns-query" `
    -AllowFallbackToUdp $false `
    -AutoUpgrade $true
The -AllowFallbackToUdp $false parameter enforces encryption and prevents the client from falling back to clear-text DNS if DoH fails. This is a setting to use carefully, because a configuration error will break DNS resolution on the local machine.
From the Windows 11 "Settings" app, you can also configure DoH: Network & Internet > Ethernet > DNS server assignment > Edit. You then need to specify the DNS server IP address, the URI template for DoH, and the "Fallback to plaintext" option corresponds to fallback (use classic clear-text DNS if DoH fails).
Now I will repeat the same DNS test as at the beginning of the article. This is a good opportunity to compare before and after.
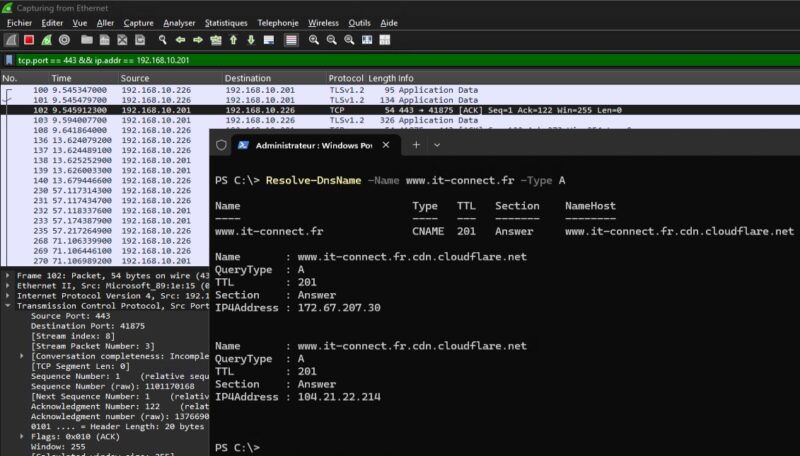
Resolve-DnsName -Name www.it-connect.fr -Type AThe resolution should complete normally. The difference is on the network. Restart a Wireshark capture on W11-01, but this time filter port 443 and the DNS server IP address:
tcp.port == 443 && ip.addr == 192.168.10.201You will see that queries no longer go in clear text on port 53 to the server. Instead, a TLS session is established to 192.168.10.201 on port 443, and the content of DNS queries is no longer readable! Excellent news! Wireshark shows TLSv1.2 traffic without being able to display the frame contents. That is proof that DoH is now protecting your queries.
Conclusion
The arrival of server-side DNS-over-HTTPS in Windows Server 2025 fills a long-standing gap for Active Directory environments. Until now, encrypting internal name resolution meant relying on third-party resolvers, which was clearly not ideal when resolving internal names! From now on, the DNS chain from the client to the domain controller can be protected by encryption using native Windows Server tools.
FAQ - DoH Windows Server 2025
Is server-side DoH available on all editions of Windows Server 2025?
Support for DoH through the DNS Server role is built into Windows Server 2025, provided you have installed the 2026-06 security update (KB5094125) or a newer version. The Standard and Datacenter editions are equally supported.
Does clear-text DNS on port 53 still work after enabling DoH?
Yes. Enabling DoH does not stop listening on port 53. The server answers both classic DNS and DoH simultaneously, which allows for a gradual client migration without service interruption.
What is the difference between DNS-over-HTTPS and DNS-over-TLS?
Both protocols encrypt DNS queries, but DoH encapsulates them in HTTPS over port 443, while DoT uses a dedicated TLS session on port 853. DoH blends into web traffic more easily and passes through firewalls more readily. Windows Server 2025 implements server-side DoH.
Can I use a self-signed certificate for DoH?
Technically, the binding will work, but clients will reject the connection if the certificate is not trusted. You would then need to import that certificate into the trusted root authority store of every client, which is not practical. A certificate issued by an enterprise AD CS or a public CA is still preferable. But for a PoC, why not.
How can I tell whether a client is really querying the server over DoH?
On the client side, the PowerShell cmdlet Get-DnsClientDohServerAddress lists the servers configured for encryption. A network capture filtered on ports 53 and 443 visually confirms that traffic is passing over TLS on 443 rather than in clear text on 53.
Does DoH also protect zone transfers between DNS servers?
No. DoH applies to name resolution between clients and the server. Zone transfers between DNS servers rely on other mechanisms and are not encrypted by this configuration. Secure them separately, for example by limiting transfers to authorized servers.
Does DoH replace DNSSEC?
No, the two mechanisms serve different purposes. DoH encrypts query transport to ensure confidentiality, while DNSSEC guarantees authenticity and integrity of responses through signatures. They complement each other and can be used together.