www.it-connect.fr


NetBird: How to Self-Host a Mesh VPN for Secure Remote Access
Access your entire homelab from anywhere, even over 5G, without opening a single port on your router: that is the promise of NetBird, an open source mesh VPN based on WireGuard. In the same spirit as Tailscale, it creates a private network between your devices, with one major difference: everything is open source, including the server that orchestrates the network. You can therefore host it yourself, without relying on a third-party service.
In this tutorial, I will show you how to install a self-hosted NetBird server on a VPS with Docker, then deploy the NetBird client on several machines. One of them, an LXC container on Proxmox VE, will act as a gateway to the local network: it will provide access to a web server and to the Proxmox administration interface, without installing an agent on those machines. Later, we will see how to lock down access with zero trust rules, how the Control Center works, and how to publish a service on the Internet with the reverse proxy built into NetBird. Finally, we will look at how to update NetBird and how it compares to Tailscale.
What is NetBird?
NetBird is an open source platform that lets you create a virtual private network between devices, wherever they are: a laptop on the road, a smartphone, a cloud server, or a machine in your homelab. Each device joins a shared network and can communicate with the others through an encrypted tunnel, as if they were on the same local network.
The project is developed by NetBird, a company based in Berlin. The code is written in Go and published on GitHub under two licenses: BSD-3-Clause for most of the repository, including the client, and AGPLv3 for the server components (management, signal and relay). The community edition is free and fully featured for homelab or small business use. Some advanced functions, such as user synchronization from an identity provider (with SCIM, for example) or network flow logging, require a commercial license. NetBird also offers a managed service, NetBird Cloud, if you do not want to host the control server yourself.
Here are some useful links:
- Official website: netbird.io
- Documentation: docs.netbird.io
- GitHub repository: github.com/netbirdio/netbird
For this tutorial, I used NetBird 0.81.5 (dashboard v2.95.0), the version retrieved by the installation script at the time of my tests. Version 0.82.0 has since been released: at the end of the article, we will see how to update the installation.
How does NetBird work?
A mesh network based on WireGuard
NetBird is built on WireGuard, a modern, lightweight, high-performance VPN protocol built into the Linux kernel. If you have already set up a WireGuard VPN server on Debian, you know that key and peer management quickly becomes tedious as the number of devices grows. That is what NetBird automates.
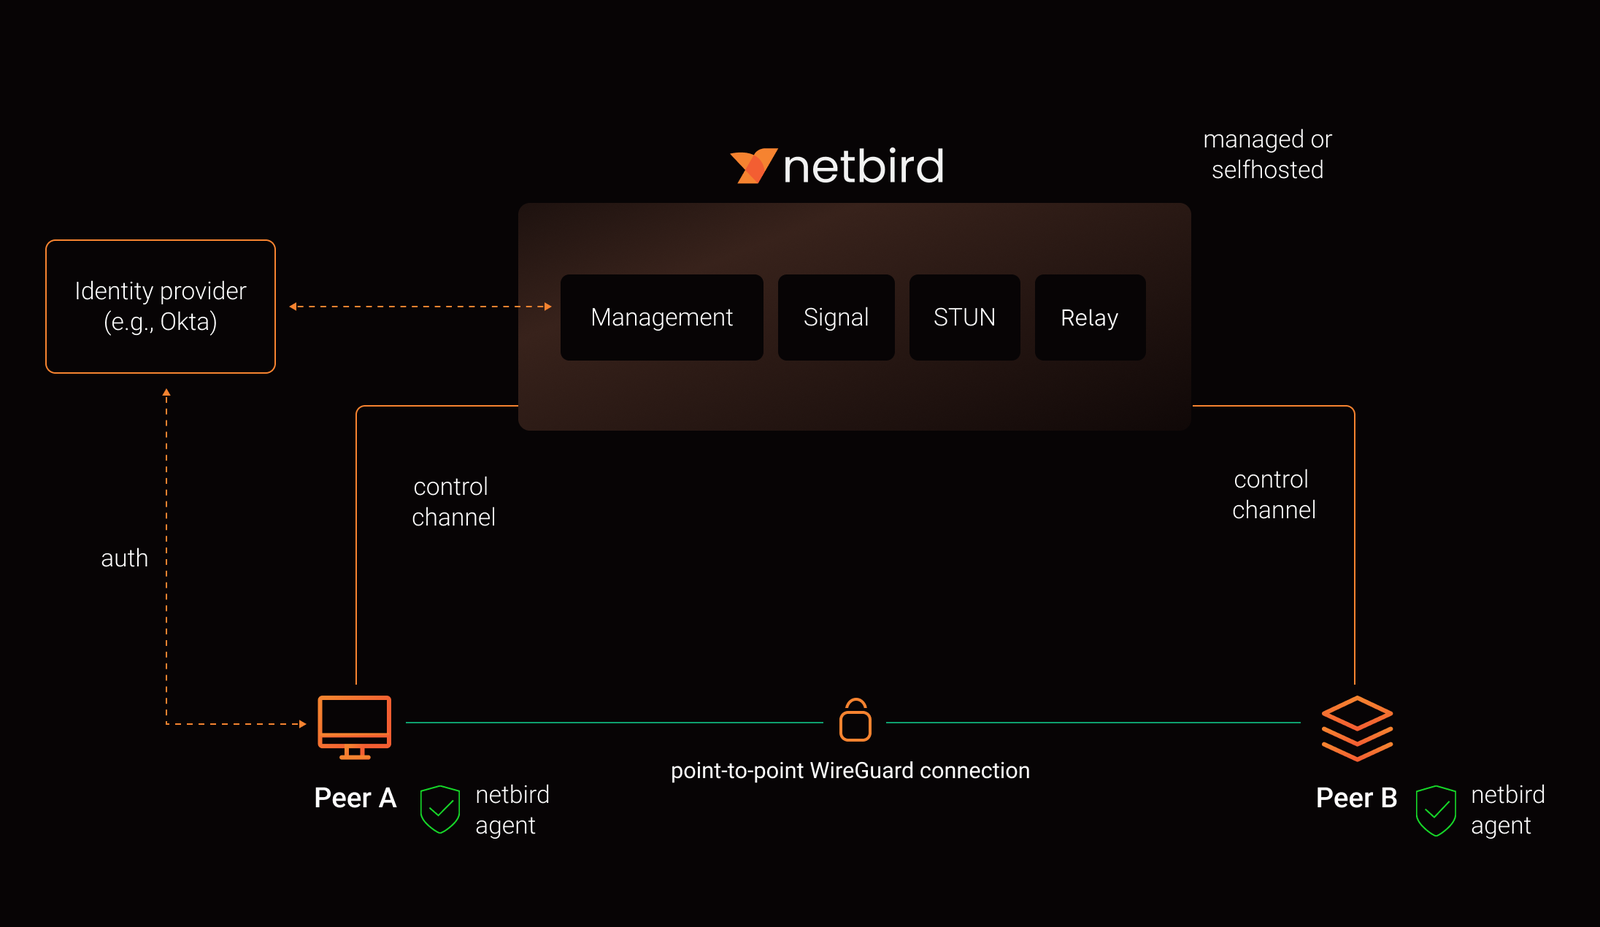
On each device, you install a NetBird agent. It creates a WireGuard interface (named wt0 on Linux) and the device gets an IP address in the NetBird network. In NetBird, each connected device is called a peer. Peers then communicate directly with each other, peer to peer: this is called a mesh network, or mesh VPN. There is no central VPN hub through which all traffic must pass, as with a classic VPN.
The addresses assigned to peers belong to the 100.64.0.0/10 range, reserved for CGNAT. NetBird picks a subnet there (100.69.0.0/16 on my instance) to reduce conflicts with private ranges used on your local networks.
The role of the NetBird server
If data does not pass through it, what is the server for? It coordinates the network. It combines several components:
- Management: it knows the list of peers, assigns them an IP address, distributes WireGuard public keys and access rules.
- Signal: it connects two peers so they can negotiate a direct connection. The exchanged messages are encrypted and it does not carry data.
- STUN: it helps each peer discover its public address so it can traverse the NAT on your router.
- Relay: it acts as a relay when a direct connection is impossible, for example when both peers are behind CGNAT or a very restrictive NAT. Traffic remains end-to-end encrypted by WireGuard: the relay carries the packets without being able to read them.
- Dashboard: this is the web administration interface, with a built-in identity provider for user authentication.
In recent versions of NetBird, the Management, Signal, Relay and STUN components are grouped into a single container called netbird-server. Keep one thing in mind: the server orchestrates everything, but your data does not pass through it, except as a last resort via the relay.
Peers and routing peers
There are two ways to use a NetBird peer:
- The standard peer: this is a client endpoint, such as your smartphone or laptop, which connects to other resources. It is reachable only on its own NetBird address.
- The routing peer: this is a peer that acts as a gateway to a network whose machines do not have the NetBird agent. It links the NetBird network to a traditional network (a LAN, a VLAN, or a cloud VPC).
The routing peer is the key piece for remote access to a homelab. Without it, every machine you want to reach would need its own agent, which is impossible for a switch, printer, or camera, and tedious for dozens of servers. With a single well-placed agent, you can access your Proxmox, your NAS, or a web server, while precisely controlling who can access what.
Prerequisites: where should the NetBird server be hosted?
Why use a VPS?
The NetBird server must be reachable by all your devices, wherever they are. It therefore needs a public IP address and a domain name. For this demonstration, I am using a VPS running Debian 13. A small VPS is more than enough: the documentation recommends at least 1 vCPU and 2 GB of RAM.
You also need to keep in mind that the server must be available at all times. If it stops responding, peers can no longer authenticate or establish new connections, and you lose remote access to your resources. A cloud VPS works well for this role because it does not depend on your home internet connection. Hosting the server at home, on a VM, is still possible, but you will need to open ports on your router. I think the VPS is really the best option, and given the required specs, it will only cost a few euros per month.
Create the DNS record
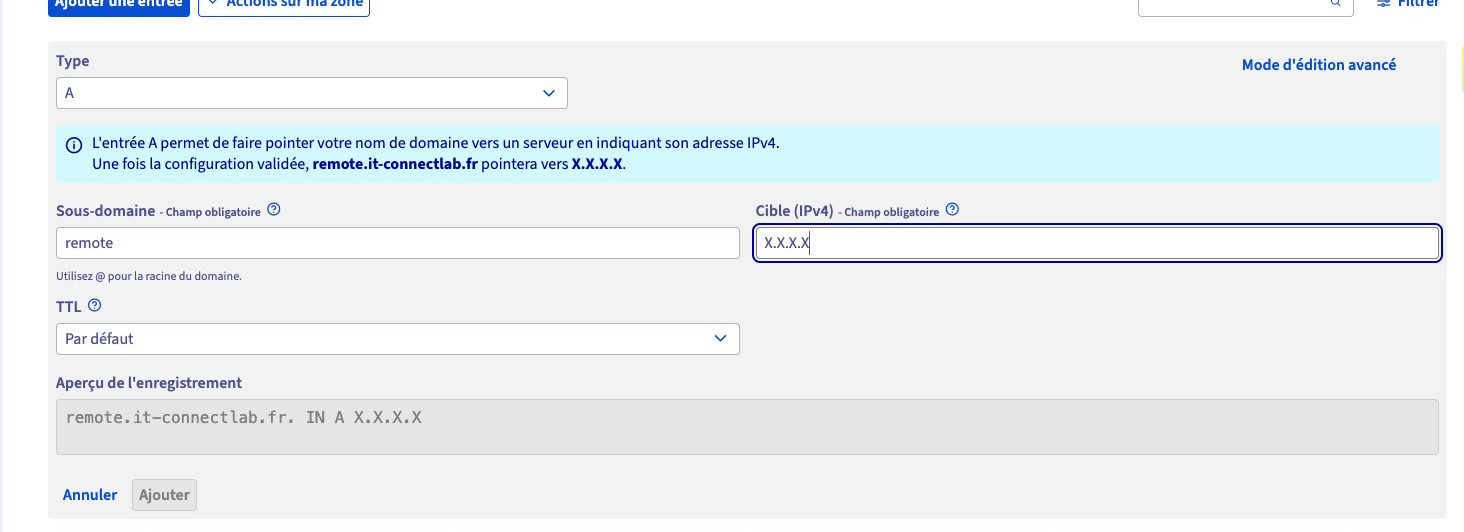
Before starting the installation, you need to create an A DNS record pointing to the public IP address of the VPS. In my case, this is remote.it-connectlab.fr.
It is important to do this first: the installation script requests a TLS certificate from Let's Encrypt, and for that to work, the name must already resolve to the server. You can verify this with the dig +short remote.it-connectlab.fr command, which should return the VPS IP address.
If you plan to use NetBird's built-in reverse proxy, you should also create a wildcard record (*.remote.it-connectlab.fr). We will come back to this in the last section.
Open the firewall ports
Whether you filter traffic directly on the VPS or at your hosting provider's firewall, here are the inbound ports to allow. This list matches the ports exposed by the stack generated by the installation script on my server:
| Port | Protocol | Role |
|---|---|---|
| 443 | TCP | Dashboard, API, signaling, and relay (WebSocket) |
| 80 | TCP | Let's Encrypt certificate validation and redirect to HTTPS |
| 3478 | UDP | STUN, for NAT traversal |
| 51820 | UDP | Optional: peer-to-peer connections for the NetBird reverse proxy |
Note: on older deployments (multi-container architecture) or with external relays, the documentation mentions other ports, such as 443/UDP for QUIC relay traffic. Refer to the summary shown at the end of your installation, which lists the ports actually in use.
Install Docker on Debian 13
The NetBird installation script deploys a Docker Compose stack. Docker is therefore mandatory. If you run the script without Docker, it stops immediately with this message:
Docker is not installed or not in PATH. Please follow the steps from the official guide: https://docs.docker.com/engine/install/Let's start by updating the system and installing the two tools the script needs: curl and jq.
# Update the system
sudo apt-get update && sudo apt-get upgrade -y

# Install the NetBird script prerequisites
sudo apt-get install -y ca-certificates curl jq
Next, let's install Docker Engine and the Compose plugin from Docker's official repository. Debian's codename (trixie for Debian 13) is detected automatically.
# Add the Docker GPG key
sudo install -m 0755 -d /etc/apt/keyrings
sudo curl -fsSL https://download.docker.com/linux/debian/gpg -o /etc/apt/keyrings/docker.asc
sudo chmod a+r /etc/apt/keyrings/docker.asc

# Add the Docker repository
echo "deb [arch=$(dpkg --print-architecture) signed-by=/etc/apt/keyrings/docker.asc] https://download.docker.com/linux/debian $(. /etc/os-release && echo "$VERSION_CODENAME") stable" | sudo tee /etc/apt/sources.list.d/docker.list > /dev/null

# Install Docker Engine and the Compose plugin
sudo apt-get update
sudo apt-get install -y docker-ce docker-ce-cli containerd.io docker-buildx-plugin docker-compose-plugin
To avoid prefixing every Docker command with sudo, I add my account to the docker group, then I check that Docker Compose is available.
# Add the current account to the docker group
sudo usermod -aG docker $USER
newgrp docker

# Check the Docker Compose version
docker compose version
For more details on Docker installation, you can refer to this tutorial: step-by-step Docker installation on Debian 13.
Install the NetBird server with the official script
Run the installation script
I create a dedicated folder for the NetBird stack in /opt/docker-compose/, as I do for all my Docker stacks. The script generates its files in the current directory, so you must move into this folder before running it.
# Create the stack folder
sudo mkdir -p /opt/docker-compose/netbird
sudo chown $USER:$USER /opt/docker-compose/netbird
cd /opt/docker-compose/netbird
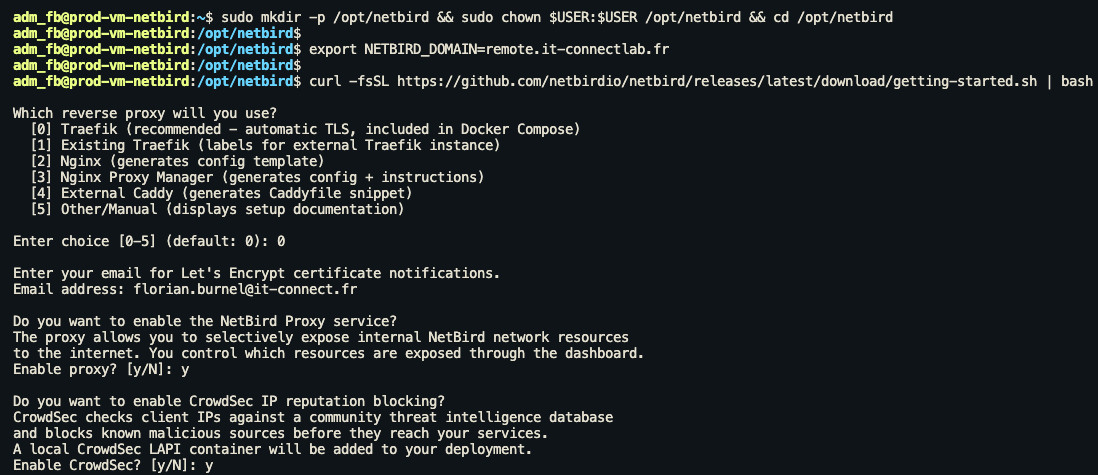
Then define the domain name in the NETBIRD_DOMAIN environment variable. If you do not, the script will ask for it, but I prefer to set it from the start. Then launch the official installation script: it fetches the latest NetBird version and generates the full Docker Compose configuration.
# NetBird server domain name (without https:// or port)
export NETBIRD_DOMAIN=remote.it-connectlab.fr

# Run the official installation script
curl -fsSL https://github.com/netbirdio/netbird/releases/latest/download/getting-started.sh | bash
Even though the script automates the essentials, it asks several questions:
- Which reverse proxy will you use?: the default choice
[0] Traefikintegrates Traefik into the stack, with automatic TLS certificate handling. This is the option I choose (especially because I am used to this reverse proxy). The script can also work with an existing Traefik instance, Nginx, Nginx Proxy Manager, or Caddy. If you are new to this tool, I recommend reading this tutorial: getting started with Traefik. - Email address: the email address used for Let's Encrypt notifications.
- Enable proxy?: this refers to the reverse proxy built into NetBird, which lets you publish internal services on the Internet. I enable it (
y), because we will use it in the last section. - Enable CrowdSec?: the script offers to add a CrowdSec container to the stack. The reverse proxy can then check the reputation of client IP addresses and block malicious addresses. CrowdSec is a French open source tool, which you may know if you have read our guide to getting started with CrowdSec. I encourage you to enable it (
y).
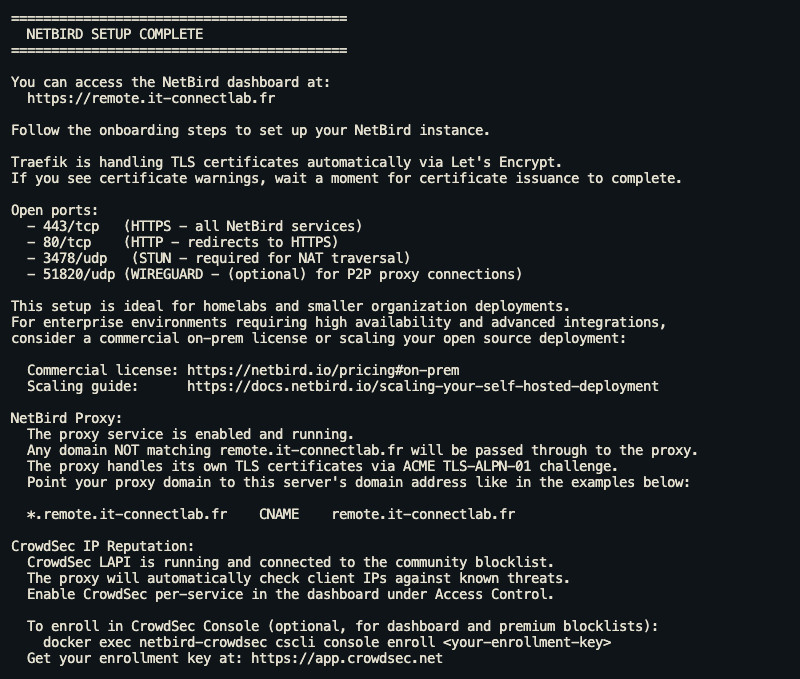
A few moments later, installation is complete. The script displays a summary with the dashboard address, the open ports, and information about the reverse proxy and CrowdSec. Take the time to read it: it notably indicates the wildcard DNS record that must be created for the reverse proxy.
Check the Docker stack
The folder now contains the files generated by the script, and the docker compose ps command lets you verify that all containers are started.
ls -l
docker compose ps
Here is the role of each element:
docker-compose.yml: the stack definition, with five containers:netbird-server(Management, Signal, Relay and STUN),netbird-dashboard,netbird-traefik,netbird-proxyandnetbird-crowdsec.config.yaml: the NetBird server configuration. Its permissions are restricted to its owner (600) because it contains secrets.dashboard.envandproxy.env: the environment variables for the dashboard and the reverse proxy.traefik-dynamic.yaml: Traefik dynamic configuration.crowdsec/: CrowdSec configuration and data.
Feel free to open these files, even just out of curiosity, to understand how this stack works.
First login to the dashboard
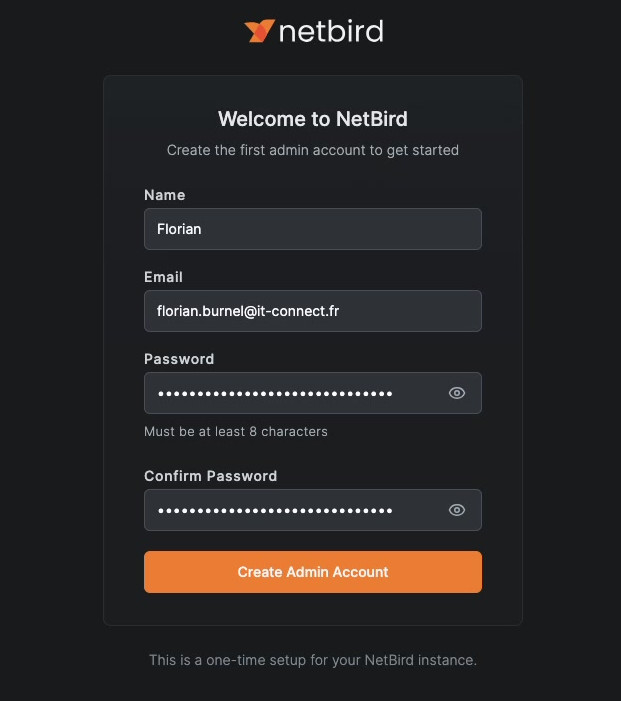
Open a browser and enter your NetBird server address over HTTPS (https://remote.it-connectlab.fr). The connection is secured with a valid Let's Encrypt certificate. On first login, NetBird asks you to create the platform administrator account. This account is local: it uses NetBird's built-in identity provider. You will be able to connect an external identity provider (SSO) later.
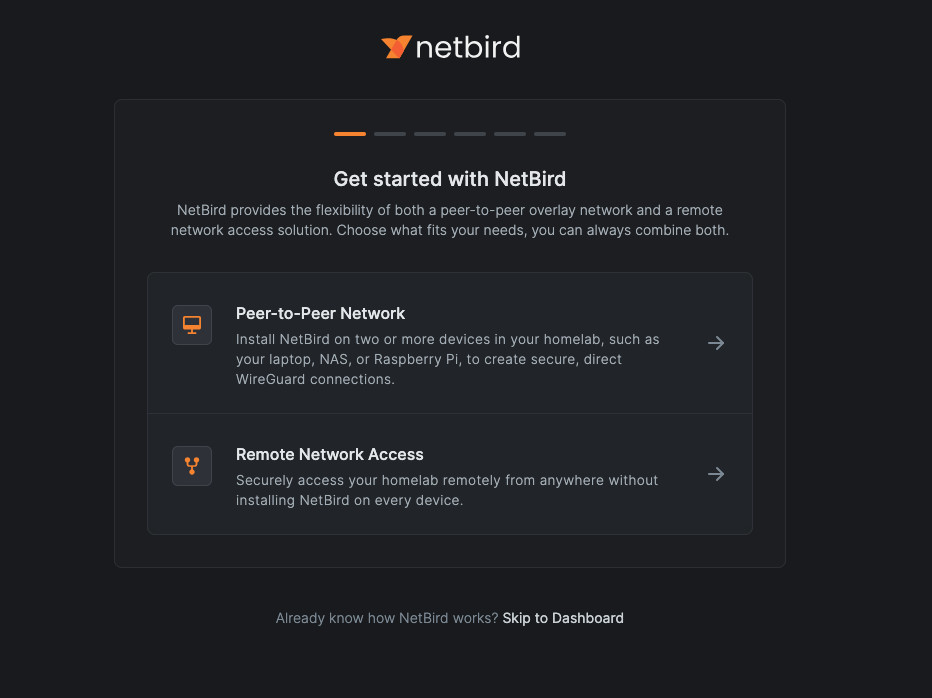
Once logged in, a wizard offers two scenarios: a peer-to-peer network between your devices, or remote access to your local network. You can follow the wizard, but here we are going to configure everything manually: click Skip to Dashboard.
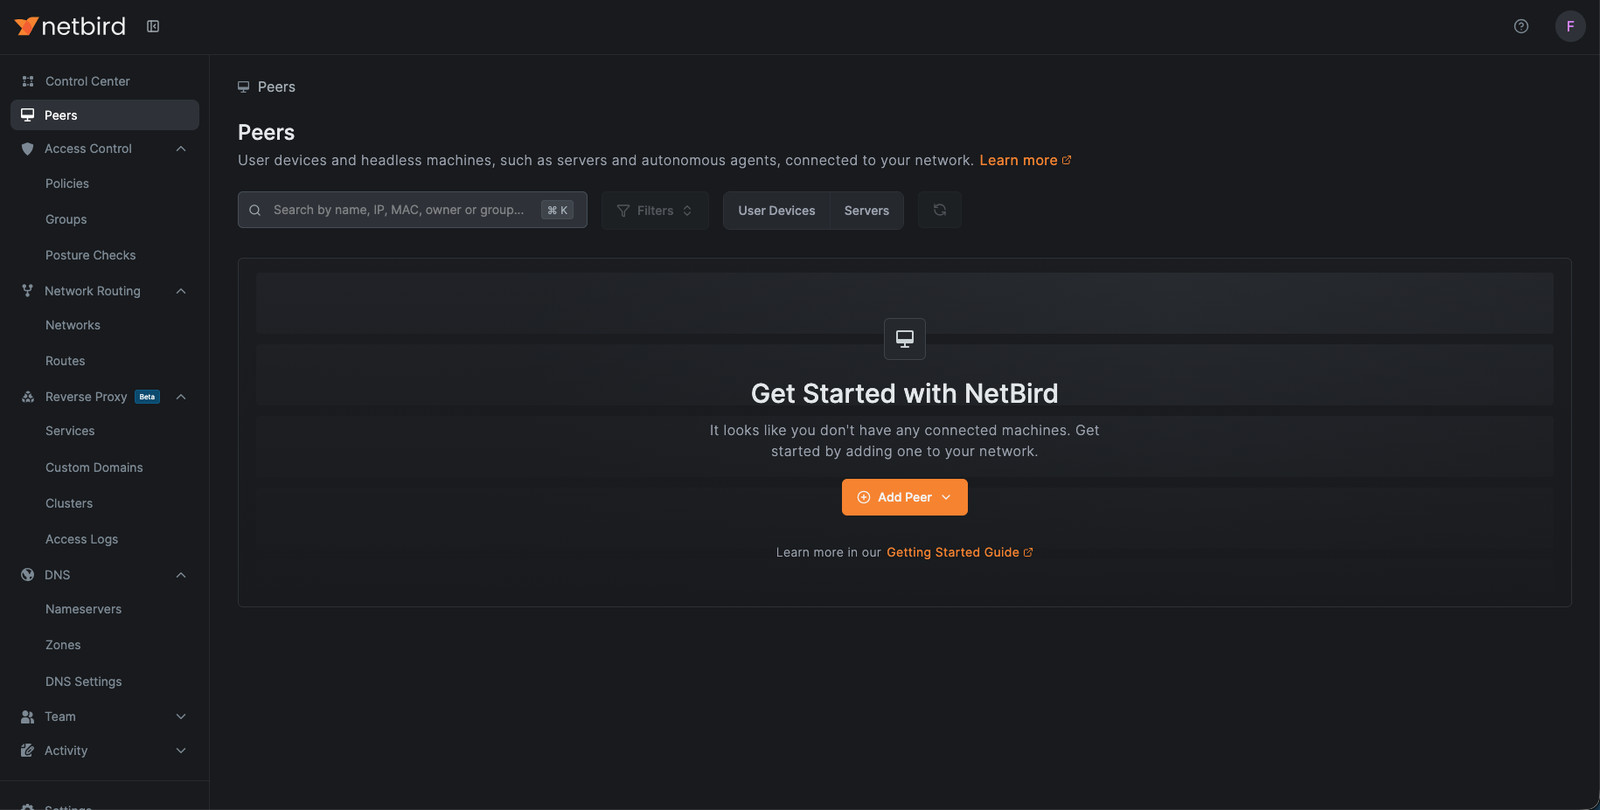
You then arrive at the NetBird dashboard, currently empty. The left-hand menu gives access to the different sections: Control Center, Peers, Access Control (rules, groups and posture checks), Network Routing (networks and routes), Reverse Proxy, DNS, Team, Activity and Settings.
Create a network and a routing peer
Networks rather than Routes
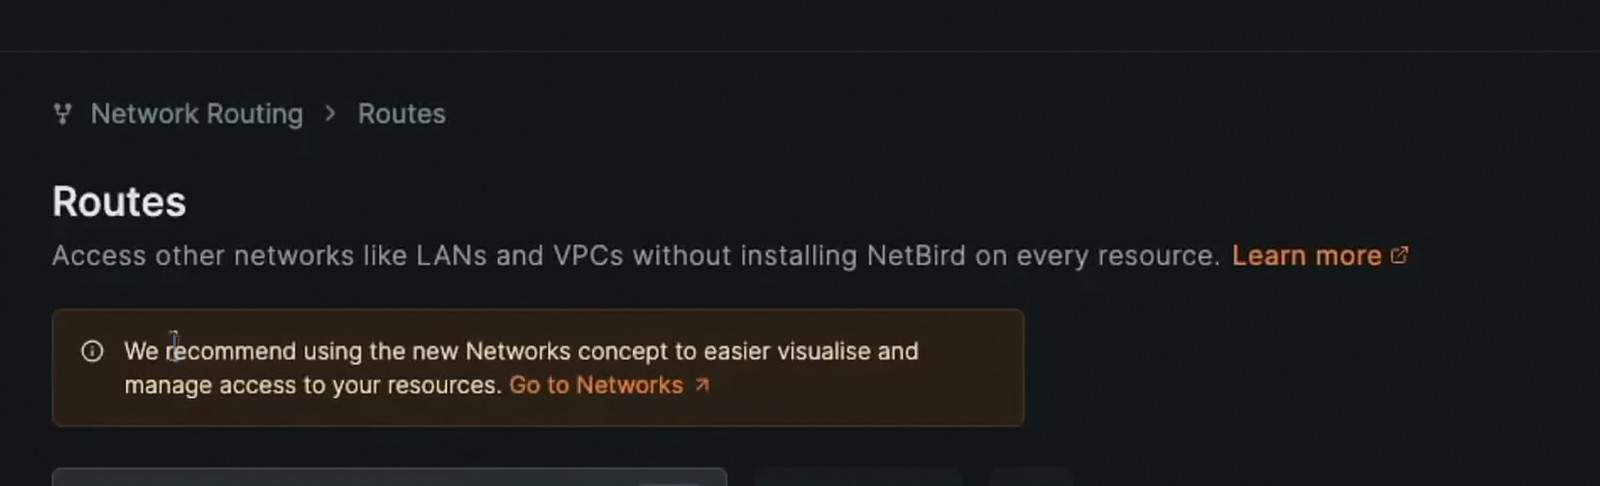
In the Network Routing section, you will find two entries: Networks and Routes. If you open Routes, a banner indicates that NetBird now recommends using Networks. This is the modern approach for remote access: a network groups resources (an IP, a subnet, or a domain name) and the routing peers that provide access to them. Most importantly, access is denied by default until a rule allows it. Classic routes are still useful for one specific case: exit nodes, which let all of a device's Internet traffic exit through another peer.
Create the HomeLab network
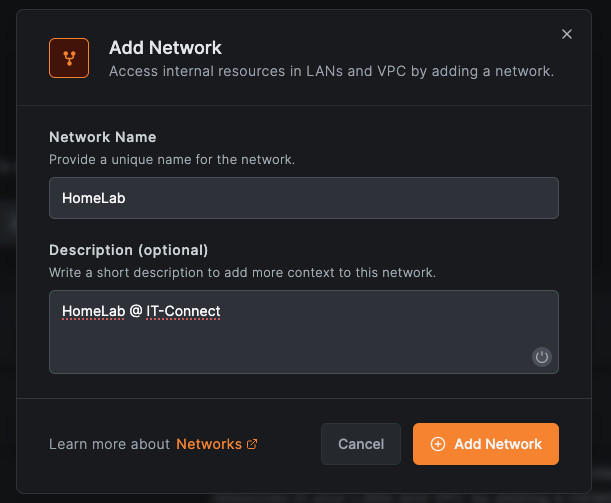
Click Network Routing and then Networks, and add a new network. I name it HomeLab because it will provide remote access to resources on my local network: a demo web server and my Proxmox VE server.
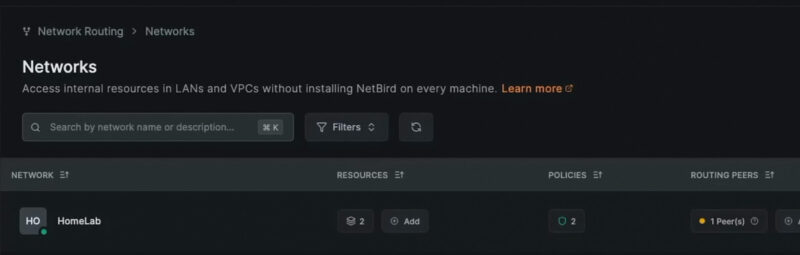
The network then appears in the list, with no resource or routing peer for now.
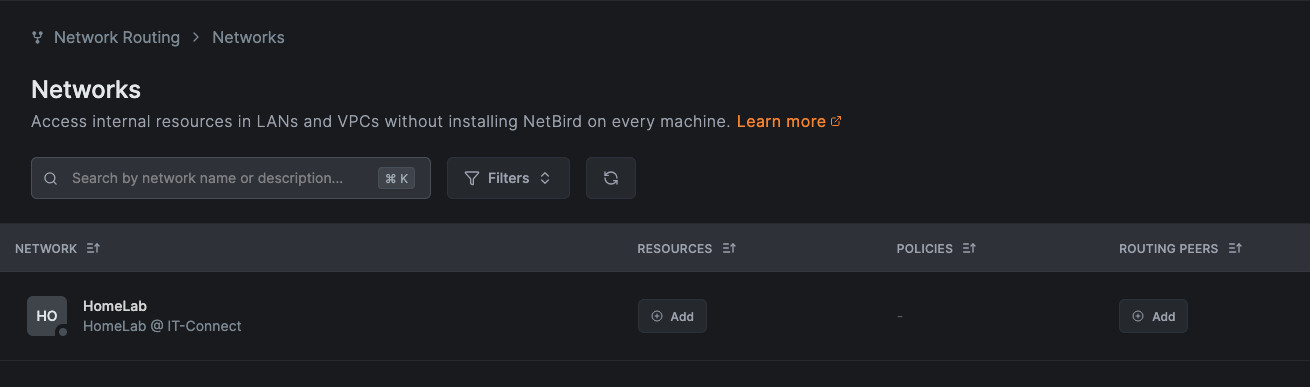
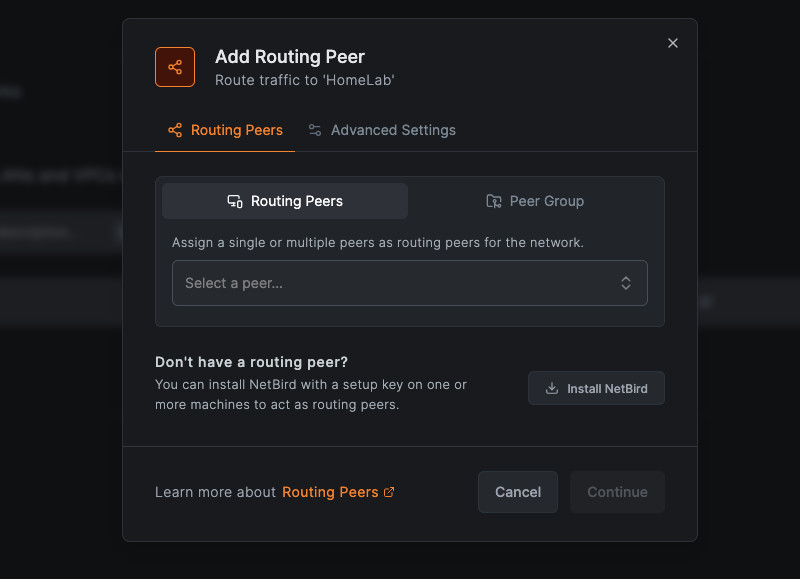
Once the network is created, NetBird offers to add resources and a routing peer. Let's start with the routing peer: without it, the resources would not be reachable. By clicking Add in the Routing Peers column, NetBird asks you to select a peer. Since we do not have one yet, click Install NetBird.
Generate a setup key
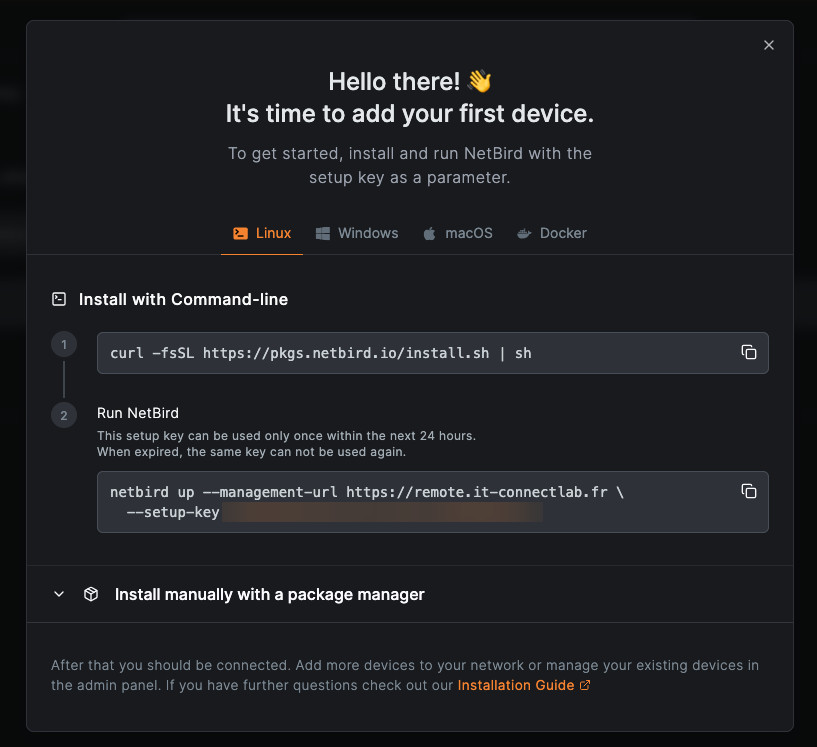
NetBird then generates a setup key and displays installation commands for Linux, Windows, macOS and Docker. The setup key allows a machine to register with the server without interactive login, which is suitable for a server or container. It is single-use and valid for 24 hours.
Linux client or Docker client?
For a routing peer, should you install the NetBird client natively or with Docker? It depends on the machine:
- On a machine dedicated to this role (VM, LXC container, Raspberry Pi), install the native client. That is my choice here: the LXC container already provides isolation, and adding Docker on top would complicate the setup without bringing any benefit. The native client runs as a systemd service and acts directly on the network interface that provides access to the LAN. This very lightweight container will do nothing else.
- On a machine that already runs other services (a NAS, a Docker host), the Docker option keeps the client isolated from the rest.
Both options are valid; it all depends on the context.
Deploy the routing peer in an LXC container on Proxmox VE
To host the routing peer, I use an LXC container on my Proxmox VE server. It is very lightweight: one CPU core and 512 MB of RAM are enough. I do everything from the command line over SSH on the Proxmox host. If you are new to LXC containers, check out this tutorial: getting started with LXC containers on Proxmox VE.
Create the LXC container
I use the Debian 13 template provided by Proxmox. If it is not already present on your server, fetch it with pveam:
# Update the template list and search for Debian 13
pveam update
pveam available --section system | grep debian-13

# Download the template to local storage
pveam download local debian-13-standard_13.6-1_amd64.tar.zst
Then create the container with the pct create command:
pct create 200 local:vztmpl/debian-13-standard_13.6-1_amd64.tar.zst \
  --hostname netbird-router \
  --cores 1 --memory 512 --swap 512 \
  --rootfs nvme-data:4 \
  --net0 name=eth0,bridge=vmbr1,ip=dhcp \
  --features nesting=1 \
  --unprivileged 1 \
  --onboot 1 \
  --password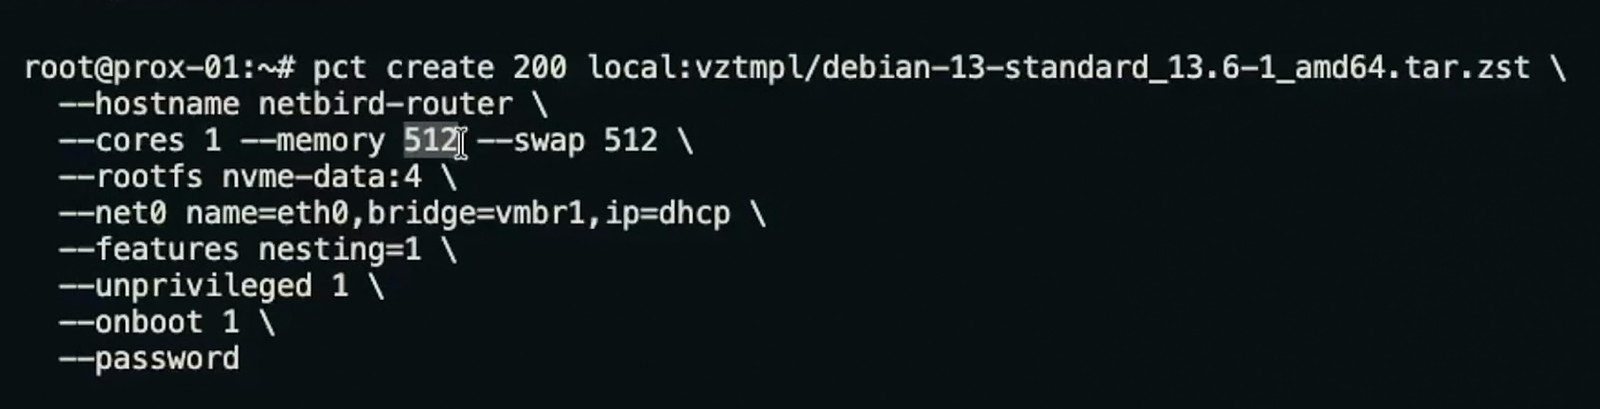
A few explanations about the options:
200: the container ID in Proxmox VE.--hostname netbird-router: the container name, which will also be the peer name in NetBird.--cores 1 --memory 512 --swap 512: one core, 512 MB of RAM, and 512 MB of swap.--rootfs nvme-data:4: a 4 GB disk on thenvme-datastorage (adapt this name to your server).--net0 name=eth0,bridge=vmbr1,ip=dhcp: a network card connected to thevmbr1bridge, with an IP address obtained by DHCP. For a routing peer, a static IP or a DHCP reservation is preferable.--features nesting=1: without this option, Proxmox shows the warningWARN: Systemd 257 detected. You may need to enable nesting.with the Debian 13 template. It is therefore recommended to enable it.--unprivileged 1: an unprivileged container, which is safer.--onboot 1: automatic container startup with the host.--password: the container's root password, requested interactively. Choose a strong password.
Put the container on the right network
The routing peer must be able to reach, by IP, the resources it will expose. The simplest approach is to place it directly on the relevant network. In my case, the vmbr1 bridge sits on a link aggregation (LACP), and untagged traffic lands in VLAN 140 of my lab, the VLAN used by the demo web server. If you want to place the container in a specific VLAN, add the tag=<ID> option to the network card.
The routing peer can also reach a resource located on another VLAN, as long as inter-VLAN routing allows it. That is the case for my Proxmox server, which we will add later. The goal is to show that NetBird can be very flexible.
Allow access to the TUN device
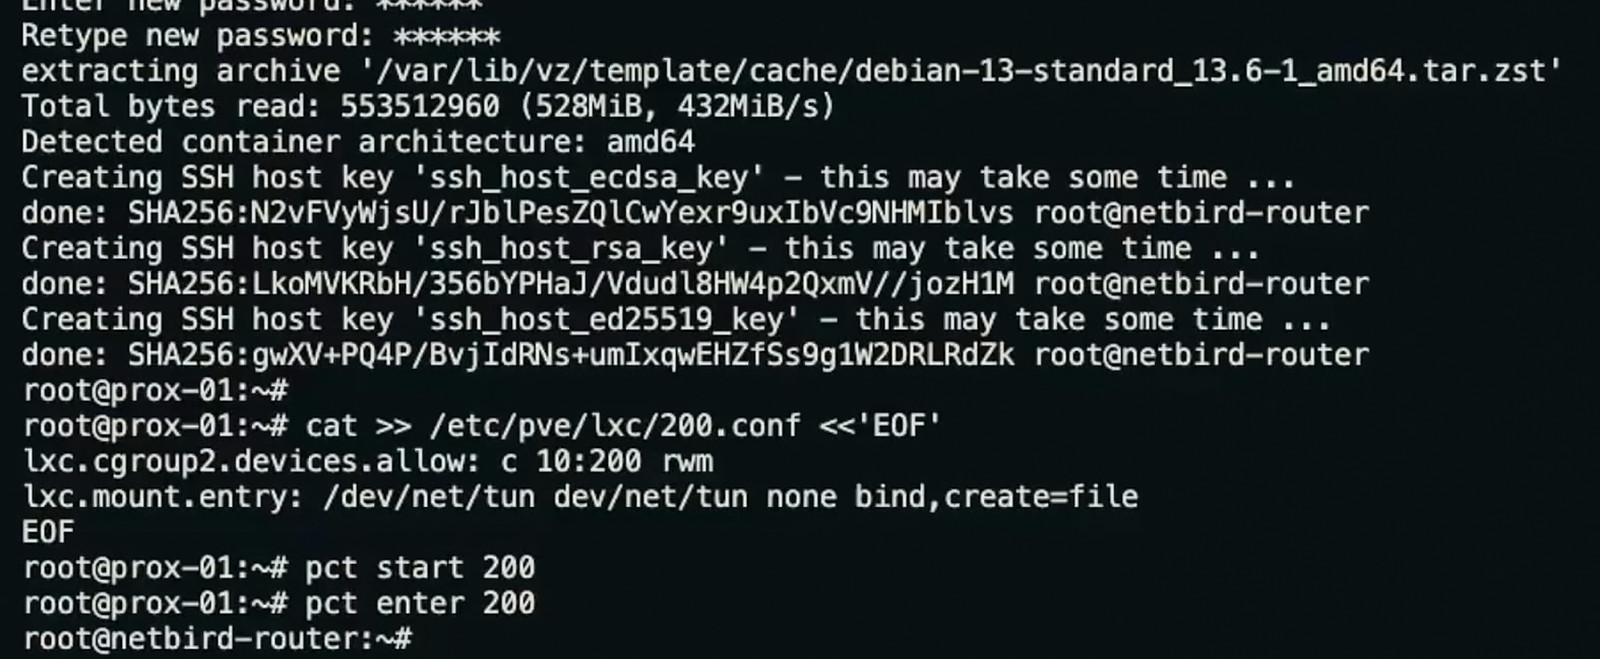
NetBird needs the /dev/net/tun device to create its WireGuard interface. However, an unprivileged LXC container does not have access to it by default. You therefore need to add two lines to the container configuration on the Proxmox host:
# TUN device access for container 200
# - cgroup2.devices.allow: allows the character device 10:200 (/dev/net/tun)
# - mount.entry: mounts the host /dev/net/tun into the container
cat >> /etc/pve/lxc/200.conf <<'EOF'
lxc.cgroup2.devices.allow: c 10:200 rwm
lxc.mount.entry: /dev/net/tun dev/net/tun none bind,create=file
EOF
Then start the container and verify that the device is present:
pct start 200
pct exec 200 -- ls -l /dev/net/tun
The output should look like this:
crw-rw-rw- 1 nobody nogroup 10, 200 Oct 27 14:30 /dev/net/tunThe nobody nogroup ownership is normal in an unprivileged container: on the host, the device belongs to root, but that user does not have a match in the container's namespace. The container's root account has CAP_NET_ADMIN capability in its own network namespace, so it can create the WireGuard interface.
To get a shell inside the container, use the pct enter 200 command.
Install the NetBird client in the container
Inside the container, start by installing updates, which also lets you verify that it has Internet access. Then install curl and the ca-certificates package, which are required by the NetBird installation script.
# Updates and prerequisites
apt update && apt upgrade -y
apt install -y curl ca-certificates
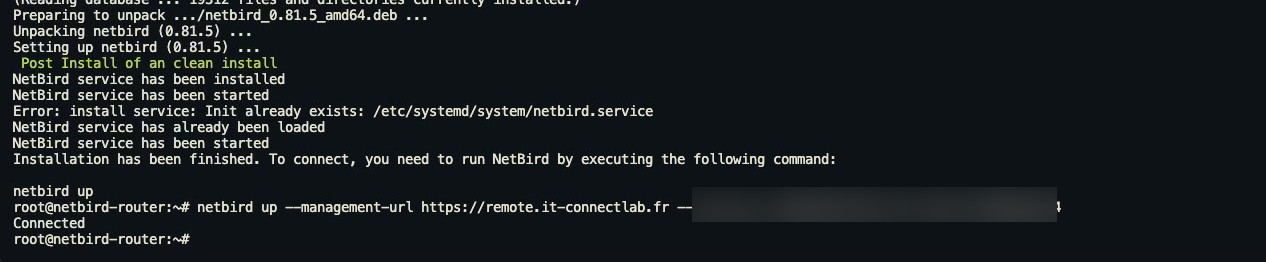
Go back to the NetBird interface and copy the two commands shown in the Linux tab. The first one installs the NetBird client. The second registers the peer with your server, using the server URL and the setup key.
# Install the NetBird client
curl -fsSL https://pkgs.netbird.io/install.sh | sh

# Register the peer with the NetBird server
netbird up --management-url https://remote.it-connectlab.fr --setup-key <YOUR_SETUP_KEY>
The command returns Connected. You can also check the connection status with netbird status.
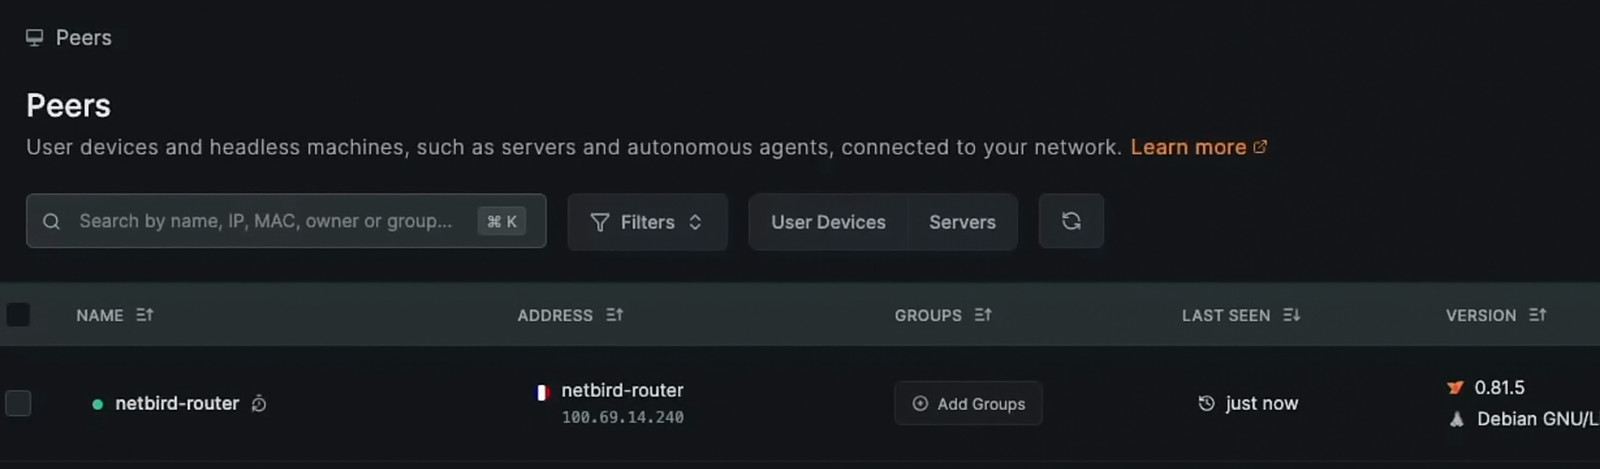
In the Peers section of the dashboard, the netbird-router peer appears with its IP address in the NetBird network, its system (Debian 13), and the agent version.
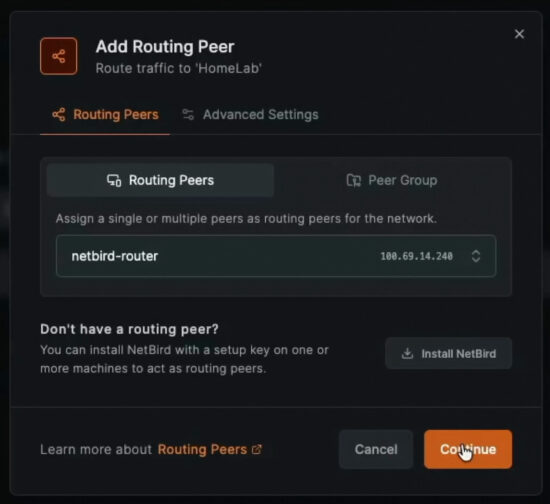
Enable the routing peer on the network
Go back to Network Routing, then Networks, and add a routing peer to the HomeLab network. This time, select netbird-router from the list, then click Continue.
The Advanced Settings tab contains three parameters:
- Enable Routing Peer: enables or disables the routing peer.
- Masquerade: the routing peer replaces the source address of packets with its own IP address on the LAN. Local network machines therefore reply to the routing peer, without needing to know about the NetBird network. With this option, there is no need to add a return route to
100.64.0.0/10on your gateway. Leave it enabled. - Metric: the priority of the routing peer (9999 by default). The lower the value, the higher the priority. This is useful if you declare multiple routing peers on the same network for high availability.
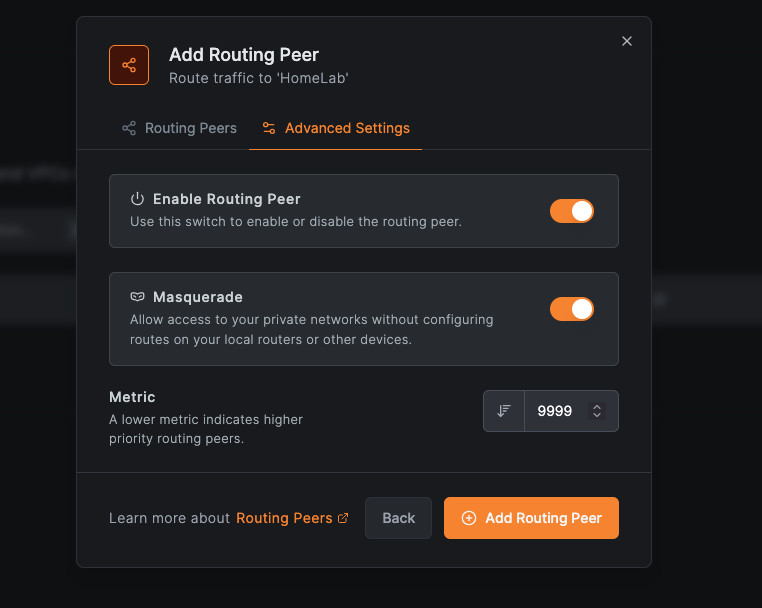
Click Add Routing Peer. The HomeLab network now has a gateway to the local network.
What about a NAS or a Docker host?
If you deploy the NetBird client with Docker, for example on a Synology NAS, you may run into the same issue: the container needs the /dev/net/tun device. In the logs, this appears as an error such as couldn't access device /dev/net/tun. NetBird's documentation recommends running the container in host network mode, with the NET_ADMIN, SYS_ADMIN and SYS_RESOURCE capabilities, and the /dev/net/tun device, which means the tun module must be loaded on the host.
If you want a guide to installing a NetBird routing peer on a Synology NAS, let me know in the comments.
Connect Windows and Linux clients
To access the resources, we now need remote clients. To simulate outside access, I use two virtual machines, one running Windows and one running Linux Mint, both connected to my smartphone's 5G hotspot.
Install the NetBird client on Windows
In the Peers section, click Add Peer then User Device. NetBird shows instructions for Linux, Windows, macOS, iOS and Android. In the Windows tab, download the installer, then install it on the machine.
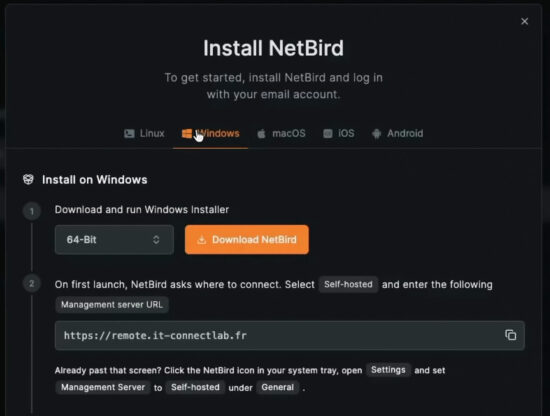
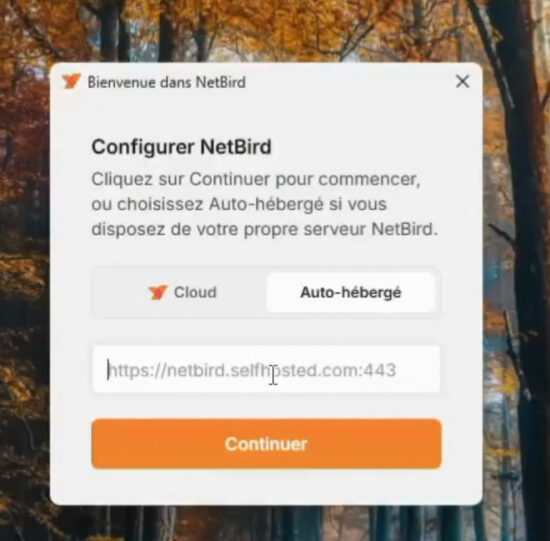
On first launch, the NetBird client asks where to connect. Choose Self-hosted and enter your NetBird server address (https://remote.it-connectlab.fr), then click Continue.
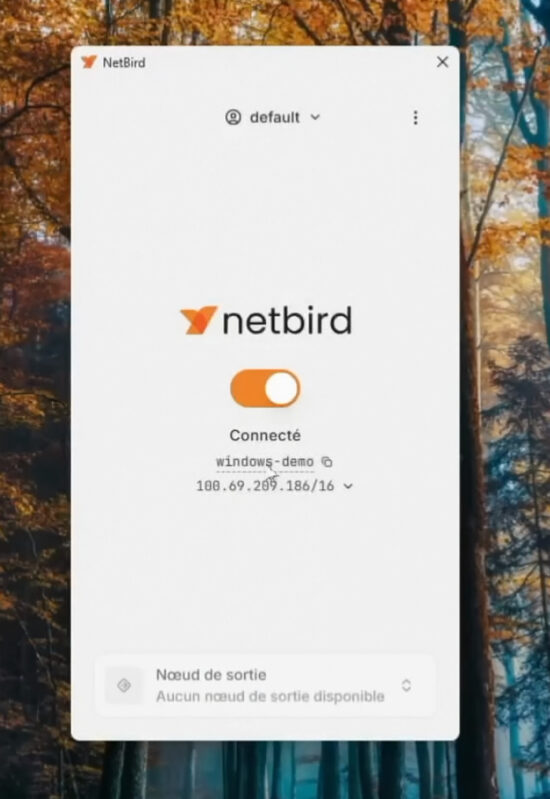
Then click the connect button. The client opens the browser to authenticate you against the NetBird server: a device does not join the network without authentication. Sign in with a NetBird account (in this case, the administrator account). The client then indicates that it is connected, with the machine name and its IP address in the NetBird network.
Install the NetBird client on Linux
On Linux, the principle is the same with the commands from the Linux tab. This time, there is no setup key: registration uses user authentication in the browser, which is appropriate for a workstation.
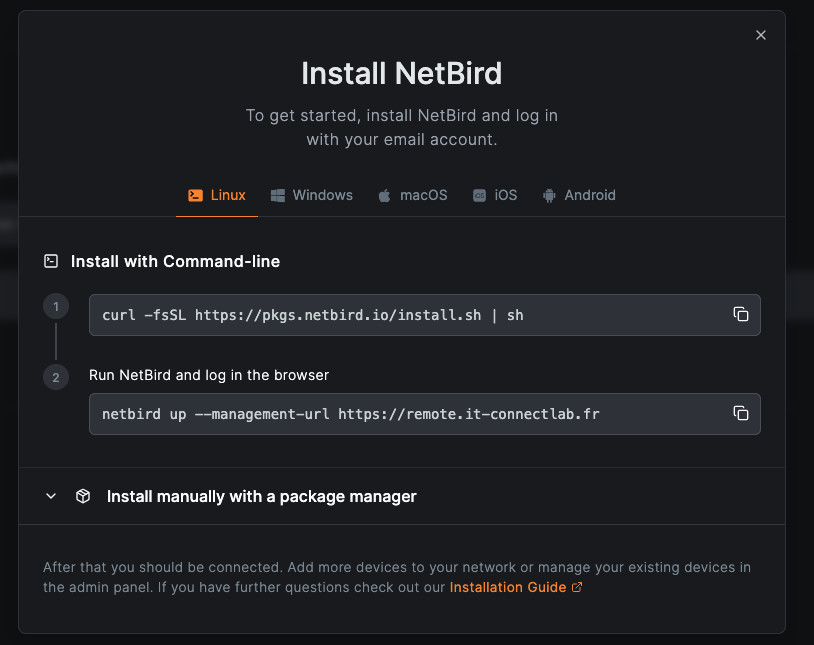
# Install the NetBird client
curl -fsSL https://pkgs.netbird.io/install.sh | sh

# Register the machine (browser authentication)
netbird up --management-url https://remote.it-connectlab.fr
The second command automatically opens an authentication page in the browser. If it does not, it displays the URL to open.
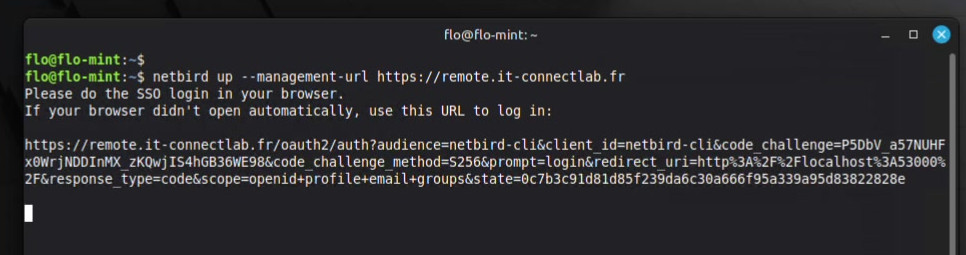
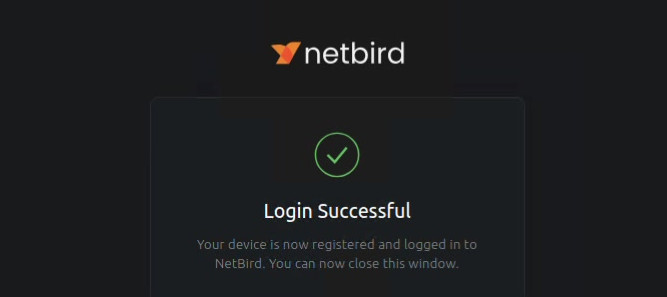
Once authenticated, the Login Successful page confirms that the machine has been registered.
Verify connectivity between peers
The Peers section now shows three peers: the two clients and the routing peer. User devices are attached to the account that registered them.
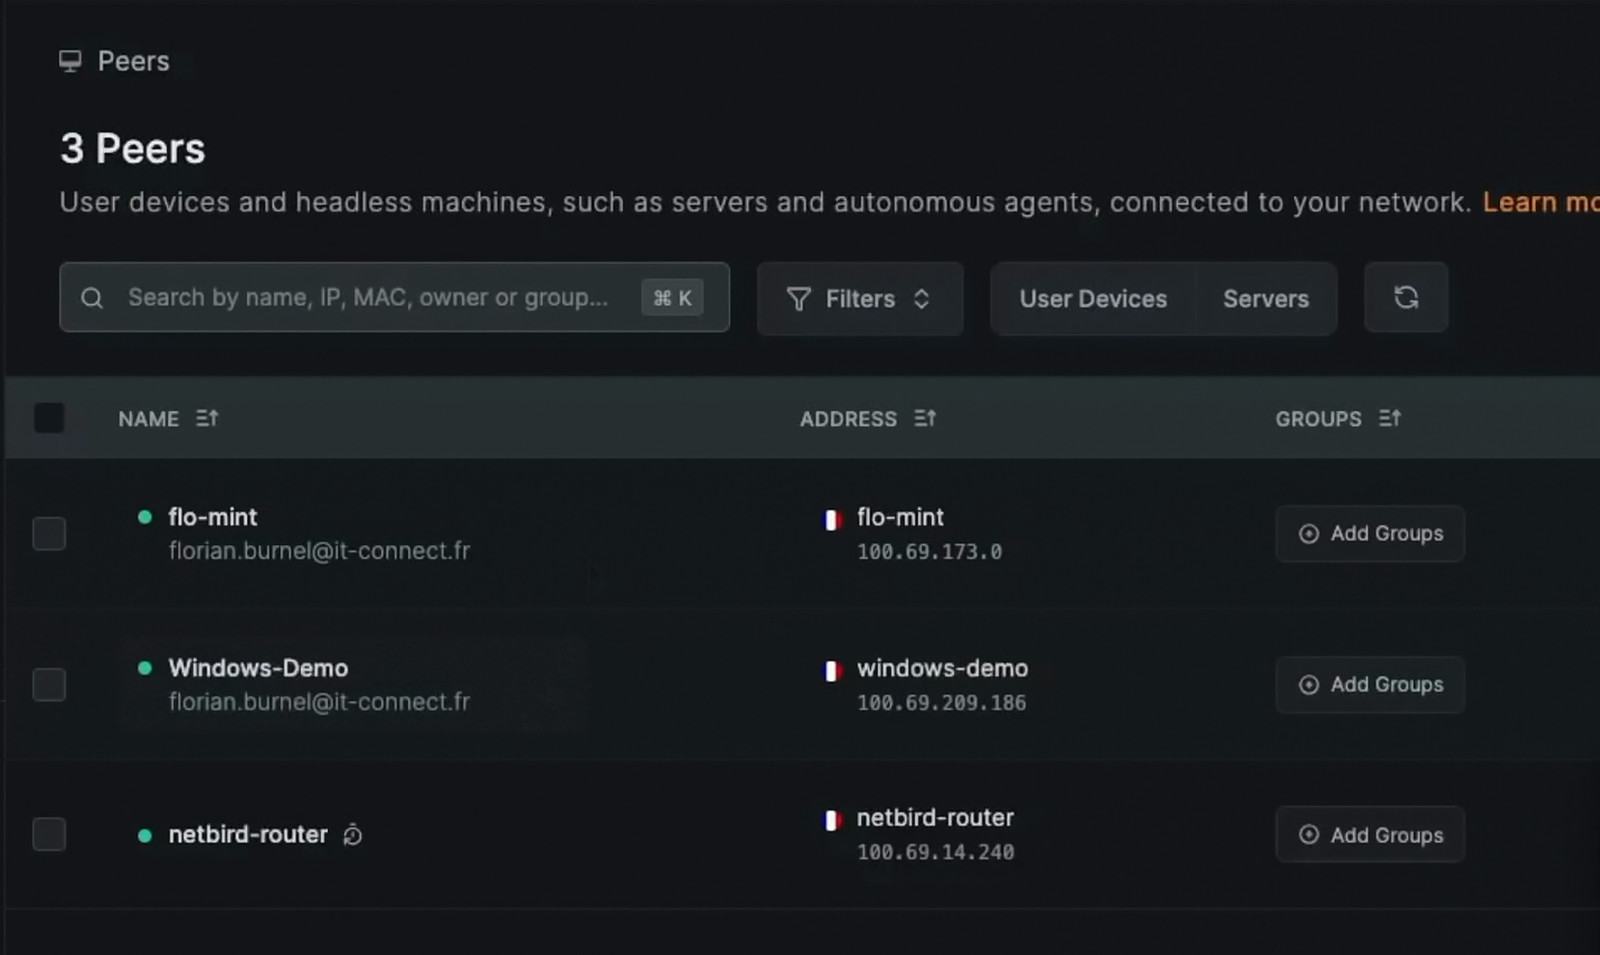
Note: each NetBird client has its own record in the peer inventory, allowing you to edit its name as well as its configuration (session expiration, SSH access, agent version, etc.).
From the Windows machine, I can already reach the netbird-router peer on its NetBird address, even though the two machines are not on the same network:
ping 100.69.14.240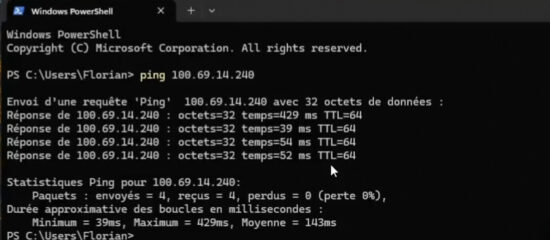
To see whether the connection between two peers is direct or relayed, use netbird status -d on a client: for each peer, it shows the connection type (P2P or Relayed).
Allow access to a local network resource
Being able to reach the routing peer is good, but it still does not grant access to anything. If I try to open my demo web server (http://192.168.140.11) from the Windows machine, the page does not load. We need to declare a resource and an access rule.
Add a resource
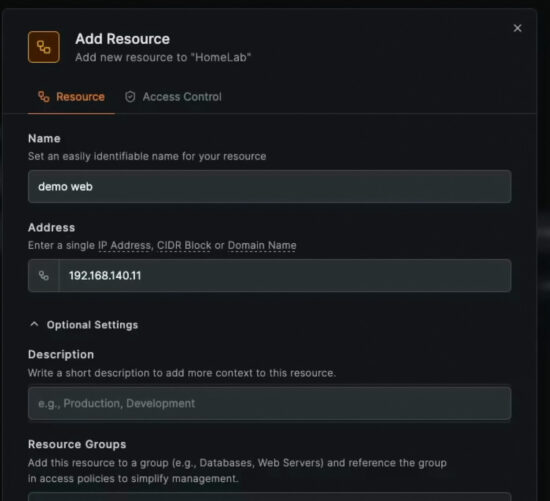
In the HomeLab network, click Add in the Resources column. Give the resource a name (demo web) and specify its address. This can be the IP address of a machine, a subnet in CIDR format, or a domain name. Here, I enter the web server IP address. A description and a resource group are optional (but this concept is important because it greatly simplifies access management across a set of resources).
Create an access rule
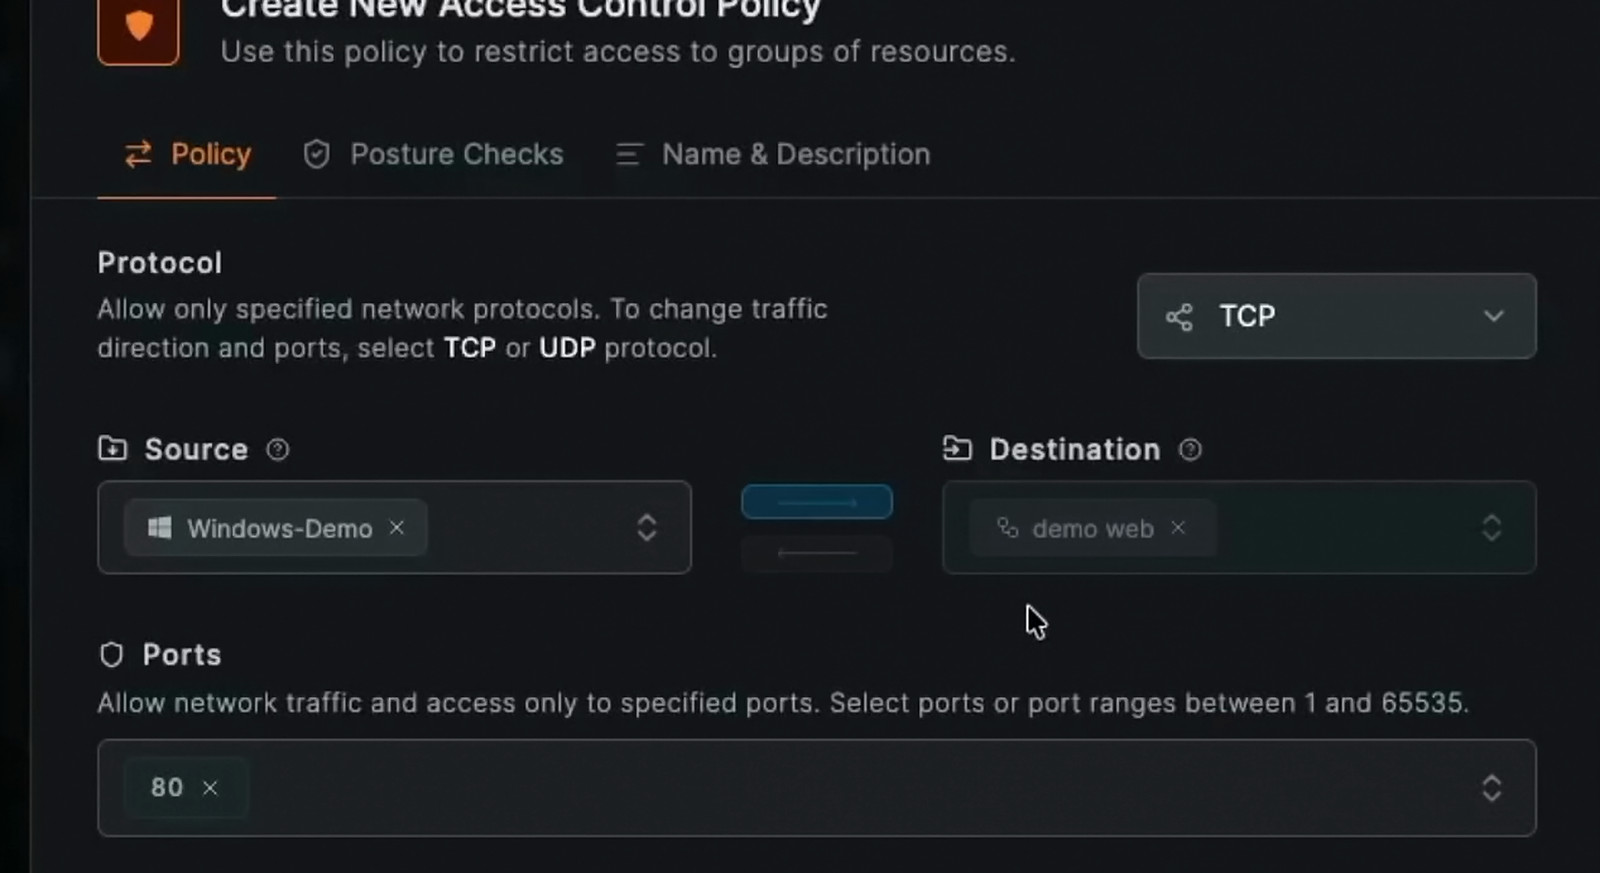
The next step is to create an access rule (Access Control Policy). This is a core part of NetBird: it lets you define precisely who can access what, all the way down to protocol and port. A rule is made of:
- A source: a peer or a group of peers. Here, I select
Windows-Demo. - A destination: the
demo webresource. - A protocol:
TCP, because my web server is only accessible over HTTP. - Ports: only port
80. Even though the web server accepts SSH connections, they will not be allowed by this rule.
For the source, the most practical approach is to work with groups, which you can manage in Access Control, Groups. For example, a PC-Perso group that gathers your personal devices makes it possible to create a single rule for all of those machines instead of one rule per device.
Add posture checks
The Posture Checks tab lets you add extra conditions that must be met for access to be allowed. NetBird offers several types of checks:
- NetBird Client Version: a minimum NetBird client version.
- Country & Region: the device location (country or region).
- Peer Network Range: the network range where the peer is located.
- Operating System: the operating system and its version.
- Process: the presence of a running process on the device.
- Certificate: the presence of a certificate issued by your own certificate authority.
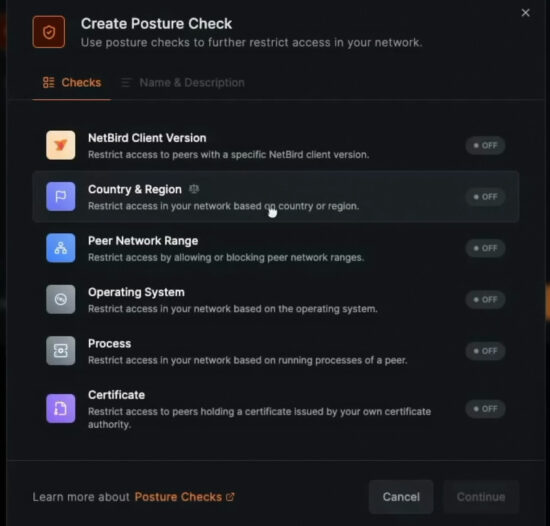
For example, the Country & Region check can be used to allow access only from France. To access the resource, you would then need the NetBird client, be registered on your server, be allowed by the rule, and be located in France. This is an interesting building block in a zero trust approach.
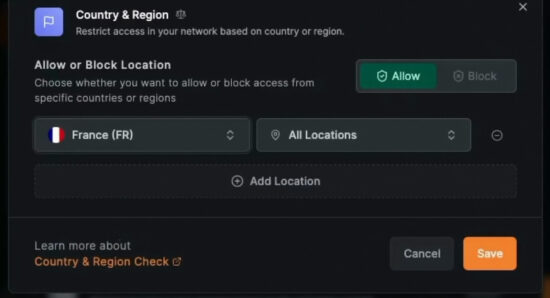
Finish with the Name & Description tab to name the rule (demo web Access), then add it.
Test access to the resource
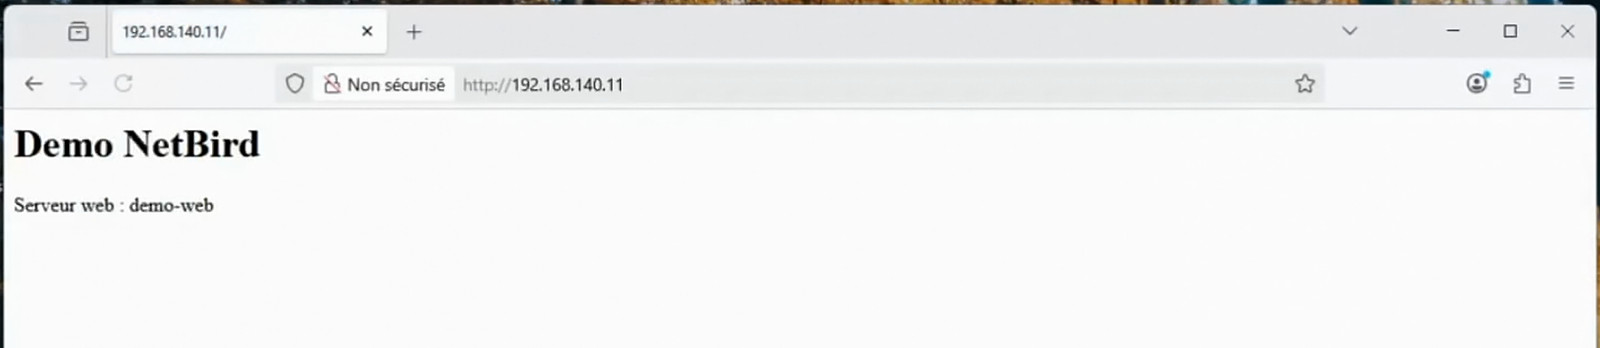
Back on the Windows machine, I retry the request to the web server: this time, the page loads. Traffic goes through the WireGuard tunnel to the routing peer, which forwards it to the web server on the local network.
Add a second resource: the Proxmox VE server
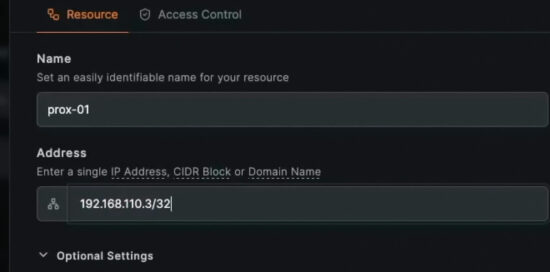
Using the same principle, I add a second resource: my Proxmox VE server, prox-01. Its IP address (192.168.110.3) is on a different VLAN from the routing peer. When you enter a single IP address, NetBird treats it as a single host and adds the /32 mask. To declare a full subnet, specify its mask, for example 192.168.110.0/24.
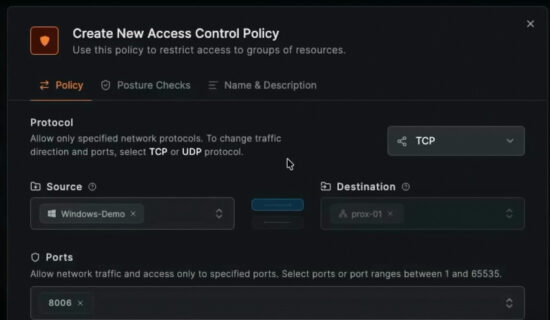
A new access rule is required because the port is different: the Proxmox VE web interface listens on TCP port 8006.
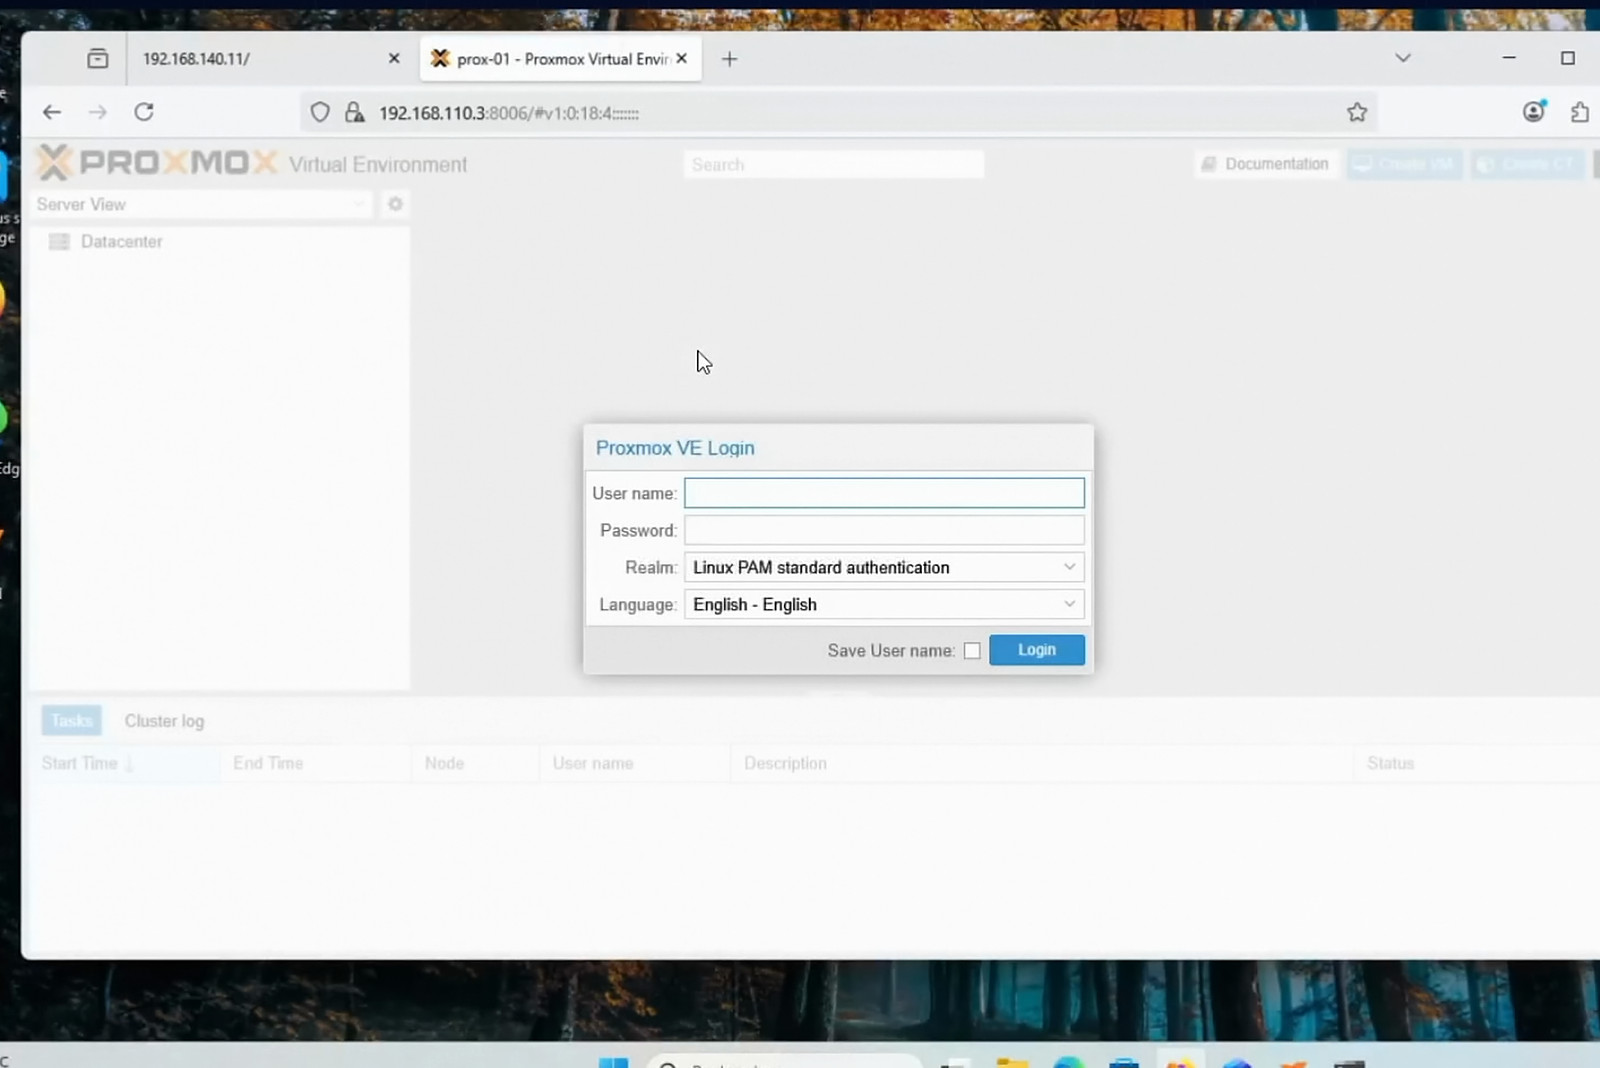
From the Windows machine, the Proxmox VE interface is now reachable remotely at https://192.168.110.3:8006, all through NetBird.
The HomeLab network now has two resources, two access rules, and one routing peer.
Two points to note when accessing a resource located on another VLAN:
- The inter-VLAN firewall must allow the routing peer: with masquerade, the Proxmox server sees connections coming from the routing peer's LAN IP, not from the NetBird client IPs. Your firewall rule must therefore allow that address to reach the resource and port in question.
- User-based access control is handled by NetBird: all clients share the same source IP address, the routing peer's. On the firewall side, keep the rule as narrow as possible (one IP and one port), and leave user filtering to NetBird rules.
If you expose a sensitive network such as your hypervisors, declare resources as /32 on only the required ports, and restrict them to a small group of administrators.
Use a domain name as a resource
A resource can also be a domain name (proxmox.lab.local) or a wildcard (*.lab.local). In that case, name resolution is performed by the routing peer by default, not by the client. A few prerequisites and limitations are worth knowing:
- The routing peer must be able to resolve the name: it must use a DNS server that knows the record. If not, you can distribute a DNS server to the routing peer group from the DNS section, Nameservers.
- NetBird DNS management must remain enabled on the client: it is what intercepts queries intended for the domain and forwards them to the routing peer.
- A dedicated network is recommended: the documentation advises against mixing domain-based resources and IP-based resources in the same network.
The Control Center and the Default rule
View access paths
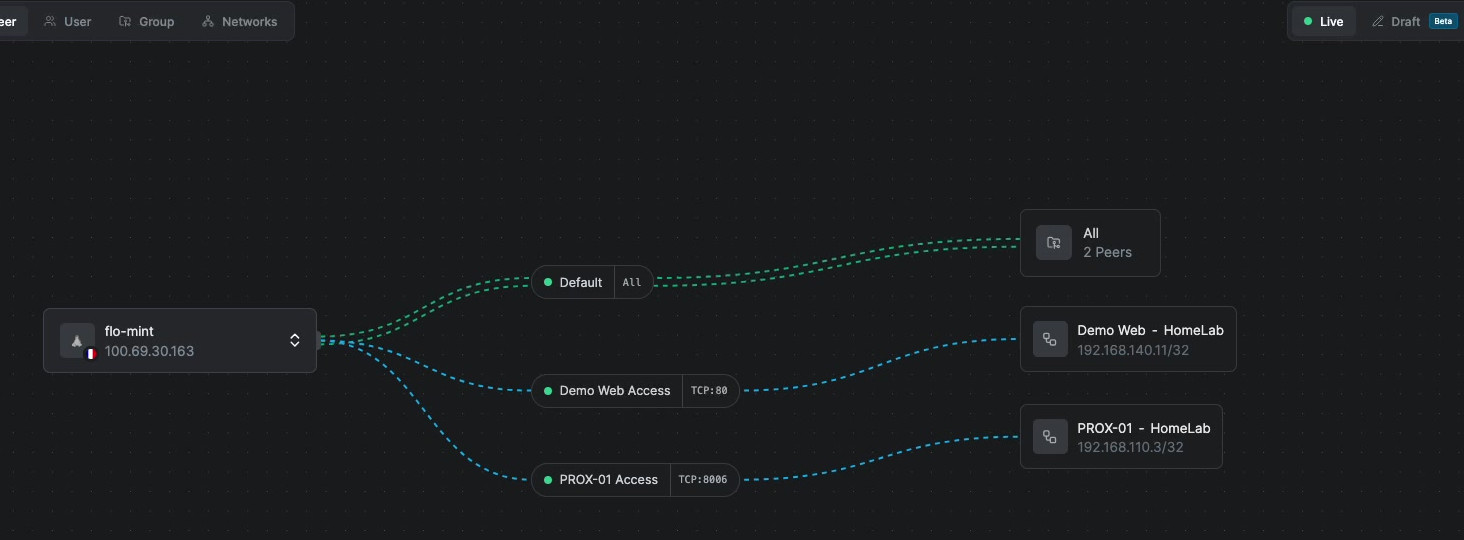
The Control Center provides a global view of access. You can look at things from the point of view of a peer, a user, a group, or a network. For example, by selecting a peer, you can see which resources it can access, through which rule, and on which protocol and port. This is very useful for spotting an overly permissive rule. The view updates according to your configuration, and a Draft mode (in beta) lets you prepare changes before applying them.
Disable the Default rule
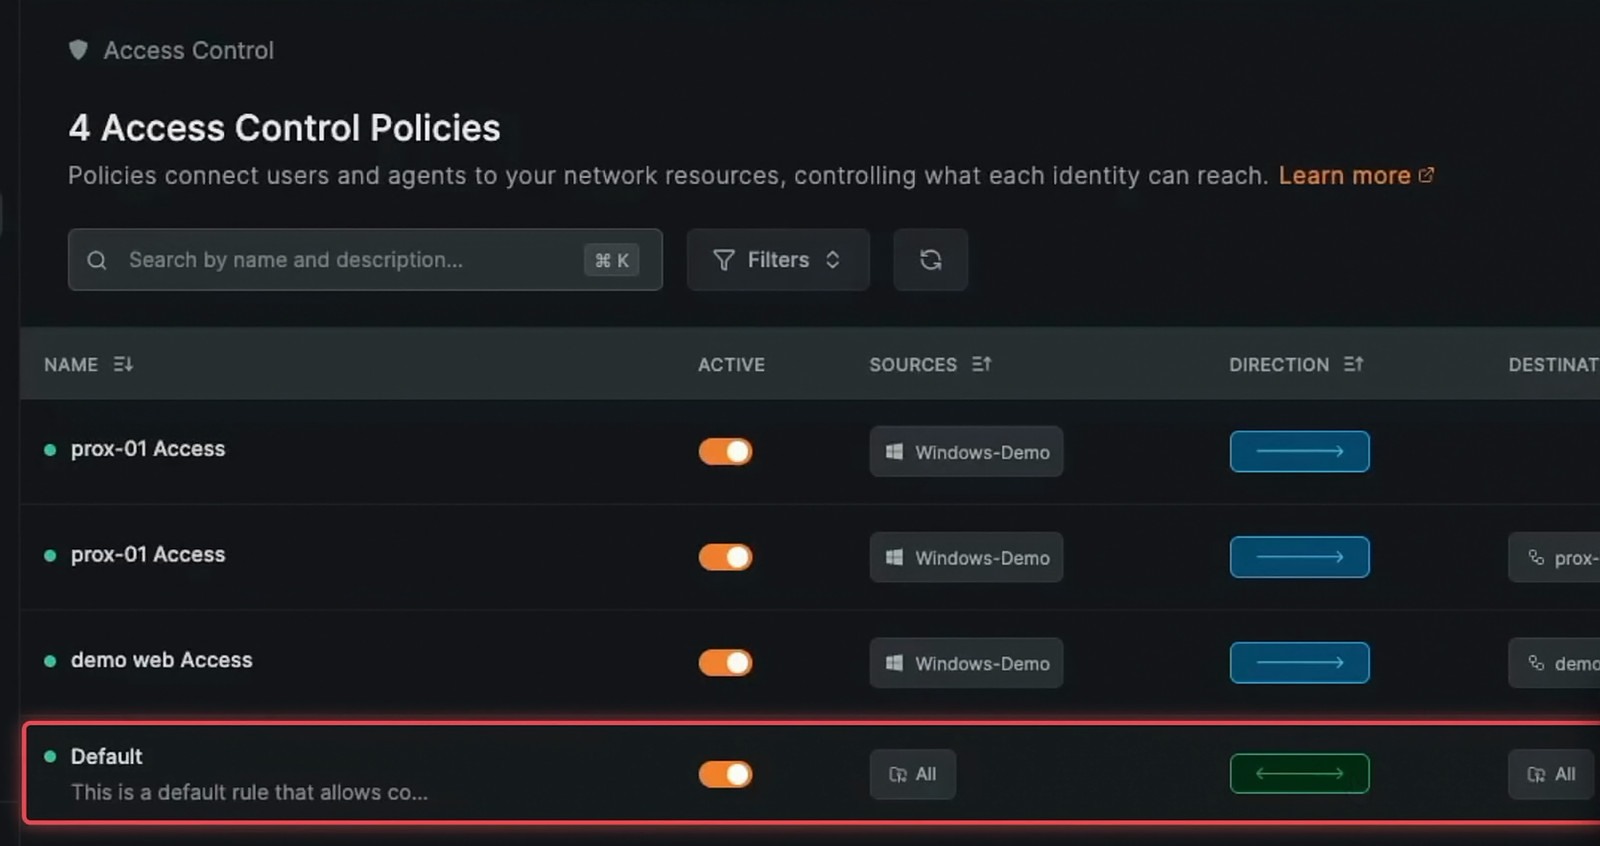
In the Control Center, you will notice a rule named Default, which links the All group to the All group in both directions, across all protocols. It is created by default and allows every peer to communicate without restriction with every other peer. In practice, the Windows machine can access all ports on the Linux machine and the routing peer: if SSH or remote desktop is running there, it can be used. And every newly registered peer automatically gets the same access.
This is convenient for an initial test, and it makes NetBird easier to deploy, but it goes against a zero trust approach. I recommend disabling this rule in Access Control, Policies, as soon as your explicit rules are in place.
After disabling it, it is important to distinguish between two types of traffic for a routing peer:
- Traffic that passes through it: packets that the routing peer forwards to resources on the local network. These are governed by resource rules, and disabling the Default rule has no impact on them. Access to the web server and Proxmox continues to work.
- Traffic addressed to it: packets sent to the routing peer itself, for example for an SSH connection. These are governed by peer-to-peer rules. This is the only access you lose.
If you need SSH access to the routing peer, create a dedicated rule, for example from the administrators group to the routing-peers group, over TCP port 22.
A tour of other NetBird settings
DNS management
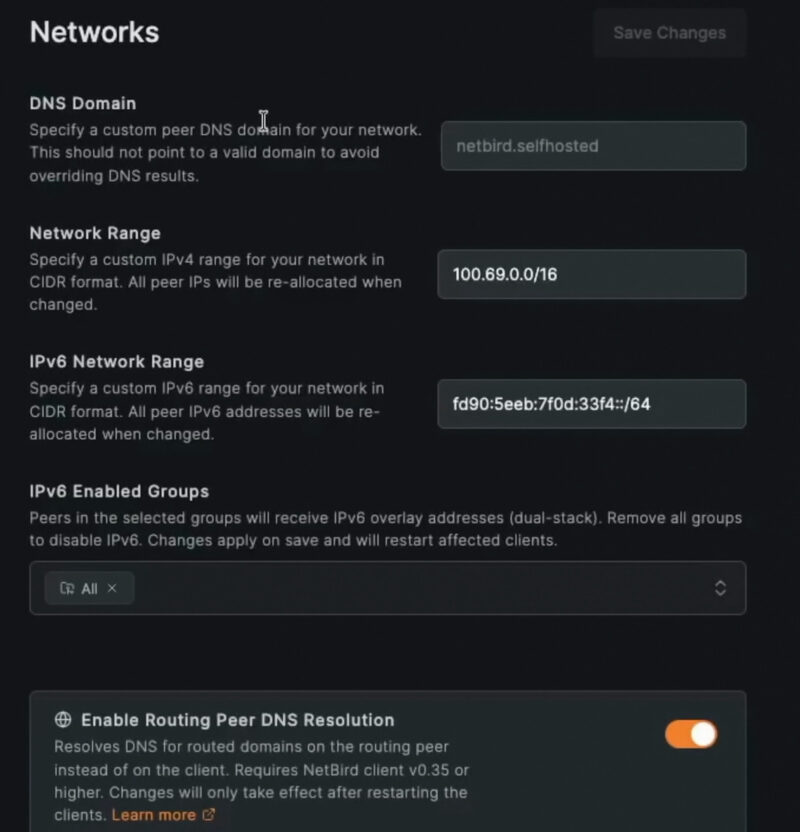
By default, the NetBird network has an internal domain name (netbird.selfhosted on my instance), which can be customized in Settings, Networks. Each peer is reachable via a name in the form <peer-name>.netbird.selfhosted.
The DNS section also lets you distribute DNS servers to your clients (Nameservers). NetBird provides templates for Google DNS, Cloudflare DNS and Quad9, or a custom server, such as the internal DNS of your local network (for example, to point to your Technitium DNS server). The Zones section lets you manage DNS zones directly in NetBird. This is an interesting part if you want to go beyond access by IP address.
Users and identity providers
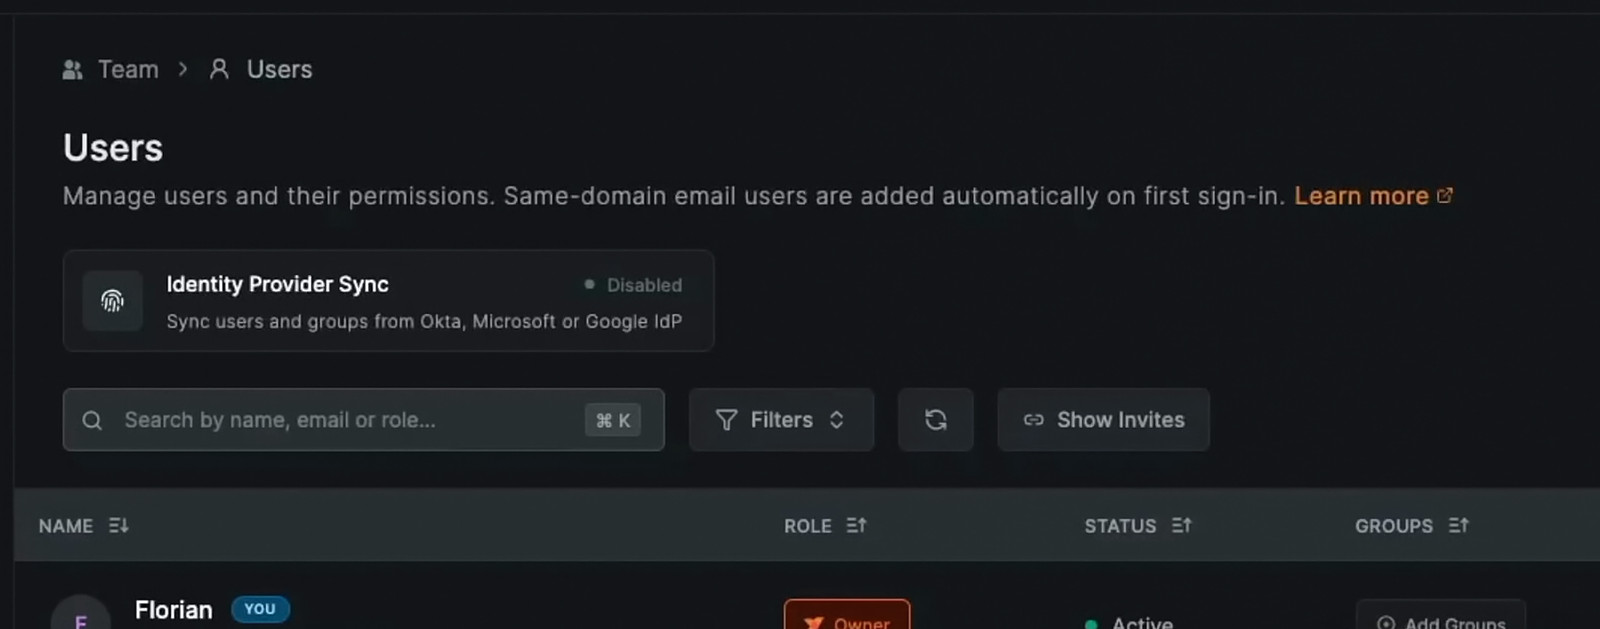
The Team section lets you manage users: account creation, invitations, roles and groups. The Service Users section is used to create accounts dedicated to the NetBird API for automation. User synchronization from an identity provider (Google Workspace, Entra ID via API or SCIM, Okta, JumpCloud) is reserved for the Enterprise license.
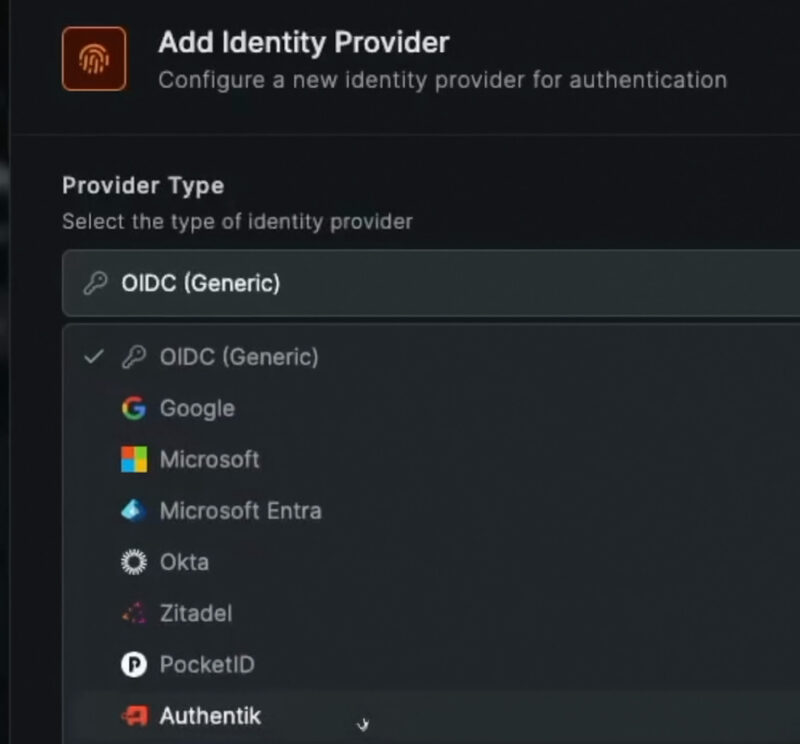
For single sign-on (SSO), go to Settings, Identity Providers. NetBird supports a generic OIDC provider, as well as Google, Microsoft Entra, Okta, Zitadel, Pocket ID, Authentik, and Keycloak. Several of these solutions are very common in homelabs, aren't they?
Audit logging
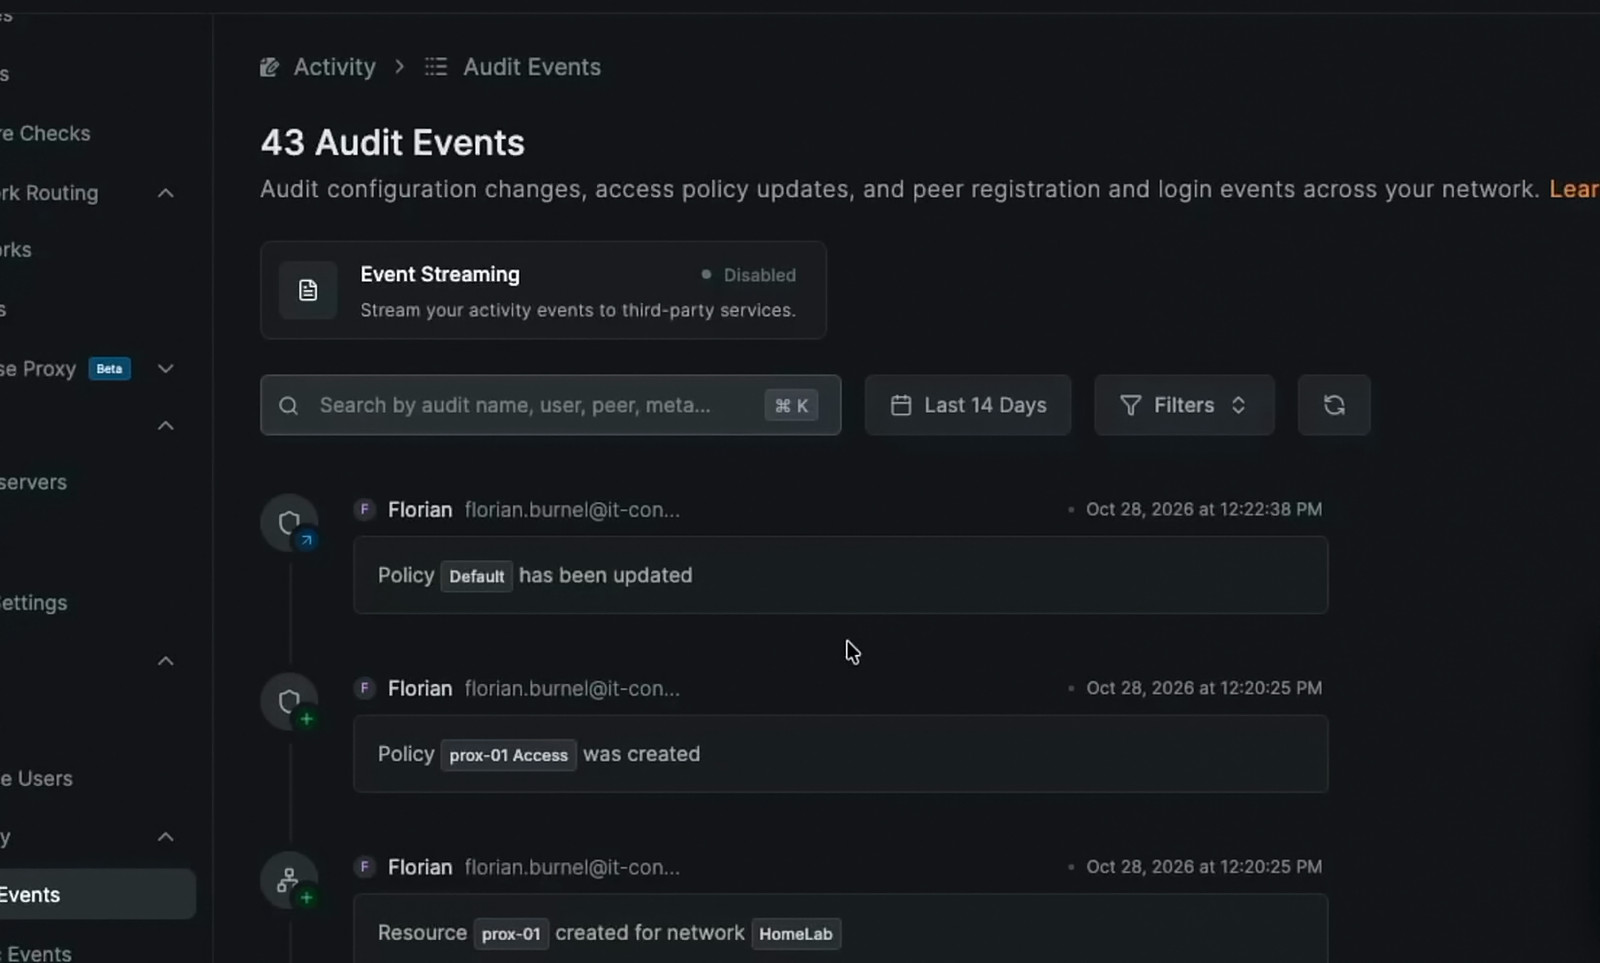
In the Activity section, Audit Events tracks every action performed on the platform: who did what, and when (creating a rule, creating a resource, changing the Default rule, and so on). Traffic Events, which logs network flows, is reserved for the Enterprise license.
Authentication and MFA
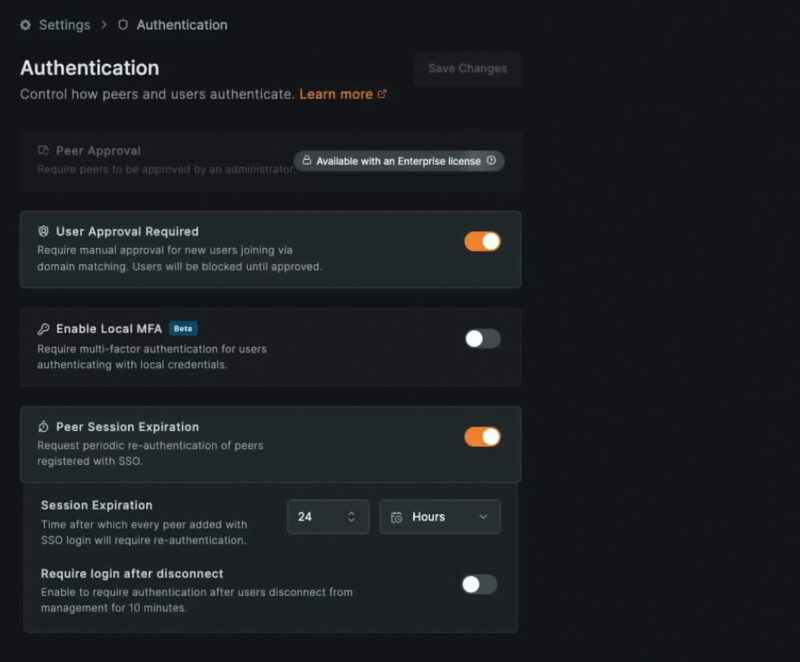
In Settings, Authentication, you can notably:
- Require approval for new users (User Approval Required).
- Enable multi-factor authentication for local accounts (Enable Local MFA). I recommend enabling it; it is basic security!
- Set peer session expiration (Peer Session Expiration), after which a new authentication is required.
Network settings
The Networks section under settings lets you change the internal DNS domain, the NetBird IPv4 address range (100.69.0.0/16 here), the IPv6 range, and the groups concerned by IPv6. It also includes the Enable Routing Peer DNS Resolution option, which delegates resolution of domain-type resources to routing peers.
Publish a service with the built-in reverse proxy
The concept
With the NetBird agent, you can access all your resources through encrypted tunnels. The downside is that you need the agent. NetBird's built-in reverse proxy (based on Traefik) addresses another need: publishing an internal resource on the Internet, accessible from a simple browser, without the agent. For example, a site under development that you want to show someone, or an application you want to access from any device.
This feature is still in beta (and has been for months), but it works well. Just keep in mind that a service published this way is exposed to the Internet: it must be protected, and that is exactly what NetBird's options allow you to do.
We will test it with the demo web server used earlier.
Create the wildcard DNS record
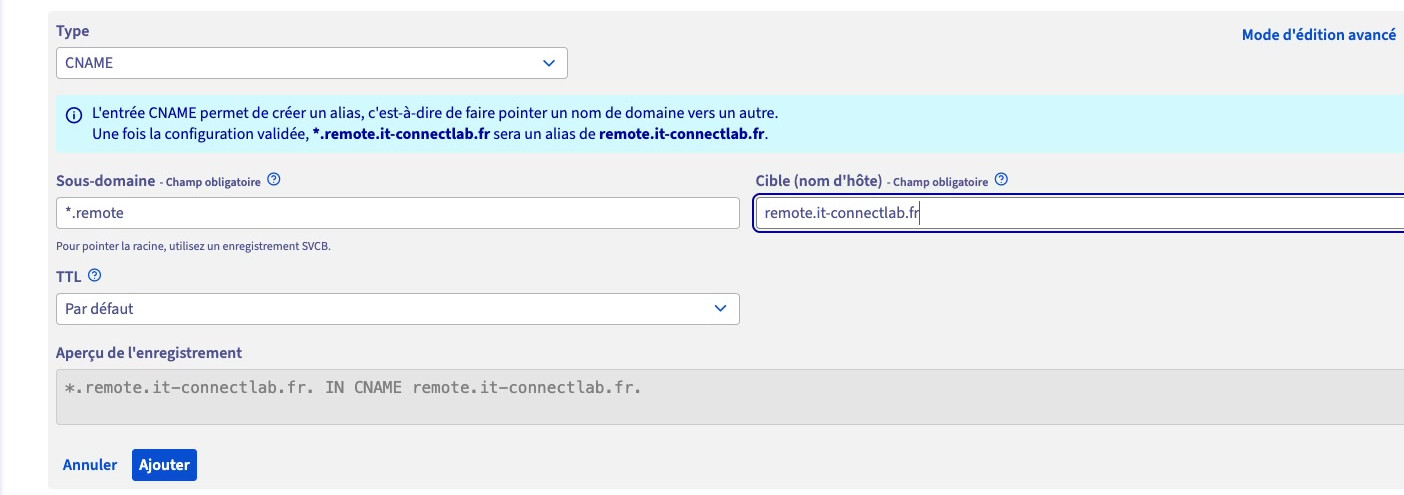
By default, a published service uses a subdomain of the NetBird domain, for example demo-web.remote.it-connectlab.fr. That name must exist in DNS, otherwise the TLS certificate cannot be issued. The simplest solution is to create a wildcard CNAME record, as suggested by the installation summary:
*.remote.it-connectlab.fr CNAME remote.it-connectlab.frThat way, each published service will automatically point to the VPS, without having to touch DNS again.
Create the service
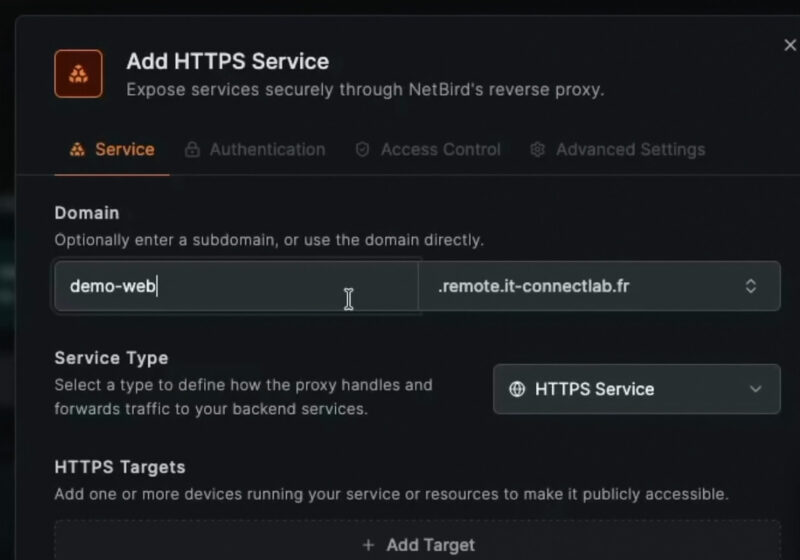
In the Reverse Proxy section, open Services and click Add Service. Enter the subdomain to use (demo-web). You can also use your own domain via the Custom Domains section.
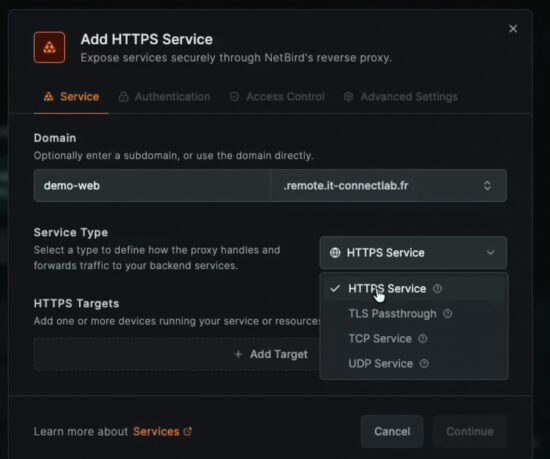
Then choose the service type:
- HTTPS Service: the reverse proxy handles HTTPS and the certificate. The backend server can remain on HTTP. This is the option I choose.
- TLS Passthrough: the reverse proxy passes the TLS stream through, and the destination server handles HTTPS and its certificate.
- TCP Service and UDP Service: for publishing a layer 4 service, such as a database or a game server.
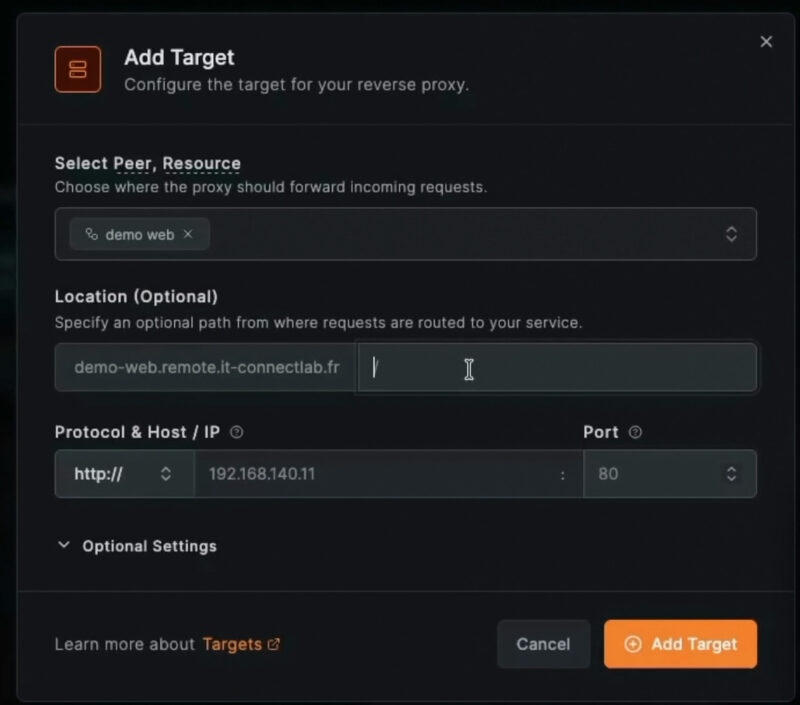
Then add a target (Add Target). It can be a peer or an existing resource. I select the demo web resource: NetBird automatically reuses its IP address and I specify port 80. Optional settings let you adjust the path, the request timeout, or add HTTP headers.
Protect the service with authentication
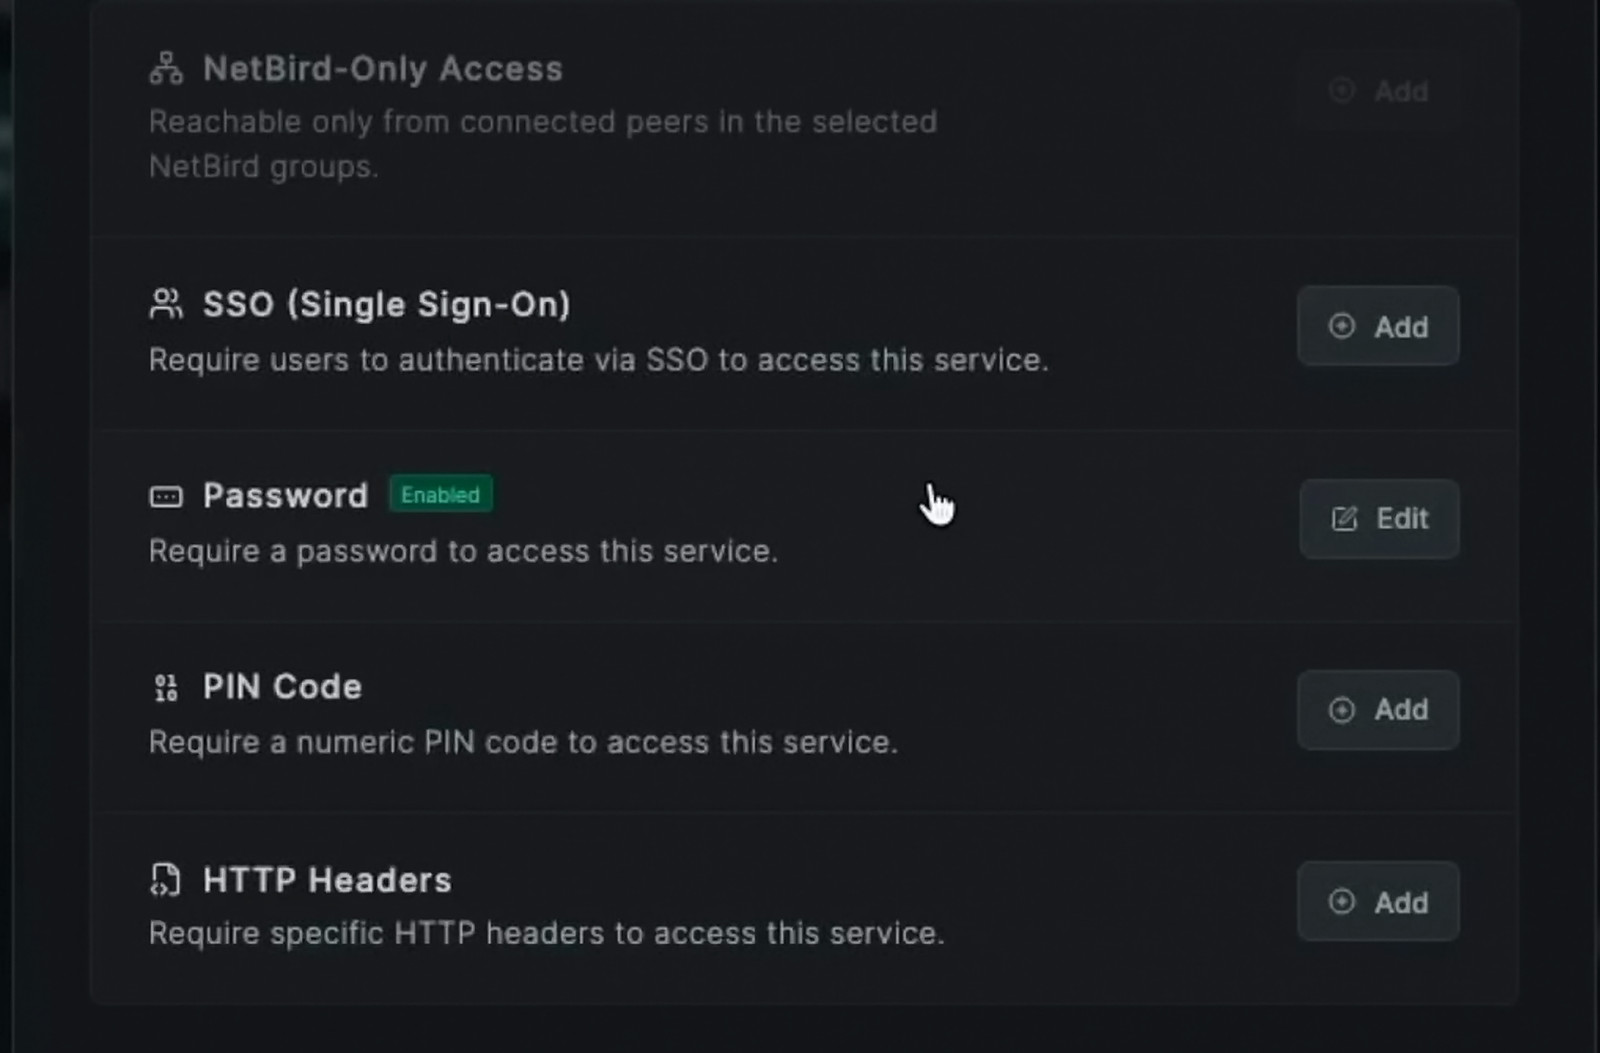
The Authentication tab lets you protect access to the service. Several methods are available:
- NetBird-Only Access: the service is accessible only to connected peers belonging to specific groups.
- SSO: the user must authenticate with the identity provider.
- Password: a password must be entered before accessing the service. This is the method I use for this demonstration.
- PIN Code: a simple PIN code.
- HTTP Headers: a header must be presented (Basic Auth, Bearer token, or custom header). This is useful for an API or webhook called by another application.
Enable CrowdSec and filter access
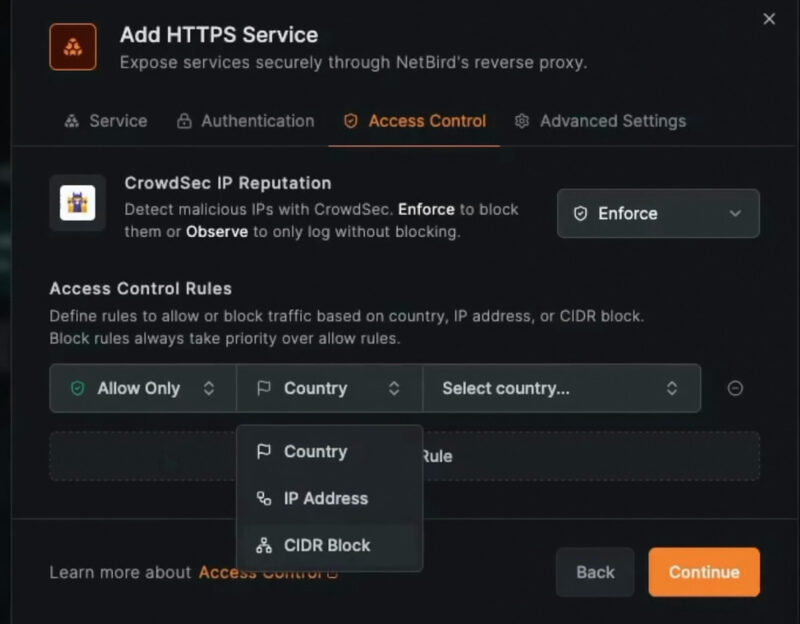
The Access Control tab lets you enable CrowdSec reputation checks for this service. In Enforce mode, malicious IP addresses known to CrowdSec are blocked. Observe mode only logs events without blocking. You can also add rules to allow or block traffic by country, IP address, or CIDR block. Block rules always take precedence over allow rules. In my case, I enable CrowdSec in Enforce mode and allow connections only from France.
If you want to dig deeper into the subject, check out our tutorial on integrating CrowdSec with Traefik.
Finally, the Advanced Settings tab contains two options: Pass Host Header to forward the original Host header to the destination server, and Rewrite Redirects to rewrite redirects returned by the server. These should be enabled case by case, depending on the published application.
Test the published service
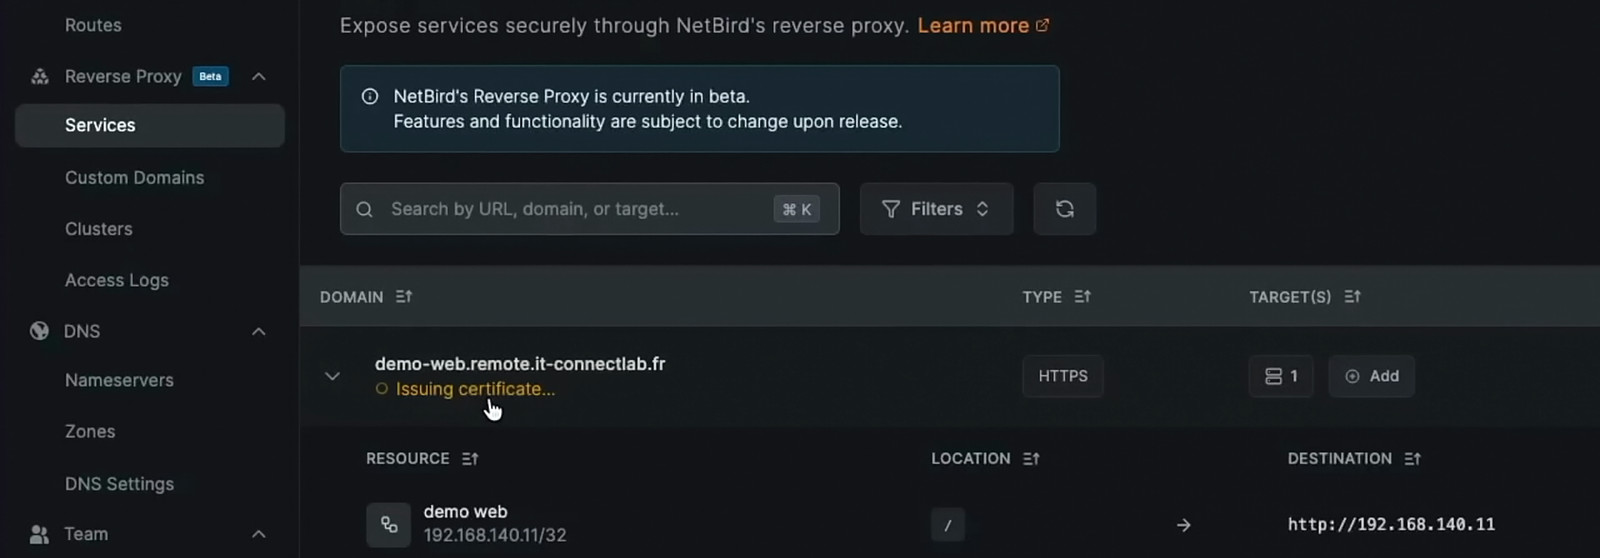
Once the service is added, its status shows Issuing certificate... while the certificate is being obtained from Let's Encrypt.
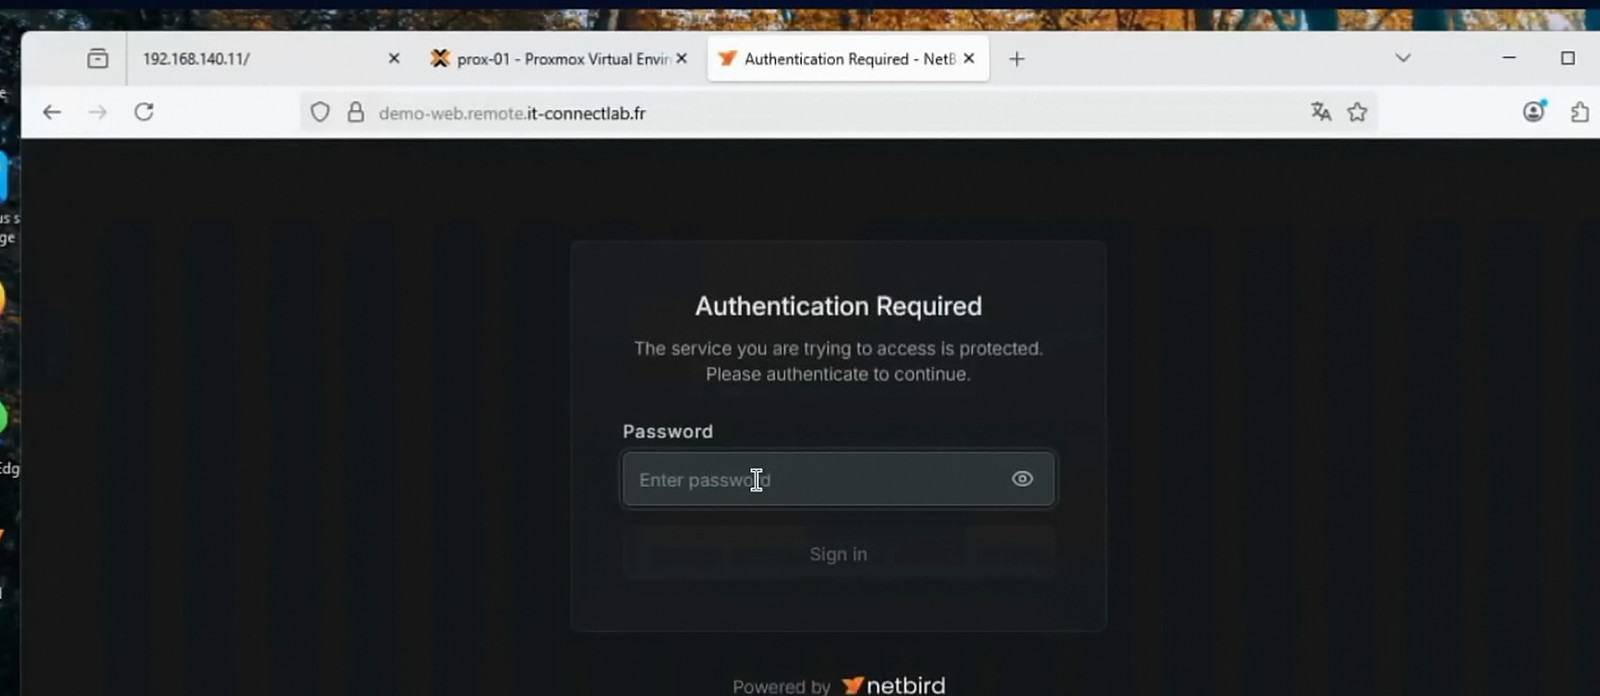
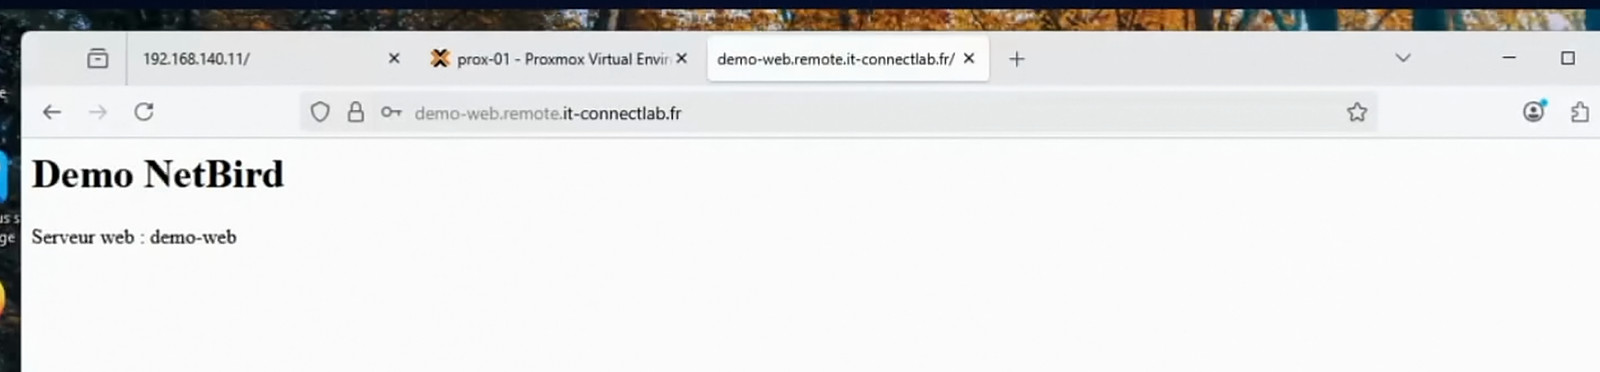
From any browser, the address https://demo-web.remote.it-connectlab.fr shows an authentication page. After entering the password, I access the web server, this time without the NetBird agent!
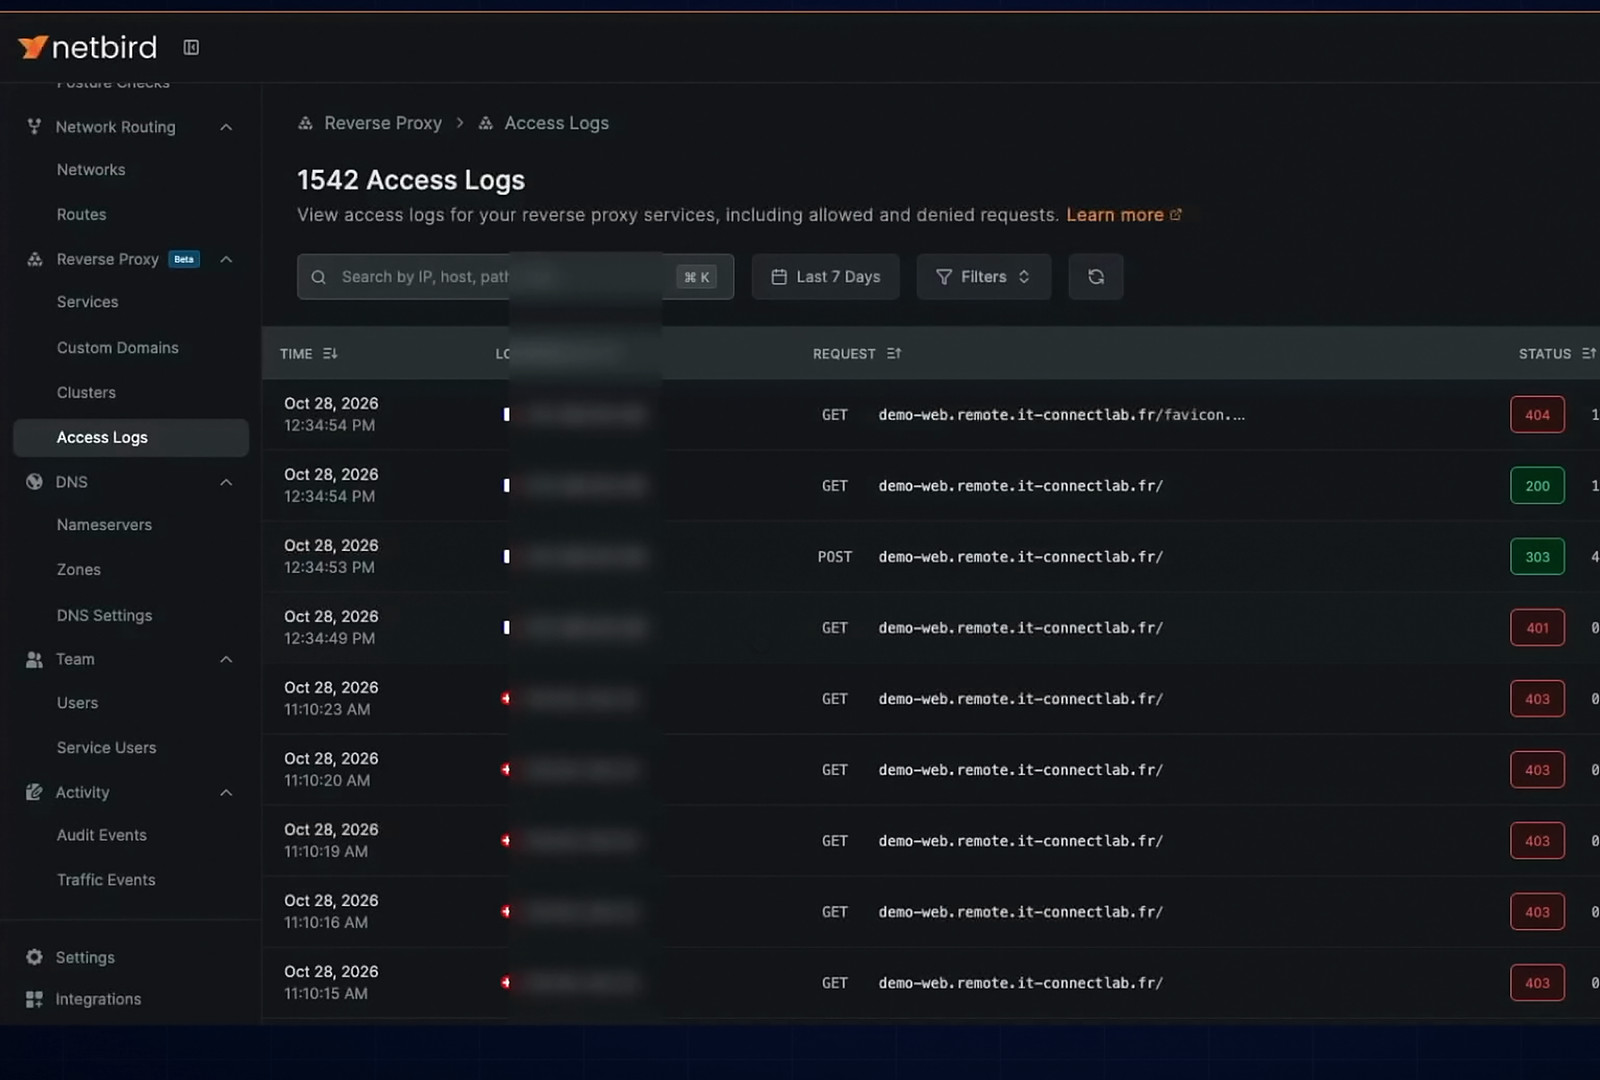
The Access Logs section of the reverse proxy lists all received requests, with method, URL, response code and authenticated user. It quickly becomes obvious that the service is being probed from abroad: these requests, coming notably from Switzerland and the United States, were blocked by the rule that allows only France.
How do you update NetBird?
NetBird evolves quickly.... So make sure to update your server and clients regularly.
Update the server
The dashboard signals the availability of a new version with an Update available button, at the bottom of the left-hand menu, next to the Management and Dashboard versions.

Before updating, I recommend that you:
- Back up the stack: the
/opt/docker-compose/netbirdfolder (includingdocker-compose.yml,config.yamland the.envfiles), the Traefik and CrowdSec configuration, as well as Docker volumes (NetBird data and certificates). - Read the release notes: those for the NetBird server and those for the dashboard, to identify any breaking changes.
Then, from the stack directory, pull the new images and recreate the NetBird containers. If the reverse proxy is enabled, update it at the same time as the server (never before).
cd /opt/docker-compose/netbird

# Download the new images
docker compose pull netbird-server dashboard proxy

# Recreate the containers
docker compose up -d --force-recreate netbird-server dashboard proxy
Without the reverse proxy, simply remove proxy from these two commands. By default, NetBird images use the latest tag. If you have pinned specific versions in the docker-compose.yml file, update them before running docker compose pull.
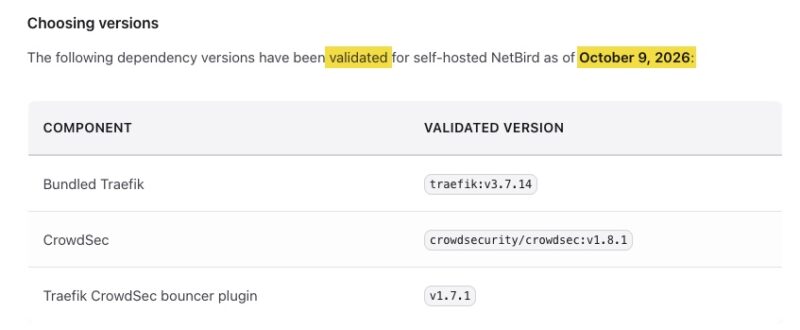
Traefik and CrowdSec are not updated by this procedure, because their images use fixed versions. The best approach is to check the documentation for the validated versions before changing the Docker Compose file.
Update the clients
For Windows and macOS clients (PKG installer), NetBird offers automatic updates. They are configured in Settings, Clients: you can choose the latest version or a specific version, and force background installation.
On Linux, automatic updates are not supported. On Debian and Ubuntu, the install.sh script installs the client from NetBird's APT repository (you can see this in its output). Updates therefore go through the package manager:
sudo apt-get update
sudo apt-get install netbird
For an installation done without a package manager, the documentation says to stop the client with netbird down, rerun the installation script with the --update option, then start the client again with netbird up.
NetBird or Tailscale: what are the differences?
If you know Tailscale, which we introduced in our complete guide to Tailscale, you have probably noticed many similarities with NetBird. Both solutions are based on WireGuard, create a mesh network, and offer access rules, gateways to local networks, and exit nodes. The main difference lies in the coordination server.
| Criterion | NetBird | Tailscale | Headscale |
|---|---|---|---|
| Protocol | WireGuard | WireGuard | WireGuard (Tailscale clients) |
| Coordination server | Open source (AGPLv3), self-hostable or available as a managed service | Proprietary, hosted by Tailscale | Open source, alternative implementation of the Tailscale server |
| Web administration interface | Yes, included | Yes, online | No official one (third-party projects) |
| Identity provider | Built in, with OIDC IdP support | Identity provider accounts supported | OIDC IdP |
| Publish services on the Internet | Built-in reverse proxy | Tailscale Funnel | No |
Tailscale remains the easiest solution to get started with, with a very mature ecosystem, but the server managing your network is not in your hands. Headscale makes it possible to self-host it, as we saw in our tutorial on Headscale, but it is a community project that does not cover all Tailscale features and does not provide an official interface. NetBird stands out as a complete self-hostable solution, including the administration interface, with a vendor that officially develops this version.
Conclusion
NetBird checks a lot of boxes for remote access to a homelab (or a business network): a WireGuard-based mesh network, fine-grained access control by group, protocol and port, security posture checks, and a complete administration interface. Everything is open source and self-hostable end to end, which sets it apart from Tailscale. Installing the server with the official script is quick, and the routing peer in an LXC container makes it possible to reach an entire local network with a minimal footprint. The built-in reverse proxy completes the package by making it possible to publish a service on the Internet securely.
I recommend working with groups, whether for resources or peers, to make your NetBird deployment easier to maintain. By saying that, I am especially thinking about access rule management: it will be easier to work with groups, and it also reduces configuration drift.
To go further, here are some resources:
And you: do you use NetBird, Tailscale, or a more traditional VPN to access your network remotely?