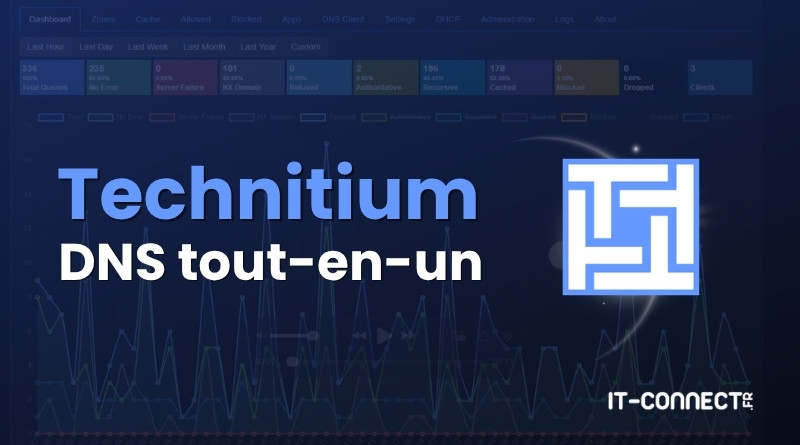
Technitium DNS Server: Block Ads and Host Your Own DNS
Block ads across your entire network, encrypt your DNS queries, host your own internal domain names, and even replace your DHCP server: Technitium DNS Server does all of that, and the best part is that it is free and open source.
I encourage you to watch my YouTube video for a complete, in-depth walkthrough.
On a local network, DNS plays a major role in privacy, performance, and overall comfort across the whole environment. In a Homelab context, instead of stacking AdGuard Home or Pi-hole for blocking, Unbound for recursive resolution, and a separate service for DHCP, Technitium brings everything together in a single container.
In this article, I will show you how to install Technitium DNS Server with Docker, then configure it: resolution (native recursion or encrypted forwarders), ad and malware domain blocking, local zones to resolve your machines by name, and even secure dynamic updates with TSIG keys. We will also see how to troubleshoot a resolution that does not work.
In short : Technitium DNS Server is an open source DNS server (GPLv3) that works both in recursive mode (it resolves names itself by querying root servers) and authoritative mode (it hosts your zones). It blocks ads at the DNS level, supports encrypted DoH, DoT, and DoQ protocols, signs and validates DNSSEC, includes a DHCP server, and is managed through a web console. On Linux, the most practical installation method is Docker in host network mode.
Table of Contents
- What Is Technitium DNS Server?
- Prerequisites
- Install Technitium DNS Server with Docker
- First Login to the Administration Console
- Configure DNS Resolution
- Block Ads and Malicious Domains
- Create Local DNS Zones
- Dynamic Record Updates with a TSIG Key
- Troubleshooting: When DNS Resolution Does Not Work
- Going Further with Technitium
- Conclusion
- FAQ
What Is Technitium DNS Server?
Technitium DNS Server is both an authoritative and recursive DNS server, designed for self-hosting and enterprise networks. Here is what it can do:
- Resolve domain names for your entire network, either through native recursion (by querying root servers directly) or by delegating to an external resolver using different protocols (classic DNS, DNS-over-HTTPS, DNS-over-QUIC, etc.).
- Block ads and malicious domains across the network, just like Pi-hole and AdGuard Home, using block lists.
- Host your own DNS zones (internal domains), with support for DNSSEC (signing and validation), zone transfers (AXFR/IXFR), and dynamic updates (RFC 2136).
- Encrypt DNS traffic via DNS-over-TLS (DoT), DNS-over-HTTPS (DoH), and DNS-over-QUIC (DoQ), both inbound and outbound (except in recursive mode for external lookups).
- Distribute IP addresses with the built-in DHCP server
- Synchronize multiple instances through clustering (introduced in version 14).
Project-wise, Technitium DNS Server is developed by Technitium (Shreyas Zare) and released under the open source GNU GPLv3 license. It is completely free, with no paid edition. As for the technology stack, it is written in C# / .NET (version 15, released in April 2026, is based on .NET 10) and runs on Windows, Linux, macOS, Raspberry Pi, and Docker. For reference, the vendor claims throughput of around 100,000 queries per second on consumer hardware.
Official resources:
- Official website: technitium.com/dns
- GitHub repository: TechnitiumSoftware/DnsServer
- Release notes: page des releases
Technitium Compared to Pi-hole + Unbound and AdGuard Home + Unbound
If you are used to the Pi-hole + Unbound or AdGuard Home + Unbound combination, the usual approach is to use one tool for blocking and a second one (Unbound) for DNS recursion. The advantage of Technitium is that it combines both roles in a single solution.
| Feature | Pi-hole + Unbound | AdGuard Home + Unbound | Technitium DNS Server |
|---|---|---|---|
| Ad/malware blocking | Yes (Pi-hole) | Yes (AdGuard Home) | Yes (built-in) |
| Native recursion | Via Unbound | Via Unbound | Built in |
| Authoritative server (local zones) | Limited | Limited | Full (DNSSEC, AXFR/IXFR) |
| Encrypted DoH/DoT/DoQ forwarders | Partial | DoH/DoT | DoH/DoT/DoQ |
| DHCP server | Yes | Yes | Yes (built in) |
| Dynamic updates (RFC 2136) | No | No | Yes (with TSIG) |
| Number of services to maintain | 2 | 2 | 1 |
I genuinely think that this is Technitium's main selling point: one single building block to install, update, and monitor, whereas the classic approach requires two. On the other hand, the interface is denser (the trade-off of a more capable tool).
Prerequisites
To follow this guide, you need:
- A Linux server (Debian or Ubuntu in our examples) with
sudoaccess. - Docker and Docker Compose installed. If you do not have them yet, refer to our Docker installation tutorial on Linux.
- A static IP address for this server. This is the address you will later hand out as the DNS server to your clients: it must not change. Set it with a DHCP reservation on your router, or with a static IP on the host. Throughout this article, the server uses
192.168.10.200. - Ports 53 (UDP and TCP) and 5380 (TCP) available on the host. We will see that port 53 is often already in use on Ubuntu.
Note : if your server sits behind a home firewall (OPNsense, pfSense…), make sure to allow outbound DNS over UDP and TCP on port 53. Native recursion needs TCP for large responses (especially DNSSEC). This is a common failure cause, and we will come back to it in the troubleshooting section.
Install Technitium DNS Server with Docker
We are going to deploy Technitium with Docker, in host network mode. As usual, the stack will live in a dedicated folder: /opt/docker-compose/technitium/, with bind mounts for data and logs, and variables stored in a .env file. I will let you create this structure with the mkdir command:
/opt/docker-compose/technitium/
├── docker-compose.yml
├── .env
├── config/            # Bind mount /etc/dns (configuration, zones, block lists)
└── logs/              # Bind mount /var/log/technitium/dns (logs)
Here is the docker-compose.yml file:
services:
  technitium:
    container_name: technitium
    hostname: dns
    image: technitium/dns-server:latest
    # Host mode : essential to see the real client IPs and use DHCP
    network_mode: "host"
    environment:
      - DNS_SERVER_DOMAIN=${DNS_SERVER_DOMAIN}
      - DNS_SERVER_ADMIN_PASSWORD=${DNS_SERVER_ADMIN_PASSWORD}
      - DNS_SERVER_WEB_SERVICE_LOCAL_ADDRESSES=${DNS_SERVER_WEB_SERVICE_LOCAL_ADDRESSES}
      - DNS_SERVER_ENABLE_BLOCKING=true
      - DNS_SERVER_LOG_USING_LOCAL_TIME=true
      - DNS_SERVER_LOG_FOLDER_PATH=/var/log/technitium/dns
      - TZ=Europe/Paris
    volumes:
      - ./config:/etc/dns
      - ./logs:/var/log/technitium/dns
    security_opt:
      - no-new-privileges:true
    restart: unless-stopped
And the .env file to place right beside it:
# Internal name used by the server to identify itself
DNS_SERVER_DOMAIN=dns.lab.it-connect.fr

# Password for the "admin" account in the web console, applied when the container starts.
DNS_SERVER_ADMIN_PASSWORD=YourStrongPassword

# Server static IP: the web console (port 5380) will listen ONLY on this address
DNS_SERVER_WEB_SERVICE_LOCAL_ADDRESSES=192.168.10.200
A few notes on the choices made:
no-new-privileges: trueis compatible with port 53. The container starts as root and can therefore bind to this privileged port. The option only prevents later privilege escalation, without interfering with the service.- The console is bound to the LAN IP via
DNS_SERVER_WEB_SERVICE_LOCAL_ADDRESSES. Since we are not exposing anything to the Internet, this is the simple, clean compromise: you manage the server from your network, without leaving the console available on other interfaces. On a trusted LAN, it remains HTTP: keep that in mind. - Bind mounts instead of named volumes: configuration (
./config) and logs (./logs) remain visible on the host. :latestor pinned version? The:latestimage makes updates easier (which you can automate with Watchtower or What's Up Docker). If you prefer reproducibility, pin a major version.
Why Host Mode?
Host mode deserves an explanation, because it is an important choice. By directly sharing the host's network stack, Technitium sees the real client IP addresses instead of only the Docker bridge address. This is essential for:
- Per-client statistics in the Dashboard,
- Blocking rules and recursion ACLs targeted by address,
- The DHCP server, if you enable it later (it must be on the broadcast network).
That is why, compared to the usual template, we add network_mode: "host", remove the entire ports: block (useless and ignored in host mode), and remove the sysctls present in the template (it must not remain in host mode, or it will change the ephemeral port range of the host itself). This is an issue seen with all services like this one (mentioned in my article about AdGuard Home).
Good to know : in host mode, the container does not get its own IP address and does not request a DHCP lease. It uses the host's IP. So the “container IP” is simply the IP of your Docker machine (for me 192.168.10.200).
If you would rather use a classic bridge mode deployment, then use this Docker Compose file:
services:
  technitium:
    container_name: technitium
    hostname: dns
    image: technitium/dns-server:latest
    ports:
      - "5380:5380/tcp"   # Administration web console (HTTP)
      - "53:53/udp"       # DNS service (UDP)
      - "53:53/tcp"       # DNS service (TCP)
      # Uncomment below depending on the protocols you will use
      # - "853:853/udp"   # DNS-over-QUIC (DoQ)
      # - "853:853/tcp"   # DNS-over-TLS (DoT)
      # - "443:443/udp"   # DNS-over-HTTPS (HTTP/3)
      # - "443:443/tcp"   # DNS-over-HTTPS (HTTP/1.1, HTTP/2)
      # - "67:67/udp"     # DHCP server (however, host mode is required for it to work)
    environment:
      - DNS_SERVER_DOMAIN=${DNS_SERVER_DOMAIN}
      - DNS_SERVER_ADMIN_PASSWORD=${DNS_SERVER_ADMIN_PASSWORD}
      - DNS_SERVER_ENABLE_BLOCKING=true
      - DNS_SERVER_LOG_USING_LOCAL_TIME=true
      - DNS_SERVER_LOG_FOLDER_PATH=/var/log/technitium/dns
      - TZ=Europe/Paris
    volumes:
      - ./config:/etc/dns
      - ./logs:/var/log/technitium/dns
    security_opt:
      - no-new-privileges:true
    restart: unless-stopped
In bridge mode, the DNS_SERVER_WEB_SERVICE_LOCAL_ADDRESSES directive has been removed, because that variable is used to bind the console to a host IP, which makes no sense here since the container is isolated behind the bridge. The console is therefore exposed through the 5380:5380 port mapping.
Finally, keep in mind that DHCP will not work properly in bridge mode (it needs to be on the broadcast network): I left the 67:67/udp line commented out with the warning. For DHCP, host mode remains mandatory. Now it is up to you to make the right choice based on your needs!
Free Up Port 53
On Ubuntu (and any installation using the systemd-resolved stub resolver), port 53 is already occupied by 127.0.0.53. Technitium will not start until you free it, which will lead to problems.
First, check who is listening on port 53:
# Who is using port 53?
sudo ss -ulpn | grep ':53'
If systemd-resolved appears, switch over like this:
# Step 1 - Disable the stub resolver using port 53
sudo nano /etc/systemd/resolved.conf

#    in the [Resolve] section, uncomment/add:
#    DNSStubListener=no

# Step 2 - Point resolv.conf to the real upstreams (instead of the 127.0.0.53 stub)
sudo ln -sf /run/systemd/resolve/resolv.conf /etc/resolv.conf

# Step 3 - Restart the service
sudo systemctl restart systemd-resolved
On a minimal Debian server without systemd-resolved, this step is often unnecessary (which is why checking with ss before doing anything is useful).
Deploy the Container
All that is left is to start the stack from the project folder:
cd /opt/docker-compose/technitium

# Start the container in the background
docker compose up -d

# Check that it is running
docker compose ps

# Follow the logs (Ctrl+C to exit)
docker compose logs -f
Let us verify that the DNS service is indeed listening on port 53, on all interfaces:
# The DNS service must listen on UDP and TCP on 0.0.0.0:53
sudo ss -ulnp 'sport = :53'
sudo ss -tlnp 'sport = :53'
The dotnet process listening directly on 0.0.0.0:53 is Technitium: proof that host mode is working. Here is an example:

First Login to the Administration Console
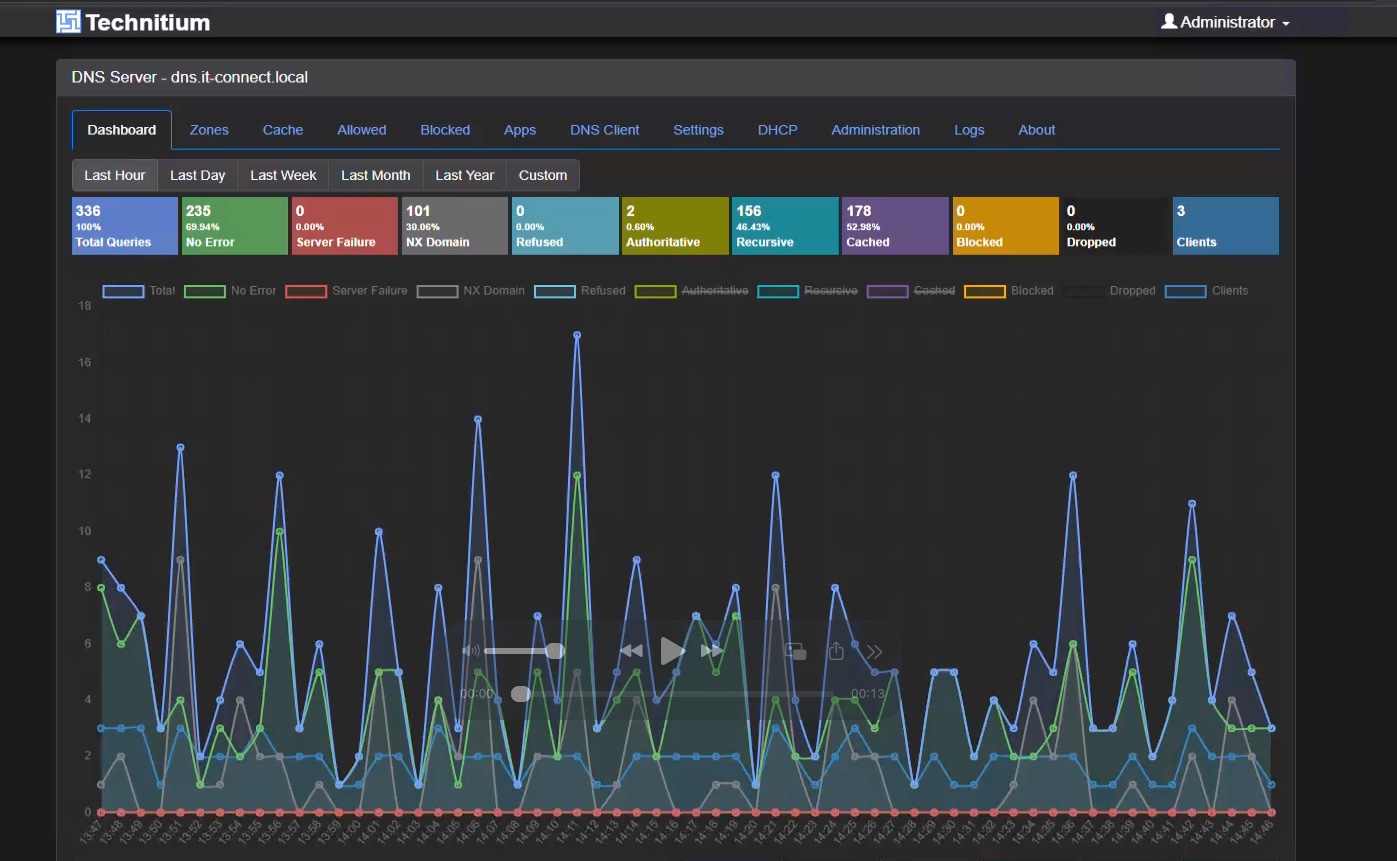
Go to http://192.168.10.200:5380 and log in with the admin user and the password defined in your .env. The Dashboard appears: it is empty for now, which is normal, since no query has passed through yet.
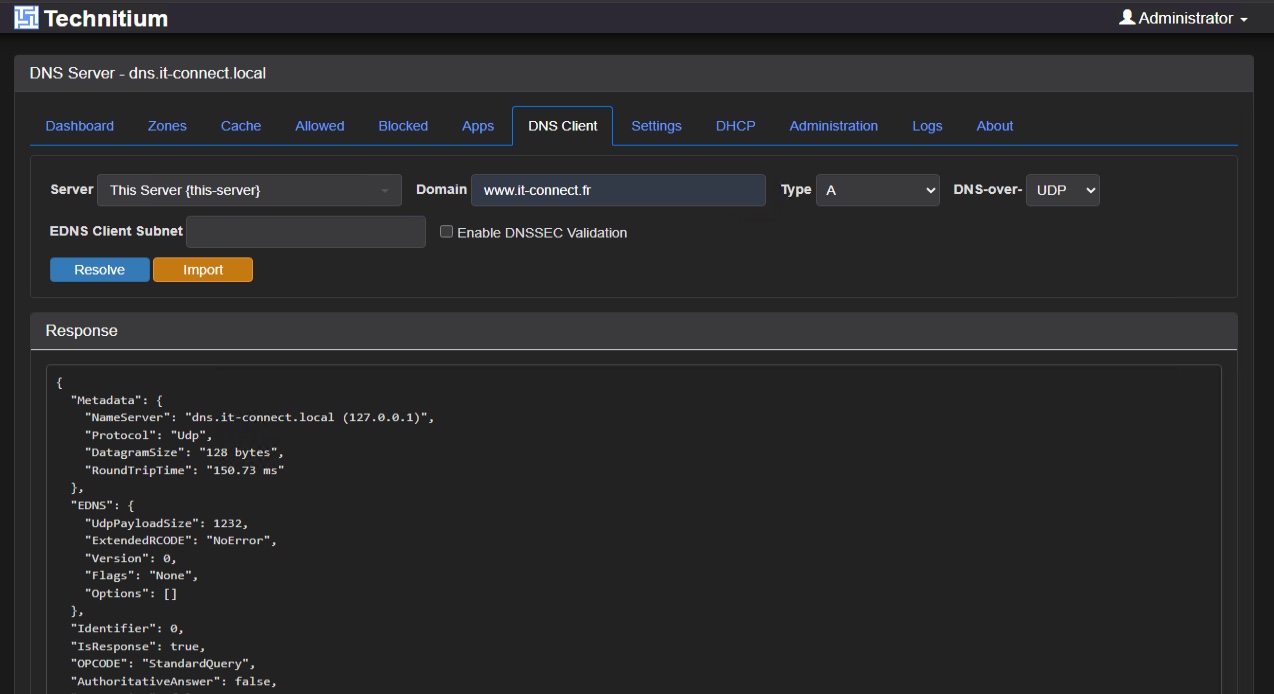
Before going any further, here is a useful validation reflex: open the DNS Client tab in the console and resolve a public domain (for example it-connect.fr). This tool queries the server without depending on your workstation's network configuration. It is the fastest way to confirm that resolution works before touching anything else.
Configure DNS Resolution
Technitium can resolve names in two ways, and that is what lets it replace the AdGuard Home + Unbound duo. Before configuring it, let us take a moment to look at both methods.
Native recursion or encrypted forwarders?
Both modes protect your privacy, but not against the same observer:
| Criterion | Encrypted forwarders (DoH/DoT) | Native recursion |
|---|---|---|
| Traffic to the upstream server | Encrypted (HTTPS/TLS) | Cleartext, over port 53 (because root servers do not support DoH/DoT) |
| Visibility for the ISP | None | Possible (cleartext port 53) |
| Who sees all your requests | A resolver (Cloudflare, Quad9…) | No single entity sees everything |
| External dependency | High (trust is shifted to the resolver) | Low (root servers) |
| Privacy lever | Channel encryption | QNAME minimization + DNSSEC |
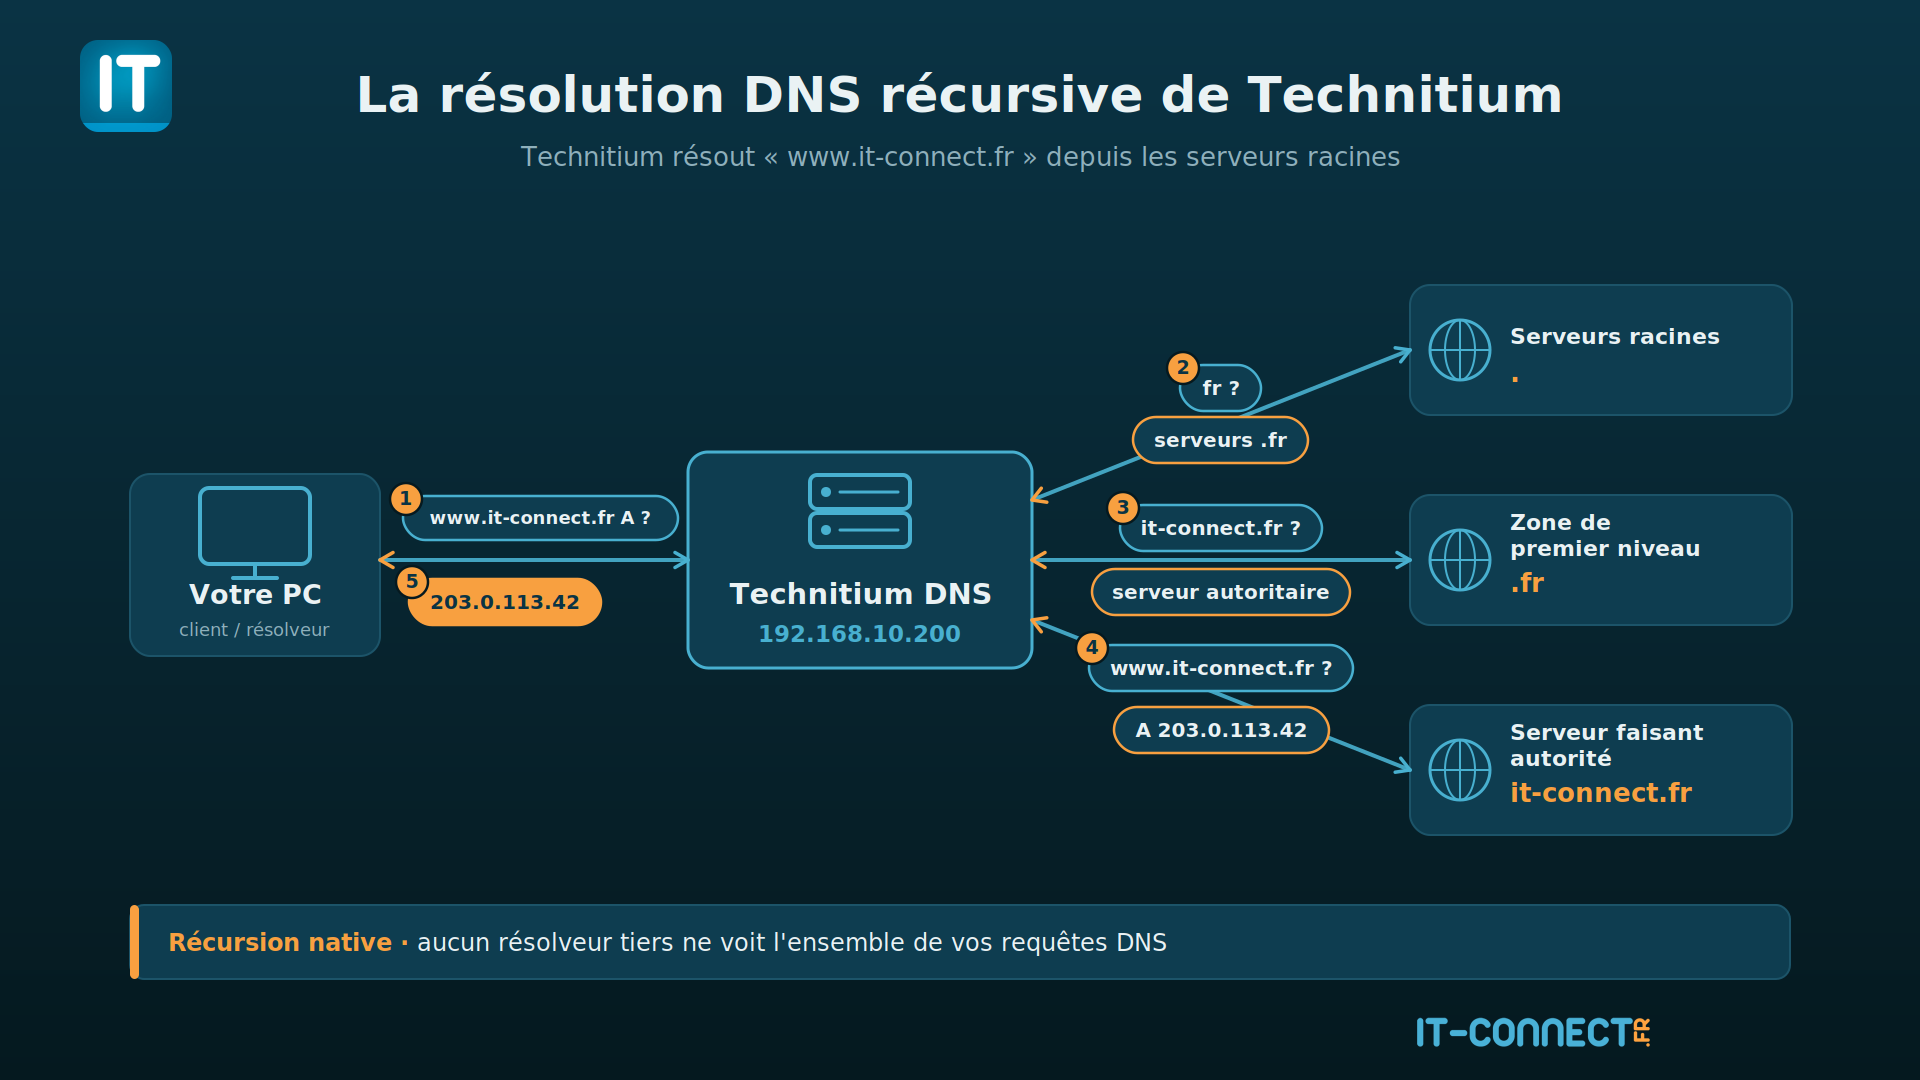
In other words: encrypted forwarders hide your queries from your ISP, but then a single resolver sees your entire DNS history. Native recursion, on the other hand, means no single actor sees all of your queries (the root server only learns the TLD queried, the TLD server only learns the second-level domain, and so on), at the cost of unencrypted traffic to the authoritative servers.
I am using native recursion in this article. But that is a choice you have to make. If your network blocks outbound port 53, or if you prefer to encrypt the channel, forwarders remain a perfectly valid option.
Configure Native Recursion
Without forwarders, Technitium resolves names on its own by querying the global root servers. For this mode to be active, in the Settings > Recursion section, you must set access to Allow recursion only for private networks. This is essential so you do not turn your server into an open resolver that can be abused from the outside (even on a non-exposed LAN, it is better hygiene).

I also encourage you to enable QNAME minimization. It improves the privacy of the recursion process. Technitium then sends only the minimum necessary information to each server in the chain, without revealing the full name to be resolved all at once.
What is QNAME minimization? Standardized by RFC 7816, it is a technique that sends each DNS server only the part of the name it needs to answer. The root server is queried for “.fr”, the .fr server for “it-connect.fr”, and only the authoritative server receives the full name. Each actor therefore learns as little as possible about your browsing.
To use Technitium as a recursive DNS server, make sure you do not define any external resolver. Go to Settings > Proxy & Forwarders: leave the forwarder list empty, then save.
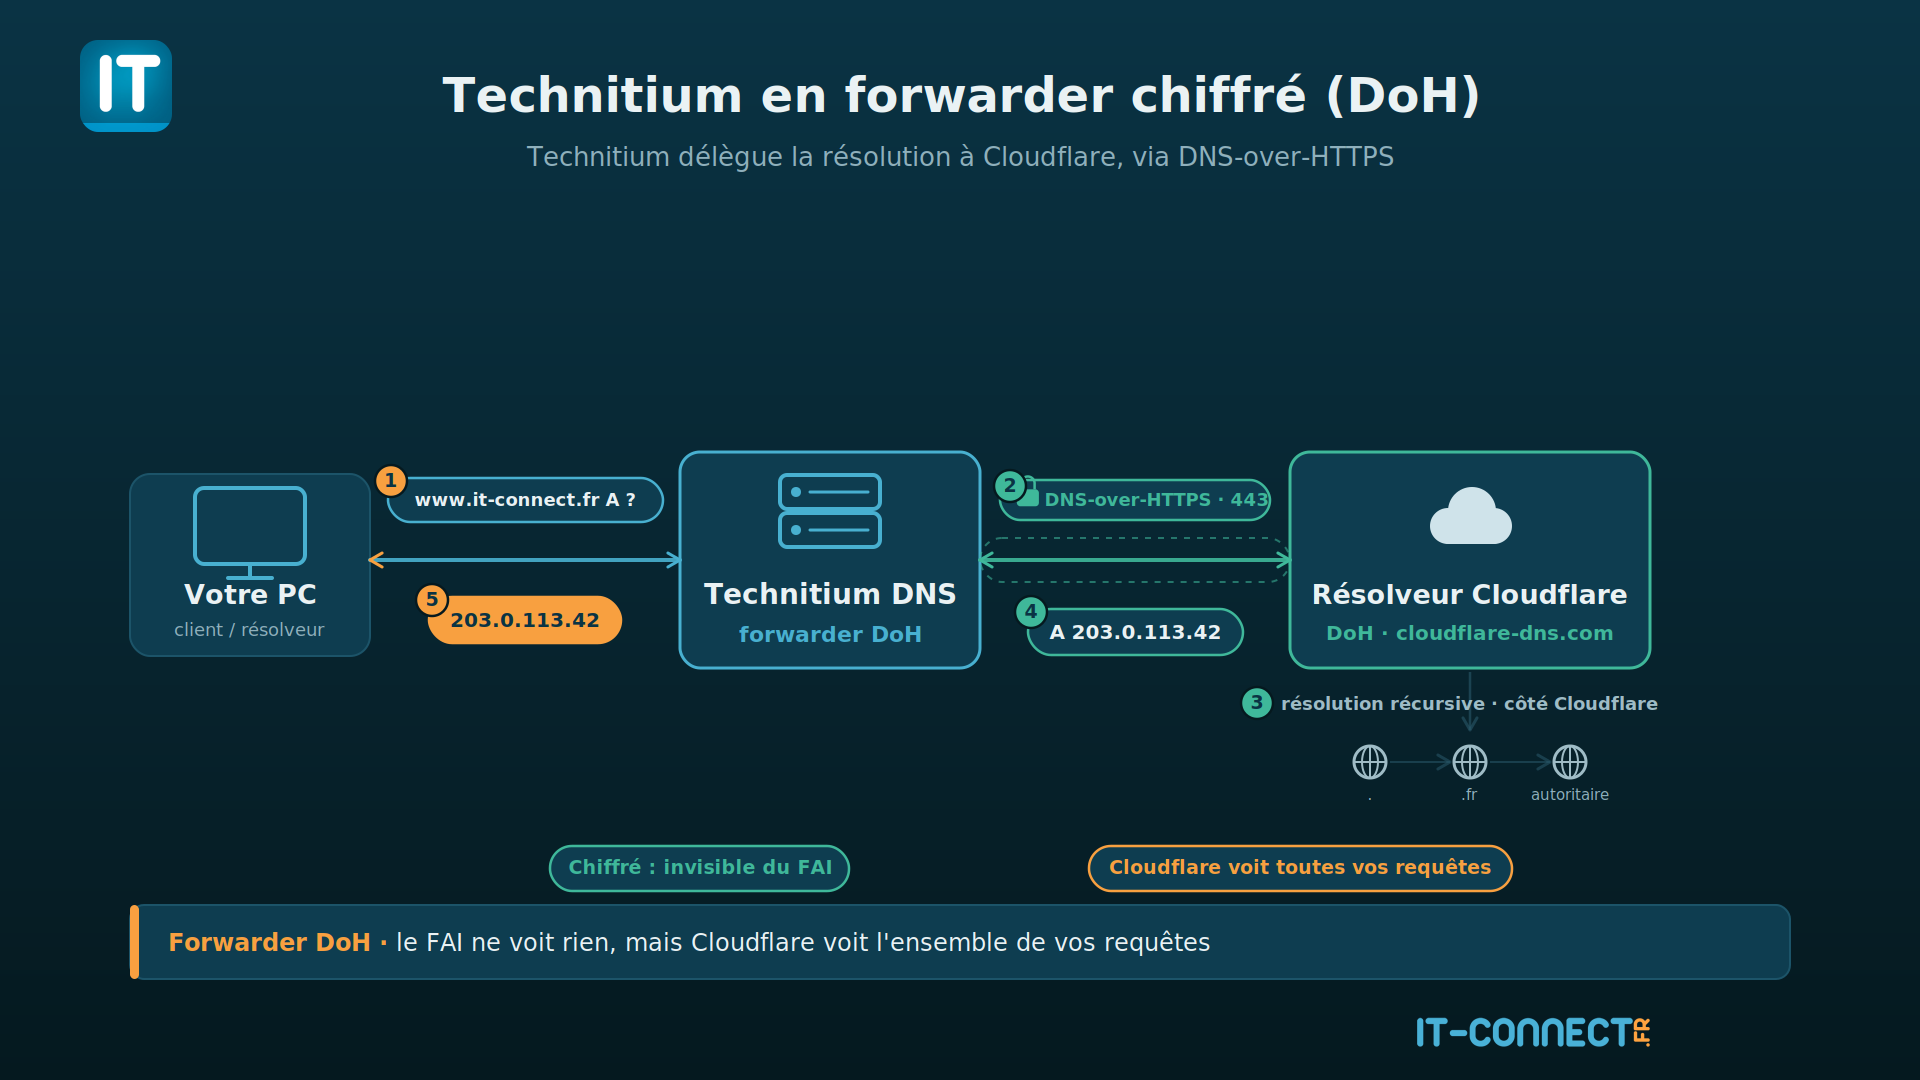
Alternative: Encrypted Forwarders (DoH/DoT)
If you prefer to encrypt outbound traffic, you can use an external DNS resolver. In this case, you will no longer query the root DNS servers directly, but instead send queries to your resolver (as Pi-Hole and AdGuard Home can do). If that is what you want, go to Settings > Proxy & Forwarders.
Choose the Forwarder Protocol Https (DoH) or Tls (DoT), then add one or more resolvers. You can either enter the address of your DNS resolver yourself or pick one from the Quick select list.
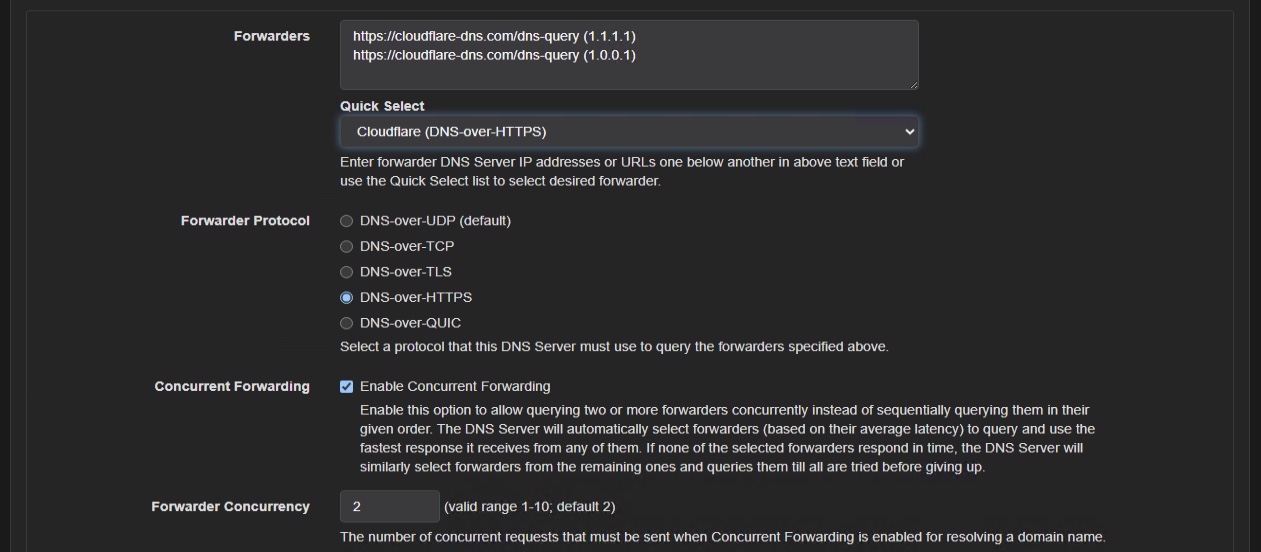
In this mode, the chosen resolver performs recursive resolution on your behalf; Technitium only forwards the query to it, encrypted. QNAME minimization therefore no longer applies on the Technitium side.
Block Ads and Malicious Domains
This is the built-in equivalent of Pi-hole and AdGuard Home. Blocking is already enabled at the container level (DNS_SERVER_ENABLE_BLOCKING=true in our Compose file). All that is left is to feed it block lists and choose its behavior.
In Settings > Blocking, make sure it is indeed enabled.
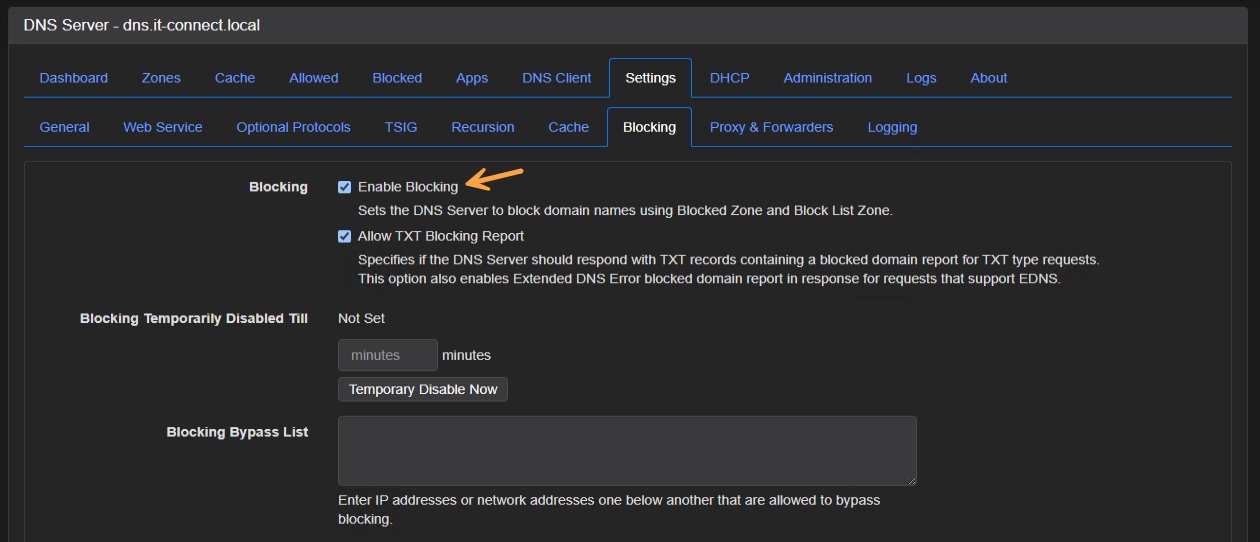
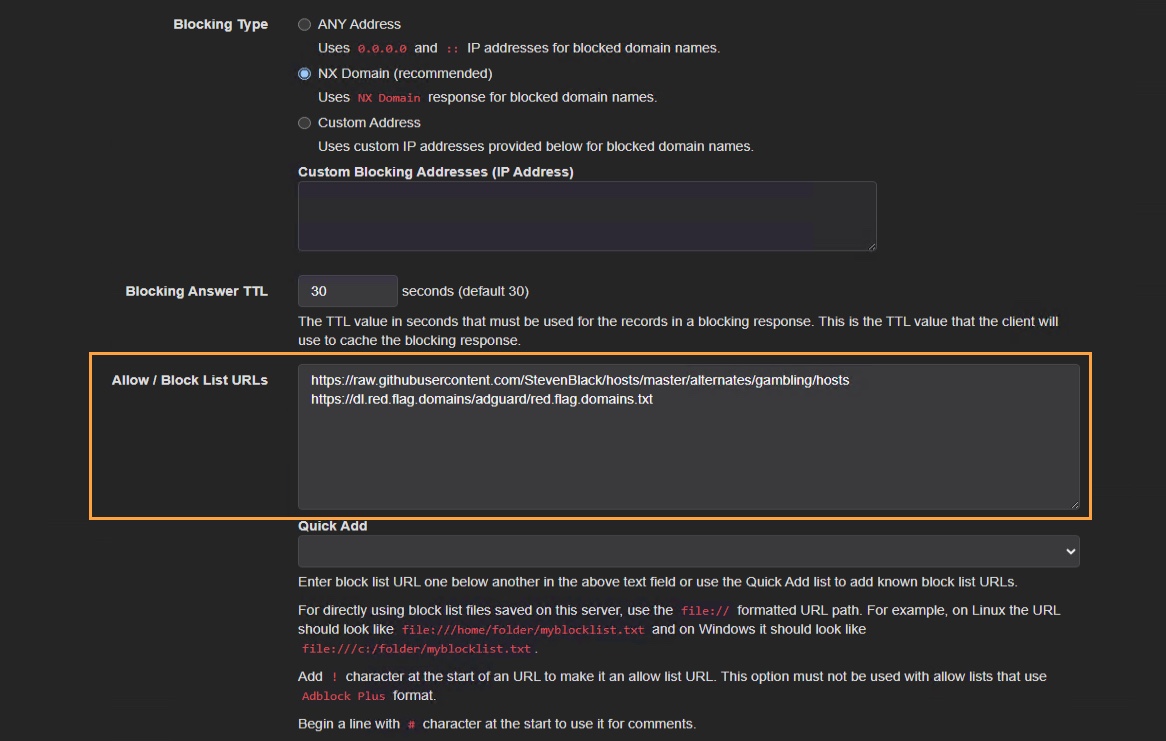
Add block lists in the Allow / Block List URLs field. A preconfigured list includes a few references, including Steven Black's lists, but you can also point to other lists (such as Red Flag Domains, for example).
https://raw.githubusercontent.com/StevenBlack/hosts/master/alternates/gambling/hosts
https://dl.red.flag.domains/adguard/red.flag.domains.txt
Set the automatic list update interval (Block List URL Update Interval) and choose the Blocking Type, meaning the response returned for a blocked domain (see below).
In addition to lists, Technitium offers a Blocked Zone (manual blocking, domain by domain) and an Allowed Zone (whitelist, which takes priority). Handy when you need to unblock a domain affected by a false positive. Even with lists in place, you still keep control over exceptions.
NXDOMAIN or 0.0.0.0: Which Response for a Blocked Domain?
The Blocking Type determines how Technitium responds when a domain is blocked. Two main approaches, and they do not say the same thing to the client:
| NX Domain | Anything Address (0.0.0.0) | |
|---|---|---|
| Response code | NXDOMAIN (RCODE 3) | NOERROR |
| Meaning | “this domain does not exist” | “it exists and points to 0.0.0.0” |
| Client reaction | Stops immediately, no connection | May attempt a connection to 0.0.0.0, which fails |
| Benefit | Cleaner, faster on the client side | Satisfies some poorly written applications that dislike NXDOMAIN |
Personally, I chose the NXDOMAIN method. To validate blocking, query a domain known to be blocked and observe the response (either through the web UI or from the command line).
dig @192.168.10.200 doubleclick.netThe response is indeed blocked by Technitium:

Create Local DNS Zones
Beyond resolution and blocking, Technitium can host your own zones: that is its authoritative role. In a homelab, this lets you resolve your machines by name (dns.lab.it-connect.fr) instead of by IP.
When you create a zone (Zones > Add Zone), Technitium offers several types. Here is what they mean, with a quick DNS zone reminder:
| Zone type | Role | Example use case |
|---|---|---|
| Primary Zone | Main read-write authoritative version | Host your internal homelab domain |
| Secondary Zone | Read-only synchronized copy (AXFR/IXFR) | Redundancy / high availability for a zone |
| Stub Zone | Contains only the name servers (NS) for a domain | Follow a delegated domain without copying its content |
| Conditional Forwarder Zone | Forces resolution of a domain to given forwarders | Send an enterprise domain to its internal DNS (for example, an Active Directory zone). |
| Secondary Conditional Forwarder Zone | Conditional forwarder replicated from a primary | Distribute a centralized forwarding configuration |
| Catalog Zone | List of member zones for automated provisioning (RFC 9432) | Manage a fleet of zones across multiple servers |
| Secondary Catalog Zone | Catalog consumer, automatically creates zones | The secondary that subscribes to the catalog |
| Secondary ROOT Zone (RFC 8806) | Local copy of the root zone | Keep root queries local (privacy + performance) |
For a homelab, the essential need is usually the Primary Zone. Create one (for example lab.it-connect.fr), then add your records (type A, name + IP address).
What Is the “SOA Serial Date Scheme” For?
When creating a zone, you will see the option called "Use SOA Serial Date Scheme". What is it for?
Every authoritative zone has an SOA record containing a serial number that must increase with each change. Secondary servers compare this number to know whether the zone has changed and whether they should trigger a transfer. This option determines how that serial is generated:
- Unchecked (default): a simple integer counter incremented by 1 for each change.
- Checked: the date-based format
YYYYMMDDnn(for example2026062801for the first change on June 28, 2026). This is the RFC 1912 recommended convention and is easy to read at a glance.
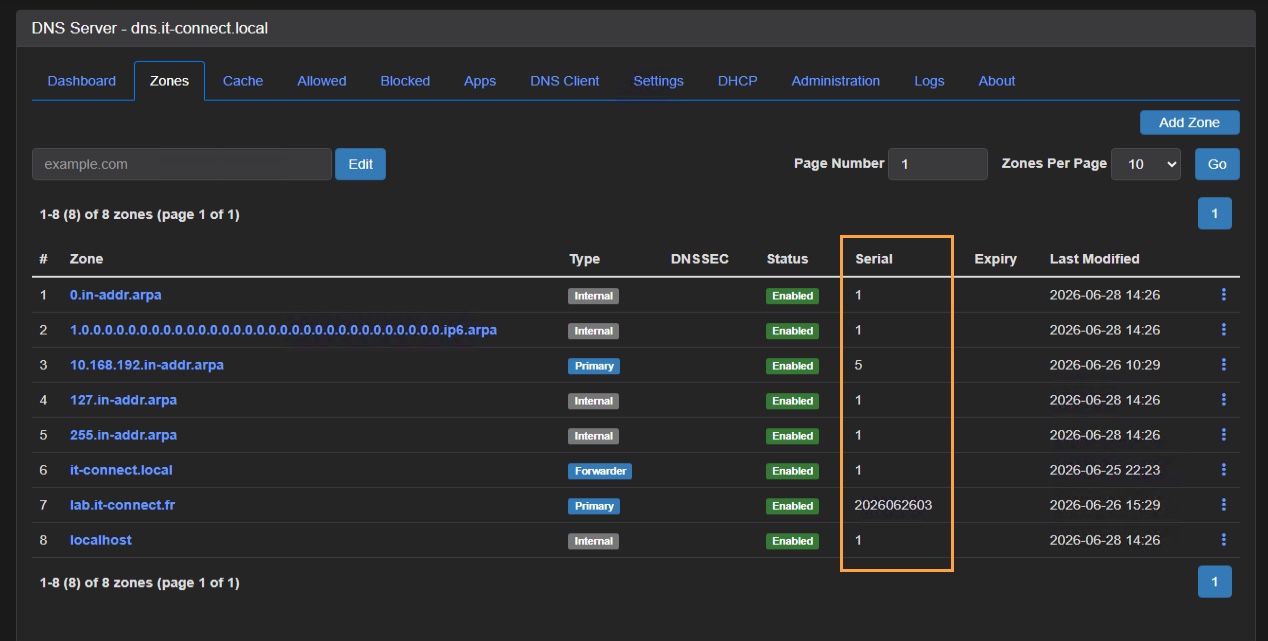
Note: the option only applies to zones for which Technitium generates the SOA (Primary, Conditional Forwarder, and Catalog), and it is better to choose the scheme when the zone is created.
Dynamic Record Updates with a TSIG Key
Here is a more advanced use case that further shows why Technitium is much more than an ad blocker: dynamic record updates. Instead of manually adding each record in the console, a machine registers itself at deployment time through a dynamic update (RFC 2136) authenticated with a TSIG key.
What is TSIG? TSIG (Transaction SIGnature, RFC 8945) authenticates DNS exchanges using a shared secret key and an HMAC. Once configured, TSIG signs the message (authenticity + integrity); it does not encrypt it. It is an authentication mechanism, not a confidentiality mechanism.
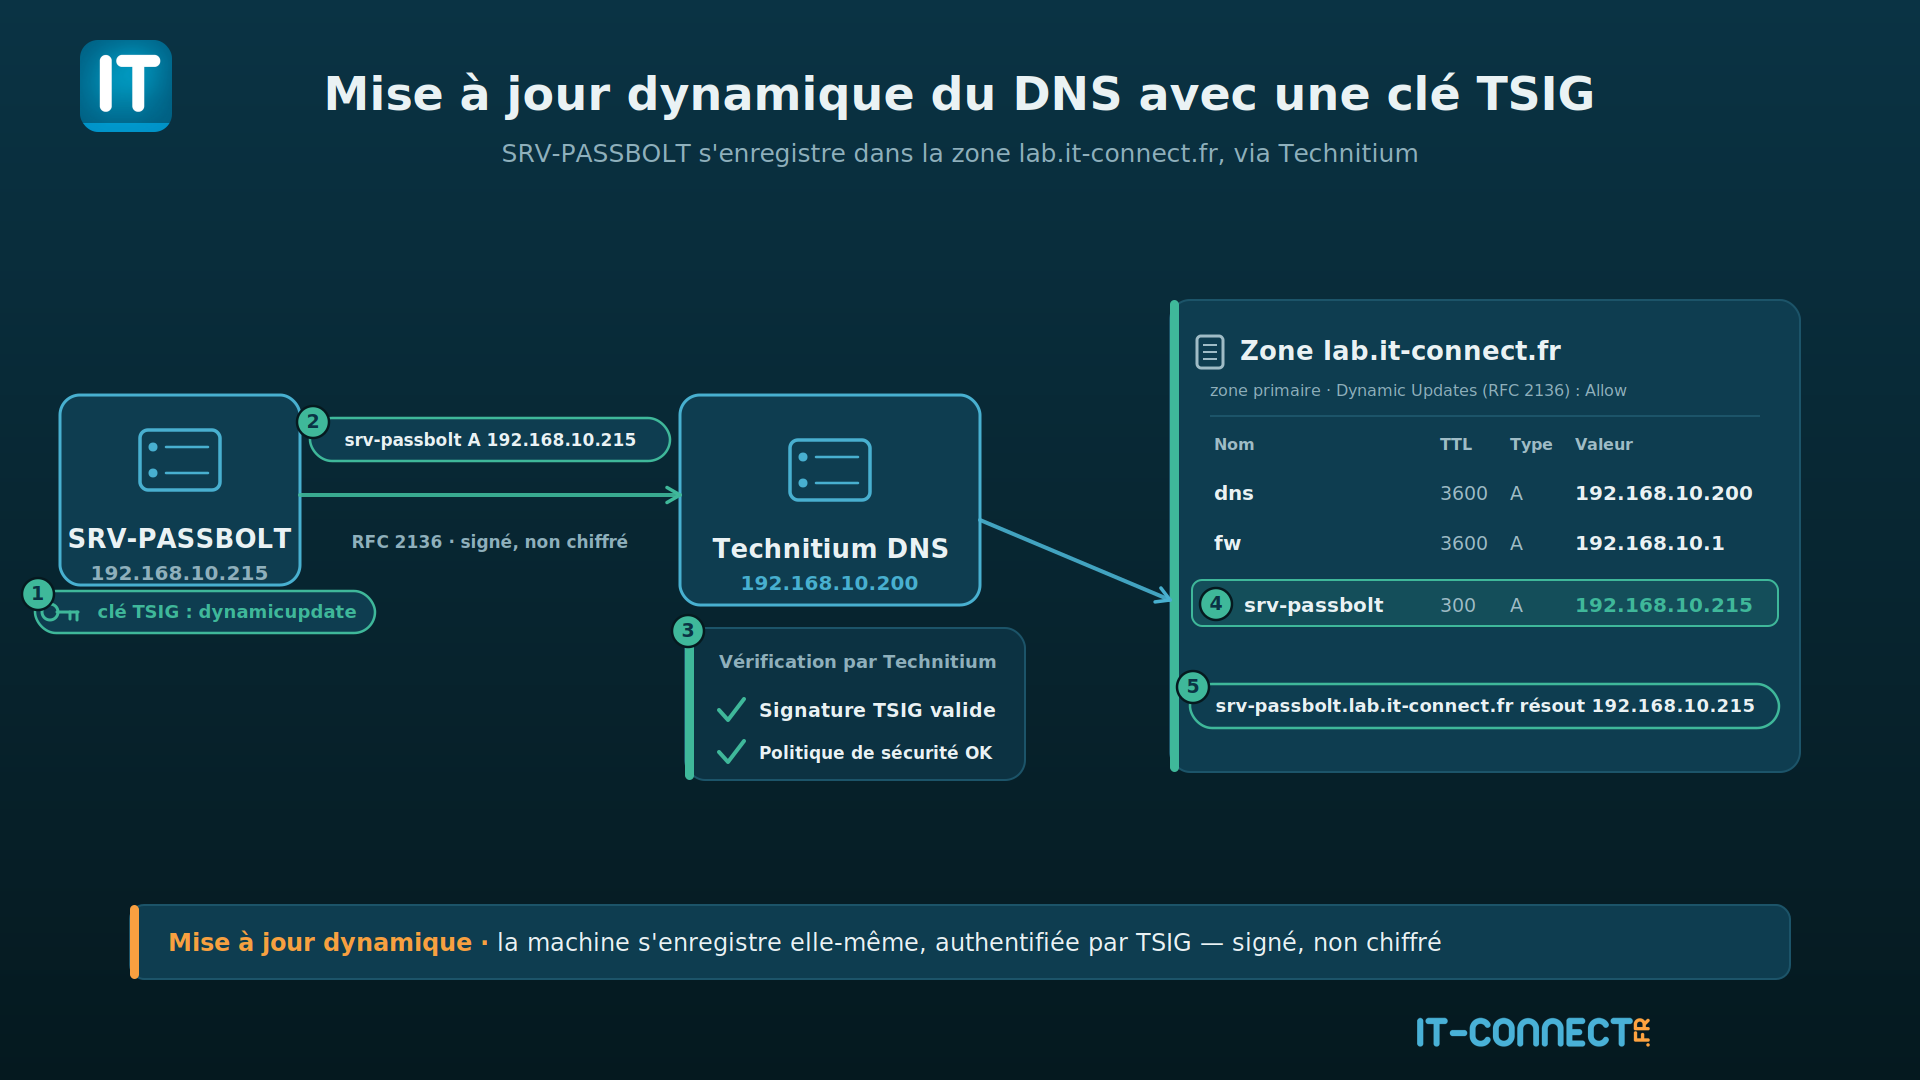
The configuration is done in two steps on the Technitium side:
First, create the TSIG key through the Settings > TSIG menu. Create a key (name ddns-deploy, HMAC-SHA256 algorithm, Shared Secret left blank for automatic generation). Note the generated secret.

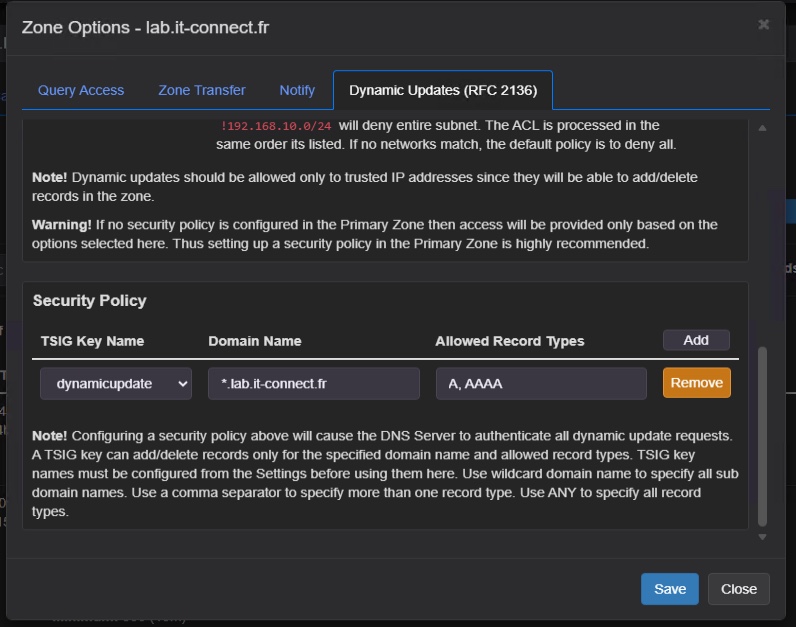
Then, you must allow updates on the zone by going to: Zones > Your zone > Options > Zone Options > Dynamic Updates (RFC 2136) tab. Here, choose Allow, then add a security policy: the dynamicupdate key created earlier, the covered domain (*.lab.it-connect.fr - do not forget the asterisk), and the allowed record types (A, AAAA). The key will not be able to touch anything else: we are applying the principle of least privilege here.
Be careful not to choose Allow mode without defining a security policy with a TSIG key. Otherwise, anyone can push updates into your DNS zone...
On the deployed machine side, you can use different methods to register the machine in DNS: Terraform, Ansible, Cloud-init... or even a simple Bash script for testing. Here is an example script (which can also be embedded in another tool):
HOSTNAME="srv-passbolt"
ZONE="lab.it-connect.fr"
DNS="192.168.10.200"                       # the Technitium server
IP="$(hostname -I | awk '{print $1}')"     # primary IP of the machine

# -k : key file (secret not on the command line, see below)
nsupdate -k /etc/ddns-deploy.key <<EOF
server ${DNS}
zone ${ZONE}
update delete ${HOSTNAME}.${ZONE}. A
update add ${HOSTNAME}.${ZONE}. 300 A ${IP}
send
EOF
For this to work, you need to install this package:
sudo apt install dnsutilsThe /etc/ddns-deploy.key file in BIND format, protected with chmod 600, contains the key in BASE64 format:
key "dynamicupdate" {
algorithm hmac-sha256;
secret "MTIzNDU2YXplcnR5MTIzNDU2";
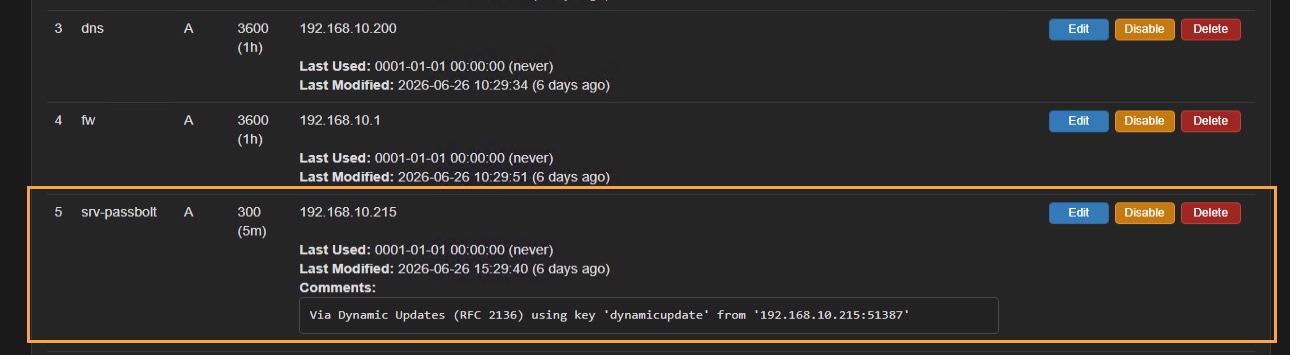
};Run the Bash script, and the machine will be registered in DNS.
From a security standpoint, three best practices apply:
- Restrict the scope of permissions for dynamic updates,
- Create one key per use case and per zone (so you can revoke one without breaking everything),
- Make sure the secret is protected (file permissions of
600at minimum).
Troubleshooting: When DNS Resolution Does Not Work
This final part of the guide is dedicated to troubleshooting. We will apply the following rule: diagnose from the server to the client, like a funnel. Until you have confirmed that Technitium responds locally, there is no point looking at the workstation.
1. Is port 53 listening?
sudo ss -ulnp 'sport = :53'

# Expected: 0.0.0.0:53 ... dotnet

State           Recv-Q           Send-Q                      Local Address:Port                     Peer Address:Port          Process
UNCONN          0                0                               127.0.0.1:53                            0.0.0.0:*              users:(("dotnet",pid=2627,fd=290))
UNCONN          0                0                          192.168.10.200:53                            0.0.0.0:*              users:(("dotnet",pid=2627,fd=256))
UNCONN          0                0                                 0.0.0.0:53                            0.0.0.0:*              users:(("dotnet",pid=2627,fd=242))
UNCONN          0                0                                    [::]:53                               [::]:*              users:(("dotnet",pid=2627,fd=244))
2. Does Technitium respond locally?
dig @127.0.0.1 it-connect.fr +shortIf it responds locally but not from another machine, the problem is on the network path (firewall, subnet), not inside Technitium.
3. Can the host reach a root server over UDP and TCP?
# Query a root server directly by IP (a.root-servers.net), over UDP
dig @198.41.0.4 fr NS +norecurse +timeout=3

# Then over TCP
dig @198.41.0.4 fr NS +norecurse +tcp +timeout=3
This double test matters. A firewall that allows only UDP/53 will let simple queries through, but will cause some queries that rely on TCP/53 to fail.
4. The client-side firewall (the nslookup false negative)
On Windows, nslookup first tries a reverse lookup (PTR) on the server IP to display its name. Without a reverse zone, you get an error message... even though direct resolution works. Prefer PowerShell:
# Direct resolution, without the reverse lookup noise
Resolve-DnsName -Name it-connect.fr -Server 192.168.10.200

# Port 53/TCP reachability (to rule out a network block)
Test-NetConnection 192.168.10.200 -Port 53
Going Further with Technitium
We have covered the essentials, but Technitium goes further:
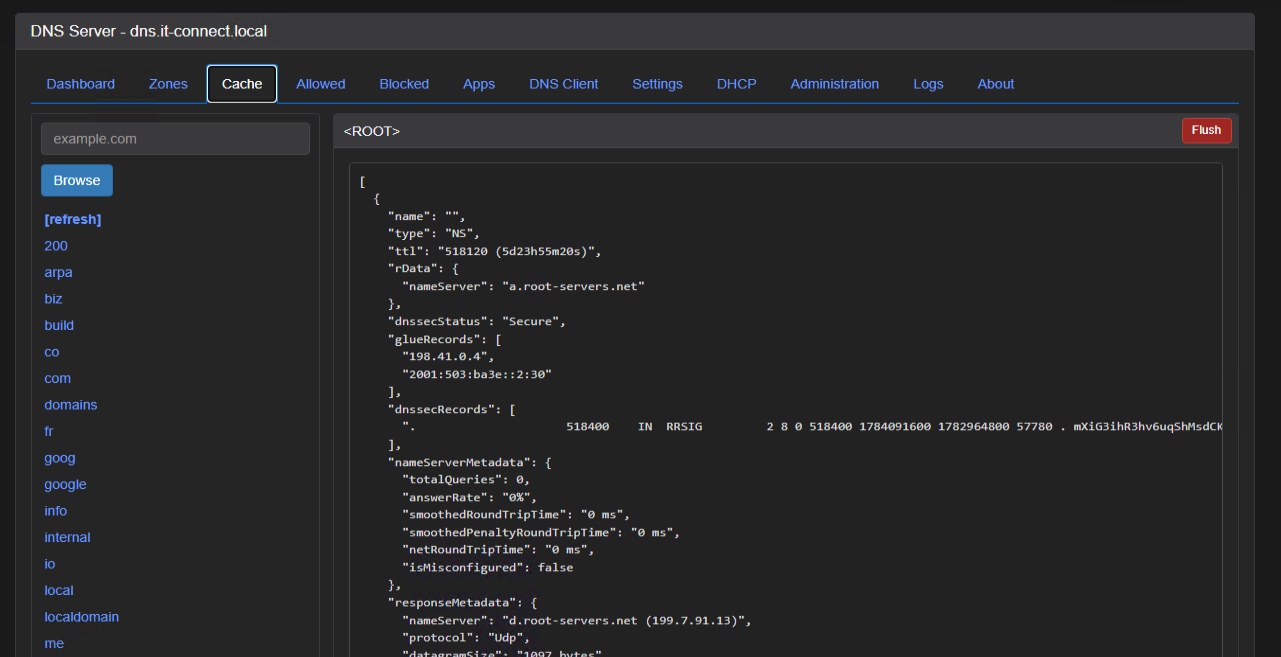
- DNS cache management : the Cache tab and Settings > Cache let you inspect and flush the cache, adjust TTLs (minimum, maximum, negative cache), and enable prefetch (to speed up responses).
- Logs and statistics : the Logs tab and Settings > Logging give you access to server logs, while the Dashboard aggregates useful statistics (top clients, most requested domains, blocked request share, most blocked domains). A query logging application is available if you want to trace each request individually.

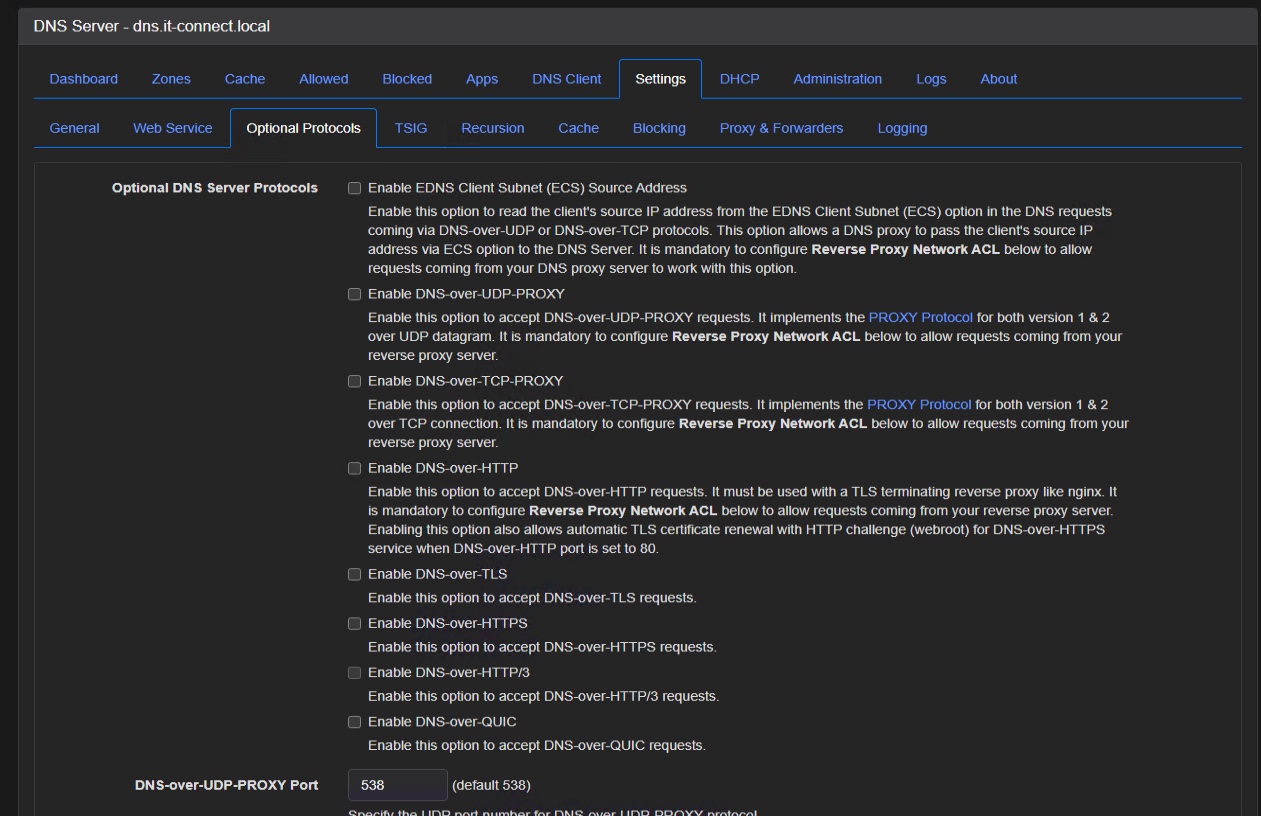
- Your own encrypted resolvers (DoH/DoT/DoQ on the server side) : beyond encrypted outbound forwarders, Technitium can also answer your clients over DoH, DoT, or DoQ (via Settings > Optional Protocols and a TLS certificate). This is what we covered in the article about DoH configuration with Windows Server, but through Technitium.
- The DNS App Store : Technitium offers additional apps (advanced blocking, split horizon, geo-routing, logging…) to extend its capabilities directly from the console.

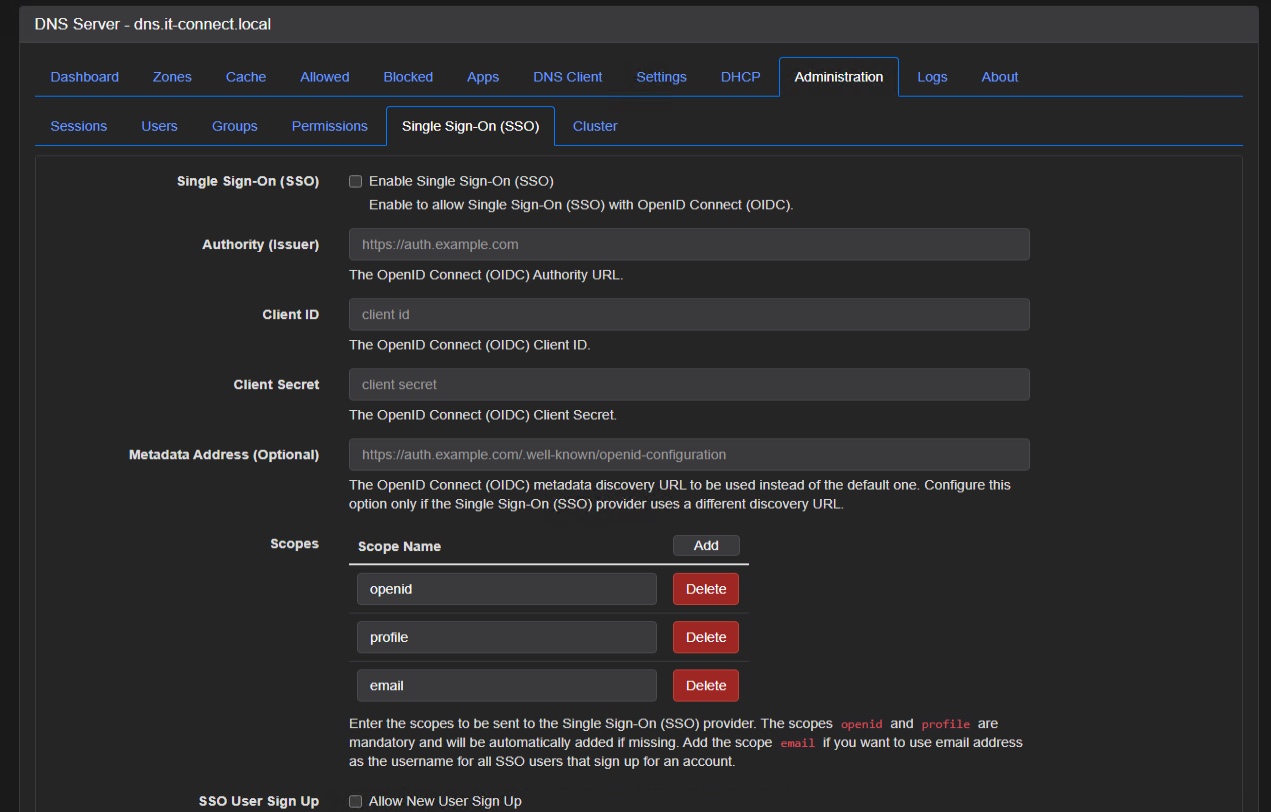
- Users, roles, and MFA : the console supports multiple admin accounts with group-based permissions, multi-factor authentication (MFA), and, since version 15, SSO via OIDC. That meets some enterprise requirements!
- Built-in DHCP server : in the DHCP tab, you can hand out leases and even automatically register machines in your zone.
- Clustering : since version 14, multiple Technitium instances can synchronize their configuration for DNS high availability.
- NAS deployment : if you do not have a dedicated Linux server, Technitium installs very well on a Synology NAS through Container Manager (I will try to publish a complementary article for this scenario).
Conclusion
Technitium DNS Server delivers on its promise: one tool to resolve, block, host zones, and hand out DHCP leases, whereas other solutions force you to stack several services. It is truly a compelling solution you can use as an alternative to AdGuard Home + Unbound or Pi-hole + Unbound, or even to ad blockers on their own.
FAQ
Is Technitium DNS Server free?
Yes, Technitium DNS Server is free and open source, released under the GNU GPLv3 license. There is no paid edition or feature-limited version: all features (recursion, blocking, zones, DHCP, DoH/DoT/DoQ, clustering) are available at no cost.
Is Technitium a good alternative to Pi-hole?
Yes. Technitium provides the same ad blocking as Pi-hole, but also includes recursive resolution (which requires Unbound alongside Pi-hole), a full authoritative server for your zones, a DHCP server, encrypted DoH/DoT/DoQ protocols, and dynamic updates. It is therefore an alternative to Pi-hole + Unbound combined into one tool.
Should I use native recursion or encrypted forwarders with Technitium?
It depends on your priority. Native recursion prevents a single resolver from seeing all your queries, but traffic to authoritative servers is sent in cleartext over port 53. Encrypted forwarders (DoH/DoT) hide your queries from the ISP, but give a single resolver your entire history.
Can Technitium replace my DHCP server?
Yes, Technitium includes a DHCP server. For it to work, the Docker container must run in host network mode so it can be present on the broadcast network. The built-in DHCP server can also automatically register machines in a local DNS zone, which avoids having to maintain a separate DHCP service on a small network.
Does Technitium DNS Server really improve privacy?
Technitium provides real gains: traffic encryption via DoH, DoT, and DoQ, DNSSEC validation, native recursion with QNAME minimization, and full query logging, all on your own server (and therefore on your side). However, you still need to make a trade-off when choosing the name resolution method (recursive vs external resolvers).