www.it-connect.fr


How to Get Started with WSL Containers and wslc on Windows
Docker Desktop is no longer the mandatory way to run Linux containers on Windows. Since September 29, 2026, Microsoft has built this capability into Windows Subsystem for Linux. This new feature is simply called WSL containers (WSL containers), powered by a new command-line tool named wslc. On paper, it is native to Windows, built on top of WSL, and its command syntax mirrors Docker. In this article, I’ll show you what WSL containers are, how to install them, and how to use them day to day.
If you read my article Apple Container : getting started with macOS containers, you’ll notice a similar approach: after Apple, Microsoft is now offering its own built-in container tool. And if containerization is still new to you, our article What is Docker and why use it? will give you the basics (images, containers, registries), which also apply to wslc.
What are WSL containers?
WSL containers, abbreviated WSLC for short, are a WSL feature that lets you build, run, and manage Linux containers directly on Windows. Now available as a stable version on Windows, Microsoft introduced them at Build 2026 (I covered it in this article), and a first preview was released on June 29, 2026. General availability has been in effect since September 29, 2026, with WSL version 3.0.1.
This new feature is built around two components:
- The wslc.exe CLI: a command-line tool for building images, starting containers, and managing networks and volumes. Throughout this article, we’ll therefore run
wslc.exewith arguments, while keeping in mind thatcontainer.exeis an alias that invokes the same binary. - The WSL containers API: a NuGet package (
Microsoft.WSL.Containers) usable in C, C++, and C#, so Windows applications can launch and control Linux containers.
In this article, I’m mainly interested in the CLI side. In terms of compatibility, wslc runs the Linux images you already use with Docker: images from Docker Hub, but also from other registries such as GitHub Container Registry (ghcr.io). Microsoft does not explicitly mention OCI image compatibility, but OCI images can be launched. The command syntax is also close to Docker’s: run, exec, logs, build, -p, -d, --rm... So if you’re used to Docker, you won’t be lost.
One virtual machine per session
Like WSL 2, WSL containers rely on a lightweight Hyper-V virtual machine that includes the Linux kernel. But the architecture differs a bit from WSL distributions. According to an article published by Pierre Boulay, a Microsoft engineer, each wslc session has its own virtual machine. The WSL service (wslservice.exe) does not control this VM directly: it creates a child process, wslcsession.exe, which runs with the user’s privileges. Operations are therefore performed in a less privileged process than the WSL service, which improves isolation between sessions from different users.
This interesting article also tells us that
- virtiofs is used for file sharing: it replaces the Plan9 protocol historically used by WSL. Microsoft presents it as about twice as fast for accessing Windows files from Linux.
- There is a network mode called consomme: yes, that is its official name. It was previously called VirtioProxy, and it comes from OpenVMM, Microsoft’s open source virtual machine monitor. This network mode relays container traffic through Windows. The goal is for containers to benefit from the same network environment as Windows applications (VPN, proxy, security policies).
- Session data (images, containers) is stored in VHD virtual disks, in the user profile (
%LocalAppData%\wslc\sessions).
Pay attention to your terminal elevation level! Indeed, wslc creates a separate session depending on whether you run it from a standard console or from an elevated console. On my machine, that gives two folders: wslc-cli-Florian and wslc-cli-admin-Florian. Each session has its own virtual machine and its own disk: the images, containers, and volumes created in one are not visible in the other. If a container or volume seems to have disappeared, first check that you’re using the same console type as when it was created. The simplest approach is to choose one and stick with it: a standard console is enough to use wslc.
wslc or Docker Desktop: what’s the difference?
Until now, running containers on Windows often meant installing Docker Desktop (and WSL 2, which is a dependency). The release of wslc is a good opportunity to briefly compare these two approaches.
| Criterion | wslc (WSL containers) | Docker Desktop |
|---|---|---|
| Vendor | Microsoft | Docker, Inc. |
| License | Open source (microsoft/WSL repository) | Proprietary (free under conditions, paid in enterprise) |
| Installation | Built into WSL (wsl --update) | Software to install |
| Architecture | One VM per user session | One Linux VM (via WSL 2 or Hyper-V) |
| Graphical interface | No official interface (community projects) | Yes |
| Docker Compose | Not yet (planned) | Built in |
| Enterprise management | Intune settings, ADMX template, Microsoft Defender for Endpoint | Docker-specific admin tools |
| Maturity | Final release since September 2026 | Mature, very large ecosystem |
So wslc is not (yet) a full replacement for Docker Desktop. It is already very relevant for running isolated containers, testing an image, or providing a development environment, but the lack of Docker Compose is a real limitation.
Install WSL containers on Windows
Prerequisites
To use WSL containers, the prerequisites are the same as for WSL. So nothing special, really. You therefore need:
- Windows 11, or Windows 10 version 2004 (build 19041) or later: WSL containers work wherever WSL 2 is supported.
- Virtualization enabled: in the machine firmware (Intel VT-x or AMD-V), as well as the Windows feature "Virtual Machine Platform".
- WSL version 3.0.1 or later: this is the first version that includes WSL containers in final release.
If WSL has never been installed on your machine, one command is enough. Open an elevated PowerShell console and run:
wsl --install --no-distributionThis command installs WSL and enables the required Windows components (including "Virtual Machine Platform"), without installing a Linux distribution. Then restart the Windows machine.
If you are testing wslc inside a virtual machine (Hyper-V, Proxmox VE...), nested virtualization must be enabled on that VM.
Update WSL
WSL containers are delivered with WSL itself: there is no separate package to install. But your WSL must be up to date, so open a console and run the following command to update WSL:
wsl --updateYou can also download the installation package from the releases page of the WSL GitHub repository. Then check the installed version:
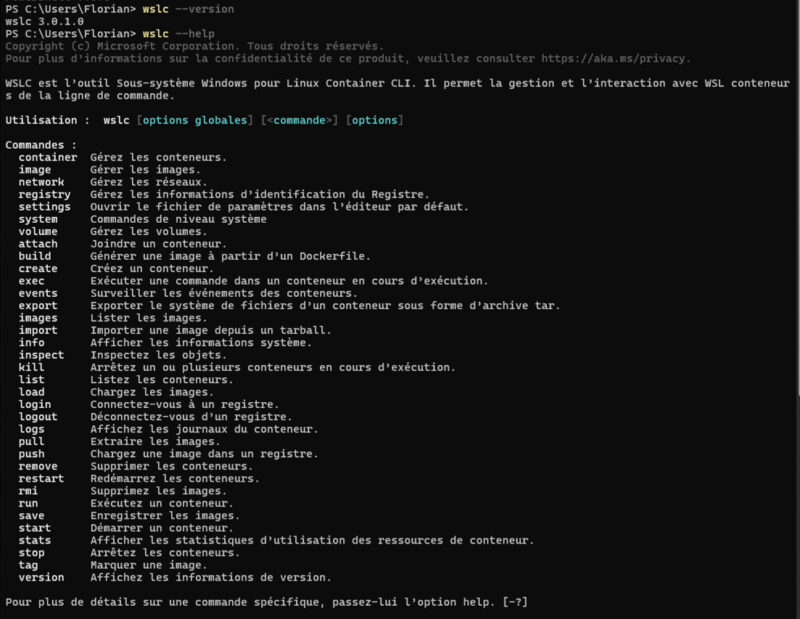
wsl --versionYou can clearly see that the installed version is now 3.0.1.

Verify the installation
Once WSL is up to date, the wslc command is available in your terminal. Display its version, then the general help to get an overview of the available commands:
wslc version
wslc --help
To get help for a specific command, add --help after its name, for example wslc run --help. The wslc system info command can also be used to display the state of the container environment. The previous command shows that a fairly large number of commands are already available.
You can also later run the command below to display the state of the container environment.
wslc system info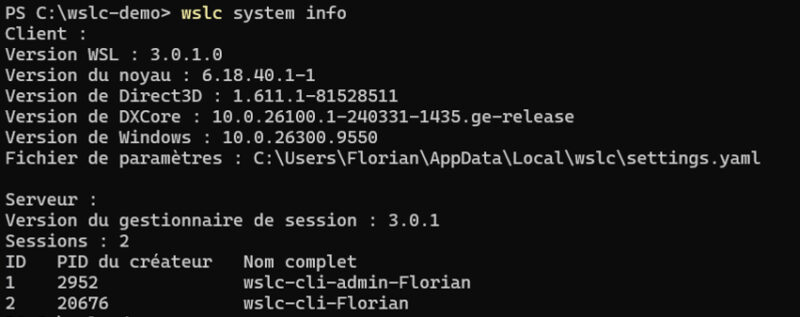
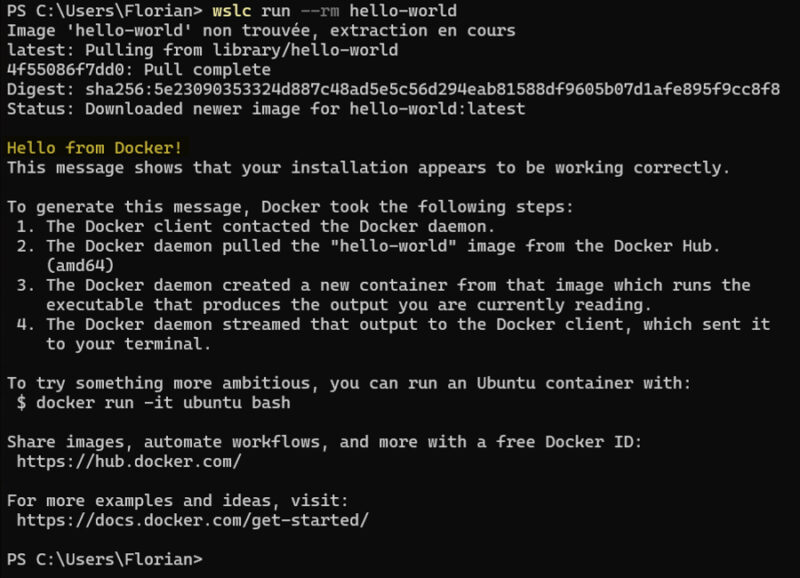
To confirm everything is working correctly, let’s start the classic hello-world test container:
wslc run --rm hello-worldThe image is downloaded, the container runs, displays its welcome message Hello from Docker!, then stops. All good!
First steps: run and manage containers with wslc
Now that the environment is ready and wslc is working, let’s learn how to use it more concretely.
Start a container
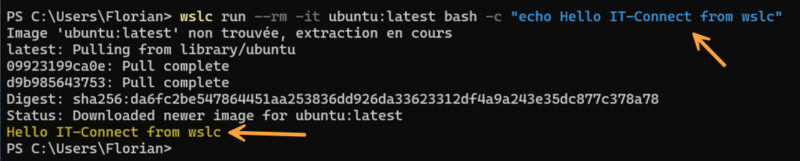
Following the same principle as the initial test, let’s start with an ephemeral Ubuntu container that runs a command and is then removed immediately. The idea is to remind you of a few basics about command syntax.
wslc run --rm -it ubuntu:latest bash -c "echo Hello IT-Connect from wslc"A few explanations about the options used:
- --rm: automatically removes the container as soon as it stops. Without this option, the container would remain in a stopped state (and could therefore be started again). This is ideal for disposable containers, as here for a simple test.
- -it: opens an interactive session with a terminal, useful for interacting with the container.
- ubuntu:latest: the image to use, with its tag.
Let’s move on to a more practical case: an Nginx web server running in the background, with a port published on the local machine.
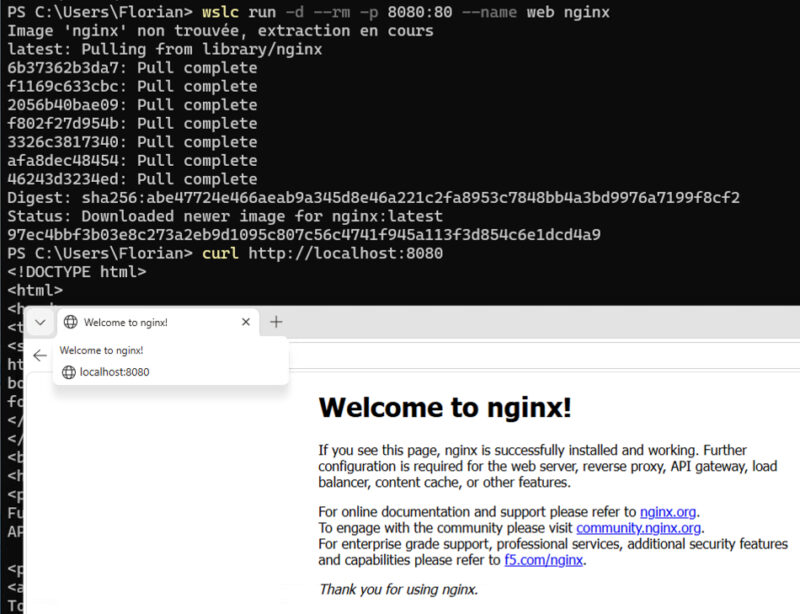
wslc run -d --rm -p 8080:80 --name web nginxThe -d option starts the container in the background (detached mode), -p 8080:80 publishes port 80 of the container on port 8080 of Windows, and --name web gives the container a name (so you can refer to it by name later).
Verify that the web server responds:
curl http://localhost:8080You can also open http://localhost:8080 in your browser: the Nginx welcome page appears.
Note: the wslc events command displays container activity in real time.
List, inspect, and enter a container
The web content started previously is still running in the background. We can verify this by listing running containers. Several syntaxes are possible:
wslc container list
wslc ls

CONTAINER ID   IMAGE         COMMAND      CREATED          STATUS        PORTS         NAMES
97ec4bbf3b03      nginx         "/docker-e…   2 minutes ago   Up 2 minut…   127.0.0.1:…   web
The wslc ls shortcut has no direct equivalent in Docker, where you need to use docker ps or docker container ls. To also show stopped containers, add the --all option; this lets you display containers regardless of their state.
To run a command inside a running container, use wslc exec:
wslc exec web cat /etc/os-release

PRETTY_NAME="Debian GNU/Linux 13 (trixie)"
NAME="Debian GNU/Linux"
VERSION_ID="13"
VERSION="13 (trixie)"
VERSION_CODENAME=trixie
DEBIAN_VERSION_FULL=13.7
ID=debian
HOME_URL="https://www.debian.org/"
SUPPORT_URL="https://www.debian.org/support"
BUG_REPORT_URL="https://bugs.debian.org/"
To open an interactive shell in the container:
wslc exec -it web bashYou can then run commands directly from the container terminal. For example, you can list Nginx’s web root.

Viewing a container’s logs and displaying its detailed configuration (in JSON format) is done with these two commands:
wslc container logs web
wslc container inspect web
Finally, to stop the container:
wslc container stop webSince it was started with the --rm option, the container is automatically removed.
Working with images
To list the images available locally, run this command:
wslc image listIf you followed this tutorial up to this point, several images should be returned in the list:
REPOSITORY       TAG      IMAGE ID       CREATED             SIZE
nginx            latest   e9567a94eddc   12 days ago         162MB
ubuntu           latest   5a0b35d45050   2 weeks ago         100MB
hello-world      latest   e2ac70e7319a   6 months ago        10.1kB
To pull images from a registry, wslc is not limited to Docker Hub. Just specify the full image name to download it from another registry. For example, GitHub Container Registry, which is also very commonly used:
wslc pull ghcr.io/linuxserver/nginx:latest

latest: Pulling from linuxserver/nginx
6d063e04f3f4: Pull complete
f6a4c3e338ed: Pull complete
61995cfd0a4d: Pull complete
e2f56c0419a7: Pull complete
75ebdff3163d: Pull complete
7ac52f6446c9: Pull complete
83f1ad36470f: Pull complete
e78d8b221ea4: Pull complete
393d51d6a24d: Pull complete
696838da84a5: Pull complete
f8e9df4c981f: Pull complete
Digest: sha256:34e67960f3f818f3d87fdd773e328b53b24c91c64b4c1e4f6d7b22bc175ee174
Status: Downloaded newer image for ghcr.io/linuxserver/nginx:latest
ghcr.io/linuxserver/nginx:latest
The wslc image inspect command displays image metadata: architecture, environment variables, exposed ports, labels, layers... Here is an excerpt of the result for the previous image:
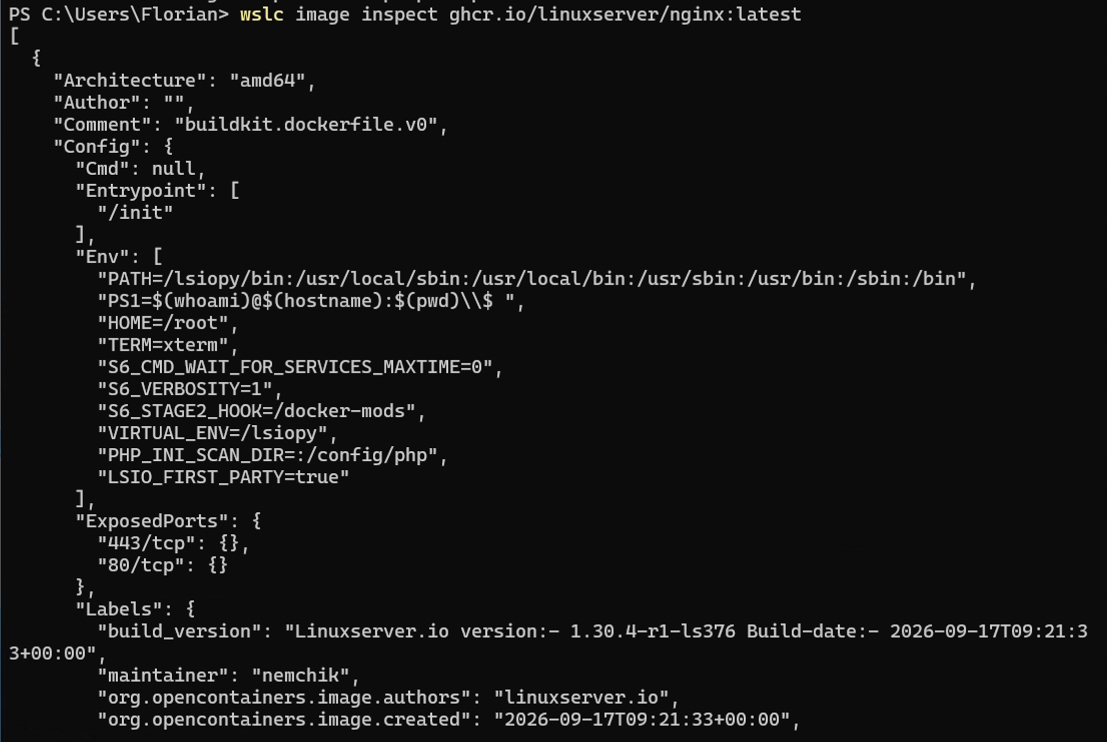
Two interesting bits here: wslc automatically pulled the amd64 variant of this multi-architecture image, and the output format is identical to docker image inspect. Your habits are not disrupted!
For cleanup, you can use the wslc image prune command. Be careful though: its behavior is the same as Docker’s. Without an option, it only removes untagged images (orphaned images, shown with the <none> tag). If all your images are tagged, none will be removed:
wslc image prune

WARNING! This will remove all untagged images.
Do you want to continue? [y/N] y
Total reclaimed space: 0B
To also remove tagged images that are not used by any container, add the --all option. To remove a specific image, use targeted deletion by specifying the image name to remove instead.
wslc image prune --all

WARNING! This operation will remove all images that do not have at least one associated container.
Do you want to continue? [y/N] y

wslc image rm hello-world
Build an image
wslc can also build images from a definition file. This file can be named Containerfile or Dockerfile, the latter being the name used by Docker when you run docker build.
As an example, we will build an image based on nginx:alpine that serves a custom HTML page. The commands below must be run in PowerShell 7: the utf8NoBOM encoding option does not exist in Windows PowerShell 5.1, and a file saved with a BOM marker can cause problems during the build.
Start by creating a working folder and the HTML page:
New-Item -ItemType Directory -Path C:\wslc-demo -Force | Out-Null
Set-Location C:\wslc-demo

@'
<!DOCTYPE html>
<html lang="fr">
<head>
  <meta charset="utf-8">
  <title>Démo wslc - IT-Connect</title>
  <style>
    body { font-family: "Segoe UI", sans-serif; background: #0f172a; color: #e2e8f0; display: grid; place-items: center; height: 100vh; margin: 0; }
    .card { text-align: center; padding: 2rem 3rem; border: 1px solid #334155; border-radius: 12px; background: #1e293b; }
    h1 { margin-top: 0; }
    code { color: #38bdf8; }
  </style>
</head>
<body>
  <div class="card">
    <h1>Hello from a WSL container!</h1>
    <p>This page is served by Nginx, in an image built with <code>wslc build</code>.</p>
    <p>Version 1</p>
  </div>
</body>
</html>
'@ | Set-Content -Path .\index.html -Encoding utf8NoBOM
Then create the Dockerfile file in the same directory and insert these three lines:
FROM nginx:alpine
COPY index.html /usr/share/nginx/html/index.html
EXPOSE 80
This file tells us that the container base image is nginx:alpine, that the index.html page replaces Nginx’s default home page (because it is overwritten), and that the container listens on port 80.
Build the image with the wslc build command. The -t option gives it a name, and the final dot indicates that the build context is the current folder:
wslc build -t demo-itconnect .
wslc image list
All that remains is to start a container based on this image, publishing its port 80 on port 8081 of Windows:
wslc run -d --rm -p 8081:80 --name demo demo-itconnect
Start-Process http://localhost:8081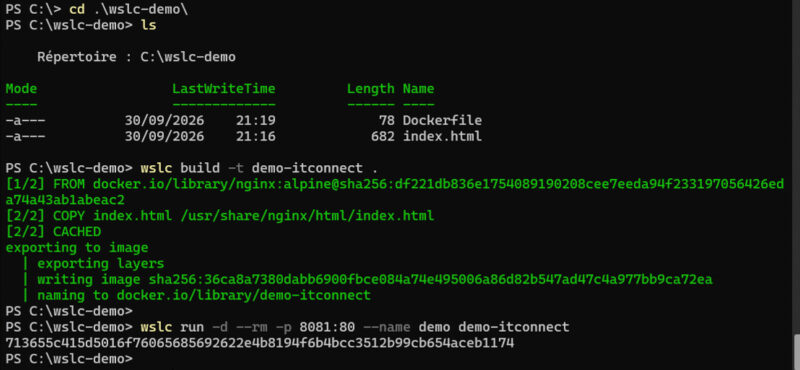
Your custom page appears in the browser.

Now let’s modify the page, then rebuild the image under the same name:
wslc container stop demo
(Get-Content .\index.html) -replace 'Version 1', 'Version 2' | Set-Content .\index.html -Encoding utf8NoBOM
wslc build -t demo-itconnect .
wslc image list
The new image takes the name demo-itconnect:latest, and the old one loses its tag: it now appears with the <none> tag. That is exactly the kind of image that wslc image prune removes. Try it, you’ll see.
wslc image prune

WARNING! This will remove all untagged images.
Do you want to continue? [y/N] y
Removed Images:
removed: sha256:36ca8a7380dabb6900fbce084a74e495006a86d82b547ad47c4a977bb9ca72ea
Networks
By default, a container is isolated. wslc lets you create networks so multiple containers can communicate with each other, and attach or detach a container from a network on the fly:
wslc network create demo-net
wslc network connect demo-net demo
wslc network disconnect demo-net demo
Data persistence with volumes
A container is ephemeral: the data it writes disappears with it. If you’ve ever used Docker (or an alternative), you know that. To keep data, you need to use a volume, which survives the container’s deletion. Let’s create a first volume named demo-data:
wslc volume create demo-data
wslc volume list
Let’s verify persistence with two successive Alpine containers. The first writes a file to the volume, then is removed thanks to the --rm option. The second, brand new one, reads the file back. The only goal is to validate the storage persistence mechanism.
wslc run --rm -v demo-data:/data alpine sh -c "echo 'Persistence OK' > /data/test.txt"
wslc run --rm -v demo-data:/data alpine cat /data/test.txt

Persistence OK
The second container displays “Persistence OK”: the data clearly survived the first container.

But where is that volume stored? The wslc volume inspect command provides the answer:
wslc volume inspect demo-dataHere is the JSON output obtained:
[
  {
    "CreatedAt": "2026-10-01T11:20:18Z",
    "Driver": "guest",
    "Labels": null,
    "Mountpoint": "/var/lib/docker/volumes/demo-data/_data",
    "Name": "demo-data",
    "Options": null,
    "Scope": "local"
  }
]
First lesson: the guest driver is used by default, and it means the volume is stored in the session’s virtual machine. In other words, it is stored in the storage.vhdx virtual disk located in %LocalAppData%\wslc\sessions\<session name>. There’s no point looking for a demo-data folder in File Explorer: the data is only accessible through containers, notably because the storage.vhdx file prevents direct access.
By the way, a small note: the path /var/lib/docker/volumes is the one used by Docker Engine, which suggests that wslc is relying on a Docker-compatible engine in its virtual machine. Microsoft does not specify this in its documentation, but that certainly seems to be the case.
Guest driver or vhd driver?
The help for the wslc volume create command mentions a second driver: vhd. With it, the volume is no longer stored in the session disk, but in its own VHDX file. This makes it possible to have an independent file.
Here is the command to create a 1 GB volume. In PowerShell, the 1GB suffix calculates the byte value for you (1,073,741,824):
wslc volume create -d vhd -o "SizeBytes=$(1GB)" demo-vhdThe volume then takes the form of a demo-vhd.vhdx file, created in the volumes subfolder of the session (%LocalAppData%\wslc\sessions\<session name>\volumes). This is a dynamic disk: for a 1 GB volume, the file only weighs about 36 MB when created, and grows as data is written to it.
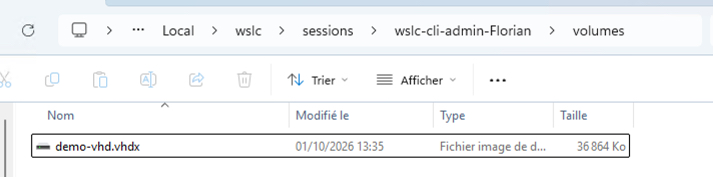
I think the vhd driver is interesting for isolating an application’s data in a separate file, with a controlled size, rather than mixing it into the session disk with images and containers.
Retrieve data from a volume
Since the data in a volume is not visible from File Explorer, how do you retrieve a file on Windows? The simplest way is to use a temporary container that mounts the volume, then use the wslc container cp command to copy the file to Windows.
wslc run -d --name extract -v demo-vhd:/data alpine sleep 300
wslc container cp extract:/data/test.txt C:\Temp\
wslc container stop extract
The extract container simply pauses for 5 minutes, long enough to copy the files. The same command works the other way around, to place a Windows file into a container.
If the volume is already mounted in a running container (for example, a continuously running application container), there’s no need to create a temporary container: you can target that container directly. In that case, specify the mount point path inside that container, not the volume name:
wslc container cp <container-name>:<mount-point>/test.txt C:\Temp\You may be tempted to open a volume’s VHDX file directly, since Windows 11 can mount that format. On the one hand, it is locked while the wslc session is active. On the other hand, it contains a Linux file system that Windows cannot read (ext4 in general). If Disk Management asks you to initialize the disk, refuse: that would make the volume unusable.
Allocate resources and use the GPU
As with Docker, you can limit a container’s resources with the --cpus and --memory options:
wslc run -d --rm --cpus 2 --memory 1g --name web-limite nginxYou may see the following warning from wslc: “Your kernel does not support swap limit capabilities or the cgroup is not mounted. Memory limited without swap”. No worries, the container does start and the RAM limit is applied. However, swap usage is not limited: the container can therefore exceed the 1 GB limit by relying on the virtual machine’s swap.
To verify that the limit is being applied, use the wslc stats command:
wslc stats

CONTAINER ID   NAME   CPU %   MEM USAGE / LIMIT   MEM %   NET I/O       BLOCK I/O   PIDS
a6de0d089d23      we…   0.00%  20.84MiB / 1GiB     2.03%   796B / …      0B / 12.3kB 25
The limited container clearly shows a 1 GiB limit, while the others can use all memory allocated to the session’s virtual machine. Unlike docker stats, which continuously refreshes the display, wslc stats shows a snapshot and then returns control (Docker’s --no-stream option does not exist here, by the way). A small detail that shows translations and Microsoft still do not always go together: the "BLOCK I/O" column is translated awkwardly as "BLOQUER LES E/S" in the original output, which refers to reads and writes to storage devices.
For a more precise check, you can read cgroup values directly inside the container:
wslc exec web-limite cat /sys/fs/cgroup/memory.max
wslc exec web-limite cat /sys/fs/cgroup/cpu.max
The first command should return 1073741824 (1 GB), the second 200000 100000, which is equivalent to 2 CPUs.
WSL containers can also use the machine’s GPU, which will be of interest to those running local AI workloads. Here is the example provided by Microsoft, for an NVIDIA card. I’m including it for information purposes, as I could not test it directly.
wslc run --rm --gpus all ubuntu bash -c 'export PATH=$PATH:/usr/lib/wsl/lib; nvidia-smi'If everything works, the nvidia-smi command displays the graphics card information from inside the container.
wslc: what about Docker Compose?
Docker Compose is the major omission in this final release. It is not yet possible to describe a multi-container application in a YAML file and deploy it with a single wslc command. That’s a shame... Personally, I deploy all my Docker stacks this way.
Microsoft is aware of this and says it is a priority: "Our goal is for wsl compose up to work with your existing compose.yaml files, without modification. We have started working on it and hope to share more soon", we are told. We can imagine that a future wslc version will address this gap.
Example: deploy WordPress and MariaDB from the command line
The goal is to reproduce what a Docker Compose file would do: a dedicated network so the two containers can communicate by name, one volume per service for data, and a healthcheck so WordPress only starts once the database is ready. Docker Compose was not supported at the time, so I challenged Claude to reproduce a similar behavior with a PowerShell 7 script (especially for the healthcheck).
The result below is fully functional.
# Random passwords (24 alphanumeric characters)
$DbPass   = -join ((48..57) + (65..90) + (97..122) | Get-Random -Count 24 | ForEach-Object { [char]$_ })
$RootPass = -join ((48..57) + (65..90) + (97..122) | Get-Random -Count 24 | ForEach-Object { [char]$_ })

# Network and volumes
wslc network create wp-net
wslc volume create wp-db
wslc volume create wp-html

# MariaDB database, with healthcheck
wslc run -d --name wp-db --network wp-net `
  -e MARIADB_DATABASE=wordpress `
  -e MARIADB_USER=wpuser `
  -e MARIADB_PASSWORD=$DbPass `
  -e MARIADB_ROOT_PASSWORD=$RootPass `
  -v wp-db:/var/lib/mysql `
  --health-cmd "healthcheck.sh --connect --innodb_initialized" `
  --health-interval 10s --health-retries 5 --health-start-period 20s `
  mariadb:lts

# Wait until MariaDB is ready
do {
  Start-Sleep -Seconds 3
  $State = (wslc container inspect wp-db | ConvertFrom-Json)[0].State.Health.Status
  Write-Host "MariaDB : $State"
} until ($State -eq "healthy")

# WordPress, which connects to the database by container name
wslc run -d --name wp-app --network wp-net -p 8088:80 `
  -e WORDPRESS_DB_HOST=wp-db `
  -e WORDPRESS_DB_NAME=wordpress `
  -e WORDPRESS_DB_USER=wpuser `
  -e WORDPRESS_DB_PASSWORD=$DbPass `
  -v wp-html:/var/www/html `
  wordpress:latest

Start-Process http://localhost:8088
A few explanations:
- The passwords are generated randomly and stored in PowerShell variables. Be sure to write them down (display them with
$DbPassand$RootPass) before closing the console. - The healthcheck relies on the
healthcheck.shscript provided in the official MariaDB image. Thedo... untilloop queries the container state every 3 seconds and waits until it becomeshealthy. This is equivalent todepends_onwith theservice_healthycondition in a Compose file. - WORDPRESS_DB_HOST=wp-db: WordPress reaches the database using the container name, automatically resolved on the
wp-netnetwork.
After a few seconds, the WordPress installation wizard appears in the browser. Once installation is complete, you have a working WordPress instance running in WSL containers. Proof in the picture!
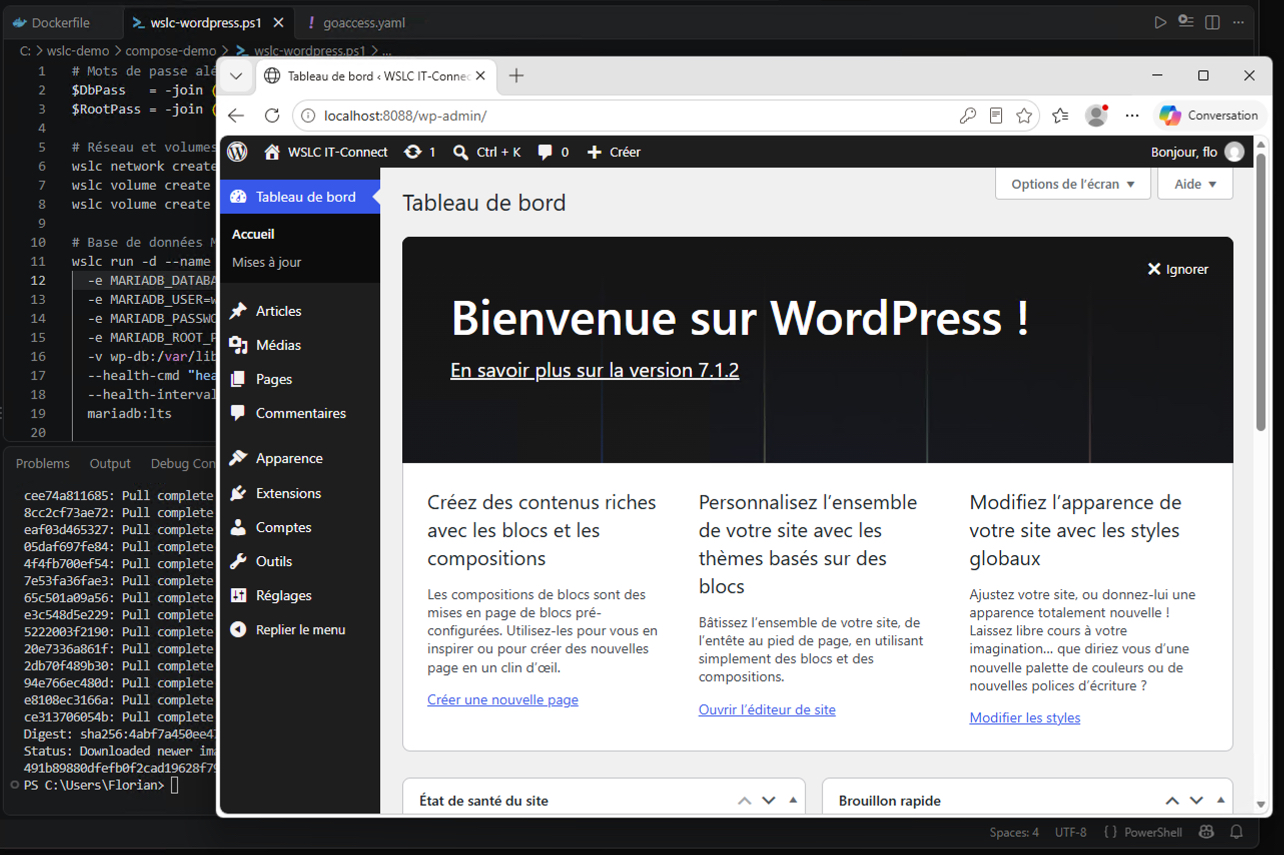
The lack of Docker Compose also means there are no usual management commands such as docker compose restart. So to manage the application lifecycle, we need to rely on other commands:
# Stop the application
wslc container stop wp-app wp-db

# Start it again (database first)
wslc start wp-db
wslc start wp-app

# Remove everything, including data
wslc container rm wp-app wp-db
wslc volume rm wp-db wp-html
wslc network rm wp-net
Manage WSL containers with a graphical interface
So far, we have been working with WSL containers from the command line. That makes sense, since Microsoft does not provide a graphical interface for wslc. However, several community projects and integrations are already available: these projects appeared following the release of the preview a few months ago.
For example, the Containers extension for VS Code, used to manage containers from VS Code, now supports wslc. In terms of graphical management, there are two interesting projects.
The first is WSL Container Desktop: a WinUI 3 application designed to manage WSL containers, Kubernetes clusters (k3s), and registries. It is available on GitHub. It is really handy for using WSL containers with a graphical interface.
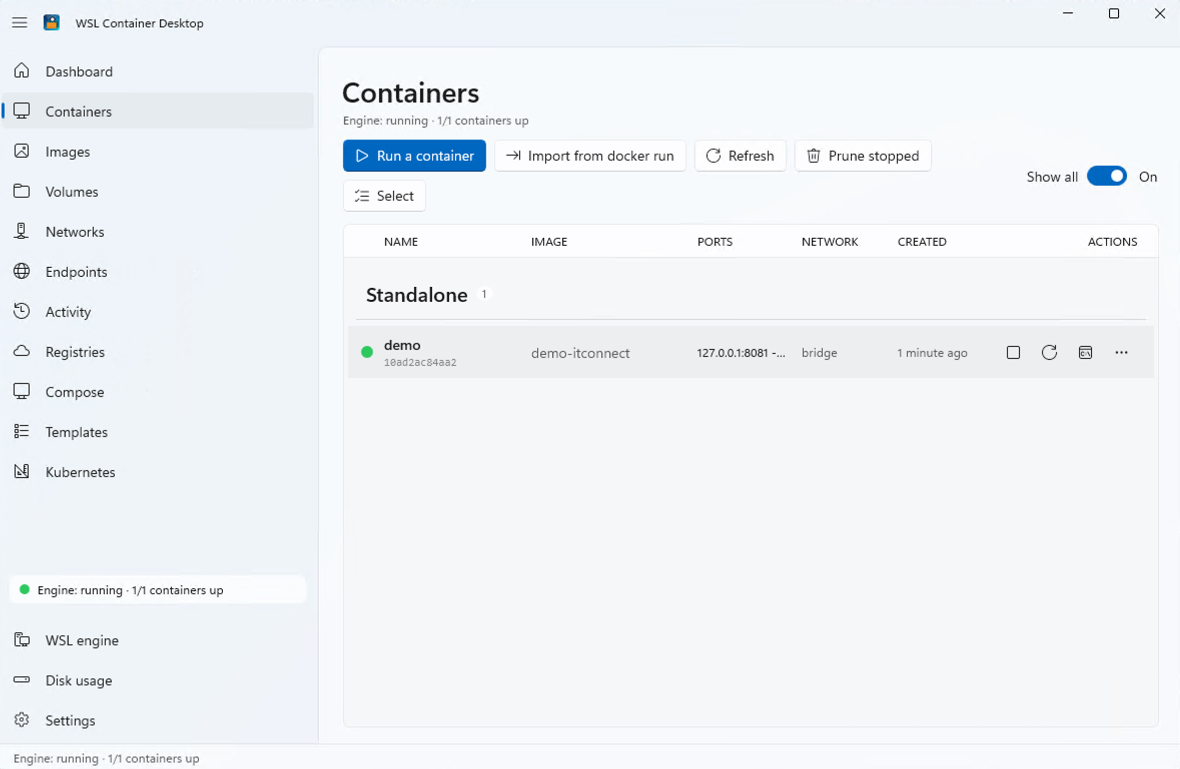
The second is Lazywslc: a text-based dashboard (TUI) for managing your WSL containers from the terminal. The project is developed by Craig Loewen, WSL product manager. It is available on GitHub. That said, it doesn’t detect any containers on my machine.
Conclusion
With WSL containers, Microsoft fills a long-standing gap in Windows: running Linux containers without a third-party tool. The wslc tool is easy to pick up for anyone who knows Docker, it runs existing images whether they come from Docker Hub or another registry, and it accepts your Dockerfile files.
In my view, wslc is already a real alternative for testing images, running isolated containers, or building development environments. It works well, and if you are familiar with Docker and containers, it is easy to get started with. At the moment, it still lacks Docker Compose support if it is to replace Docker Desktop in everyday use. Microsoft is working on it.
FAQ
What is wslc?
wslc (wslc.exe) is the command-line tool for WSL containers. Built into Windows Subsystem for Linux since version 3.0.1, it lets you build, run, and manage Linux containers on Windows, using syntax close to Docker’s.
What is the difference between wslc.exe and container.exe?
None from a functional standpoint. container.exe is an alias provided by Microsoft that runs the same binary as wslc.exe. You can use either command.
Which WSL version is required to use WSL containers?
The final release is built into WSL 3.0.1. Update WSL with wsl --update, then check the version with wsl --version.
Do you need to install a Linux distribution to use wslc?
No, you only need WSL on the machine (wsl --install --no-distribution). Enabling the virtualization components only, without installing a distribution, is enough.
Do WSL containers replace Docker Desktop?
Not completely yet: wslc does not yet support Docker Compose and has no official graphical interface (although there is a very good open source tool). Microsoft is working on a wsl compose up command compatible with existing compose.yaml files.
Are Docker images compatible with wslc?
Yes. wslc runs Linux images published on Docker Hub and other registries, such as GitHub Container Registry. It also builds images from a Dockerfile or Containerfile.
Where does wslc download images from by default?
When you specify a short name such as nginx or ubuntu, the image is pulled from Docker Hub. For another registry, specify the full image name, for example ghcr.io/linuxserver/nginx.
Where are containers and images stored?
The data is stored in VHDX virtual disks, in the user profile (%LocalAppData%\wslc\sessions).
Is there a graphical interface for wslc?
Microsoft does not provide an official interface. Projects such as Lazywslc (text-based interface) and WSL Container Desktop (WinUI 3 application) fill the gap, and the Containers extension for VS Code supports wslc.