Apple Container: Getting Started with macOS Containers
Docker is no longer the only way to run containers on a Mac. Since 2025, Apple has offered its own open source tool, simply called Container, to run Linux containers natively on Apple Silicon Macs. No Docker Desktop, no permanent daemon, and a different isolation model. The tool has recently reached an important milestone: version 1.0 stable has been available since June 2026. Around this core, a small ecosystem of community tools has already emerged: a Docker Compose equivalent, graphical interfaces similar to Docker Desktop, and more. In this article, I’ll walk you through what container is, how to install it, and how to use it day to day.
If containerization is new to you, reading our article What Is Docker and Why Use It? will give you the basics (images, containers, registries) that also apply to container.
Table of Contents
What is container, Apple’s container tool?
container is an open source tool developed by Apple that lets you create and run OCI-format Linux containers (like Docker images) directly on a Mac equipped with an Apple Silicon chip. Its uniqueness comes from its architecture: each container runs in its own lightweight virtual machine, via the Virtualization framework in macOS, whereas Docker Desktop runs all containers inside a single shared Linux VM.
In practice, the tool does what you expect from a container runtime: pull, build, run, and push OCI images from any standard registry (Docker Hub, GitHub Container Registry, private registry, and so on). The command line is very similar to Docker’s, which makes it easy to get started.
A few words about this Apple-made tool:
- License: open source, under the Apache 2.0 license.
- Business model: free, a first-party tool shipped by Apple.
- Technical stack: written in Swift, it relies on the macOS Virtualization framework and an optimized Linux kernel (from the Kata family). It depends on the Swift Containerization package, which exposes low-level APIs (images, networking, VM startup). A small Swift init system,
vminitd, starts containers very quickly. - Resources: the official GitHub repository
apple/container, theapple/containerizationpackage, and the project page on Apple Open Source.
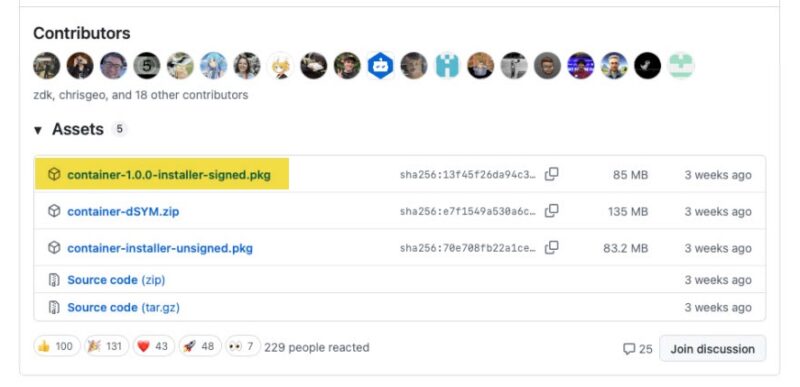
Note: container reached version 1.0.0 on June 9, 2026, one year after its WWDC 2025 introduction. This is the first stable release: the CLI and APIs (XPC) are now frozen, with compatibility guaranteed across patch releases (1.0.x). The project is still active and more changes are expected in future minor versions. Check the current version on the releases page.
One architecture: one VM per container
Docker Desktop on Mac starts a single Linux virtual machine that hosts the Docker engine and all containers. container, on the other hand, starts a dedicated micro-VM for each container, with its own Linux kernel and network stack.
This choice has direct consequences:
- Stronger isolation: one container shares neither kernel nor memory space with another. The attack surface between containers is reduced.
- On-demand resources: there is no large VM running permanently in the background. Resources (CPU, memory) are allocated when a container is active and released afterward.
- One kernel per container: in theory, containers based on different kernels can coexist.
- One IP per container: each container gets its own network address at the Mac host level, which changes how it is exposed (we’ll come back to this).
container or Docker Desktop: what’s different?
Here is a quick comparison to position the two approaches:
| Criterion | container (Apple) | Docker Desktop |
|---|---|---|
| Vendor | Apple | Docker, Inc. |
| License | Open source (Apache 2.0) | Proprietary (free under conditions, paid in enterprise) |
| Architecture | One lightweight micro-VM per container | One shared Linux VM for all containers |
| Linux kernel | Dedicated kernel per container | Shared kernel |
| Networking | One IP per container (macOS network stack) | NAT / bridge through the VM |
| Platform | Apple Silicon + macOS 26 only | Intel and Apple Silicon; macOS, Windows, Linux |
| Daemon | No permanent system daemon | Docker daemon + menu bar icon |
| Docker Compose | No native support (third-party projects) | Integrated |
| Startup | Under a second, on-demand resources | VM active in the background at all times |
| Maturity / ecosystem | Stable since 1.0 (June 2026), ecosystem still being built | Mature, very large ecosystem |
container is therefore not (yet) a universal replacement for Docker Desktop. It is a tool designed first and foremost for local development on Mac, well suited to single-container workflows, but not meant for orchestration or production. For that, Docker remains the right choice, and at a higher level, Kubernetes.
Installing container on macOS
Prerequisites
To follow this guide and use Apple Container, you need:
- A Mac with an Apple Silicon chip (M1, M2, M3, M4, and so on). The tool is not designed for Intel Macs.
- macOS 26 (Tahoe). This is the officially supported version:
containertakes advantage of virtualization and networking improvements introduced in this release. The maintainers state that issues not reproducible on macOS 26 will not be handled.
Download and install the package
The official method is to download the signed installation package (.pkg) from the GitHub releases page. Prefer the package signed and notarized by Apple: it avoids having to bypass Gatekeeper. Double-click the .pkg and follow the instructions.
container is also available via Homebrew, which many users prefer for managing command-line tools:
brew install containerThe container installer will create several binaries under /usr/local/bin: container, container-apiserver, uninstall-container.sh, update-container.sh.
Start the service and verify the installation
Once installed, start the system service that manages the container lifecycle:
container system startOn first launch, the tool will prompt you to download and install a default Linux kernel: accept it.

Then verify that everything is responding by listing containers (the list is empty at first):
# List all containers (including stopped ones)
container ls -a

# The output shows empty headers:
ID  IMAGE  OS  ARCH  STATE  IP  CPUS  MEMORY  STARTED

# Display version information (for container and container-apiserver)
container system version
To stop the service (for example before an update):
container system stopUpdates and rollbacks are handled with the update-container.sh and uninstall-container.sh scripts (installed in /usr/local/bin), the latter accepting -k to keep your data or -d to remove everything.
Note: since 1.0, system configuration is handled through a TOML file (~/.config/container/config.toml). The container system property get/set subcommands from earlier versions have been removed. That’s something to keep in mind if you are migrating from a 0.x release.
Getting started: running and managing containers on Mac
The good news, if you already know Docker, is that the syntax is very similar. Let’s look at the essential commands you need to start using Container on your Mac.
Run a container
Instead of running docker run, you will use container run. Here’s how to start an interactive container and get a shell:
container run -it alpine shTo start a container in the background (detached mode), specify the -d option, just like with Docker. You can also name the container, here serveur-web from the nginx image.
container run -d --name serveur-web nginxThe -i and -t options (--interactive and --tty) connect your terminal to the container shell. Again, these options are identical to Docker’s.
List, inspect, and enter a container
First difference to know: there is no container ps. The equivalent of docker ps in Apple’s tool is container ls. Here are a few usage examples.
- List running containers
container ls- List all containers, including stopped ones
container ls -aThe two containers launched in the previous step are visible, including the one named serveur-web.

- Get detailed information (JSON) for a container
container inspect serveur-web- Run a command inside a container
container exec serveur-web ls /usr/share/nginx/html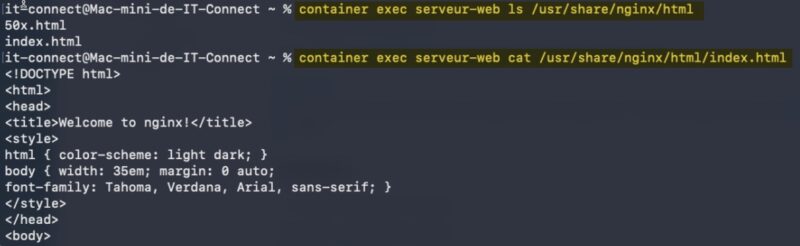
- Open an interactive shell in a running container
container exec -it serveur-web sh- Monitor live resource usage
container stats

Container ID  Cpu %  Memory Usage          Net Rx/Tx             Block I/O             Pids
serveur-web   0.00%  22.29 MiB / 1.00 GiB  31.49 KiB / 0.59 KiB  16.30 MiB / 8.00 KiB  6
If you are not familiar with a container’s lifecycle, our tutorial Creating and Managing Docker Containers explains the same concepts on the Docker side, and they translate directly here.
Working with images
In this section, we’ll see how to download an image from a registry, how to list local images, and how to create a custom image using a Dockerfile.
To fetch an image from a registry, run the following command (example with alpine). The image will be downloaded in its latest version from Docker Hub.
container image pull alpineEquivalent full form of the command above:
container image pull docker.io/library/nginx:latestOfficial images (nginx, alpine, ubuntu, and so on) live in the library namespace of Docker Hub, while images published by a user or organization follow the docker.io/<account>/<image> pattern.
To fetch a specific version, add the tag after the image name, as you would normally do with Docker:
container image pull nginx:1.27-alpine
container image pull alpine:3.20
To pull an image from another registry (GitHub Container Registry, private registry, and so on), specify its host in the reference:
# GitHub Container Registry
container image pull ghcr.io/<organisation>/<image>:<tag>
On Apple Silicon, the arm64 variant is downloaded by default. You can force another architecture or platform, for example to get an amd64 image:
container image pull --platform linux/amd64 nginx:latestOnce the image is downloaded, it appears in the local list, and you can inspect its metadata:
container image ls

NAME     TAG     DIGEST
alpine   latest  28bd5fe8b56d
nginx    alpine  54f2a904c251
nginx    latest  ec4ed8b5299e
Show detailed image metadata (JSON):
container image inspect nginx:latestAnd what about searching Docker Hub? At this time, the container CLI does not provide an equivalent to docker search: there is no command to query Docker Hub directly from the terminal. To find an image, use the Docker Hub website (hub.docker.com) or one of the graphical clients mentioned later (Orchard, for example), which include registry search.
Building an image
To illustrate image building, let’s create a small application: a static web page served by Nginx, with an IT-Connect logo, which we’ll then display in a container. Start by creating a project folder containing three files:
mon-app/
├── Dockerfile
├── index.html
└── logo-it-connect.png
The Dockerfile describes, step by step, how to build the image:
# Lightweight base image: Nginx on Alpine Linux
FROM nginx:alpine

# Image metadata
LABEL org.opencontainers.image.title="mon-app" \
      org.opencontainers.image.description="Page de demonstration IT-Connect servie par Nginx" \
      org.opencontainers.image.authors="IT-Connect"

# Copy the page and logo into the directory served by Nginx
COPY index.html /usr/share/nginx/html/index.html
COPY --chmod=644 logo-it-connect.png /usr/share/nginx/html/logo-it-connect.png

# Document the port the container listens on
EXPOSE 80

# No CMD here: the official Nginx image already starts the server in the foreground
Let’s break down each instruction:
FROM nginx:alpine: defines the base image. We start from Nginx on Alpine Linux, a deliberately minimal variant to keep the image lightweight.LABEL: adds standardized metadata (title, description, author) to the image. This is optional, but it documents your work and is used by some tools.COPY index.htmlandCOPY logo-it-connect.png: copy the local files into/usr/share/nginx/html, the directory Nginx serves by default.EXPOSE 80: indicates the port the service listens on.- No
CMD: the official Nginx image already defines the startup command (launching the server in the foreground), which our image inherits automatically.
Here is a basic example of an index.html page, with some text and the logo displayed:
<!DOCTYPE html>
<html lang="fr">
<head>
  <meta charset="utf-8">
  <meta name="viewport" content="width=device-width, initial-scale=1">
  <title>mon-app - Demo container</title>
  <style>
    body {
      margin: 0;
      font-family: sans-serif;
      background: #0A3344;
      color: #ffffff;
      display: flex;
      flex-direction: column;
      align-items: center;
      justify-content: center;
      height: 100vh;
      text-align: center;
    }
    img { max-width: 220px; margin-bottom: 1.5rem; }
    h1 { color: #F8A040; margin: 0 0 0.5rem; }
    p { color: #48B0D0; }
  </style>
</head>
<body>
  <img src="logo-it-connect.png" alt="Logo IT-Connect">
  <h1>Bravo, ca tourne !</h1>
  <p>Conteneur construit avec l'outil container d'Apple.</p>
</body>
</html>Note: place your logo-it-connect.png file in the project folder, next to the Dockerfile. If you do not want to include a logo, simply remove the COPY logo-it-connect.png line from the Dockerfile as well as the <img> tag from the page.
All that remains is to build the image from the project folder. Before running the following command, change into the project directory (cd mon-app).
container build -t mon-app .This command may return the following error:
Error: internalError: "failed to bootstrap container" (cause: "internalError: "failed to bootstrap container buildkit (cause: "unknown: "Error Domain=VZErrorDomain Code=2 "Rosetta is not installed" UserInfo={NSLocalizedFailure=Invalid virtual machine configuration., NSLocalizedFailureReason=Rosetta is not installed}""")"")The BuildKit builder relies on Rosetta, and if you see this message, it means it is not installed on your Mac. As a reminder, Rosetta is Apple’s translation layer that allows a Mac with an Apple Silicon (ARM) chip to run programs compiled for Intel processors (x86-64) by translating them on the fly.
The solution is to install Rosetta 2, which can be done with a single command in Terminal:
softwareupdate --install-rosetta --agree-to-licenseOnce installation is complete, simply run your build again:
container build -t mon-app .This time, the operation succeeds!
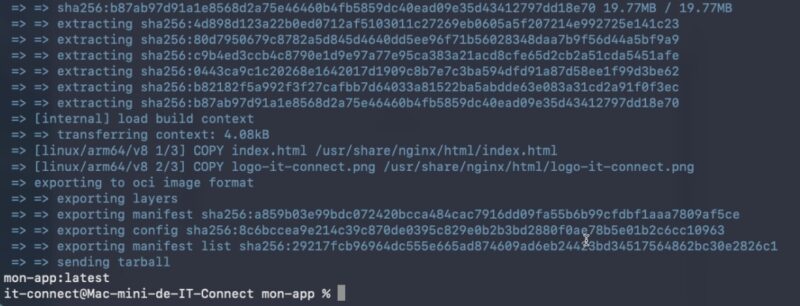
This custom image is now available:
container image list

NAME     TAG     DIGEST
mon-app  latest  29217fcb9696
The next step is to run a container based on this image. For example:
container run -d --name serveur-itco mon-appThe web application is then accessible:
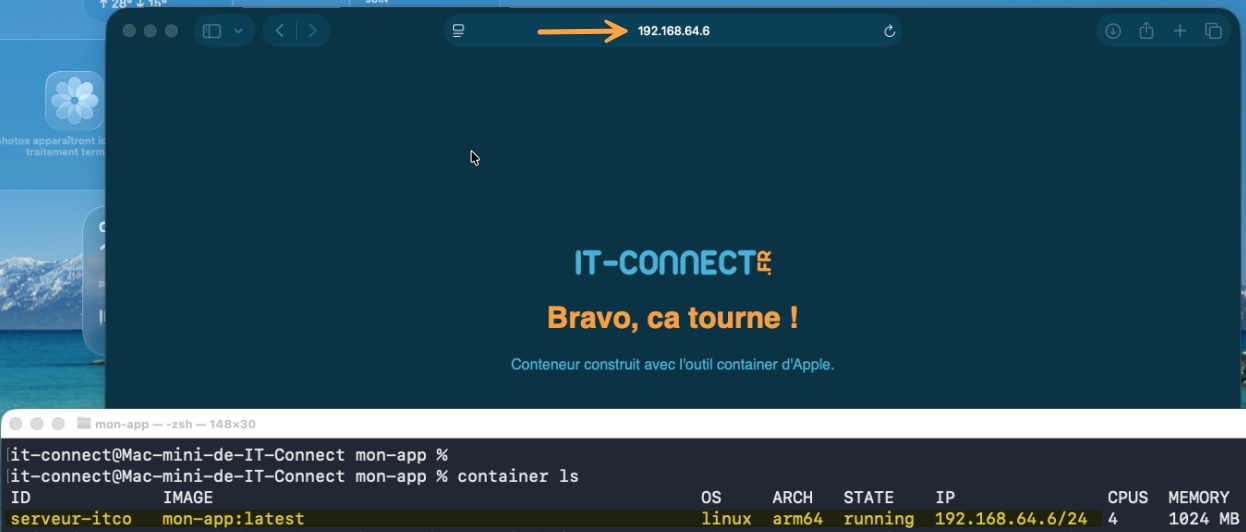
On Apple Silicon, images are built as ARM64 by default. container can also produce multi-architecture images, which is useful when publishing an image that should work on both ARM64 and AMD64:
# Build for both architectures
container build --arch amd64,arm64 -t mon-app:1.0.0 .
To publish to a registry, authenticate first and then push the image. As with Docker, prefer a personal access token (PAT) over your account password, and give it an expiration date.
Start by logging in to a registry (Docker Hub here):
container registry login --username <user> docker.ioThen tag and push the image:
container image tag mon-app:latest docker.io/<user>/mon-app:1.0.0
container image push docker.io/<user>/mon-app:1.0.0
The concepts of images, layers, and registries are common to the entire OCI ecosystem: our chapter on key concepts (images, containers, registries) is still a good reference.
Finally, since we just connected to a registry, note that you can check which registries have stored credentials:
container registry listNote: container registry list only shows registries where you have signed in with container registry login. Docker Hub can still be used without authentication to pull public images, as we did earlier with nginx or alpine.
Networking: one IP address per container
This is where the container model really stands out. Docker also assigns an IP address to each container, but under Docker Desktop these addresses live on an internal network inside the Linux VM and are not directly reachable from macOS: you publish a port (-p) to access the service via localhost. With container, each container gets an IP exposed on the macOS host network, so it can be reached directly, without port publishing.
Try the steps below and you’ll see:
# Get the container IP address
container ls

# Example output: serveur-web  running  192.168.64.3

# Open the service directly on its IP
open http://192.168.64.3
Networking: reach a container by name
Apple’s container tool can also let you reach a container by name (<name>.<domain>) rather than by IP, but this requires a two-step setup that does not do the same thing:
- Register the domain at the macOS level with
container system dns create. This requiressudo, because it tells the system to route*.<domain>queries to thecontainerresolver. This is what makes the domain actually resolvable from the host. - Set that domain as the default domain for containers in the
~/.config/container/config.tomlfile. This user file only selects which domain should be used by default. It cannot register anything with the system, which requires administrator privileges (hence the first step).
Both are therefore required: the first creates the domain in the system, the second tells container to use it. Declaring a domain in config.toml that was never created would be equivalent to pointing to a domain that macOS does not know how to route. Here is the full sequence, using a local domain named mac.
Register the local domain at the macOS level (once only):
sudo container system dns create macCreate the configuration file and declare the default domain:
mkdir -p ~/.config/container

cat > ~/.config/container/config.toml << 'EOF'
[dns]
domain = "mac"
EOF
Restart the service to apply the changes:
container system stop
container system start
Verify that the domain has been registered:
container system dns list

DOMAIN
mac
Once this configuration is in place, containers are resolved on the mac domain (for example serveur-web.mac), directly from your Mac.
Note: the config.toml file does not exist by default, nor does the ~/.config/container/ folder; that is why we create them in step 2. The service only reads this file at startup: after any change, restart it.
Data persistence
By default, everything a container writes to its filesystem disappears with it: delete the container, and the data is gone. To preserve state beyond the life of a container (a database, uploaded files, logs), you need to store that data outside of it. container offers two mechanisms for this, just like Docker: bind mounts and named volumes.
Bind mounts: mount a host folder
A bind mount links a folder on your Mac to a path inside the container. It is ideal in development, when you want the container to work directly on files you edit on macOS. Here is an example that mounts the host’s current directory into the container.
container run -it -v $(pwd):/app -w /app alpine shLet’s break down the -v <source>:<target> syntax:
$(pwd): the source, here the current folder on your Mac (you can specify any absolute path)./app: the target, the mount point inside the container.-w /app: sets the container working directory to that mount point.
Everything written to /app inside the container is actually written to the host folder, and vice versa: changes are visible on both sides in real time. You can also mount a folder as read-only by adding ,readonly, which is a good practice when the container should not modify the files:
container run -it -v $(pwd)/data:/data,readonly alpine shNamed volumes: storage managed by container
A named volume is persistent storage managed by container itself, independent of any host folder. This is the recommended solution for application data that you do not manipulate directly, such as a database data directory. Create it, then attach it to a container with the same -v syntax, using the volume name as the source.
Start by creating a named volume called donnees-bdd:
container volume create donnees-bddThen attach the volume to the bdd container (here, PostgreSQL’s data directory):
container run -d --name bdd \
  -e POSTGRES_PASSWORD=motdepasse \
  -v donnees-bdd:/var/lib/postgresql/data \
  postgres:16
The volume survives container deletion: you can stop and remove bdd, then recreate a container attached to the same donnees-bdd volume, and your data will still be there. That brings me to a few more commands for managing volumes.
- List volumes:
container volume ls- Show volume details (JSON):
container volume inspect donnees-bdd
- Delete a volume (impossible if it is used by a container):
container volume delete donnees-bdd- Delete all unused volumes:
container volume pruneA volume used by a container, even a stopped one, cannot be deleted: you must first remove the container that references it.
Bind mount or named volume: which one should you choose?
| Criterion | Bind mount (-v /host/path:/target) | Named volume (-v name:/target) |
|---|---|---|
| Location | A specific folder on your Mac | Managed by container, outside your tree |
| Typical use case | Development: edit code on the Mac, run it in the container | Application data: database, generated content |
| Direct file access | Yes, from Finder | No, access goes through the container |
| Portability | Depends on the host directory layout | Independent of the machine |
In practice: bind mount for code you edit, named volume for the state the application produces.
Allocate CPU and memory to a container
By default, a container gets 4 CPU and 1 GB of RAM. You can verify this with the container ls command:

To adjust these limits, you can add the --cpus and --memory options to the run command:
container run -d --name web --cpus 2 --memory 2g nginxA few details about these options:
--cpus <number>: the number of cores allocated to the container VM.--memory <size>: the amount of memory, with a unit suffix (k,m,g,t, and so on). Units are binary:2gtherefore means 2 GB. Without a suffix, the value is interpreted as bytes.
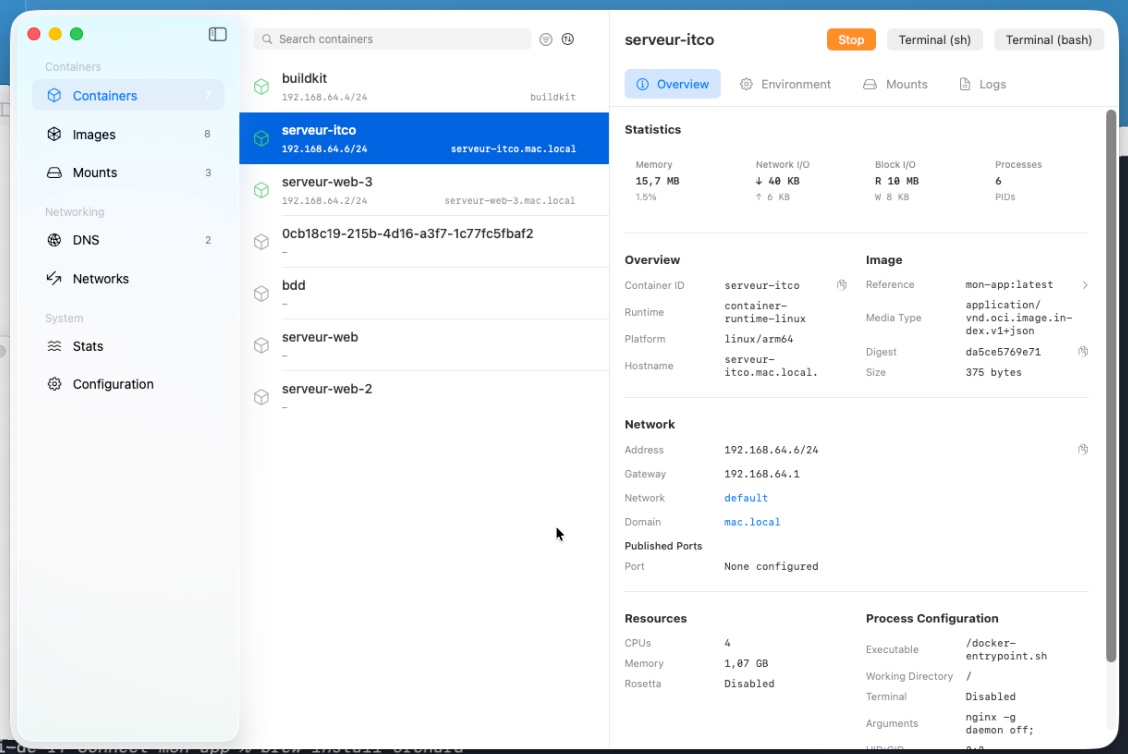
You can check the resources actually assigned to a container with container inspect, which exposes them in a resources block:
container inspect web

...
      "readOnly" : false,
      "resources" : {
        "cpuOverhead" : 1,
        "cpus" : 2,
        "memoryInBytes" : 2147483648
      },
Note - builder case: the VM that builds images (buildkit) has its own default values, which are more modest: 2 CPU and 2 GiB of RAM. For heavier builds, you can increase them by starting the builder explicitly beforehand, for example container builder start --cpus 8 --memory 8g.
Finally, instead of repeating these options on every run, you can define persistent defaults in the ~/.config/container/config.toml file (the same one used for DNS), through a dedicated container section. For example:
[container]
cpus = 2
memory = "2g"
container machine: a persistent Linux environment
Version 1.0 is not limited to application containers: it also introduces container machine mode, which provides a persistent Linux environment on the Mac. Where a container is modeled after an ephemeral application, a container machine is modeled after a full Linux system: your macOS home folder is mounted there, you edit on the Mac and compile on Linux, and you can run long-lived services. It is the closest equivalent to WSL (available on Windows) on macOS.
Because the subject deserves its own treatment, I dedicate a separate article to it: container machine: a persistent Linux environment on macOS, WSL-style.
Going further: a Docker Compose equivalent for container
The biggest current gap is the lack of native Docker Compose support. Describing a multi-service stack in a docker-compose.yml file and launching it with a single command is not (yet) possible natively with container.
What is Docker Compose? It is a tool that lets you define a multi-container application (for example a database, an API, and a front end) in a single YAML file, then start or stop it with one command (docker compose up / down). It is incredibly handy as soon as an application grows beyond a single container.
The community has already started filling this gap with open source projects that read a Compose-format file and translate it into container commands. I recommend checking out this tool:
- Container-Compose (by Mcrich23): a Swift-based tool under the MIT license that maps the volumes and networking defined in a Compose file to their
containerequivalents. Be aware that this is not a full wrapper either, and not everything is supported. But if you want to try it, here is the repository link: github.com/Mcrich23/Container-Compose.
Managing Apple containers with a graphical interface
Another missing piece on the Apple side: there is no official dashboard equivalent to Docker Desktop’s interface. Here too, several open source graphical interfaces have emerged. They rely on the container CLI (or its APIs) to provide visual management of containers, images, volumes, and networks. A few projects worth knowing:
- Orchard: a native macOS app written in Swift, which communicates with
containerthrough theContainerAPIClientlibrary (via XPC). It lets you create, start, stop, and delete containers, browse and pull images, search Docker Hub, monitor logs from multiple containers in parallel, and track CPU, memory, and network usage. Install via Homebrew or a prebuilt package. Repository: github.com/andrew-waters/orchard.
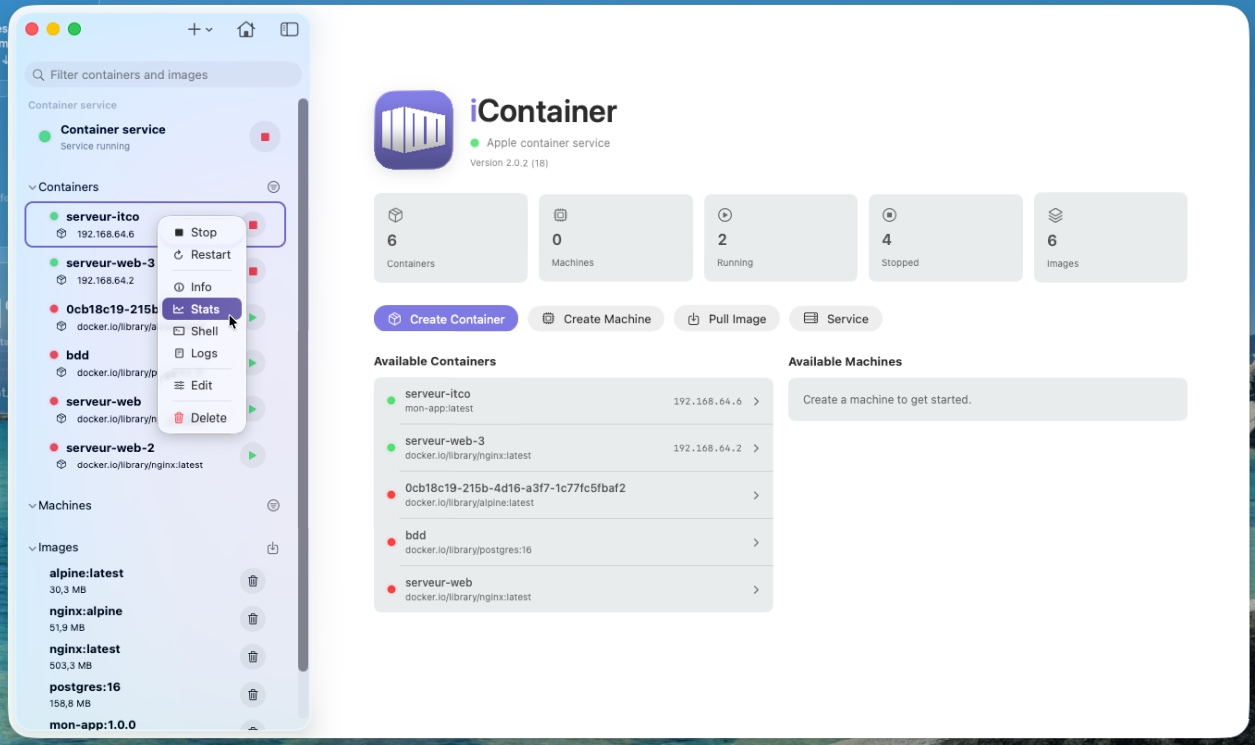
- iContainer: a native macOS app written in SwiftUI (MIT license), vibe-coded with Claude, based on the official
containerCLI. It offers a dashboard, full container lifecycle management (create from an image or Dockerfile build, start, stop, restart, edit ports/volumes/environment variables), per-container tabs (network and mount details, statistics with charts, persistent interactive shell, live logs), image management (list, pull, inspect, delete, registry authentication), and control of thecontainerservice. Install via Homebrew (cask) or a prebuilt package. Repository: github.com/nico81/iContainer.
You can also mention AppleContainerGUI and Container Desktop, which I’ll let you explore if you’re interested.
Warning: several of these community clients (iContainer, Container Desktop, and others) are not notarized by Apple, because their authors do not have a paid developer account. Notarization is the check Apple uses to verify that an app does not contain malicious code. Without it, macOS blocks the first launch with a message such as "Apple could not verify that <app name> is free of malware". Do not click “Move to Trash”; click “Done” instead, then allow the app through the Security settings or use the following command to remove the quarantine attribute (example with iContainer): xattr -dr com.apple.quarantine /Applications/iContainer.app.
Conclusion
Apple’s Container tool is a game changer for running containers on Mac: an open source, native, Apple-signed container runtime built on an architecture designed for Apple Silicon. For single-container use cases or small service stacks, it is already pleasant to use, and its “one VM per container” model is interesting from an isolation standpoint.
With the version 1.0 released in June 2026, the tool is now stable: the CLI and APIs are locked down, and the container machine feature paves the way for persistent Linux environments on the Mac. Now we are waiting for native support for Docker Compose files, and perhaps an official interface as well. Today, those two gaps are being filled by promising but mostly immature community projects.
To go further
- Documentation and code on the
apple/containerrepository and theapple/containerizationpackage. - Our course Master Docker and Kubernetes to strengthen your containerization fundamentals.
- In a related and original vein: Dockur - run Windows 11 and macOS in a Docker container.
FAQ
What is Apple’s container tool?
It is an open source tool developed by Apple that lets you create and run OCI-format Linux containers directly on an Apple Silicon Mac. Each container runs in its own lightweight virtual machine via the macOS Virtualization framework.
Does container replace Docker on Mac?
With stable version 1.0, container becomes a credible option for local development on Mac, especially for single-container or small-service workflows. However, it still lacks native Docker Compose support. You can absolutely keep Docker alongside it.
What are the requirements for using container?
A Mac with an Apple Silicon chip (M1 or newer) and macOS 26 (Tahoe), the officially supported version. Building images also requires Rosetta 2. macOS 15 may work partially, but with networking limitations.
Does container work on an Intel Mac?
No. The tool is designed and optimized for Apple Silicon. Intel-based Macs are not supported.
How do you install container on macOS?
Download the signed installation package (.pkg) from the releases page of the apple/container repository, then install it by double-clicking. You then need to start the service with container system start. Installation via Homebrew is also available.
How do you launch a container with container?
The syntax is similar to Docker: container run -it alpine sh for an interactive shell, or container run -d --name serveur-web nginx for a background container. Then list containers with container ls.
Is there a Docker Compose equivalent for container?
Not natively. But community projects such as Container-Compose (by Mcrich23, written in Swift) read a docker-compose.yml file and translate it into container commands. It is still fairly immature at the moment.
Is there a graphical interface for Apple Container?
Apple does not provide an official interface, but several open source graphical clients exist, such as Orchard, Container Desktop, AppleContainerGUI, and iContainer. They rely on the container CLI to visually manage containers, images, volumes, and networks.
Can container use Docker Hub images?
Yes. Container can run and build standard OCI images. It can therefore pull and run images from Docker Hub, GitHub Container Registry, or any other compatible registry, and push your own images there.
What is the current version of container?
container reached version 1.0.0, released on June 9, 2026, one year after its preview launch at WWDC 2025. This is the first stable release, with frozen CLI and APIs. The project continues to evolve: check the releases page of the apple/container repository to see the latest version.