Windows: How to Deploy Network Locations via GPO
Deploying network locations directly in Windows Explorer using a Group Policy lets you provide shared resources without relying on traditional drive letters. Let’s see how to set this up.
Before diving into the technical configuration, we’ll take a moment to look at the differences between a mapped network drive and a network location. For a long time, mapped drives were the default choice, but a network location is a real alternative.
Differences Between a Mapped Drive and a Network Location
Before starting the configuration, it is important to technically distinguish these two methods of exposing resources.
A mapped network drive associates a UNC network path, such as \\serveur.domaine.fr\Partage with a logical drive letter on the workstation. It is directly visible in File Explorer, and this connection appears as a drive with its own letter. This method is older and well supported by legacy applications that require a local path (for example, P:\Dossier\Fichier.txt). On the other hand, it does not support web protocols.
A network location is a specialized shortcut stored in the user profile. It does not consume any drive letter. It is compatible with classic UNC paths, but also with FTP addresses (ftp://serveur.domaine.local) or WebDAV URLs (which makes it possible to connect to various applications!). Just like a mapped drive, it appears in Windows Explorer, but it has no associated letter.
| Characteristic | Mapped Drive | Network Location |
| Drive letter assignment | Yes (for example: Z:, Y:, X:) | No |
| Connection limit | Limited (26 letters maximum) | "Unlimited" (no alphabet-related restriction) |
| Supported protocols | Mainly SMB (CIFS) | SMB, FTP, HTTP / HTTPS (WebDAV) |
| Display in "This PC" | Yes | Yes |
| Software compatibility | High (required by older applications needing an absolute path) | Standard (great for user browsing, less suitable for your old Batch scripts) |
| Offline behavior | Configurable offline files | Shortcut becomes unusable if the target is unreachable |
| Configuration via GPP | User Configuration > Preferences > Windows Settings > Drive Maps | User Configuration > Preferences > Windows Settings > Shortcuts |
There is another point I wanted to cover, and it relates to malware behavior. Let’s take ransomware as an example. On an infected machine, it will scan all available drives: it will detect the C volume and mapped network drives because they have an associated letter. This means two things:
- It will also be able to encrypt data stored on shares (depending on permissions and security rules).
- It will miss resources mapped as network locations because they are not listed as drives. However, they may still be targeted later as the attack continues, depending on lateral movement and other factors (is the resource exposed on the network? Are permissions properly managed? etc.).
Be careful, I am not saying that network locations are immune to ransomware, but their discovery is less obvious if the analysis is done from a drive listing.
Where Are Network Locations Stored?
To manage network locations through Group Policy, you need to understand how they are recorded in Windows configuration. Let’s start by connecting a network location to a remote SMB share. For example:
This connection is actually stored in the user profile as a simple shortcut. So, by going to the path %UserProfile%\AppData\Roaming\Microsoft\Windows\Network Shortcuts\, we can see the following:
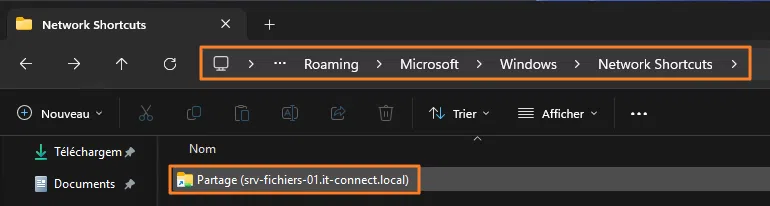
In Group Policy, this is the directory you need to target (at the Windows profile level of each user).
If you would rather map a network drive, check out this tutorial:
Deploy a Network Location via GPO
The first step is to create the Group Policy Object in Active Directory. Because applying a network location is tied to the user environment (their file explorer), the GPO must be applied to "Users" objects.
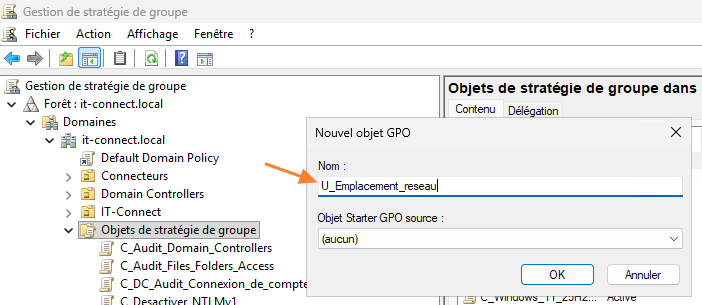
Log on to your domain controller or an administration workstation with RSAT tools installed. Open the "Group Policy Management" console (gpmc.msc).
Expand your domain tree. Identify the OU containing the users targeted by this network location deployment. When that is done, right-click the OU and select "Create a GPO in this domain, and Link it here."
Name this new policy, for example: U_Emplacement_reseau
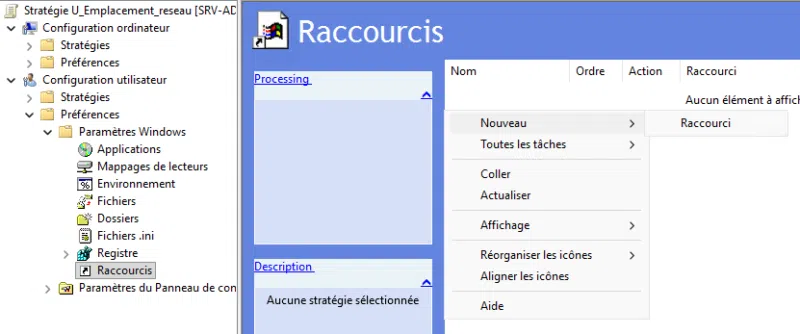
Once the GPO has been created and linked, it must be configured through Group Policy Preferences. Right-click your new GPO U_Emplacement_reseau and click "Edit."
Navigate through the following tree:
- User Configuration > Preferences > Windows Settings > Shortcuts.
In the right pane, right-click, then choose: New > Shortcut.
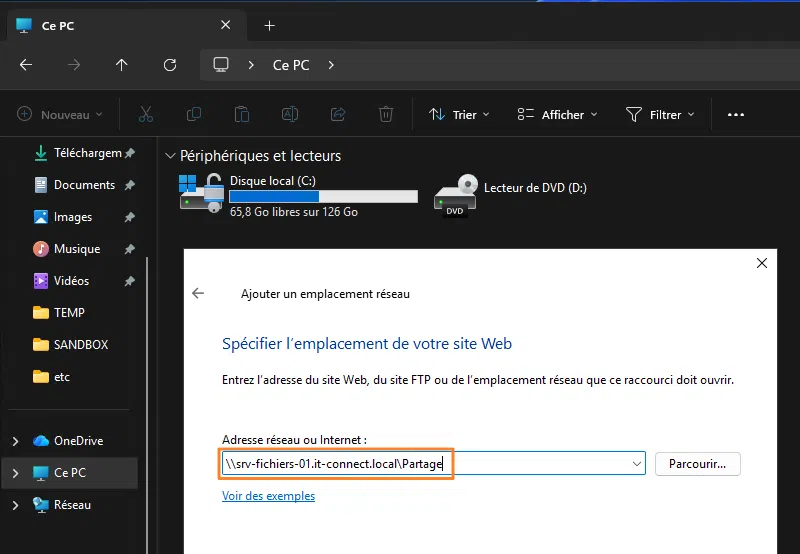
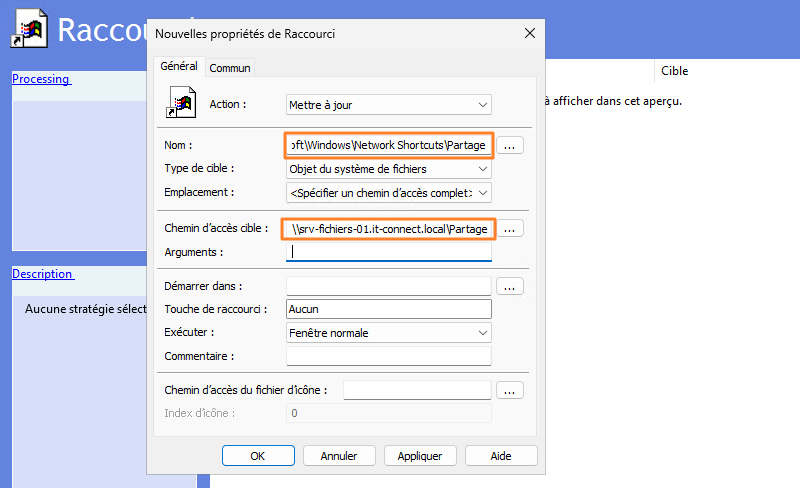
The shortcut properties window appears. Configure the fields as follows:
- Action: choose
Update, so the shortcut is created if it does not already exist, and its settings are updated if it has already been deployed. - Name: the simplest approach here is to enter the full path to the folder where shortcuts are stored, while ending with the name you want to give this network location in Explorer. To name it "Partage", enter the following:
%UserProfile%\AppData\Roaming\Microsoft\Windows\Network Shortcuts\Partage - Target type: for a standard share, select "File System Object."
- Location: make sure to select "Specify full path."
- Target path: enter the address of your share or resource (example:
\\srv-fichiers-01.it-connect.local\Partage).
Click Apply then OK. That’s it, your network location is ready to be deployed!
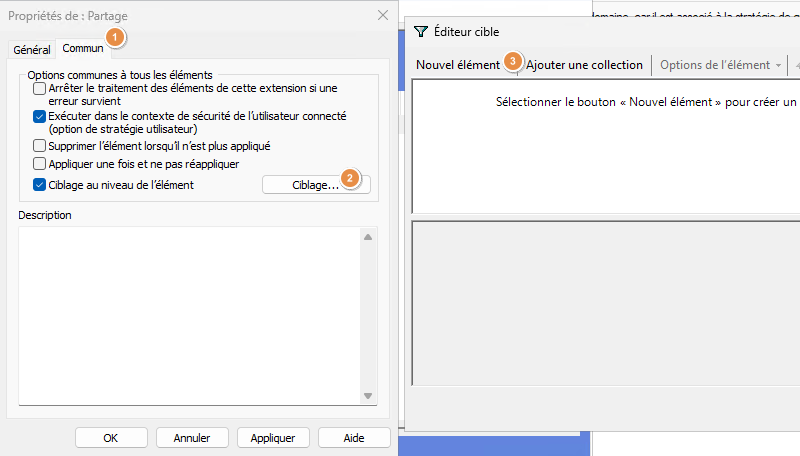
In a production environment, it is rare for all users to need the same network locations. The accounting department does not necessarily need access to the same share as the marketing department. There are several ways to handle this beyond permissions (access-based enumeration, for example).
In this case, instead of creating one GPO per department, you can use "Item-level targeting" through the "Common" tab. This lets you define a targeting rule so each network location is applied only to users belonging to a specific security group.
Once the GPO is ready, close the editor. It is linked to the correct organizational unit, so all that remains is to test it.

Client-Side Testing and Validation
To validate that the GPO is working correctly, log on to a Windows workstation with a user account targeted by the GPO (and belonging to the right security group if you used targeting).
Run the gpupdate /force command to refresh policies and retrieve the new configuration from the domain controller.
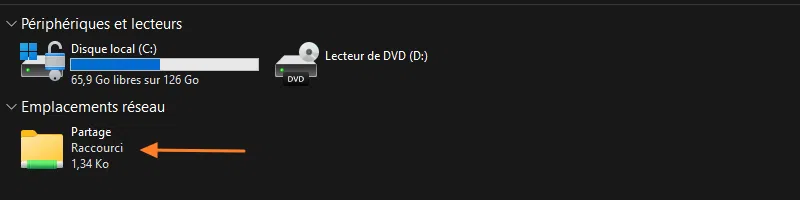
Then open File Explorer and click "This PC" in the left navigation pane. Look at the "Network locations" section: your new shortcut should be there! On my PC, it is indeed present, as shown by the appearance of the shortcut named "Partage."
Conclusion
Creating network locations through Group Policy Preferences is a modern, clean, and effective way to provide access to resources through Windows File Explorer. This approach supports SMB (the usual file share method), which is still widely used today.
FAQ - Network Locations
What is a network location, exactly?
A network location is a special shortcut managed by Windows Explorer. It points to a remote directory and appears alongside disk drives in the "This PC" interface.
What is the difference from a mapped drive?
A mapped drive is mounted on a logical letter (for example: S:) and limited by the alphabet. A network location does not use a letter and natively supports web or file transfer protocols.
Does a network location consume a drive letter?
No, that is one of its advantages. In theory, you can map dozens of them without exhausting Windows’ logical address space.
With GPO, can you target specific user groups?
Yes, through the GPP item properties, using the "Common" tab and then "Item-level targeting." You can filter deployment by security group, IP address, operating system type, etc., depending on your needs.
Where are these shortcuts physically stored on the client machine?
They are stored in the profile of the signed-in user, more specifically in the following folder: %UserProfile%\AppData\Roaming\Microsoft\Windows\Network Shortcuts\.