How to Detect and Block Brute Force Attacks on Windows Server with PowerShell
In this article, we will see how to detect, using PowerShell scripts, brute force attacks on Windows servers exposed to the Internet. By analyzing logs, it will be possible to identify malicious IP addresses regardless of the targeted service (RDP, IIS, RDS, or other services). We will also discuss blocking options when suspicious activity is detected.
This work was carried out following several requests, audits, and field analyses, with the goal of strengthening governance, visibility, and independence from third-party solutions. We then developed an approach based on scripts relying solely on native Windows mechanisms.
Table of Contents
Security Risk of Hosted Servers
Today, many French companies, especially small businesses and mid-sized companies, as well as some public-sector organizations, are continuously exposed to brute force attacks, often without realizing it. This is something we have observed through several engagements. Yet this is not for lack of regularly communicating about this bad practice.
Due to a lack of visibility, resources, or simply because the issue is underestimated, these environments generally have no detection mechanism in place. The logs exist, but they are not being used, allowing these attacks to happen silently.
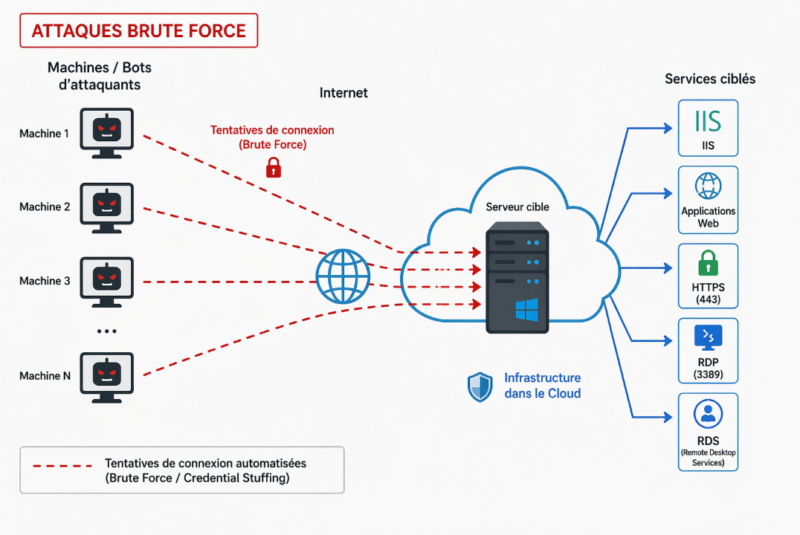
Brute force remains one of the most widespread threats and one of the easiest for an attacker to exploit, especially on exposed services such as Remote Desktop access (RDP protocol).
To address this issue, we are offering a simple and open solution based on a script that can quickly detect these attacks, without depending on third-party tools or adding complexity to the infrastructure.
Our approach focuses more on isolated servers, not necessarily joined to an Active Directory domain, and exposed directly to the Internet, whether in a DMZ or hosted by a service provider / managed hosting provider.
You can read the following article to learn more about brute force attacks and related best practices in an AD environment.
Detecting Brute Force Attacks on Windows Server
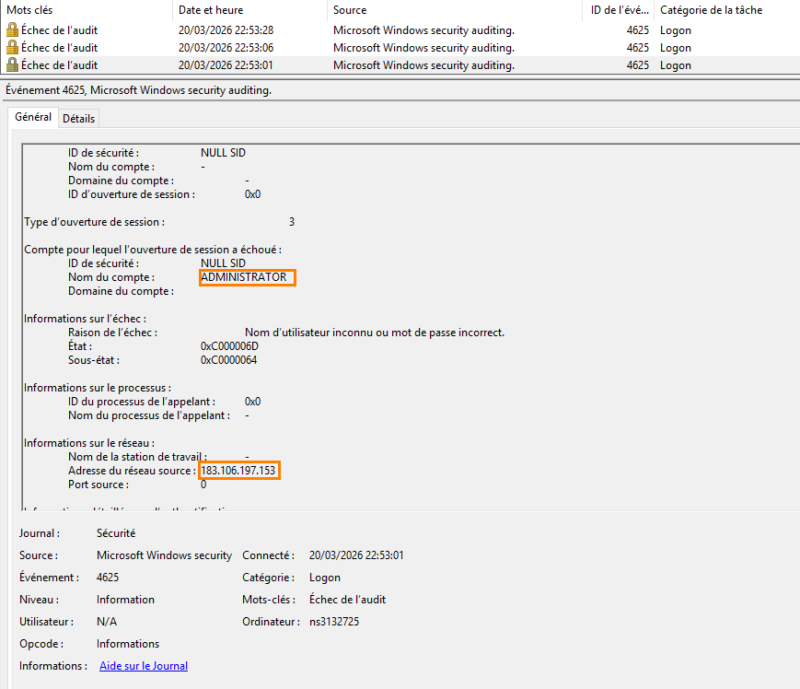
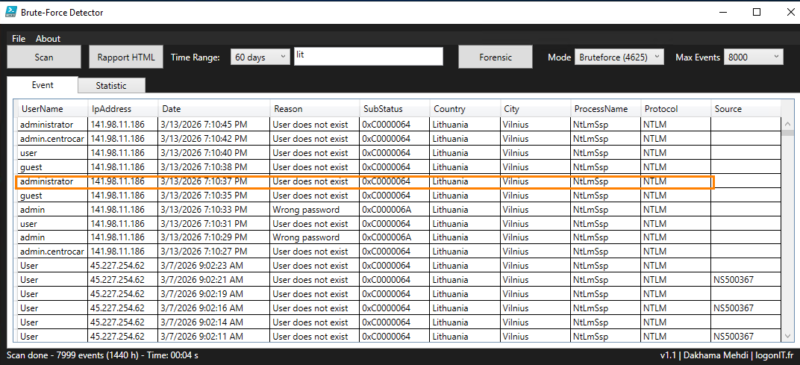
Brute force attacks primarily show up as authentication failure events in Windows logs. The most interesting ones to analyze are those related to network connections (Logon Type 3), which are often the clearest sign of suspicious remote activity.
For example, we can see repeated attempts on an account named "Administrator".
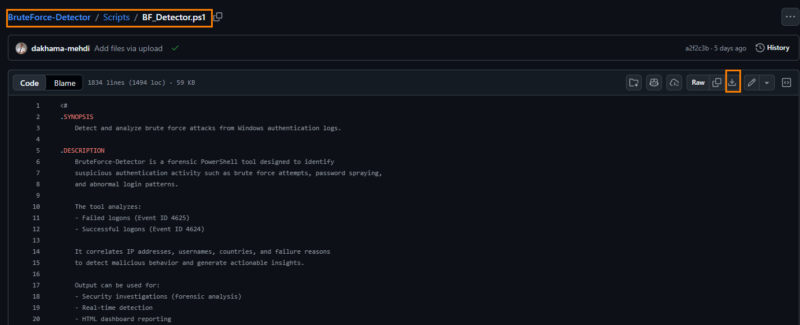
However, reading these events quickly becomes complex when the volume is high. Analysis through scripts or command lines can quickly become tedious and difficult to use effectively. In this context, we use our open source tool, which makes analysis simpler, saves time, and makes decision-making easier.
Detecting Attacks with the BruteForce-Detector Script
Before going further, it is essential to verify whether the server is actually under brute force attack. To do this, it may be necessary to review the logs over a wider period in order to get a realistic view of activity.
The open source tool we developed is based on a high-performance library that enables fast analysis and clear presentation of results. The goal is simple: quickly determine whether the server is exposed to risk by checking best practices and recommendations.
To get started, simply download the script from the GitHub repository or copy it directly into the PowerShell ISE editor. It all depends on your PowerShell scripting habits.
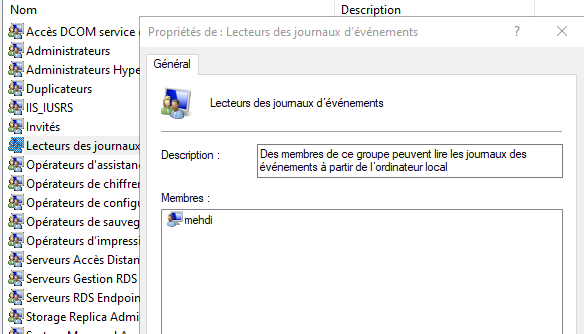
By default, the script requires administrator rights to access the event log. To avoid this, you can add the current user to the "Event Log Readers" group. If you choose this option, you will need to sign out and sign back in for the change to take effect.
Then run the script with PowerShell. A portable executable version is also available on GitHub.
Once launched, the tool displays a simple, lightweight, and intuitive interface that is quick to get started with.
Here is an overview of the tool’s main features:
- The "Scan" button starts log analysis.
- The "Time range" field lets you define the analysis period. It is recommended to start with 4 to 10 hours, then increase gradually if needed.
- The "Max Events" menu lets you limit the number of events analyzed and displayed, in order to preserve performance. This value can be adjusted based on log volume.
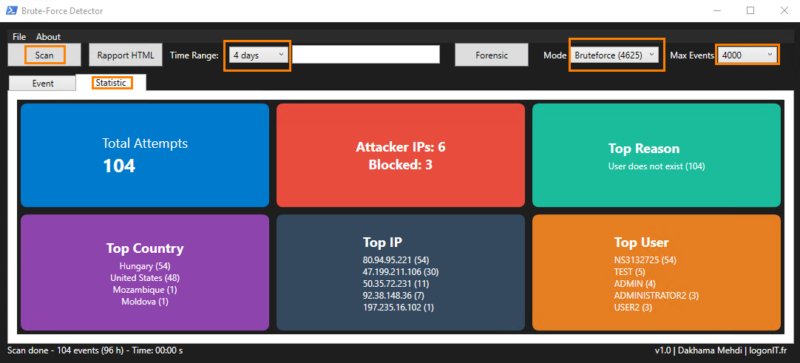
- The "Statistic" section provides a summary view of activity, including the most active IP addresses and the number of associated attempts.
- The "Rapport HTML" button generates a detailed, usable report.
- The "Mode" menu lets you switch between failed logons and successful logons.
- The "Forensic" button launches an advanced analysis by correlating events and checking the system configuration to assess risk.
- The "Export CSV" button, available through the "File" menu, exports the results in CSV format.
Scan Mode
Click Scan to start an analysis. One of the tool’s advantages is geolocation resolution for IP addresses through two free APIs. However, with a large number of IPs, some lookups may fail. The free version allows 100 requests per minute per IP, which is more than enough for most use cases.
The information displayed provides the elements needed to analyze the situation and make a decision.
In this example, the server is clearly being targeted by a brute force attack, with a high volume of attempts. The first indicators highlight risky accounts linked to poor configuration, especially default accounts such as Guest or Administrator. These elements are taken into account in the configuration audit, which we will cover later.
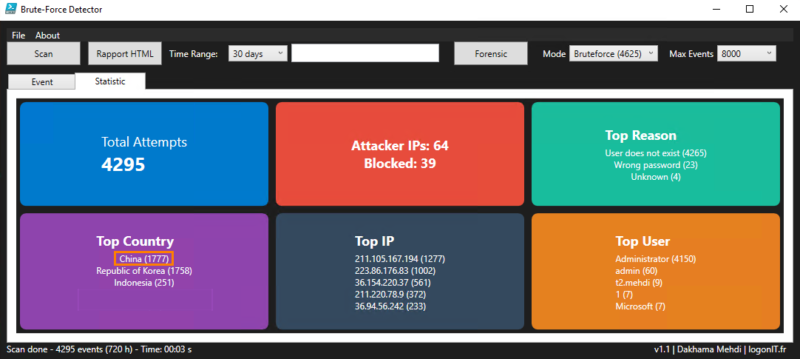
In the "Statistic" tab, you can see the number of attempts as well as their distribution by country. In this example, we can see that a large number of attempts originate from China.
You can then export the results using the Export CSV or Rapport HTML buttons to keep a record or share the analysis.
The HTML page is limited to 4,000 items to avoid making it too heavy; this value can be changed at the beginning of the script in the $maxeventhtmltable variable.

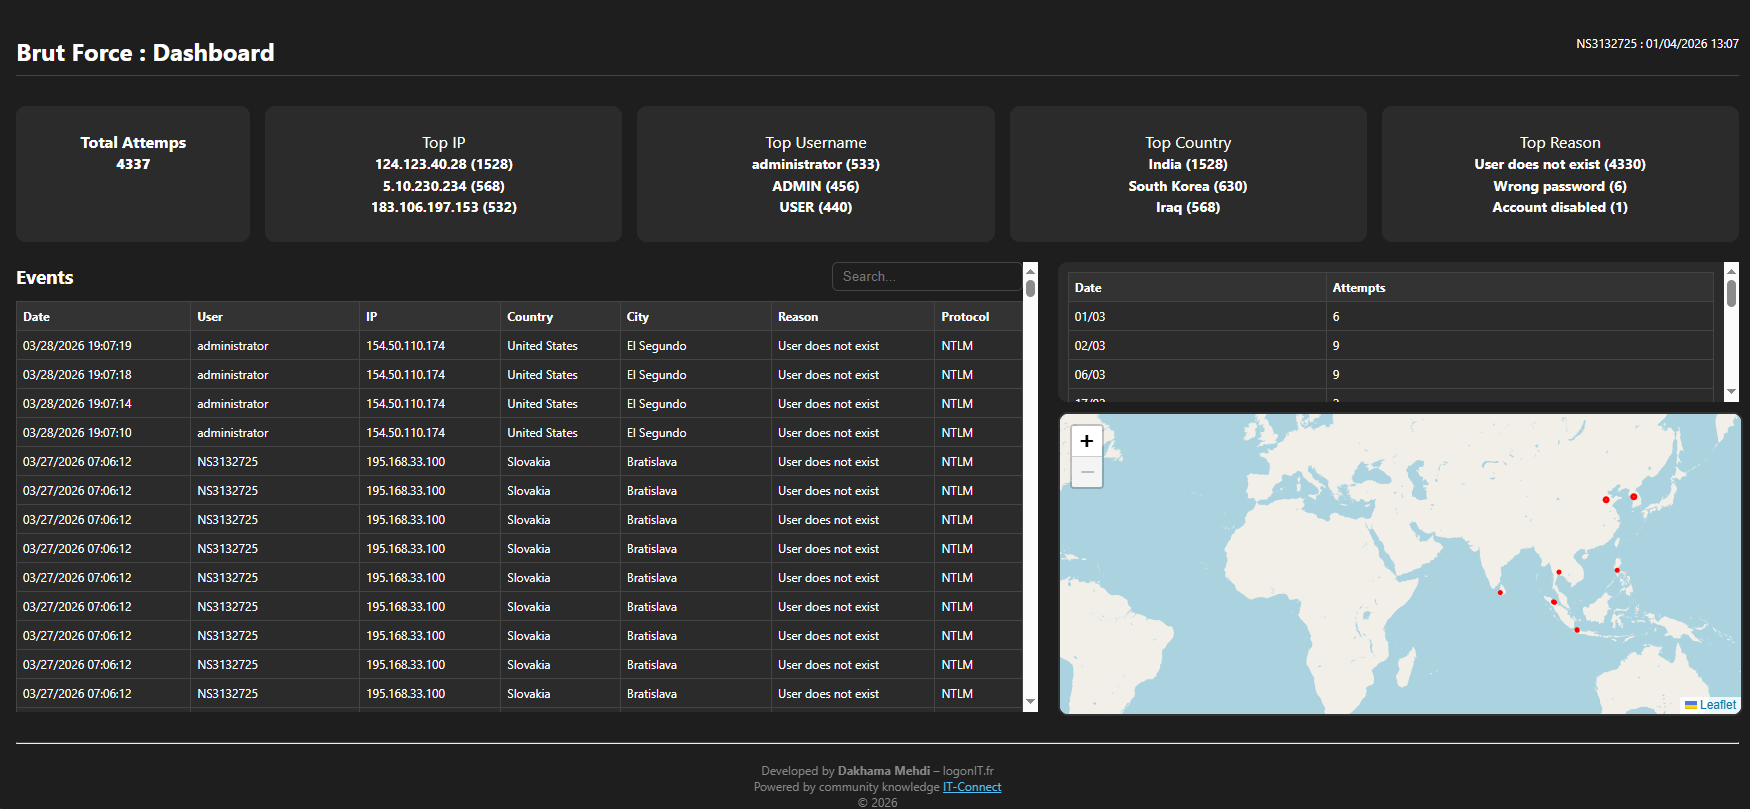
The report provides a simple and clear view, with a map showing attack locations in red, as well as a table of attempts per day.
Here is a sample report:
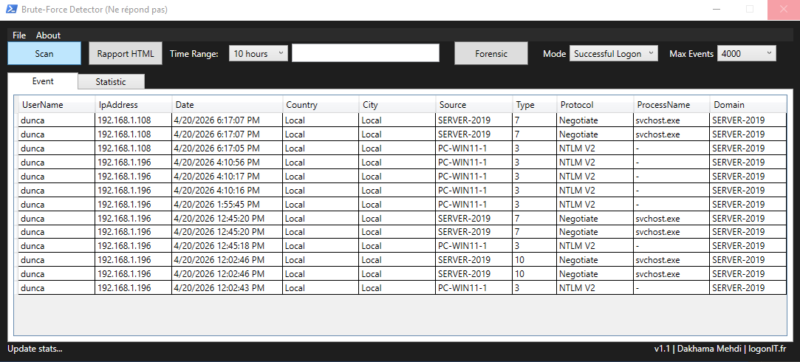
The "Successful" mode lets you analyze successful logons on the machine, especially remote ones. This mode displays relevant information such as the logon process, domain, authentication protocol, and logon type.
This view makes it possible to quickly detect abnormal or suspicious activity, or simply obtain a clear summary of logons.
In the screenshot below, the analysis was performed only on a local server so as not to expose sensitive information related to real connections.
Forensic Mode
This mode triggers an advanced analysis of events. It is recommended to select a wider period, such as 4, 7, or 15 days, in order to obtain a usable volume of data.
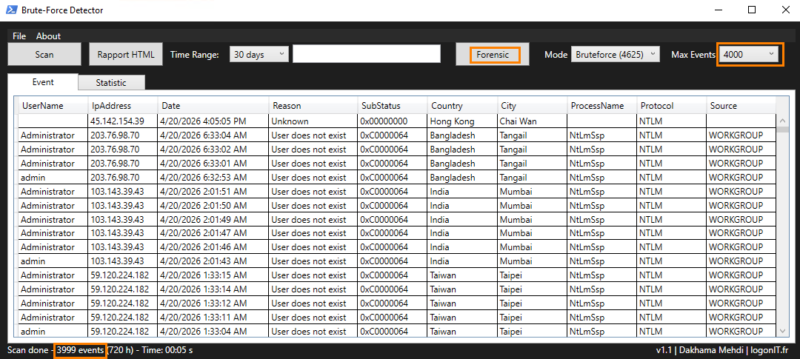
If the event limit is reached, as in the screenshot above, it is necessary to increase the Max Events value. For example, in our case, the events display 3,999, which means that additional events exist but are not displayed. You will need to increase the value from the Max Events menu.
Here is an example of the Forensic output.

The forensic report offers clear and structured visibility, with several checks related to security best practices. It makes it possible to identify weaker authentication protocols, such as NTLMv1, but also to detect sensitive local accounts or dictionary-based accounts, such as guest, invité, sql, or srv.
It also highlights open listening ports outside Microsoft services, while giving an overall view of the machine’s configuration through a security score, calculated from several elements, including the number of failures and successful connections during the analyzed period, which makes it possible to quickly assess the level of risk.
The analysis then makes it possible to identify IP addresses that managed to connect after several failed attempts, along with the reasons for failure and the corresponding time windows, in order to precisely reconstruct the course of the attack.
Finally, the "User Logon Analysis" section groups users who logged on remotely, associating each connection with the IP addresses used and their location. This view is particularly useful in the event of compromise, as it makes it possible to quickly detect a suspicious logon.
Blocking Attacks with the BruteForce-Blocker Script
Before putting blocking mechanisms in place, it is essential to perform an assessment with the detection tool seen above in order to evaluate the level of exposure. For blocking, we will use the BrutForce_Blocker script, run through a scheduled task. It can automatically block IP addresses according to several criteria. An audit mode is also available, with historical tracking.
Despite the existence of some tools, often no longer maintained, we wanted to offer an open source solution that is simple and adaptable. For a limited number of exposed servers, this script is sufficient and works locally, without any external dependency.
Let’s start by downloading the script from GitHub.

Place the script in the BruteForceBlocker folder (for example under: C:\Temp). This path can be changed later. Then open the script in an editor such as PowerShell ISE.
Here is the parameter section, located at the beginning of the script, which you should understand before using it.
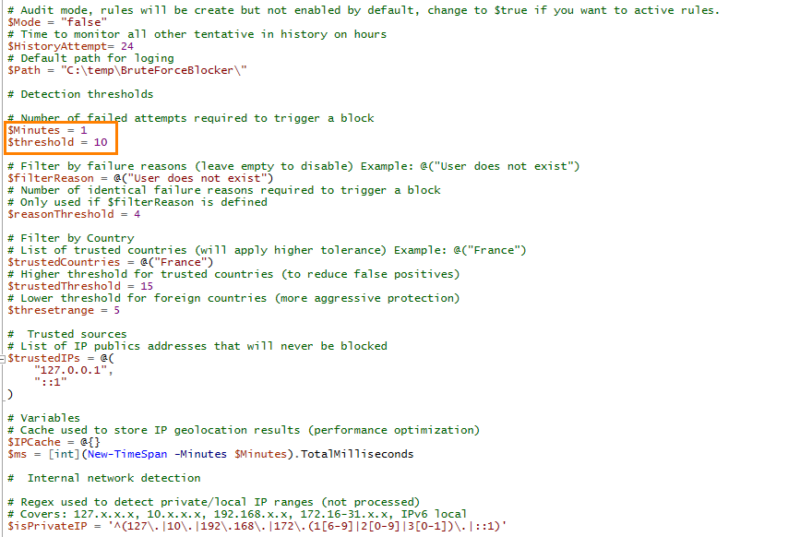
- Mode: enables or disables the firewall rule. When set to
false, the rule is created but not enabled (audit mode). - HistoryAttempt: retains failed attempts for a period of time (24 hours by default) in order to accumulate slow attacks as well.
- Path: log file path.
- Minutes & Threshold: define the number of failed attempts over a given interval, here 10 attempts in 1 minute. This value may seem high, but it will be explained below.
- FilterReason: lets you adjust the threshold according to the reason for failure (for example: user does not exist), still over the same period. Some reasons are more indicative of an attack than others, which makes it possible to reduce false positives caused by an expired or forgotten password.
- TrustedCountries: lets you increase the threshold for certain countries (for example: France -> 15 attempts instead of 10).
Note: retrieve the exact country name to exclude from the BruteForce Detector tool so you can copy it exactly as-is.
- ThresholdRange: threshold applied to other countries outside France; for example, by setting a lower value, attacks originating from unauthorized countries will be blocked more quickly.
- TrustedIPs: list of public IP addresses to ignore (those you trust),
- IsPrivateIP: regular expression used to exclude private IPs.
- Details about Threshold
The one-minute period makes it possible to analyze events over this duration. Some attacks are very aggressive, with several attempts in just a few seconds, while others are slower, as attackers adjust their pace.
Attempts are accumulated over a period of up to 24 hours, which also makes it possible to detect slow attacks
This script can block failed authentication attempts originating from unauthorized countries, for example, by automatically rejecting any attempt from outside France as soon as suspicious behavior is detected. It therefore effectively limits brute force attacks. However, if an attacker has valid credentials, they can still log in.
We are developing an inverse mechanism based on successful logons (4624) so that logons can be restricted according to criteria such as country, city, IP address, or user.
Once your settings have been adjusted, place the script in a folder (for example: C:\Temp\BruteForce).
Creating the Scheduled Task to Run the Script
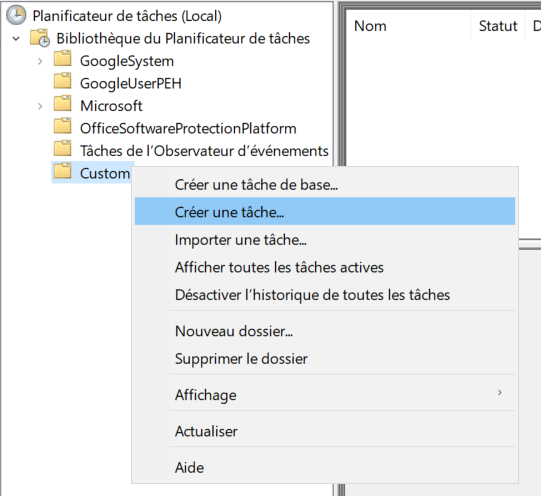
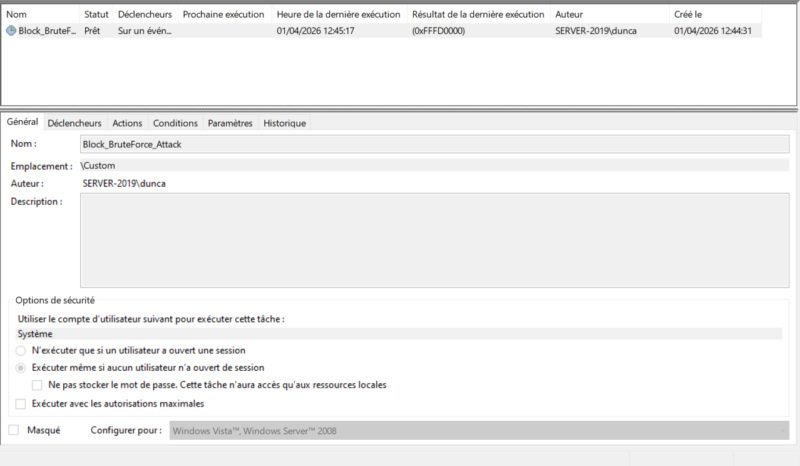
We will now create an event-triggered scheduled task. Open the "Task Scheduler" on your server.
Start by creating a basic task.
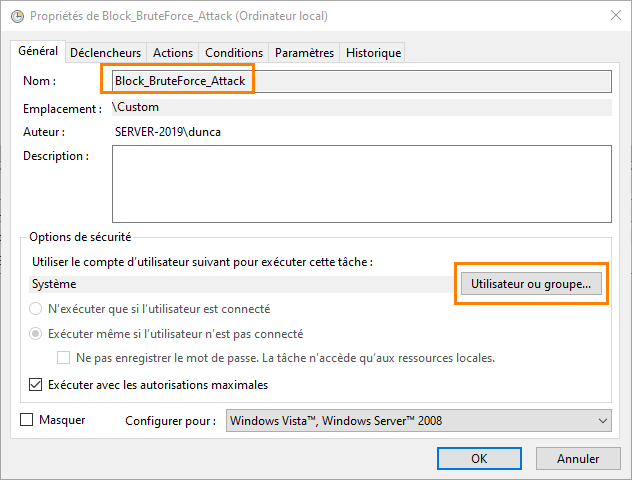
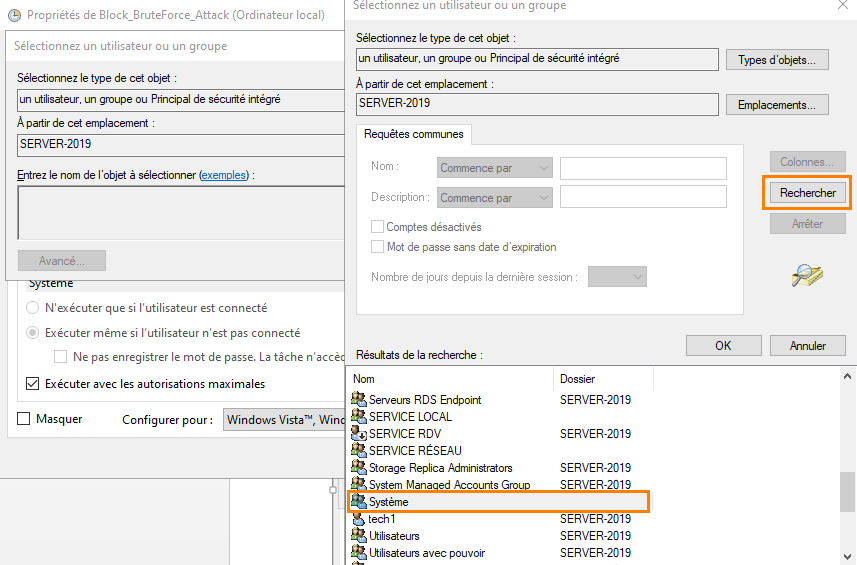
Name the task, then click "User" and select the SYSTEM account.
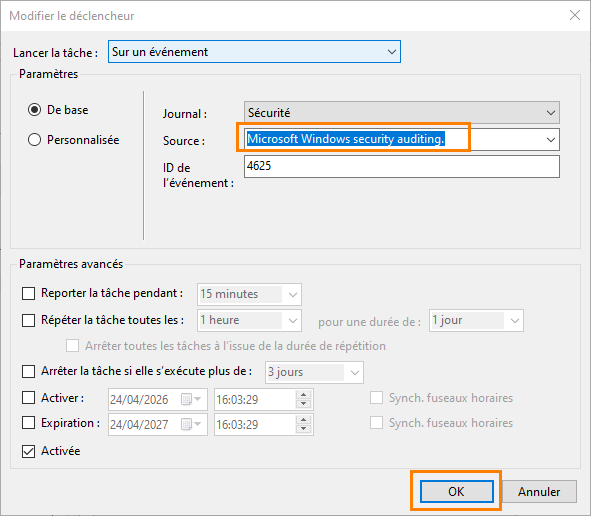
In "Triggers", click "New" then choose "Start the task on an event".
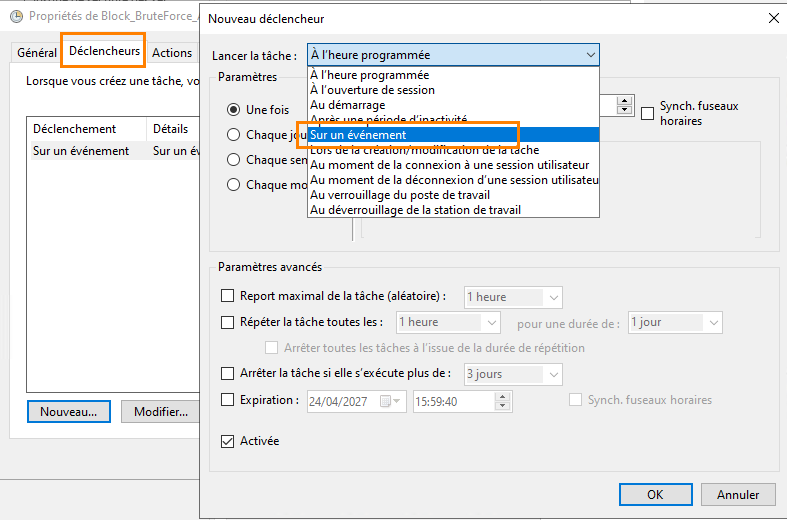
Fill in the events as follows, then confirm with OK.
In the "Action" tab, click "New" then "Start a program". Enter "PowerShell" then in the arguments section, specify the following (adjust according to the script path and name):
-File "C:\temp\BruteForce\BF_Blocker.ps1" –ExecutionPolicy Bypass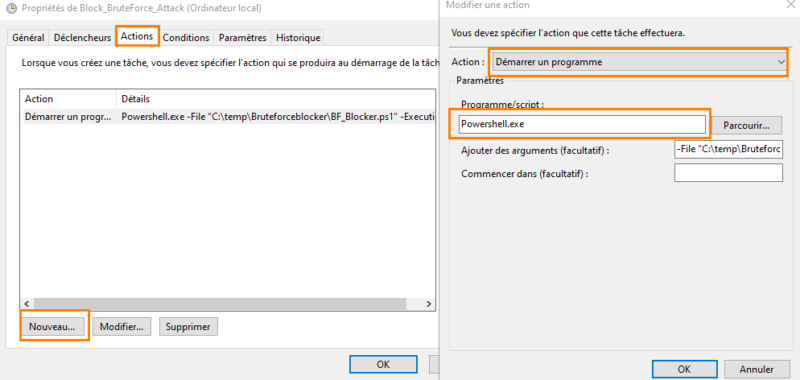
Enabling Blocking in Windows Firewall
Once finished, you can run the task manually for a test, or wait for an event to trigger its execution.
If you run the task, a rule will be created in the firewall, but it will not be enabled yet. You can click it to verify it.
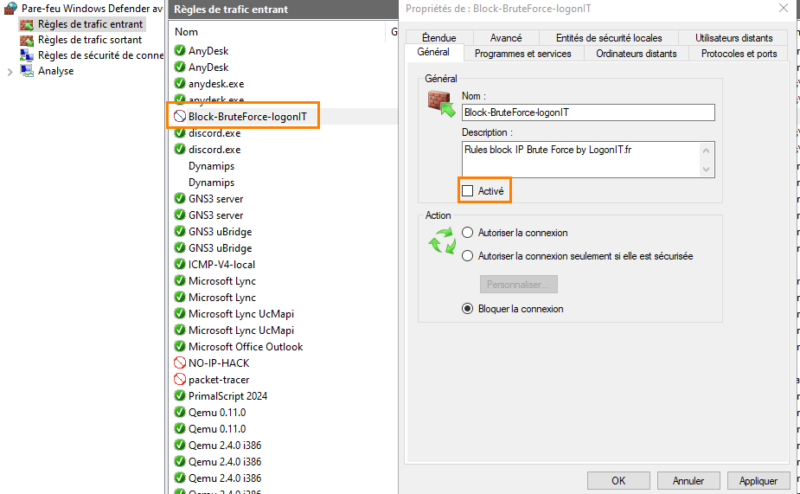
As you can see, the rule is in audit mode, the IPs will be added in the "Scope" tab but not blocked. Check "Enabled" to block the attackers’ IPs.

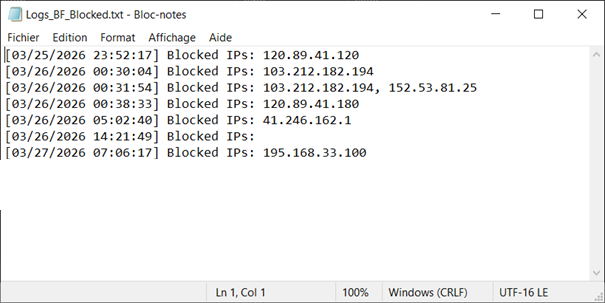
You can see that the list of blocked IP addresses gradually fills up if your server is targeted by attacks.
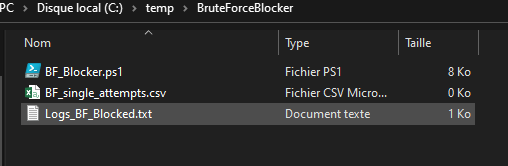
In the folder, two files are generated:
BF_blocked.log: contains the blocked IP addresses,BF_single_attempts.log: contains IPs currently being detected that have not yet reached the threshold.
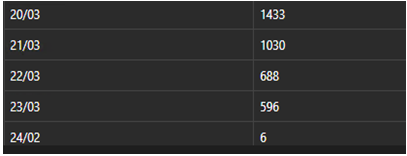
Concrete Production Results
Here is an example after deployment. In just a few days, the number of attacks was clearly reduced. The few remaining attempts are my own tests.
In several cases, this approach significantly reduced threats on exposed servers. On about ten servers where I deployed this script in production, brute force attacks were reduced by 97%.
Conclusion
We have seen that with native solutions, especially PowerShell, it is possible to quickly gain visibility into the risks affecting a server and identify the main weaknesses. The BruteForce Detector tool fits into this approach by providing a clear and actionable view of events.
When needed, the BruteForce Blocker script can help mitigate attacks by blocking malicious source IP addresses. This approach remains simple and effective, but it should be complemented by additional security measures to strengthen protection over the long term.