How to Host Your Password Manager with Vaultwarden Using Docker and Traefik
This tutorial explains how to self-host the Vaultwarden password manager. The installation scenario with Docker and the Traefik reverse proxy will be used for this hands-on guide.
Vaultwarden is an open source fork written in Rust, fully compatible with the Bitwarden ecosystem. This means you can use Bitwarden browser extensions and mobile apps to connect to your Vaultwarden instance. Its source code and Wiki documentation are hosted on GitHub.
Here are some of its features:
- Each user has a personal vault. It can be used to store credentials (username + password), secure notes, banking details, or SSH keys.
- The vault can be used to store attachments (files).
- The Send feature lets you securely and temporarily share information with a third party.
- Organization management like in Bitwarden (multi-user support, shared collections, logs, roles for permission management, etc.).
- Multi-factor authentication (MFA) to secure the vault (TOTP, Yubikey, etc.).
- Dedicated admin panel for instance configuration (for example, organization management).
- Emergency access mechanism.
My Vaultwarden environment
For this guide, I used a server with Docker and Traefik already in place. In this setup, Traefik handles exposure of ports 80 (HTTP) and 443 (HTTPS). It also automatically obtains TLS certificates via a DNS resolver, such as OVHcloud with Let's Encrypt. All the applications we want to publish are connected to an external Docker network named frontend. Vaultwarden will be connected to the same network to communicate with Traefik.
This is the configuration set up in my introductory Traefik tutorial, which you can reuse as a starting point:
Step-by-step Vaultwarden installation
Preparing the directory
To begin, we will structure the folders on our Linux machine. A good practice is to centralize projects under a dedicated directory.
Create a dedicated folder for Vaultwarden under /opt/docker-compose :
mkdir -p /opt/docker-compose/vaultwarden
cd /opt/docker-compose/vaultwarden
Inside this directory, create a subfolder named data. This folder will contain all the application data, including the database (SQLite by default) and users' vaults. Regular backups of this storage area should be planned.
mkdir /opt/docker-compose/vaultwarden/dataThe password for administration
Vaultwarden's admin interface is protected by a specific token. This password must not be entered in plain text in your configuration file, but must be formatted in Argon2. To generate it, first install the required packages on your Linux system:
sudo apt update
sudo apt install argon2 openssl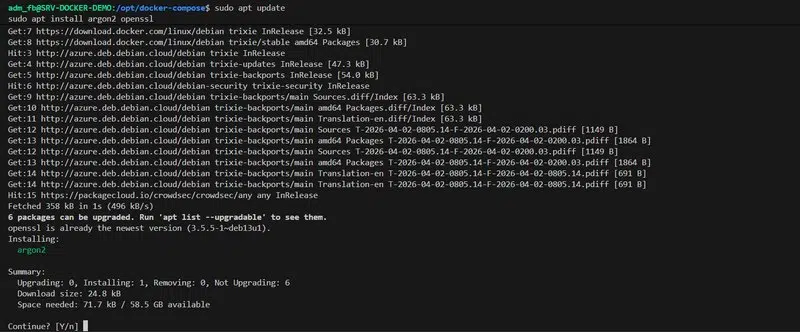
Next, run the following command, replacing VotreMotDePasse with a strong password of your choice:
echo -n "VotreMotDePasse" | argon2 $(openssl rand -base64 32) -e -id -k 65540 -t 3 -p 4 | sed 's/\$/\$\$/g'The role of the sed command at the end is to automatically double the $ symbols in the generated string. This is required by Docker Compose syntax, which would otherwise interpret those symbols as variable references. Copy the string returned by the terminal; we will need it shortly!
The Vaultwarden Docker Compose file
Now create the docker-compose.yml file in your /opt/docker-compose/vaultwarden folder.
It is worth recalling that, historically, it was necessary to publish the web application on port 80 and handle WebSockets separately on port 3012. On the Traefik configuration side, this meant having two routers, as shown below. However, in recent versions, all of this has been merged onto port 80, which simplifies the Traefik configuration.
    labels:
        # Global
        - "traefik.enable=true"
        - "traefik.http.routers.vaultwarden.rule=Host(`vaultwarden.it-connectlab.fr`)"
        - "traefik.http.routers.vaultwarden.entrypoints=websecure"
        - "traefik.http.routers.vaultwarden.tls=true"
        - "traefik.http.routers.vaultwarden.tls.certresolver=ovhcloud"
        - "traefik.http.services.vaultwarden.loadbalancer.server.port=80"
        - "traefik.http.routers.vaultwarden.service=vaultwarden"
        - "traefik.docker.network=frontend"
        # Websocket
        - "traefik.http.routers.vaultwarden-ws.rule=Host(`vaultwarden.it-connectlab.fr`) && PathPrefix(`/notifications/hub`)"
        - "traefik.http.routers.vaultwarden-ws.entrypoints=websecure"
        - "traefik.http.routers.vaultwarden-ws.tls=true"
        - "traefik.http.routers.vaultwarden-ws.tls.certresolver=ovhcloud"
        - "traefik.http.services.vaultwarden-ws.loadbalancer.server.port=3012"
        - "traefik.http.routers.vaultwarden-ws.service=vaultwarden-ws"
To deploy Vaultwarden with Docker Compose, insert the following code, making sure to modify the domain, SMTP settings, and admin password (ADMIN_TOKEN):
services:
  vaultwarden:
    image: vaultwarden/server:latest
    container_name: vaultwarden
    volumes:
      - ./data:/data
    environment:
      # Disable signups
      SIGNUPS_ALLOWED: "false"
      # Disable invitations
      INVITATIONS_ALLOWED: "false"
      # Domain name used to access Vaultwarden
      DOMAIN: "https://vaultwarden.votre-domaine.fr"
      # SMTP configuration for sending emails
      SMTP_HOST: "smtp.gmail.com"
      SMTP_FROM: "votre-compte@gmail.com"
      SMTP_PORT: "587"
      SMTP_USERNAME: "votre-compte@gmail.com"
      SMTP_PASSWORD: "VotreMotDePasseDApplication"
      SMTP_SECURITY: "starttls"
      # Logging configuration
      LOG_FILE: "/data/vaultwarden.log"
      LOG_LEVEL: "warn"
      EXTENDED_LOGGING: "true"
      # Admin token configuration
      ADMIN_TOKEN: "$$argon2id$$v=19$$m=65540..."
      # Time zone configuration
      TZ: "Europe/Paris"
    restart: unless-stopped
    networks:
      - frontend
    labels:
        # Global
        - "traefik.enable=true"
        - "traefik.http.routers.vaultwarden.rule=Host(`vaultwarden.votre-domaine.fr`)"
        - "traefik.http.routers.vaultwarden.entrypoints=websecure"
        - "traefik.http.routers.vaultwarden.tls=true"
        - "traefik.http.routers.vaultwarden.tls.certresolver=ovhcloud"
        - "traefik.http.services.vaultwarden.loadbalancer.server.port=80"
        - "traefik.http.routers.vaultwarden.service=vaultwarden"
        - "traefik.docker.network=frontend"

networks:
  frontend:
    external: true
Here are some explanations of the variables specified in this configuration:
SIGNUPS_ALLOWED: "false": prevents account creation from the web home page (anyone will not be able to register).DOMAIN: specifies the access URL, which is useful for proper service operation.SMTP_*: allows email notifications to be sent, for example when logging in on a new device or inviting a user.LOG_LEVEL: "warn": limits log verbosity to errors and warnings. These logs can also be read by a tool such as Fail2ban to ban malicious IPs.
When the configuration is ready, save and close this file.
Starting up and first access to Vaultwarden
Start the container by moving into the vaultwarden folder and running:
docker compose up -dSince Vaultwarden is lightweight, the container is created quickly. Open your browser and enter your domain name (for example: https://vaultwarden.votre-domaine.fr). You will notice the absence of a button to create an account, which is normal given our configuration.
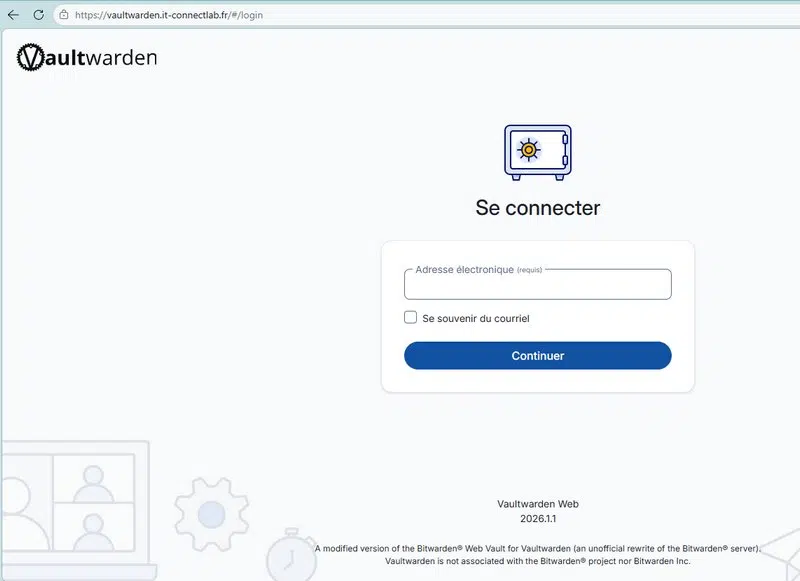
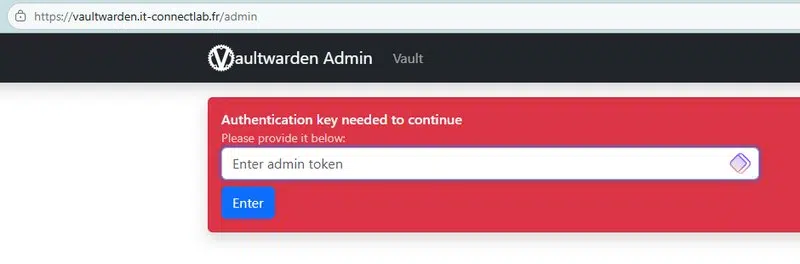
Don't panic. Add /admin to the end of your URL to access the administration interface. Enter the plain-text password (the one used before computing the Argon2 hash) to log in.
In this interface, go to the Users section to invite a user by entering their email address. More generally, all configuration for your Vaultwarden instance is done from this interface. I encourage you to explore the different sections.
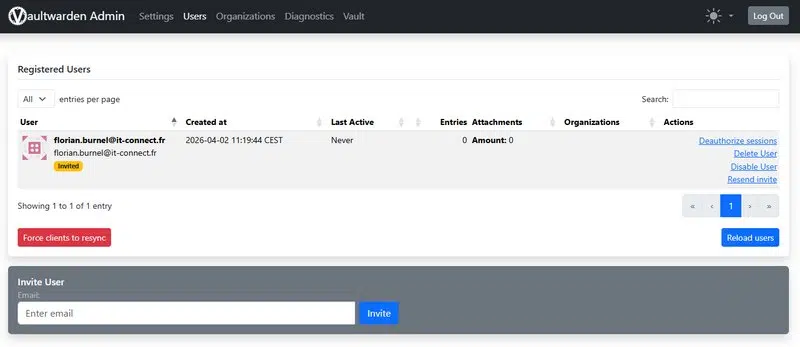
That user will receive an email containing a link to complete account creation.
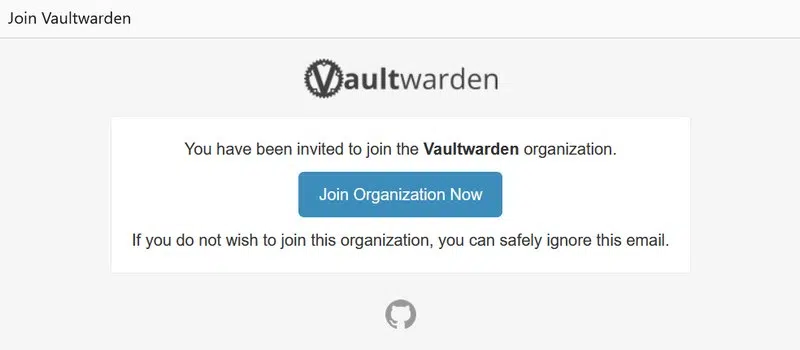
They will need to choose a secure master password to unlock their vault; if they forget it, access to their secrets will be lost.
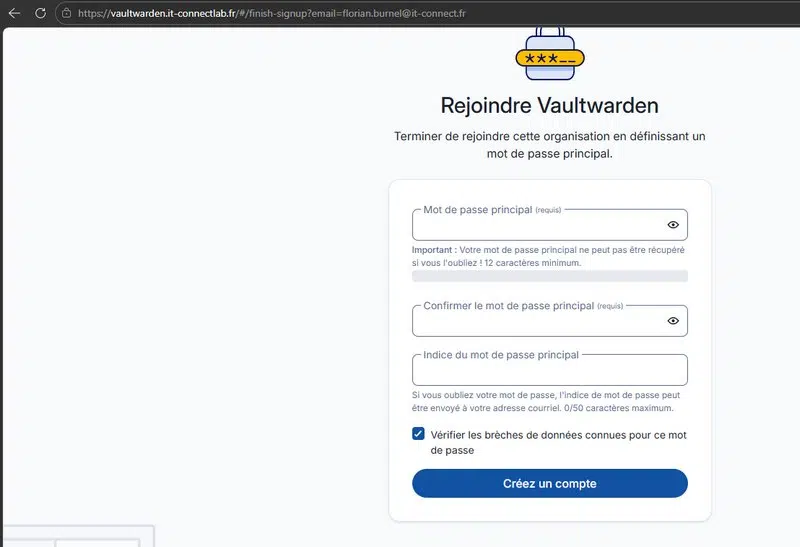
There you go, your first Vaultwarden account has been created!
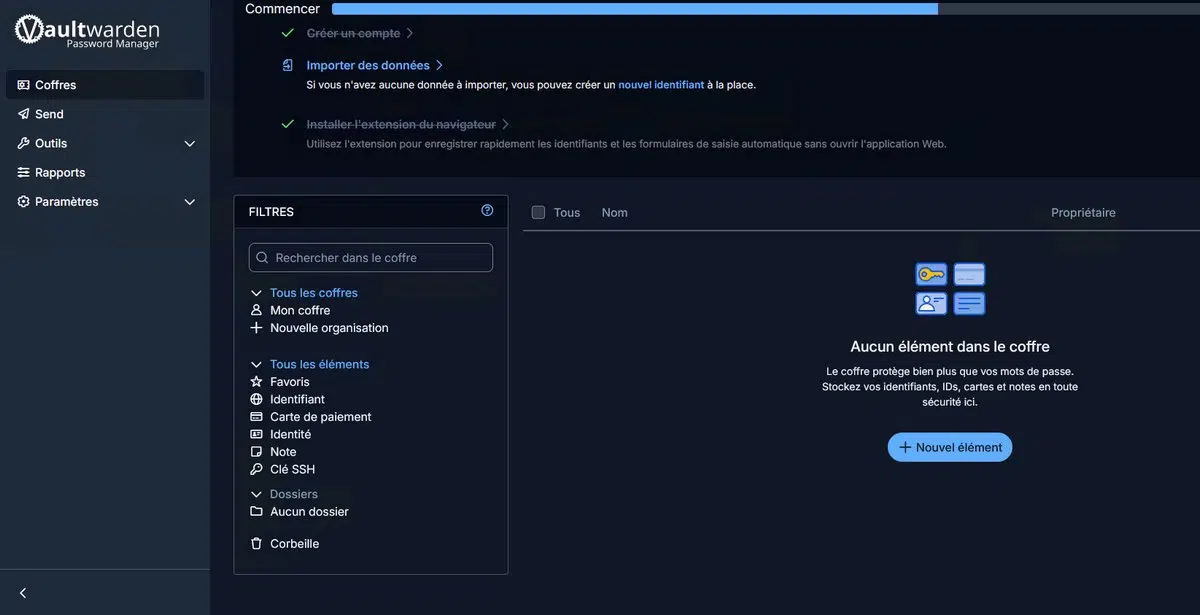
You can start adding items to your account, but the best way to take advantage of it is to install the browser extensions and/or the apps.
Using Bitwarden clients
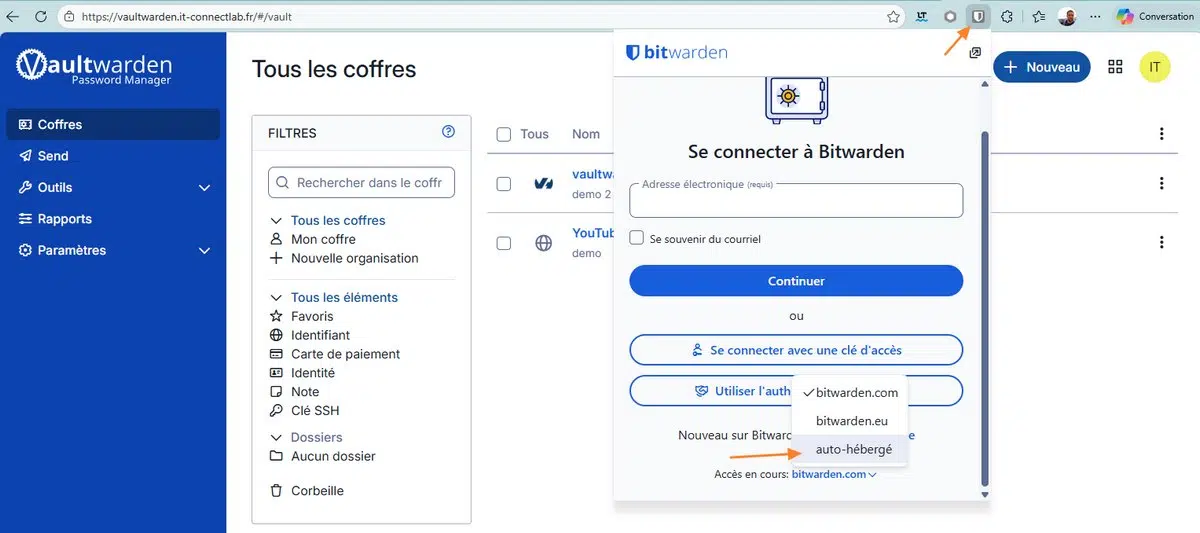
To interact with your data, you will not use clients named Vaultwarden. You need to install the official Bitwarden browser extension or mobile app.
On the first launch of the Bitwarden client:
- On the login page, choose the Self-hosted setting.
- Enter your Vaultwarden server URL.
- Enter your email address and master password.
All changes made (adding a login, deleting an item, etc.) are synchronized in real time between the web interface, browser extensions, and mobile apps. There is no need to refresh the page, which confirms that the server and the WebSockets mechanism are working properly.
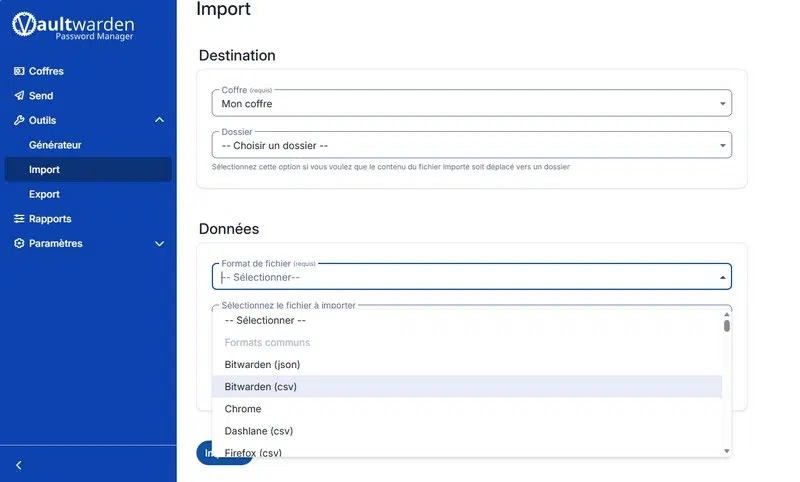
But there is no need to start from scratch: if you already use another password manager, you can import your data. Vaultwarden supports different formats (KeePass, LastPass, Chrome, etc.).
Securing the Vaultwarden admin interface
To further strengthen security, it is possible to block access to the /admin page from the Internet and restrict it to your local network (LAN). To do this, we will configure the reverse proxy directly and use a Traefik ipwhitelist middleware.
Edit your docker-compose.yml file and add the following lines at the end of the labels section (after the main router):
        # Admin interface (IP restriction on /admin)
        - "traefik.http.middlewares.vaultwarden-admin-ip-filter.ipwhitelist.sourcerange=192.168.1.0/24"
        - "traefik.http.routers.vaultwarden-admin.rule=Host(`vaultwarden.votre-domaine.fr`) && PathPrefix(`/admin`)"
        - "traefik.http.routers.vaultwarden-admin.entrypoints=websecure"
        - "traefik.http.routers.vaultwarden-admin.tls=true"
        - "traefik.http.routers.vaultwarden-admin.tls.certresolver=ovhcloud"
        - "traefik.http.routers.vaultwarden-admin.service=vaultwarden"
        - "traefik.http.routers.vaultwarden-admin.middlewares=vaultwarden-admin-ip-filter"
Adjust the 192.168.1.0/24 subnet to match your own addressing scheme. Here, only machines connected to that network will be able to access Vaultwarden's /admin endpoint. The goal is to limit access to trusted IP addresses.
Apply the change by restarting the container:
docker compose up -dFrom now on, any attempt to access the admin page from a public IP will return an HTTP 403 (Forbidden) error, meaning access is denied. The configuration is being enforced correctly!

Conclusion
If you want to self-host a password manager compatible with multi-user workflows and device synchronization, Vaultwarden is a solid choice. It is not the only option, since there is also Passbolt, which I covered in another article.
Integrating Vaultwarden with Docker and Traefik is a first-class solution for hosting your passwords. Thanks to its low resource usage and full compatibility with Bitwarden clients, the user experience is excellent on both desktop and mobile. By applying measures such as IP filtering on the admin interface and correctly configuring your backups, you ensure a high level of longevity for your digital vault.
Vaultwarden - FAQ
What is Vaultwarden?
It is a Rust-based fork, fully compatible with the Bitwarden password manager. You can self-host it on your server, NAS, or Raspberry Pi. It is completely free. The source code is publicly hosted on GitHub.
Are there Vaultwarden apps?
No, there are no Vaultwarden apps. You must use the official Bitwarden browser extensions and mobile apps.
Can Vaultwarden work with a database other than SQLite?
By default, it relies on SQLite, but it is possible to use a MySQL or PostgreSQL engine by adjusting the configuration. This may be a good idea if the instance is used by many users.
How do I access the Vaultwarden server settings?
You need to go to your domain name followed by the /admin path (for example: https://vaultwarden.domaine.fr/admin). All configuration is done from this interface, including HIBP integration.
What is the Admin Token used for?
It is used to enable the administration interface and define the password required to log in.
How do I create a user account once signups are closed?
The administrator must go to the Users tab in the admin interface and invite the person using their email address. The alternative is to temporarily reopen signups by adjusting the Docker Compose configuration.
Can passwords be imported into Vaultwarden?
Yes, Vaultwarden has import and export functionality. It supports many formats: Bitwarden (JSON, CSV), LastPass, 1Password, Safari, Chrome, Dashlane, Enpass, and more. Migrating from another solution is therefore easier.
Are there open source alternatives to Vaultwarden?
Yes, Passbolt (suited to teams and businesses) can be mentioned, as well as KeePass (and KeePass XC) with a more local approach.