ClamAV Guide: How to Install and Configure Antivirus on Linux
In this tutorial, we will learn how to deploy and configure an open source antivirus on Linux : ClamAV. We will see how it works and how it can be used to analyze file signatures on a system. We will also use it in a practical case to secure a web platform handling external documents.
Table of Contents
ClamAV, how does it work?
ClamAV is a widely used open source antivirus solution for malware detection on Linux servers. It is mainly made up of three components:
- clamav-daemon (clamd), which provides a fast scanner in daemon mode and can be queried locally,
- freshclam, which handles automatic virus signature updates,
- clamscan, a command-line tool for running ad hoc scans.
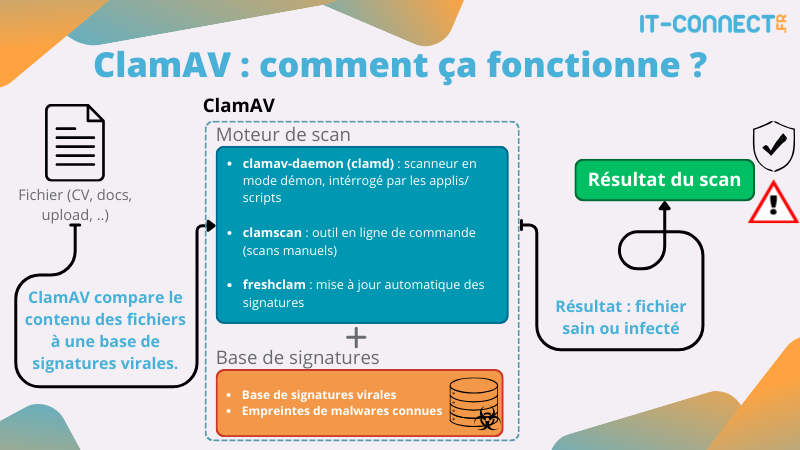
In practical terms, ClamAV does not guess whether a file is malicious: it compares file content against a virus signature database that is updated regularly. You can run it in the background, query it from a web application (directly through code), or schedule regular scans with cron or systemd.
To run a scan with ClamAV, there are two tools: clamscan or clamdscan. These are two different native ways to use ClamAV, but they do not work the same way. Here are some comparison points between the two:
| Criteria | clamscan | clamdscan |
|---|---|---|
| Principle | Standalone scanner with its own engine | Lightweight client that queries the clamd daemon |
| Daemon required | No, works on its own | Yes, clamav-daemon must be running |
| Signature database | Reloaded into memory on every execution | Already loaded permanently by clamd |
| Startup speed | Slow (several seconds of loading, due to loading the signature database) | Nearly instant |
| Memory usage | High on each launch (several hundred MB) | Low on the client side (the daemon handles the load) |
| Configuration source | Command-line options | Inherits settings from clamd.conf |
| File access | Reads files directly (no issue if run as root) | The daemon runs as clamav, so it often requires --fdpass (we will see a case later). |
Installing and configuring ClamAV on Linux
Installing the ClamAV packages
The first step is to update our repositories and install ClamAV along with its daemon:
sudo apt update
sudo apt install -y clamav clamav-daemon
These packages include the detection engine, the background daemon, and the freshclam signature update service. In fact, installing these two packages will also install the following dependencies: clamav-base, clamav-freshclam, clamdscan, libclamav12.
Initial signature update
After installation, the virus signatures are empty. You therefore need to run a manual update to download the first signatures, then let freshclam run in the background to keep the database up to date.
What is a virus signature?
A virus signature is a characteristic fingerprint of a malware, used to identify it. You can compare it to a fingerprint for a virus.
ClamAV has a signature database (files, strings, hashes, etc.). During a scan, it reads the content of a file and looks for matches against these signatures. If a match is found, the file is detected as infected or suspicious.
The quality of, and keeping up to date, this signature database is therefore important: an antivirus without up-to-date signatures is almost blind, because threats evolve very quickly.
Here is how to update or install our ClamAV signature databases for the first time:
# Stop the clamav-freshclam service
$ sudo systemctl stop clamav-freshclam

# Manual update of the signature databases
$ sudo freshclam
ClamAV update process started at Fri Mar  6 19:33:03 2026
Fri Mar  6 19:33:03 2026 -> daily database available for download (remote version: 27932)
Time:    0.4s, ETA:    0.0s [========================>]   22.29MiB/22.29MiB
Testing database: '/var/lib/clamav/tmp.d4b1018d45/clamav-bf6b1e9b1627e6aafbd08cd7afa99290.tmp-daily.cvd' ...
Database test passed.
Fri Mar  6 19:33:06 2026 -> daily.cvd updated (version: 27932, sigs: 355191, f-level: 90, builder: svc.clamav-publisher)
Fri Mar  6 19:33:06 2026 -> main database available for download (remote version: 63)
Time:    0.9s, ETA:    0.0s [========================>]   84.95MiB/84.95MiB
Testing database: '/var/lib/clamav/tmp.d4b1018d45/clamav-ad1c987102555a9705fad09f212a6903.tmp-main.cvd' ...
[...]

# Restart the clamav-freshclam service
$ sudo systemctl start clamav-freshclam
You will then find the newly downloaded or updated signature databases in the /var/lib/clamav directory:
# ls /var/lib/clamav/ -al
total 110112
drwxr-xr-x 2 clamav clamav     4096 Mar  6 19:33 .
drwxr-xr-x 1 root   root       4096 Mar  6 19:30 ..
-rw-r--r-- 1 clamav clamav   281702 Mar  6 19:33 bytecode.cvd
-rw-r--r-- 1 clamav clamav 23373683 Mar  6 19:33 daily.cvd
-rw-r--r-- 1 clamav clamav       90 Mar  6 19:33 freshclam.dat
-rw-r--r-- 1 clamav clamav 89072577 Mar  6 19:33 main.cvd
freshclam regularly queries ClamAV servers to retrieve the latest signatures. We need to enable freshclam at startup (this is often the default after installation):
# Configure automatic startup of the clamav-freshclam service
$ sudo systemctl enable clamav-freshclam
Starting and enabling the clamav-daemon daemon
To make the ClamAV daemon active and start it automatically at boot, we will use the following command:
sudo systemctl enable --now clamav-daemonLet us check its status with:
# Display the status of clamav-daemon
$ systemctl status clamav-daemon

● clamav-daemon.service - Clam AntiVirus userspace daemon
     Loaded: loaded (/usr/lib/systemd/system/clamav-daemon.service; enabled; preset: disabled)
    Drop-In: /etc/systemd/system/clamav-daemon.service.d
             └─extend.conf
     Active: active (running) since Fri 2026-03-06 19:40:43 CET; 24s ago
 Invocation: 5edc792762a44d049fa33386da08dc33
TriggeredBy: ● clamav-daemon.socket
       Docs: man:clamd(8)
             man:clamd.conf(5)
             https://docs.clamav.net/
    Process: 6176 ExecStartPre=/bin/mkdir -p /run/clamav (code=exited, status=0/SUCCESS)
    Process: 6179 ExecStartPre=/bin/chown clamav /run/clamav (code=exited, status=0/SUCCESS)
   Main PID: 6182 (clamd)
      Tasks: 2 (limit: 9387)
     Memory: 960M (peak: 960.3M)
        CPU: 7.304s
     CGroup: /system.slice/clamav-daemon.service
             └─6182 /usr/sbin/clamd --foreground=true

$ ps -edf |grep clam
clamav      5450       1  0 19:40 ?        00:00:00 /usr/bin/freshclam -d --foreground=true
clamav      6182       1  8 19:40 ?        00:00:07 /usr/sbin/clamd --foreground=true
ClamAV can communicate through:
- A local socket (
LocalSocket), - A TCP port (
TCPSocket) listening locally or externally.
For security reasons, it is recommended to use LocalSocket when access comes from the same server or from a local application. This avoids exposing the daemon to the network and reduces risk.
ClamAV can also be used as a server and queried by multiple clients. But that is not the goal of this tutorial.
The socket path is usually /var/run/clamav/clamd.ctl or /var/run/clamav/clamd.sock. The configuration is located in /etc/clamav/clamd.conf, where you can check or change the following line if needed (not necessary by default):
LocalSocket /var/run/clamav/clamd.ctlI encourage you to take the time to review the other options. This is where you can adjust ClamAV's behavior.
Component verification
We will now perform a first ClamAV command-line scan test, but first we need to give it something to scan. Let us use the EICAR file:
What is the EICAR file?
The EICAR file (European Institute for Computer Antivirus Research) is a fake test virus: a harmless simple text file specifically designed to verify that an antivirus works correctly without using a real malware. It contains no malicious code, but it is nevertheless recognized as a “test virus” by most antivirus products, including ClamAV. It is used to test detection, logs, alerts, and more.
To create it, simply insert this simple string into a text file:
# Create an EICAR test file
echo 'X5O!P%@AP[4\PZX54(P^)7CC)7}$EICAR-STANDARD-ANTIVIRUS-TEST-FILE!$H+H*' > eicar.txt
Let us now launch our first manual ClamAV scan using the clamscan command:
# Launch a manual ClamAV scan on the eicar.txt file
clamscan --infected --remove --recursive eicar.txt
Here is a breakdown of the options we just used:
--infected: only displays infected files.--remove: deletes files detected as infected.--recursive: recursively scans subdirectories (not essential here since we are targeting a single file, but useful in practice).
Here is the output you may get:
/eicar.txt: Eicar-Signature FOUND
/eicar.txt: Removed.

----------- SCAN SUMMARY -----------
Known viruses: 3627604
Engine version: 1.4.3
Scanned directories: 0
Scanned files: 1
Infected files: 1
Data scanned: 0.00 MB
Data read: 0.00 MB (ratio 0.00:1)
Time: 6.865 sec (0 m 6 s)
Start Date: 2026:03:06 19:50:00
End Date:   2026:03:06 19:50:07
Here we have clear information that the file eicar.txt was detected as malicious and removed. A summary then gives us additional information such as scan time, number of files scanned, engine version, and the number of signatures in the database.
We now have confirmation that the ClamAV engine works, that the signatures are loaded correctly, and that detection is operational. We will now move on to a somewhat more realistic use case for ClamAV.
Server-side integration: CV analysis scenarios
To illustrate what ClamAV does, we will use a scheduled task to process recently uploaded documents and move them into a “safe” directory once they have been verified.
We will work with the following directories:
/var/www/data/cv_incoming/: initial drop directory for files (by the web server)./var/www/data/cv_safe/: directory for scanned and safe files./var/www/data/cv_infected/: quarantine for infected files (optional).
We will create a shell script that:
- Scans the files in
cv_incoming. - Scans them with
clamscanorclamdscan. - Moves each file according to the result.
Here is such a script:
#!/bin/bash

INCOMING="/var/www/data/cv_incoming"
SAFE="/var/www/data/cv_safe"
INFECTED="/var/www/data/cv_infected"
LOG="/var/log/clamav/scan_cvs.log"

mkdir -p "$SAFE" "$INFECTED"

# For each file in the drop directory
for file in "$INCOMING"/*; do
    [ -e "$file" ] || continue

    # Scan the file: we capture BOTH the output and the return code
    result=$(clamscan --stdout "$file" 2>&1)
    ret=$?

    echo "$(date '+%F %T') - $result" >> "$LOG"

    # Based on the command return code
    case "$ret" in
        0)
            # No virus found
            mv -- "$file" "$SAFE"/
            ;;
        1)
            # At least one virus found
            mv -- "$file" "$INFECTED"/
            ;;
        *)
            # 2 or other: error during scan, quarantine as a precaution
            mv -- "$file" "$INFECTED"/
            ;;
    esac
done
We then need to make it executable with the following command:
# Add execute permissions to the script
chmod +x /usr/local/bin/scan_cvs.sh
We will now test our script manually by adding an eicar.txt file, as before, and a file that contains no known signature and is not malicious, into our reception directory /var/www/data/cv_incoming/, then we will run our script:
$ echo 'X5O!P%@AP[4\PZX54(P^)7CC)7}$EICAR-STANDARD-ANTIVIRUS-TEST-FILE!$H+H*' > var/www/data/cv_incoming/eicar.txt
$ echo 'This is my CV' > var/www/data/cv_incoming/ok.txt

# Displaying the web server tree
$ tree /var/www/data/
/var/www/data/
|-- cv_incoming
|   |-- eicar.txt
|   `-- ok.txt
|-- cv_infected
`-- cv_safe

# Running the ClamAV scan script
$ /usr/local/bin/scan_cvs.sh

# Displaying the web server tree
$ tree /var/www/data/
/var/www/data/
|-- cv_incoming
|-- cv_infected
|   `-- eicar.txt
`-- cv_safe
    `-- ok.txt
Success! Each of our files has been sorted into the correct directory, and our eicar.txt file has ended up in the cv_infected folder. You will find, for each scan launched by our script, the result and the summary in the file /var/log/clamav/scan_cvs.log.
The next step is, of course, to create the scheduled task that will run this script regularly. Let us assume it will run every 15 minutes.
Warning: scanning an entire directory tree can take several minutes, especially because our signature databases are large (and continue to grow). Be sure to test and avoid running scans too frequently, as the load could build up over time (risk of denial of service).
I recommend that you read our tutorial on scheduled tasks with crontab if you are not familiar with this tool at all:
Use the crontab command to add a new scheduled task:
# Editing scheduled tasks
sudo crontab -e
For example, we can add the following line:
# Run the antivirus analysis script every 15 minutes
*/15 * * * * /usr/local/bin/scan_cvs.sh
And that is it, now you only need to make sure the application places uploaded files from visitors into the cv_incoming folder and that internal users can only access cv_safe. The scheduled task will do the rest.
Real-time scanning with ClamAV
With ClamAV On-Access Scanning, the antivirus can perform real-time scanning of files stored on your machine. This relies on a separate service, and since we already installed the clamav-daemon package, it should already be present on the local machine.
To make sure, run this command (if there is no error, you are good to go).
clamonacc --helpReal-time scanning is customizable, meaning it can be limited to certain directories, certain users, or only files below a certain size.
Create the service for real-time scanning
We will create a service to run this additional component (there is already a default service, but we are going to create a custom one).
nano /etc/systemd/system/clamonacc.serviceIn this file, copy and paste this configuration:
[Unit]
Description=ClamAV On-Access Scanner
Requires=clamav-daemon.service
After=clamav-daemon.service syslog.target network.target

[Service]
Type=simple
User=root
ExecStart=/usr/sbin/clamonacc -F --fdpass --log=/var/log/clamav/clamonacc.log --move=/var/quarantine
Restart=on-failure

[Install]
WantedBy=multi-user.target
Save and close the file.
You should know that:
--fdpass: this option avoids access errors when performing real-time scanning of files stored in certain directories, such as a user'shome, for example.--log=/var/log/clamav/clamonacc.log: the log file where errors and information about detected infected files will be recorded.--move=/var/quarantine: when a malicious file is detected, it will be moved to quarantine.
Now enable the service to start at boot and launch it:
sudo systemctl daemon-reload
sudo systemctl enable --now clamonacc
Preparing the quarantine folder
So that ClamAV can move infected files to quarantine, we need to prepare the folder where these files will be stored.
Run these two commands:
sudo mkdir -p /var/quarantine
sudo chmod 700 /var/quarantine
Configuring real-time scanning
Now, edit the clamd.conf file to customize the real-time scanning feature. Here, I am going to configure ClamAV to perform real-time scanning only on the following directory: /home/flo/Téléchargements. On a server, for example, you could target the uploads directory if it is a web application.
nano /etc/clamav/clamd.confAfter the configuration, add the following lines to set up real-time protection (adapt as needed).
Enable real-time protection:
OnAccessPrevention yesMonitor only the /home/flo/Téléchargements directory, recursively. Need to monitor several directories? Add the OnAccessIncludePath instruction multiple times.
OnAccessIncludePath /home/flo/TéléchargementsTo exclude clamav and root from the scope, also add this:
OnAccessExcludeUname clamav
OnAccessExcludeRootUID yes
These two directives are not trivial: they are used to prevent the antivirus from scanning itself in a loop. In fact, when the ClamAV daemon scans a file, it must open it to read it: that opening itself is a file access, which would in turn be detected by the On-Access scanner. You would then enter an endless loop: ClamAV scans a file, which triggers a new event, which launches another scan, and so on. The OnAccessExcludeUname clamav directive specifically excludes all accesses made by the clamav user, under which the daemon runs.
The second line, OnAccessExcludeRootUID yes, excludes accesses made by the root user. In some cases, it is useful to keep it, especially on a server where more actions are performed as root. On a workstation, it is better to include this line.
It is also possible to exclude certain directories. This can be useful if you scan a broader root (such as /home) or the whole system, to avoid cache folders or folders that are not relevant. For example:
OnAccessExcludePath /proc
OnAccessExcludePath /dev
OnAccessExcludePath /sys
Restart the two services:
sudo systemctl restart clamonacc.service
sudo systemctl restart clamav-daemon.service
Testing protection
Start real-time display of the logs related to real-time scanning:
sudo tail -f /var/log/clamav/clamonacc.logThen download a malicious file (EICAR) from the web.
curl -o /home/flo/Téléchargements/eicar.txt https://secure.eicar.org/eicar.com.txtThe malicious file is immediately detected and placed in quarantine.

Real-time protection on the "Téléchargements" directory is working!
Scheduling a scan with ClamAV
ClamAV can also perform periodic scans on your system, whether on the entire machine or on specific directories. To set up this routine, we can create a dedicated systemd service paired with a timer. The example below scans the entire /home/ directory every Sunday at 2:00 a.m.
Before we begin, note that the service/timer pair is based on a separation of responsibilities:
- The
.servicefile defines what should be executed (here, theclamdscanscan command on/home/), - The associated
.timerfile defines when to run it (every Sunday at 2:00 a.m.), with systemd taking care of triggering the service automatically at the right time.
Now let us create the two files.
The service
Create /etc/systemd/system/scan-home-hebdo.service :
[Unit]
Description=Weekly ClamAV scan of /home
Requires=clamav-daemon.service
After=clamav-daemon.service

[Service]
Type=oneshot
Nice=19
IOSchedulingClass=idle
ExecStart=/usr/bin/clamscan --recursive --infected --move=/var/quarantine --log=/var/log/clamav/scan-home-hebdo.log --exclude-dir="^/home/[^/]+/\.cache" /home
SuccessExitStatus=1
clamscan scans a folder recursively by default, so all of /home and its subfolders will be covered by this scan. Here, the Nice=19 and IOSchedulingClass=idle parameters were added to put the scan at low CPU/disk priority: even if the machine is not completely idle at 2:00 a.m., the scan will not interfere with the system. This is not necessarily essential, depending on the machine's nighttime activity (sometimes backups are also run during this period). In addition, cache folders will be excluded from the scan.
Save and close the file.
The timer
Create /etc/systemd/system/scan-home-hebdo.timer :
[Unit]
Description=Launch the weekly ClamAV scan of /home/

[Timer]
OnCalendar=Sun *-*-* 02:00:00
Persistent=true

[Install]
WantedBy=timers.target
Here, the expected schedule is defined by OnCalendar=Sun *-*-* 02:00:00 = every Sunday at 2:00 a.m.. To change the day, replace Sun with another value: Mon, Tue, Wed, Thu, Fri or Sat. Finally, note that Persistent=true catches up the scan at the next startup if it was missed (machine powered off at 2:00 a.m.).
If you are unsure about the schedule syntax, you can also check it with this command:
systemd-analyze calendar "Sun *-*-* 02:00:00"Activation and verification
Once both files are ready, you can run these commands to enable the service, start it (it will wait for the next schedule), and display the upcoming schedule. This will validate the configuration that has been put in place.
sudo systemctl daemon-reload
sudo systemctl enable --now scan-home-hebdo.timer
systemctl list-timers scan-home-hebdo.timer
If you want to run a test right now, use this command:
sudo systemctl start scan-home-hebdo.serviceCheck the logs:
tail -f /var/log/clamav/scan-home-hebdo.logBest practices and limitations of ClamAV
We have seen here a basic and standard installation and use of ClamAV, but it also includes many parameters and use cases. Let us quickly review the main best practices and limitations of ClamAV:
Best practices
- Update signatures regularly: verify that
freshclamis running correctly and monitor its logs (/var/log/clamav/freshclam.log). - Restrict access to the daemon: prefer
LocalSocketrather than an open TCP port to the outside if it is not necessary, and restrict permissions on the socket and scanned directories. - Adjust the configuration: in
/etc/clamav/clamd.conf, you can tweak file size limits, archived file types scanned, number of threads, etc. This helps optimize ClamAV based on your needs. - Log scans: keep scan logs (infected files, errors) to make troubleshooting and auditing easier.
- Test regularly: reuse the EICAR file to make sure the whole chain works (upload, scan, logs).
Limitations of ClamAV
- Primarily signature-based: ClamAV relies mainly on a signature database, so it should not be confused with an EDR. It is notably less effective against very recent malware (0-day), heavily obfuscated variants, and advanced attacks.
- No full agent for end-user workstations: ClamAV is mainly designed for Linux servers, not to replace a full antivirus on a Windows workstation.
- Performance impact: scans can be CPU-intensive and take time, especially on large amounts of data or large directory trees.
Conclusion
ClamAV is a well-known antivirus solution for Linux environments, and it is still preferable that it be part of the security building blocks in your environments, but you need to understand how it works and know how to use it properly, especially through scheduled and regular scans.
ClamAV should be seen as one security building block among others, such as proxy/mail-level filtering, server hardening, access control, and user awareness.
To go further, find the official ClamAV documentation and discover ClamUI, a GUI for ClamAV:
FAQ
Can ClamAV be installed on Windows?
Yes, ClamAV also provides binaries for Windows, but it is mainly used on Linux servers. On Windows, it is more often used as a secondary scanning engine rather than as the primary endpoint antivirus.
Does ClamAV update its signature databases automatically?
Yes, the freshclam component can run as a service and automatically download the latest virus signatures. You just need to enable it at startup and make sure Internet access is allowed to the update servers.
Is ClamAV enough to protect a web server receiving files (CVs, documents, etc.)?
ClamAV is a very good protection layer for filtering incoming files, but it does not replace a global security approach. It should be combined with server hardening, access controls, and good application-side practices.
Does ClamAV detect “recent” viruses or 0-day attacks?
ClamAV relies mainly on signatures, so it is very effective against known malware. However, like all signature-based antivirus solutions, it is less effective against 0-day threats or very new threats that do not yet have a signature.