phpIPAM: How to Deploy an Open Source IP Address Management Solution
Efficiently managing an IP addressing plan quickly becomes a major technical challenge as an organization’s IT environment grows. More needs often means more physical or virtual servers. And if you follow best practices, your network must be segmented into multiple subnets.
Managing IP addresses with an Excel file is possible, you’ve probably seen it before, but it’s not efficient enough. That’s exactly why IPAM (IP Address Management) tools were created to address these business needs. Among the solutions available on the market are phpIPAM (developed in PHP, as its name suggests), as well as others like Netbox and GestióIP.
This tool provides a web interface to centralize the management and tracking of your subnets, VLANs, patch panels, and all your connected equipment. This applies to a single site, multiple sites, and even multi-client management.
The goal of this tutorial is to guide you through deploying phpIPAM with Docker. For a complete presentation of this solution, I invite you to watch my video:
Before we begin, here is some information about phpIpam’s key features:
IP and network management:
- IP address management: full support for IPv4 and IPv6.
- Topology management: creation of sections (sites), networks, and subnets (nesting).
- Visualization: visual display of subnets and automatic free-space calculation.
- Automation: automatic subnet scanning for host discovery and IP address state (status) checks.
- Layer 2 & Routing: declaration of VLANs and VRFs (Virtual Routing and Forwarding).
- Network tools: IPv4 calculator, MAC address lookup, etc.
Infrastructure and Hardware (DCIM)
- Rack management: visual modeling of your server racks, with equipment integration.
- Inventory: manual integration of network/server equipment and creation of custom equipment types.
- Mapping: dedicated module to manage geographic locations and physical rooms.
Administration, security, and auditing
- Centralized authentication: log in to the portal via Active Directory (AD), LDAP, or Radius.
- Granular access control: management of access permissions by group, applicable to specific sections or subnets.
- Traceability: global search engine in the IP database, email notifications, and detailed change logging (changelogs).
Integrations, imports, and customization
- API & DNS: full REST API to script your actions and native integration with PowerDNS.
- Bulk imports: easy import of subnets from RIPE databases or via XLS / CSV spreadsheet files.
- Flexibility: support for custom fields to adapt the tool to your business.
- Multi-language: interface available in several languages.
Installing phpIPAM with Docker
Installing with Docker containers requires configuring several services that will work together. phpIPAM needs a web server with PHP, a scheduling service (cron) to scan networks and check the status of devices, and a database to store the information (MariaDB).
Start by creating a dedicated directory for your project on your server, then move into that folder:
mkdir /opt/docker-compose/phpipam
cd /opt/docker-compose/phpipam
Create three subdirectories for data persistence:
mkdir /opt/docker-compose/{database,logo,ca}Next, in the project root, create a file named docker-compose.yml using your favorite text editor (such as Nano or Vim):
nano docker-compose.ymlInsert the following configuration into the file. This configuration defines the three containers required for the application to work properly:
services:
  phpipam-web:
    container_name: phpipam-web
    image: phpipam/phpipam-www:latest
    ports:
      - "80:80"
    environment:
      - TZ=Europe/Paris
      - IPAM_DATABASE_HOST=phpipam-mariadb
      - IPAM_DATABASE_PASS=MotDePasseBaseDeDonnees
      - IPAM_DATABASE_WEBHOST=%
    restart: always
    volumes:
      - ./logo:/phpipam/css/images/logo
      - ./ca:/usr/local/share/ca-certificates:ro
    depends_on:
      - phpipam-mariadb

  phpipam-cron:
    container_name: phpipam-cron
    image: phpipam/phpipam-cron:latest
    environment:
      - TZ=Europe/Paris
      - IPAM_DATABASE_HOST=phpipam-mariadb
      - IPAM_DATABASE_PASS=MotDePasseBaseDeDonnees
      - SCAN_INTERVAL=1h
    restart: always
    volumes:
      - ./ca:/usr/local/share/ca-certificates:ro
    depends_on:
      - phpipam-mariadb

  phpipam-mariadb:
    container_name: phpipam-mariadb
    image: mariadb:latest
    environment:
      - MYSQL_ROOT_PASSWORD=MotDePasseRoot
    restart: always
    volumes:
      - ./database:/var/lib/mysql
This Docker Compose file allows you to:
- Deploy the three containers required for phpIPAM to function: the one for the web server, the one for scheduled tasks (cron, especially to perform a scan every hour), and the one for the database. The latest Docker images will be used for each component (adjust this if you want to pin versions).
- To initialize the application, you must specify the password associated with the MariaDB root account defined in the
MYSQL_ROOT_PASSWORDdirective of thephpipam-mariadbcontainer. - The
phpipam-webcontainer exposes port80, which allows you to connect to the phpIPAM interface over HTTP. Later on, you can refine the configuration to use a certificate (via the previously createdcafolder) and HTTPS access.
Save and close this file.
If you want to publish phpIPAM through a reverse proxy, that is possible. However, you must make sure to add the IPAM_TRUST_X_FORWARDED=true parameter to the phpipam-web container’s environment variables.
The example below shows how to publish phpIPAM with Traefik. The network to which Traefik is connected is called frontend, while a second network dedicated to internal communication between the three phpIPAM containers is also used; it is named phpipam-backend.
services:
  phpipam-web:
    image: phpipam/phpipam-www:latest
    environment:
      - TZ=Europe/Paris
      - IPAM_DATABASE_HOST=phpipam-mariadb
      - IPAM_DATABASE_PASS=${DB_PASSWORD}
      - IPAM_DATABASE_WEBHOST=%
      - IPAM_TRUST_X_FORWARDED=true
      - IPAM_DISABLE_INSTALLER=1
    restart: unless-stopped
    volumes:
      - ./logo:/phpipam/css/images/logo
      - ./ca:/usr/local/share/ca-certificates:ro
    depends_on:
      - phpipam-mariadb
    networks:
      - frontend
      - phpipam-backend
    labels:
      - traefik.enable=true
      - traefik.http.routers.phpipam-https.rule=Host(`phpipam.it-connectlab.fr`)
      - traefik.http.routers.phpipam-https.entrypoints=websecure
      - traefik.http.routers.phpipam-https.tls=true
      - traefik.http.routers.phpipam-https.tls.certresolver=ovhcloud
      - traefik.http.services.phpipam-https.loadbalancer.server.port=80
      - traefik.docker.network=frontend

  phpipam-cron:
    image: phpipam/phpipam-cron:latest
    environment:
      - TZ=Europe/Paris
      - IPAM_DATABASE_HOST=phpipam-mariadb
      - IPAM_DATABASE_PASS=${DB_PASSWORD}
      - SCAN_INTERVAL=1h
    restart: unless-stopped
    volumes:
      - ./ca:/usr/local/share/ca-certificates:ro
    depends_on:
      - phpipam-mariadb
    networks:
      - phpipam-backend

  phpipam-mariadb:
    image: mariadb:latest
    environment:
      - MARIADB_ROOT_PASSWORD=${DB_ROOT_PASSWORD}
      - MARIADB_DATABASE=phpipam
    restart: unless-stopped
    volumes:
      - ./database:/var/lib/mysql
    networks:
      - phpipam-backend

networks:
  frontend:
    external: true
  phpipam-backend:
    internal: true
With this version, I also used a .env file to define passwords in environment variables (cleaner). My .env file therefore looks like what is shown below, and the variables are called in the Docker Compose file.
DB_ROOT_PASSWORD=MotDePasseRootComplexe
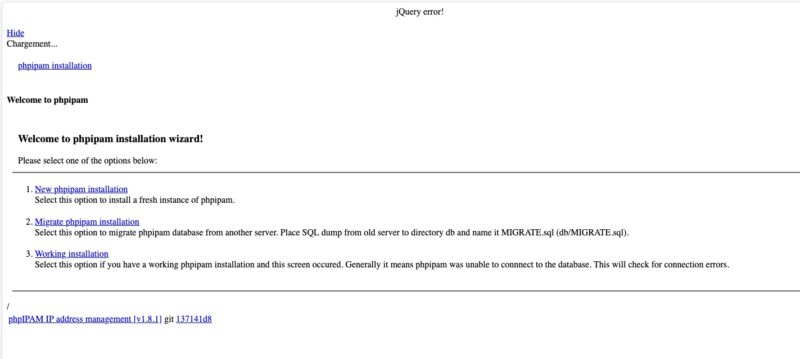
DB_PASSWORD=MotDePasseBaseDeDonneesFor your information, if you do not add the line required for phpIPAM to work behind a reverse proxy, you will get this JQuery error.
Once the file is saved, you can launch the container creation and start them in the background with the following command:
docker compose up -dDocker will download the required images and then start the containers in the correct order. You can verify that all services are running by typing the docker compose ps command.
Initializing phpIPAM
Then open a web browser and enter your server’s IP address (for example, http://192.168.1.200). You will be welcomed by the phpIPAM installation page. Here are the steps to follow in the web wizard.
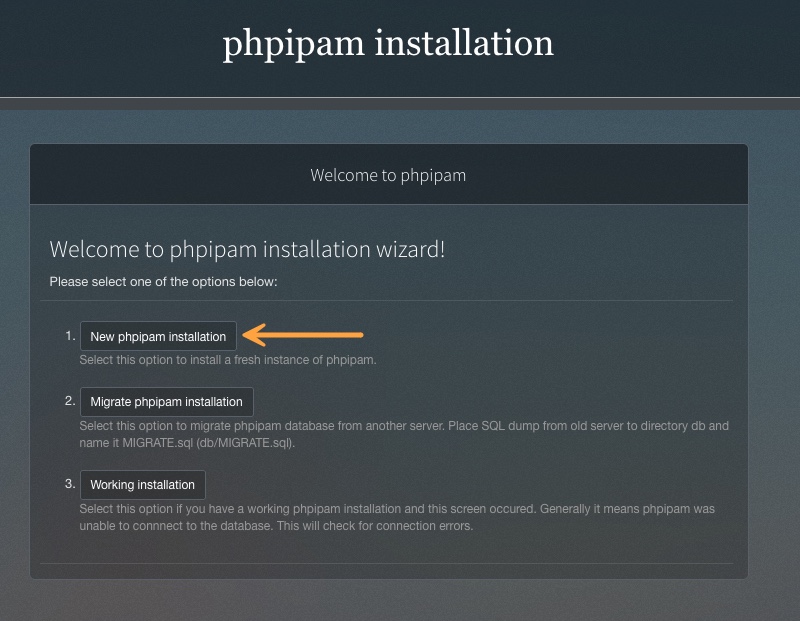
Start by clicking the button named "New phpipam installation".
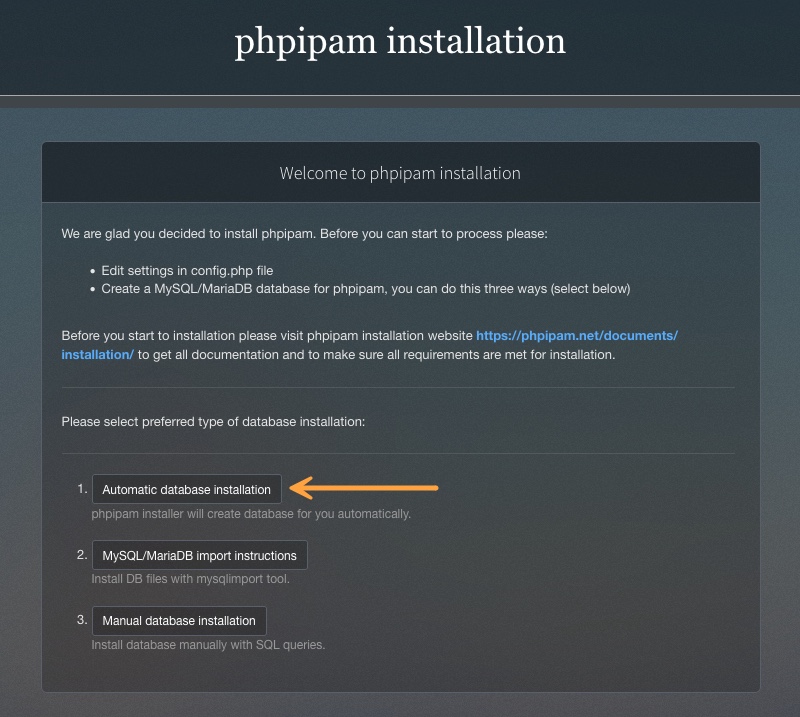
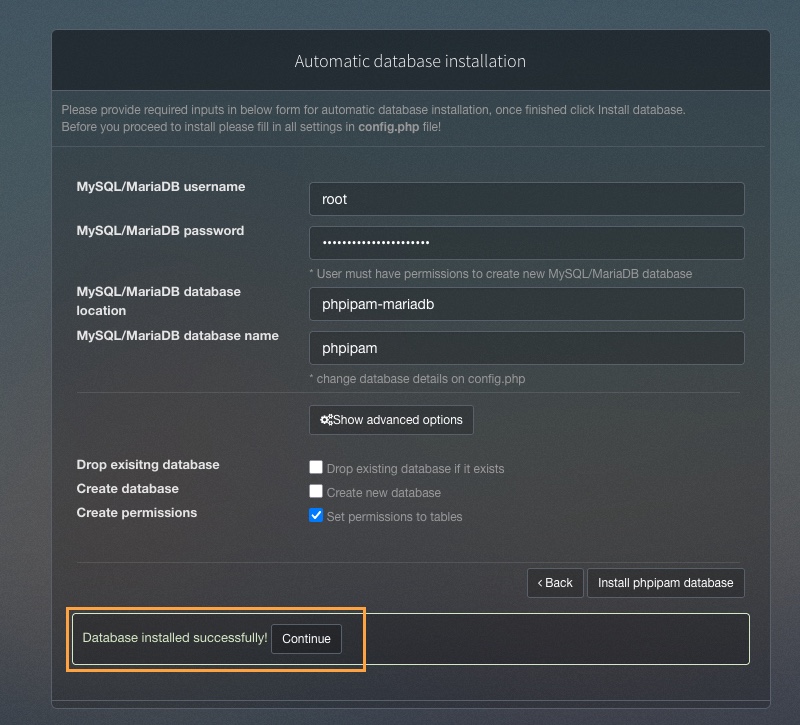
Select the "Automatic database installation" option so the tool creates the database schema itself.
Enter the database login details. The host is phpipam-mariadb (the Docker service name), the user is root, and the password is the one you defined in the Docker Compose file (mentioned earlier). If everything is OK, you should see the message "Database installed successfully."
Note: if a message appears stating that the database already exists, check the "Drop existing database if it exists" option in the advanced settings.
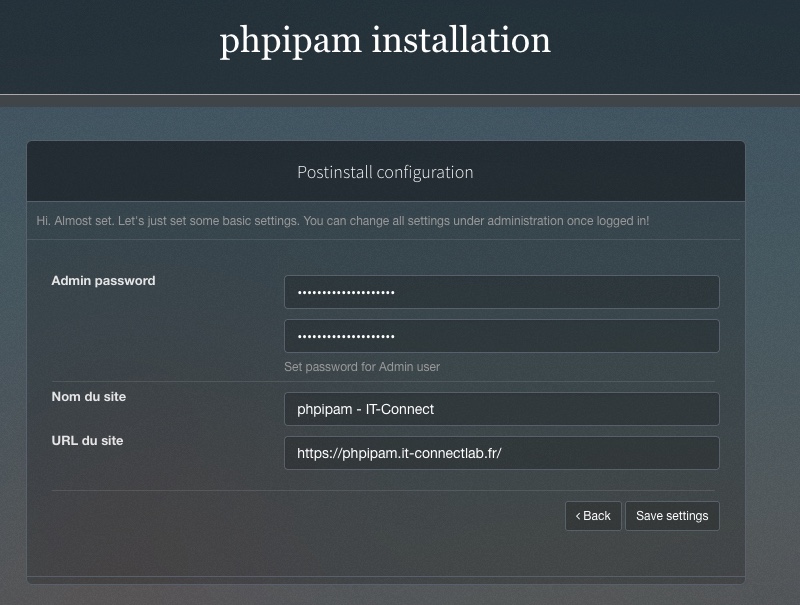
Once the database is created, the wizard will ask you to define a password for the web interface administrator account (the default login is admin). Also specify the site URL, either via the DNS name or the IP address depending on your setup.
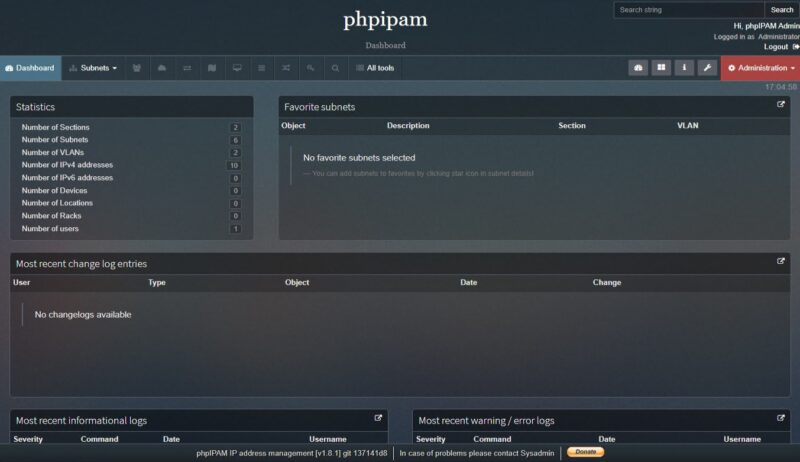
Once these steps are completed, you will be able to log in to the main dashboard. This is also where you will notice a security warning under the login interface.
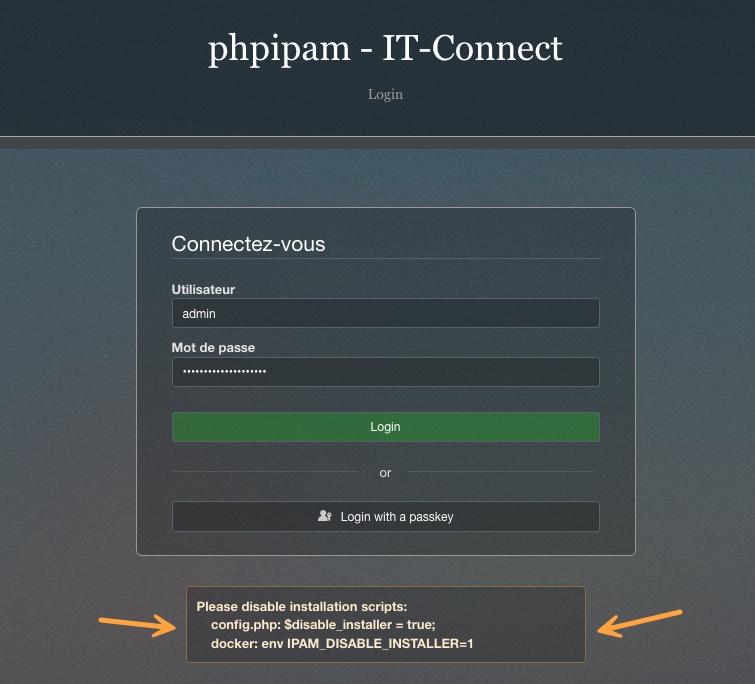
You need to adjust the phpIPAM configuration to disable the installation wizard. In other words, this prevents someone from trying to rerun the installation of your instance. This is a post-installation action you must perform.
If you are using a “bare metal” phpIPAM instance, adjust the config.php file directly as shown in the image above. Otherwise, if you are using Docker, add an environment variable to your Docker Compose file, like this (IPAM_DISABLE_INSTALLER=1).
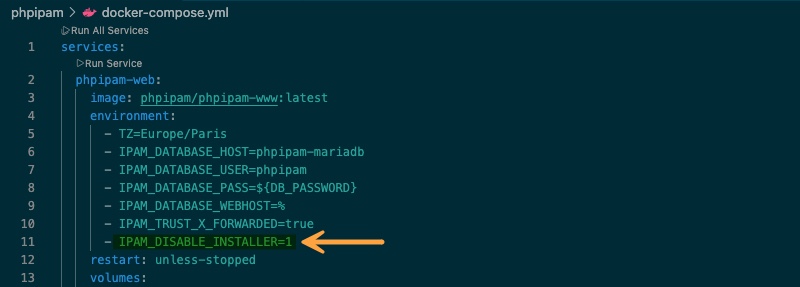
Then restart your instance if you are using Docker. This command is enough:
docker compose up -dConfiguring phpIPAM
The phpIPAM interface is designed in a hierarchical way. To get started properly, you need to understand the organization into Sections and Subnets.
Sections represent the highest level of classification. By default, you will find sections such as "Customers". You can create your own sections, for example "Head Office" and "Remote Branches", or simply your company name, to visually separate the different environments in your organization.
You can then add a new subnet and associate it with a section. I recommend using a fairly large mask so you can create the subnets corresponding to your environment (and your VLANs, for example) as child subnets (nested, to use phpIPAM’s terminology).
I encourage you to watch my video where I explain the configuration and present the different modules.
Conclusion
Implementing an IPAM solution, whether this one or another, is essential for IT teams to have the right tools to manage and structure their network. This provides a clear view of the network organization, which also helps reduce configuration errors.
Using Docker (and Docker Compose), deploying phpIPAM is quick! It saves you from manually setting up a full LAMP stack, although that is still possible. The interface is far from the most modern, but it is still feature-rich, and phpIPAM truly includes a large number of capabilities.