Mastering Package Management with APT on Linux
Whether you administer a Debian server in production or are just getting started with Ubuntu on your desktop, APT is the tool you will use every day to install, update, and remove software from the command line. Here is the complete guide to mastering APT.
Above all, mastering APT is essential for every system administrator, because it is involved in many scenarios: preparing a web server by installing Nginx and PHP, keeping a fleet of Debian machines up to date, or diagnosing a package installation issue. These are all situations where knowing the right commands, and especially their options, is necessary.
This tutorial is a survival guide to the APT commands you need to know, from the most common to the more specific ones, so you can manage packages on Linux. It is the package manager used on Debian and Debian-based distributions, such as Ubuntu, Linux Mint, Kali Linux, and Raspberry Pi OS.
Table of Contents
- What exactly is APT?
- Refresh the package cache: apt update
- Upgrade the system: apt upgrade and apt full-upgrade
- Install packages: apt install
- Search for packages and get information
- Remove packages: remove, purge and autoremove
- Manage APT repositories
- Clean up and maintain your system
- Advanced commands and options with APT
- The APT cheat sheet
- Conclusion
- APT FAQ
What exactly is APT?
APT, short for Advanced Package Tool, is the package manager for Debian-family distributions. It relies on the lower-level tool dpkg, which handles the actual installation of .deb files, while APT adds an intelligence layer: automatic dependency resolution, package downloads from remote repositories, update management, and more. Although it is a tool used from the terminal, it greatly simplifies package installation on the distributions where it is used.
Historically, administrators used two separate tools: apt-get for package management and apt-cache for information lookup. Since Debian 8 and Ubuntu 16.04, the apt command has unified the most useful functions of both tools. So, we will use apt as the command throughout this guide, although in some cases the same command would work by replacing apt with apt-get.
Before you begin: almost all management commands (install, remove, update) require elevated privileges. You will therefore need to prefix them with sudo, or run them as root.
Good to know : apt-get and apt-cache are still available and operational.
Refresh the package cache: apt update
This is THE command to run before any other operation. The one you will find many times in tutorials published on IT-Connect. Contrary to what its name suggests, apt update does not update any software: this command synchronizes the local package index with the content of the repositories declared on your machine.
sudo apt updateThis means APT contacts each repository listed in the /etc/apt/sources.list file and in the files in the /etc/apt/sources.list.d/ directory, then downloads the list of available packages with their versions. Without this step, your system works with outdated information. So, if you install a package without first running apt update, you could end up installing an older version of a package (not the latest available in the repositories).
The command output tells you how many packages can be upgraded:
Reading package lists... Done
Building dependency tree... Done
All packages are up to date.
Or:
Atteint : 1 http://security.debian.org/debian-security trixie-security InRelease
Atteint : 2 http://ftp.fr.debian.org/debian trixie InRelease
Atteint : 3 http://ftp.fr.debian.org/debian trixie-updates InRelease
9 paquets peuvent être mis à jour. Exécutez « apt list --upgradable » pour les voir.
As the message suggests, you can list the affected packages before launching the upgrade:
apt list --upgradableThis command returns the list of packages for which an update is available. Here is an example.
libinput-bin/stable-security 1.28.1-1+deb13u1 amd64 [pouvant être mis à jour depuis : 1.28.1-1]
libinput10/stable-security 1.28.1-1+deb13u1 amd64 [pouvant être mis à jour depuis : 1.28.1-1]
libpoppler-cpp2/stable-security 25.03.0-5+deb13u3 amd64 [pouvant être mis à jour depuis : 25.03.0-5+deb13u2]
libpoppler-glib8t64/stable-security 25.03.0-5+deb13u3 amd64 [pouvant être mis à jour depuis : 25.03.0-5+deb13u2]
libpoppler147/stable-security 25.03.0-5+deb13u3 amd64 [pouvant être mis à jour depuis : 25.03.0-5+deb13u2]
libssl3t64/stable-security 3.5.6-1~deb13u2 amd64 [pouvant être mis à jour depuis : 3.5.6-1~deb13u1]
openssl-provider-legacy/stable-security 3.5.6-1~deb13u2 amd64 [pouvant être mis à jour depuis : 3.5.6-1~deb13u1]
openssl/stable-security 3.5.6-1~deb13u2 amd64 [pouvant être mis à jour depuis : 3.5.6-1~deb13u1]
poppler-utils/stable-security 25.03.0-5+deb13u3 amd64 [pouvant être mis à jour depuis : 25.03.0-5+deb13u2]
Make it a habit: apt update first, everything else after that.
Upgrade the system: apt upgrade and apt full-upgrade
Once the cache has been refreshed with apt update, installed packages can be upgraded with the following command (type "O" and press Enter to confirm).
sudo apt upgrade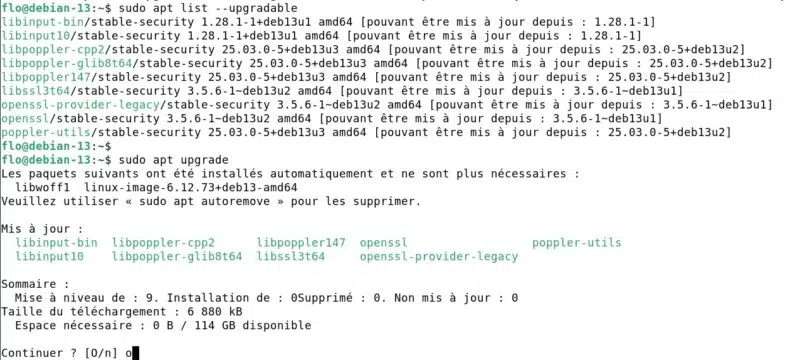
This command upgrades all packages for which a new version is available, without ever removing an existing package. If an upgrade requires removing another package, it is simply held back.
For more advanced cases, there is:
sudo apt full-upgradeThis command, equivalent to apt-get dist-upgrade, allows APT to remove packages if necessary to complete the upgrade. It is notably used during distribution major upgrades (Debian 12 to Debian 13, for example).
The maintenance routine for a Debian/Ubuntu machine fits into one line:
sudo apt update && sudo apt upgrade -yThe -y option added here automatically accepts the updates, which avoids having to press "O" and then Enter.
To upgrade a single package: apt install does the job, since it installs the latest available version of the package, whether it is already present or not:
sudo apt install --only-upgrade nginxThe --only-upgrade option ensures that the package will not be installed if it is absent from the system: only an already installed package will be upgraded.
Install packages: apt install
Let us now talk about package installation with the APT command. As mentioned in the previous example, installation is done with the following command:
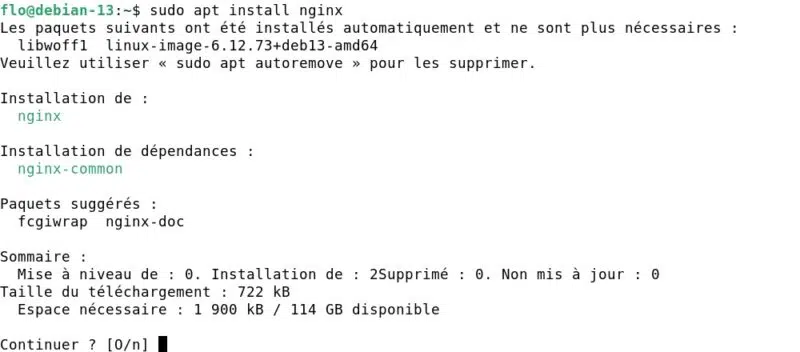
sudo apt install <nom du paquet>
sudo apt install nginx
APT then calculates the required dependencies, displays a summary (packages to be installed, required disk space), and waits for your confirmation. We can see that the nginx package will be accompanied by the installation of nginx-common as a dependency.
Several options are worth knowing:
- Install multiple packages in a single command :
sudo apt install nginx php8.4-fpm mariadb-serverSimply specify all names one after another, with a space between each name.
Automatically answer "yes" to the prompt, essential in scripts:
sudo apt install -y htop- Install a specific version of a package :
sudo apt install nginx=1.26.3-3+deb13u6Okay, but how do you find out which versions are available? Use apt list -a nginx or apt policy nginx, and you will get the answer! The first command provides a more readable result with one version per line. For example:
nginx/stable-security 1.26.3-3+deb13u6 amd64
nginx/stable 1.26.3-3+deb13u4 amd64- Limit installation to the bare minimum, excluding recommended packages (different from suggested packages) :
sudo apt install --no-install-recommends vlcThis option is useful on servers, where the goal is to reduce the attack surface and disk footprint. It can prevent you from ending up with packages related to tools you will not use.
- Simulate an installation without changing anything, to check what APT plans to do:
sudo apt install -s docker.ioThe -s option (or --simulate, --dry-run) works with most APT commands. It is a good habit before a sensitive operation on a production server.
- Reinstall a package whose files were altered or accidentally deleted:
sudo apt reinstall openssh-serverFinally, know that APT can install a local .deb file while resolving its dependencies, something dpkg -i cannot do by itself:
sudo apt install ./mon-paquet_1.0_amd64.debThe ./ is mandatory so APT understands that this is a local path and not a package name. Many applications and tools are distributed as .deb files to be installed manually, so it is important to know this installation method.
Search for packages and get information
Before installing a package, you first need to know its exact name. So far, I have specified several package names that I knew, and above all, that are very popular. To identify the name of a package, you can search the web or ask APT.
The search looks at the package name and description. If you are looking for a web server, you could run a generic search like this:
apt search serveur web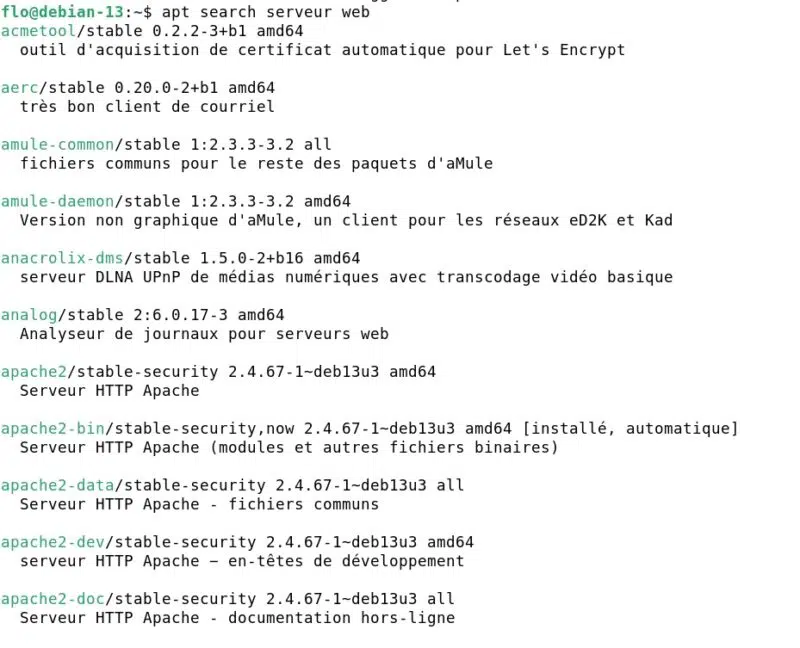
To limit the search to package names only, the --names-only option is useful:
apt search --names-only nginxEven a simple query like this will not return just one or two results. On my machine, this example returns dozens of packages. The reason: Nginx libraries are listed, such as libnginx-mod-http-ndk because the searched keyword appears in the name.
Once the package has been identified, the apt show command displays its full details: version, dependencies, size, description, source repository, and more.
apt show nginx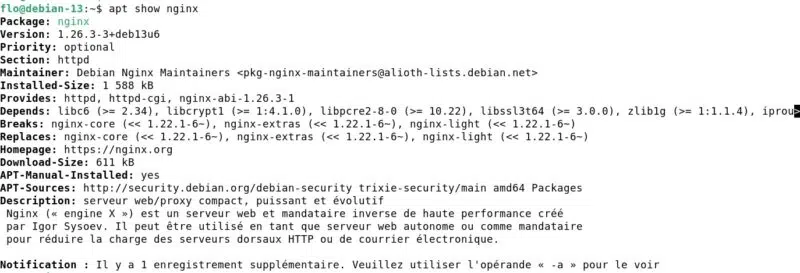
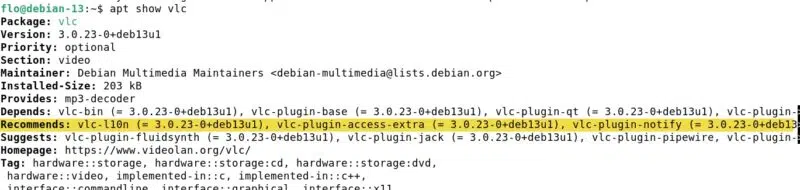
In the case of Nginx, there are no recommended packages. However, with some packages, such as VLC Media Player, there are. So, packages in the Recommends category will be installed on the machine, even though they are not essential. If you want to avoid their installation, you should add the --no-install-recommends option mentioned earlier.
Here are more commands you should know to get package information.
- List installed packages :
apt list --installed

7zip/stable,now 25.01+dfsg-1~deb13u2 amd64 [installé, automatique]
accountsservice/stable,now 23.13.9-7 amd64 [installé, automatique]
acl/stable,now 2.3.2-2+b1 amd64 [installé, automatique]
adduser/stable,now 3.152 all [installé]
adwaita-icon-theme/stable,now 48.1-1 all [installé, automatique]
alsa-topology-conf/stable,now 1.2.5.1-3 all [installé, automatique]
alsa-ucm-conf/stable,now 1.2.14-1 all [installé, automatique]
alsa-utils/stable,now 1.2.14-1 amd64 [installé, automatique]
amd64-microcode/stable,now 3.20250311.1 amd64 [installé]
anacron/stable,now 2.3-43 amd64 [installé, automatique]
apache2-bin/stable-security,now 2.4.67-1~deb13u3 amd64 [installé, automatique]
apparmor/stable,now 4.1.0-1 amd64 [installé, automatique]
...- Check whether a specific package is installed :
apt list --installed | grep nginx

WARNING: apt does not have a stable CLI interface. Use with caution in scripts.

nginx-common/stable-security,now 1.26.3-3+deb13u6 all [installé, automatique]
nginx/stable-security,now 1.26.3-3+deb13u6 amd64 [installé]
Note : the warning "apt does not have a stable CLI interface." is not an error. It simply reminds you that the output format of the
aptcommand may change from one version to another. For interactive use like here, you can safely ignore it. In a script, however, prefer apt-get whose output remains stable over time (older command still supported).
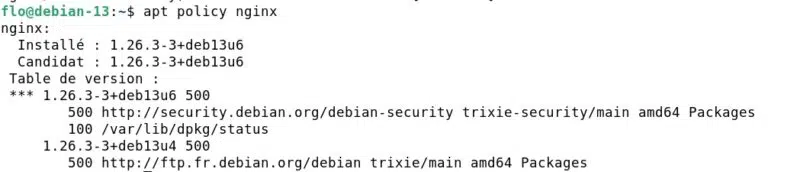
- Find out the installed version and the candidate version (the one that would be installed by
apt install), as well as the source repository :
apt policy nginxHere, we can see that the installed version is identical to the version available in the repositories. In other words, the package is up to date. But be careful: this is true in the context of the repositories we use. It is possible that a newer version exists, but it may not yet be present in the repositories declared on the local machine.
- List the contents of an installed package, with the dpkg tool :
dpkg -L nginxLet us set APT aside for a moment, because this complementary command is very useful. It makes it easy to see where a package was installed. The previous example returns:
/.
/usr
/usr/sbin
/usr/sbin/nginx
/usr/share
/usr/share/doc
/usr/share/doc/nginx
/usr/share/doc/nginx/changelog.Debian.gz
/usr/share/doc/nginx/changelog.gz
/usr/share/doc/nginx/copyright
/usr/share/man
/usr/share/man/man8
/usr/share/man/man8/nginx.8.gz
Remove packages: remove, purge and autoremove
Installing packages is good, but being able to uninstall them and clean up the local machine is just as important.
Removing a package is done with the following command:
sudo apt remove <paquet>
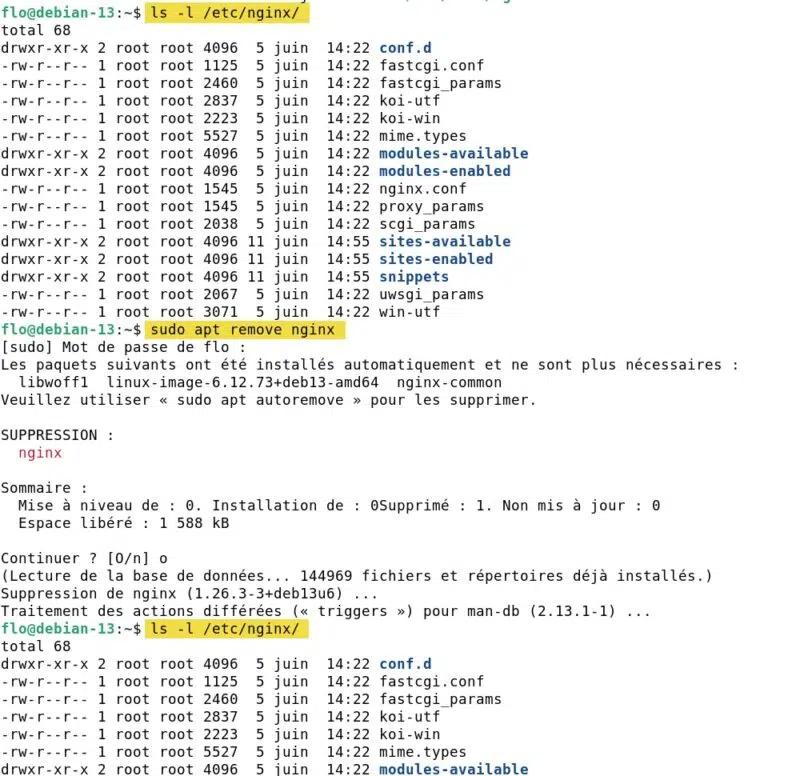
sudo apt remove nginxBe careful though: remove deletes the package binaries, but keeps its configuration files (usually located in /etc). This is intentional behavior, allowing you to reinstall the package later and keep its configuration.
If we do a before/after by displaying the contents of the /etc/nginx directory, this confirms that the apt remove command behaves this way.
For a complete removal, configuration included, use purge:
sudo apt purge nginxIf you have already removed a package with remove and want to eliminate its residual configuration files, running purge afterward works as well. To spot these "ghost" packages, in the rc state (removed, config-files), the following command is useful:
dpkg -l | grep '^rc'The nginx example is interesting because running apt purge nginx did not remove the /etc/nginx directory. Did I lie? No. It is more subtle than that. The base configuration files (nginx.conf, mime.types, the /etc/nginx/... tree) are provided by the nginx-common package, not by nginx.
You can verify this with:
dpkg -S /etc/nginx/nginx.confHowever, apt remove nginx and then apt purge nginx only act on the nginx package. The nginx-common package, on the other hand, remained in place, so its content in /etc/nginx did not move. To truly purge the configuration, you need to target the right package:
sudo apt purge nginx-commonThis behavior also means that uninstalling the nginx package only removes that package. All dependencies that have become unnecessary remain on the system. In a way, they end up cluttering the machine and accumulating over time.
In that case, you can clean things up with this command designed to identify and remove dependencies that are no longer needed:
sudo apt autoremoveIt is also possible to do everything at once, combining removal of orphaned dependencies and purge of their configuration:
sudo apt autoremove --purgeNote: this is also the command that removes old Linux kernels on Ubuntu, something to watch on machines with a small /boot partition.
Manage APT repositories
Repositories are the sources from which APT downloads packages. Every distribution ships with a set of preconfigured repositories. Their declaration can be found in two places:
- The historical file
/etc/apt/sources.list - The individual files in the
/etc/apt/sources.list.d/directory
A repository line in the classic format looks like this:
deb http://deb.debian.org/debian bookworm main contrib non-free-firmwareIt contains the type (deb for binary packages, deb-src for sources), the mirror URL, the distribution release name, and the enabled components. In reality, this format is not the only one, and current distributions are gradually migrating to another format: the "deb822" format, which is more structured, with .sources files.
The deb822 format for sources
Debian 13 includes a command to migrate from the classic format to this new one. And you know what? It is based on APT!
sudo apt modernize-sourcesNote : before running this command in production, back up your source files. Indeed, it is possible that some specific options (specified between brackets) are not carried over by this command. They will need to be added manually. With the default configuration, there is no problem.
After running this command, there is a file named debian.sources available on the machine. It replaces the sources.list file mentioned earlier.
It contains several blocks, including this one:
# Modernized from /etc/apt/sources.list
Types: deb deb-src
URIs: http://ftp.fr.debian.org/debian/
Suites: trixie
Components: main non-free-firmware
Signed-By: /usr/share/keyrings/debian-archive-keyring.gpg
The advantage of this format is readability: each piece of information gets its own field instead of being condensed onto a single line. The mapping to the classic format is straightforward:
Types:the entry type (deb,deb-src). Multiple values can be specified, separated by a space.URIs:the mirror URL.Suites:the distribution release or releases (heretrixieandtrixie-updates).Components:the enabled components (main,contrib,non-free-firmware).Signed-By:the path to the GPG key that signs the repository, equivalent to the[signed-by=…]attribute in the inline format.
Add a repository to the sources
On Debian, whichever format you choose, the first step is the same: retrieve the repository GPG key and store it in /etc/apt/keyrings/, in line with current best practice. Usually, you are given a command to run in order to download this key and set it up (an instruction provided in the documentation for the tool you want to install).
Once that is done, all that remains is to declare the repository on your local machine. Here is an example for Docker.
With the classic format, this will be one line in a file such as /etc/apt/sources.list.d/docker.list:
deb [arch=amd64 signed-by=/etc/apt/keyrings/docker.gpg] https://download.docker.com/linux/debian trixie stableWith the deb822 format, this will be a complete block in a file such as /etc/apt/sources.list.d/docker.sources:
Types: deb
URIs: https://download.docker.com/linux/debian
Suites: trixie
Components: stable
Architectures: amd64
Signed-By: /etc/apt/keyrings/docker.gpg
On Ubuntu, adding a PPA (Personal Package Archive) is done with:
sudo add-apt-repository ppa:<éditeur>/<nom du paquet>After adding or modifying a repository, do not forget the usual reflex:
sudo apt updateThis is essential, otherwise your local package cache will not know about the packages available in the new repository.
Clean up and maintain your system
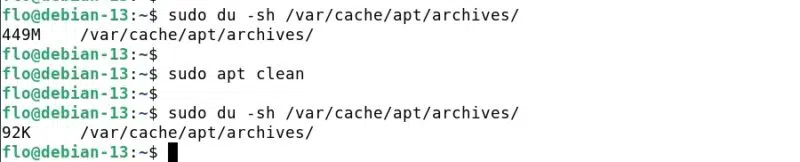
APT keeps downloaded packages in the /var/cache/apt/archives/ directory. On a system used for a long time, this cache can take up several gigabytes. Two commands allow you to clean it up.
This first command completely empties the downloaded package cache.
sudo apt cleanIf we do a before/after, we can see that there was a gain of more than 400 MB on the local machine.
The APT command with the autoclean option is more conservative. It only removes packages that can no longer be downloaded from the repositories (old versions, removed packages).
sudo apt autocleanSo, if we want to both update packages on a Debian machine and clean up obsolete packages, a maintenance routine on Debian/Ubuntu can look like this:
sudo apt update
sudo apt upgrade -y
sudo apt autoremove --purge -y
sudo apt autoclean
Advanced commands and options with APT
Freeze a package with apt-mark
If you want to prevent a specific package from being upgraded (for example, an application validated in a specific version), know that it is possible. This is sometimes necessary during upgrade tasks. The apt-mark command addresses this need:
sudo apt-mark hold nginxThe package is then "frozen": it will be ignored by apt upgrade and apt full-upgrade. To lift the hold:
sudo apt-mark unhold nginxAnd to list currently held packages:
apt-mark showholdRepair a broken system
An interrupted installation (network outage, unfortunate Ctrl+C) can leave APT in an inconsistent state. Two commands are worth knowing to get out of trouble:
sudo apt --fix-broken installOften shortened to apt -f install, it attempts to resolve broken dependencies. In addition, if dpkg reports packages that are not configured:
sudo dpkg --configure -aThis command resumes package configuration where it left off. It is a rare situation, but it can help!
Download without installing
To retrieve a .deb file without installing it, for example to transfer it to a machine without Internet access:
apt download nginxThe file is placed in the current directory. For example, the previous command makes it possible to obtain the file: nginx_1.26.3-3+deb13u6_amd64.deb. On the target machine, installation is done with sudo apt install ./nginx_1.26.3-3+deb13u6_amd64.deb or sudo dpkg -i.
View operation history
APT logs all operations in the /var/log/apt/history.log file. To see which package was installed or removed, and when:
less /var/log/apt/history.logThis complete history makes it possible to trace all actions performed via APT. Here is an excerpt:
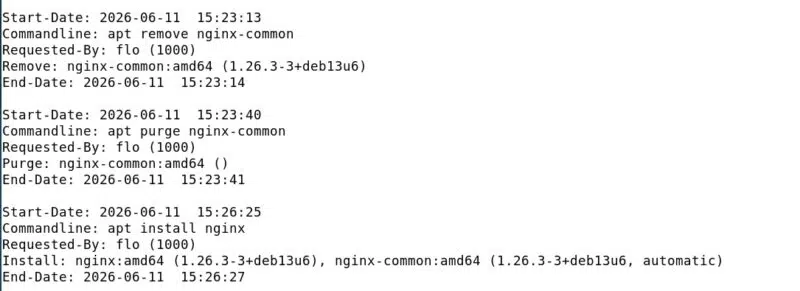
Here is how to decode the information in this log:
- Start-Date : the date and time when the operation started, in
YYYY-MM-DD HH:MM:SSformat. This is when APT began processing the command. - Commandline : the exact command as entered by the user. This field makes it possible to precisely identify the action that was triggered.
- Requested-By : the user who initiated the operation, with name and UID in parentheses (
flo (1000)). Useful for auditing on a shared machine. This field is absent when the action was launched directly as root. - Remove / Purge / Install : the nature of the operation and the list of affected packages, with their architecture and version.
- End-Date : the date and time when the operation ended. The gap with
Start-Dategives the processing duration (here one to two seconds depending on the action).
Note : older logs are compressed (history.log.1.gz, etc.) and can be viewed with zless.
Going further: native history and rollback with APT 3.2
So far, viewing history was limited to reading the history.log file, and rolling back required digging through dpkg logs or relying on filesystem snapshots. The APT 3.2 release, published by the Debian team, introduces a native history and rollback system, comparable to what DNF offers on Red Hat family distributions. This is a major step forward for APT.
This version adds five commands dedicated to transaction management:
apt history-list: displays the history of previous package transactions.apt history-info: provides detailed information about a specific transaction.apt history-undo: reverses a specific transaction, like a "Ctrl+Z".apt history-redo: reapplies a transaction that had been undone.apt history-rollback: returns the system package state to an earlier transaction.
Warning : these commands are not available on Debian 13 (Trixie), the version used as a reference for writing this guide. APT 3.2 is expected on Ubuntu 26.04 LTS, on Debian 14 (Forky) planned for summer 2027, and is already available on Debian Sid (Unstable) for those who want to test it. On a Debian 13 system, the history.log file method described above remains the way to go.
The APT cheat sheet
To conclude this guide, here is the recap of the commands you should keep handy to feel comfortable with APT on Debian and its derivatives.
| Command | Purpose |
|---|---|
sudo apt update | Synchronize the package index |
sudo apt upgrade | Upgrade installed packages |
sudo apt full-upgrade | Upgrade with removals allowed |
sudo apt install <package> | Install a package |
sudo apt remove <package> | Remove a package (config kept) |
sudo apt purge <package> | Remove a package and its configuration |
sudo apt autoremove | Remove orphaned dependencies |
apt search <keyword> | Search for a package |
apt show <package> | Display a package summary |
apt list --installed | List installed packages |
apt policy <package> | Installed/candidate versions and origin |
sudo apt clean / autoclean | Clean the package cache |
sudo apt-mark hold <package> | Freeze a package (pin version) |
sudo apt -f install | Repair broken dependencies |
apt -v | Display the APT version |
Conclusion
After reading this guide, you now have a solid overview of the commands needed to manage packages on a Debian or Ubuntu system every day. The most common tasks are synchronizing the index with apt update and installing packages with apt install, but the other possibilities are also worth knowing.
APT FAQ
Does APT work on all Linux distributions?
No, APT is specific to the Debian family (Debian, Ubuntu, Linux Mint, Kali Linux, Raspberry Pi OS, etc.). Red Hat family distributions (RHEL, Fedora, AlmaLinux, Rocky Linux) use DNF/YUM, while Arch Linux uses pacman and openSUSE relies on zypper.
What is the difference between apt and apt-get?
The apt command combines the most commonly used functions of apt-get and apt-cache into a more user-friendly interface. However, apt-get is still recommended in scripts because its output is stable from one version to the next.
What is the difference between apt update and apt upgrade?
The apt update command refreshes the list of available packages without installing anything, while apt upgrade upgrades installed packages. The two commands are complementary and should be run in that order (important!).
What is the difference between apt upgrade and apt full-upgrade?
The apt upgrade command never removes packages, whereas apt full-upgrade can remove them if necessary to complete the upgrade. The latter is notably used during distribution release upgrades.
What is the difference between apt remove and apt purge?
The remove option deletes the package but keeps its configuration files, while purge also removes the configuration. Use purge to start from scratch during a reinstallation, which is useful for cleaning a package and reinstalling it cleanly.
How do I install a specific version of a package with APT?
Use the syntax sudo apt install package=version, for example sudo apt install nginx=1.22.1-9. Available versions can be listed with apt list -a nginx or apt policy nginx.
How can I prevent a package from being upgraded?
Freeze the package with sudo apt-mark hold package-name. It will be ignored by the upgrade and full-upgrade commands until you run sudo apt-mark unhold package-name. The goal is to be able to pin a specific version of a package.
How do I list all installed packages on the system?
Use apt list --installed, or dpkg -l for a more compact output. To search for a specific package, add a filter: apt list --installed | grep nginx.
How do I install a manually downloaded .deb file?
The recommended method is sudo apt install ./file.deb, because APT automatically resolves dependencies. The sudo dpkg -i file.deb command also works, but it will need to be followed by sudo apt -f install if dependencies are missing.
Does APT work without an Internet connection?
APT needs access to repositories to download packages. Without a connection, you can install .deb files downloaded beforehand with apt download (but watch out for dependencies!), or set up a local repository or internal mirror on your network. If you have a package repository on your local network, then no, you do not need the Internet.