www.it-connect.fr


Claude Code Skills: What They Are and How to Create One
In this tutorial, we show you how to create your first Skill in Claude Code, a mechanism that lets you save a reusable instruction once and use it in any conversation. We will use a practical example: a skill that automatically turns the current exchange into clean technical documentation, ready to be added to an internal wiki.
This article is the natural follow-up to the Claude Code installation tutorial we published earlier. If Claude Code is not yet working on your machine, I invite you to read our dedicated article before continuing:
- IT-Connect - Installer et prendre en main Claude Code en CLI
In every IT role, and especially in system administration, we often spend the day answering the same questions, following the same procedures, and above all rewriting the same formatting instructions when documenting what we just did. "Put this into runbook format with the sections Purpose, Prerequisites, Procedure, Validation, Rollback, common issues"... How many times have you typed a sentence like that to your assistant? Skills were designed for exactly this: write the procedure once, then reuse it automatically in every future conversation.
In this article, we will see what a Skill is, where to place it in your directory tree (under Linux as well as under Windows), how to write a clean SKILL.md, how to make it use a reference template, and finally how to use it.
What Is a Claude Code Skill?
What is a Skill?
A Skill in Claude Code is simply a folder that contains a SKILL.md file and, optionally, a few additional reference files. The SKILL.md file is the main element: it contains the skill name, its description, and a few options in the front matter, followed by a Markdown body that describes, in natural language, what Claude should do when the Skill is activated.
The analogy is that of an internal procedure written once and applied every time the case arises. Instead of repeatedly explaining to your assistant "generate me documentation with these sections, in this tone, with these conventions, make sure you use this format", you write the procedure in a file and let Claude refer to it. The benefit is twofold: time savings (no need to rephrase), and above all consistent results from one conversation to another.
One detail we will come back to later: the key for Claude to invoke the Skill itself at the right time, without you having to think about it, is the quality of the
descriptionfield in the SKILL.md. It plays the role of a "signpost" for the assistant.
For me, the main value of the skill is this: even though I start many conversations on different technical topics, when I want the model to turn that into documentation, I no longer need to restate my request about syntax, formatting, and so on. You can really think of it as a shared, identical capability regardless of the conversation and its content.
The Three Scopes: User, Project, Plugin
A skill can be installed in three different places, and this choice is not trivial.
- User scope: The skill is placed in your personal folder and will be available in all your Claude Code conversations, regardless of the directory you are working in.
- On Linux / macOS:
~/.claude/skills/ - On Windows:
%USERPROFILE%\.claude\skills\(usuallyC:\Users\<your-user>\.claude\skills\) - This is the scope we will use in this tutorial.
- On Linux / macOS:
- Project scope: The skill is placed in
.claude/skills/at the root of a Git repository. It is then versioned with the code and automatically shared with everyone on the team who clones the repository. This is the option to choose for project-specific skills (custom commit conventions, dedicated API documentation generation, etc.). - Plugin / marketplace scope: A skill can be packaged into a Claude Code plugin and distributed through the marketplace. This is the format to target if you want to share your skill beyond your team, but it is also the heaviest to produce. We will not cover it today.
Two Invocation Modes
Once the Skill is in place, it can be triggered in two different ways:
- Explicit invocation: you type
/<skill-name>at the Claude Code prompt, for example/tech-doc. Ideal when you know exactly what you want. - Auto-triggering: Claude scans all available Skills and, based on their
description, decides on its own to invoke one if the context fits. Saying "document the procedure we just went through" may be enough to trigger our futuretech-doc, without you having to type the command.
It is this second mode that changes everything. It turns your skills into assistant reflexes that it uses on its own: you express your wish in natural language, Claude recognizes that a skill matches, and uses it. But for the magic to work, the description must be written well, because that is what Claude uses to determine whether the skill can help with the requested task or not. We will come back to this when writing our SKILL.md.
Creating the tech-doc Skill
Preparing the Directory Structure
Let’s get started! We are going to create a Skill named tech-doc that will produce technical documentation (a runbook) from the topic of the current conversation. The target directory structure is as follows:
tech-doc/
├── SKILL.md
└── templates/
    └── runbook.md
This folder must be placed at the user level described earlier. On Linux or macOS, in one command:
# Create the Skill directory structure (Linux / macOS)
mkdir -p ~/.claude/skills/tech-doc/
mkdir ~/.claude/skills/tech-doc/templates
On Windows, in PowerShell:
# Create the Skill directory structure (Windows PowerShell)
New-Item -ItemType Directory Force -Path "$env:USERPROFILE\.claude\skills\tech-doc"
New-Item -ItemType Directory -Force -Path "$env:USERPROFILE\.claude\skills\tech-doc\templates"
Once the folders are created, remember to check in Claude Code that your Skill is being detected properly. The /skills command displays the skills loaded in the current session: if your tech-doc does not appear there (after you have written it, of course), it usually means that a file is in the wrong place, or that the SKILL.md file is malformed.
Writing the SKILL.md File
We will now write the heart of the Skill. Open the SKILL.md file in your preferred editor:
---
name: tech-doc
description: Generates technical documentation in runbook format from the topic of the current conversation. Use when the user asks to "document", "produce a runbook", "formalize a procedure", "clean up the steps", or any equivalent wording aimed at turning a technical exchange into reusable documentation.
---

# Skill : tech-doc
## Objective
Produce a **short runbook** that summarizes the technical procedure discussed in the current conversation.

## Procedure
1.  Read the reference template located in `templates/runbook.md` (relative to the location of this Skill) and strictly follow its structure.
2.  Reuse the factual elements from the conversation (commands executed, files modified, decisions made) without inventing anything.
Mention in particular the problems encountered and their solutions.
3.  Add nothing that was not discussed: if a section of the template cannot be documented from the conversation, write `To be completed` explicitly rather than filling in generic content.
4.  Produce the result in a file `runbook-<slug>.md` at the root of the current working directory, where `<slug>` is a short, readable identifier for the topic.
5.  At the end, confirm to the user the location of the created file.

## Formatting Rules
*   French, formal address.
*   Shell commands in code blocks with the language specified (`bash`, `powershell`, etc.).
*   No promotional content, no emoji.
*   Target length: 1 to 2 pages maximum.
A few points are worth highlighting. The name field must be unique on your machine: it is what will be recognized as the invocation command (/tech-doc). The description field, meanwhile, is the lever for auto-triggering.
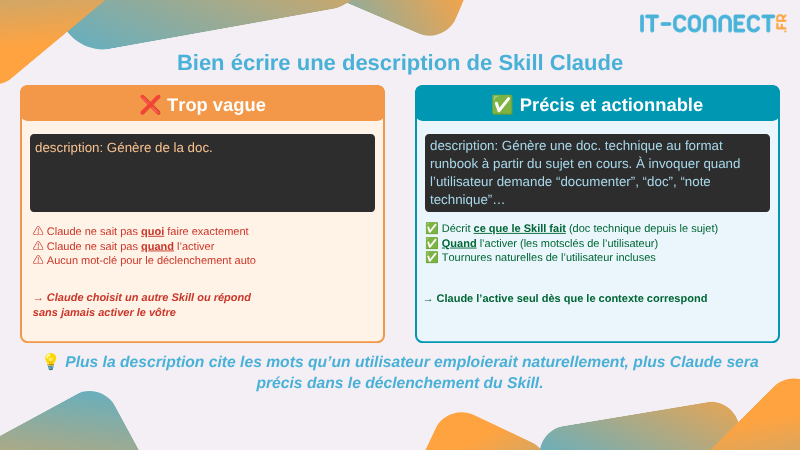
Note that the description is written in the third person, in a descriptive way, as if you were describing the tool to a colleague who needs to decide when to use it. That is exactly the role it plays for Claude.
The runbook.md Template
The second file to create is the model referenced by our SKILL.md. Its purpose is to freeze the expected structure, so that every document produced looks the same, no matter where the conversation started.
This file is not mandatory, and its name and format can be adapted to your needs; a SKILL.md would be enough. But it lets me show you how additional data can be passed to a skill, especially to avoid making the .md overly complex.
Create the file templates/runbook.md with the following content:
# Runbook : <Titre de la procédure>
## But

<En une à deux phrases, quel est l'objectif opérationnel ?>

## Pré-requis
*   <Accès, droits, version de l'outil, etc.>

## Procédure
1.  <Étape 1 - with the exact command if relevant>
2.  <Étape 2>
3.  <Étape 3>

## Validation
* <How do you verify the operation succeeded (command, log, functional test)?>

## Rollback
* <How do you return to the previous state if something goes wrong?>

## Références
*   <Links to official docs, tickets, related articles>
There you have it, our skill is complete. A small tip along the way, off topic but useful: version your ~/.claude/skills/ folder in a personal Git repository. Over time, you will accumulate several skills (this one, and probably others for your recurring use cases), and it would be a shame to lose them every time you change machines. A simple git init in this folder, pushed to a repository, and your skills will follow you everywhere.
Using the Skill Day to Day
Explicit Invocation
Great! Let’s test our skill now. Launch Claude Code in any folder, discuss a technical topic for a few exchanges, then simply type:
/tech-docClaude then reads the SKILL.md, follows the instructions it contains (reading the template, extracting the elements from the conversation, generating the runbook), and creates the file in your working directory. It really is that simple.
If nothing happens or Claude tells you it does not know this skill, the first reflex is to type
/skillsto check whether it appears in the loaded list. The usual causes of a silent skill are: a malformed SKILL.md header (the opening or closing triple dashes---were forgotten), the file being in the wrong location, or the file encoding not being UTF-8.
Here is what this explicit invocation looks like:
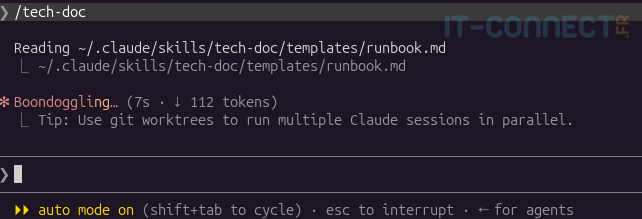
We can see the skill (tech-doc), then the output of its execution and the path to the created file.
Auto-Triggering by Claude
Now let’s look at the second mode, which is very practical and comfortable to use. Reopen a technical conversation, then at the point where you want to close it, simply phrase a request in natural language:
"For the record, document the procedure we just went through as a runbook."You will then see Claude announce that it is invoking the tech-doc Skill, then produce the runbook. It made the connection by itself, thanks to the description in the SKILL.md, which explicitly mentions the verbs "document" and "procedure". That is the whole point of a well-written description: you no longer think about the skill, the skill comes to you.
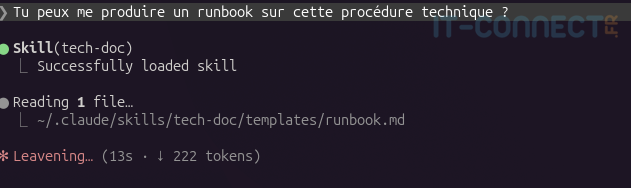
After our natural-language request, Claude identifies the skill to use and executes it on its own. As before, when the skill is activated, Claude reads the instructions in SKILL.md and then follows what is requested inside it: reading the runbook.md template file, which is what I show in the screenshot above.
Be aware that several skills can coexist and partially overlap. In that case, Claude chooses the one whose
descriptionbest matches the request. That is why, as your skill library grows, it is important to remain specific in your descriptions and avoid overly broad wording that could trigger the wrong skill at the wrong time.
There you have it: we now have a clean, structured runbook ready to be stored in your internal wiki. And above all, the same /tech-doc will work exactly the same in your next conversation, whether it is about a GPO, a PowerShell script, or a frequent user workstation issue. You define the structure once, and then reuse it forever.
Conclusion
In this article, we saw what a Claude Code skill is, how to place it according to the desired scope (user, project, plugin), how to write a SKILL.md whose description enables intelligent auto-triggering by Claude, and how to give it a template file to lock down the output structure. We also learned how to invoke it in two ways (explicitly via /tech-doc, or in natural language).
Feel free to share your own adminsys Skill ideas in the comments, or come and chat with our community on our Discord server!