www.it-connect.fr

PrivateBin : how to deploy your own PasteBin on a server?
Table of Contents
I. Introduction
PrivateBin is an open-source alternative to PasteBin, which you can host on your own machine, be it a server or NAS. As a reminder, PasteBien is a popular online service that lets you paste text or code, then share a link for easy access.
PrivateBin is a free, open-source web application that lets you host your own instance of PasteBin, with client-side encryption (via AES 256 bits). This means that the server never sees the content, as it is encrypted directly in the user's browser.
The idea is simple: you copy and paste the text you want to share, and you get a unique (and temporary) sharing link. This link can be valid for a limited time, and may be password-protected.
Here are a few interesting uses for PrivateBin :
- Secure sharing of passwords, license keys and other sensitive information: an alternative to e-mail.
- Share network information, such as IP addresses.
- Sharing a configuration.
- Share a file or any document.
- Code snippets for easy sharing.
This alternative to PasteBin is ideal for businesses or those who want to retain total control over their data.
II. Installing PrivateBin with Docker
In this tutorial, we'll take a look at how to install a PrivateBin instance using Docker, as well as the Nginx reverse proxy, also installed via Docker. The PrivateBin application cannot run over an HTTP connection, so you'll need to use an HTTPS connection. In this case, I think it's best to use a reverse proxy to publish the application.
A Linux machine will be used, already equipped with Docker. We will deploy 2 Docker containers:
- 1 Docker container with PrivateBin, based on PHP-FPM and a Nginx web server
- 1 Docker container with Nginx as reverse proxy
The aim will be to be able to access the application via the following address: https://privatebin.it-connect.local. Here, I'm deliberately using a local domain name to use a self-signed certificate. To put an instance into production, it's strongly recommended to use a certificate issued by a public certification authority (Let's Encrypt may suffice).
Before you start, please make sure to configure DNS. As far as I'm concerned, a DNS record has been created in the zone it-connect.local to associate the name privatebin to IP address 192.168.10.200.
A. Create a Docker container for PrivateBin
We'll start with the PrivateBin container, using the official privatebin/nginx-fpm-alpine image. There are several images, as PrivateBin can be based on a MySQL / PostgreSQL database, S3 storage or a Google Cloud Storage environment. Here, we'll be using the file system.
Create the directories in which the container data will be stored (/opt/docker-compose/ already exists):
mkdir /opt/docker-compose/privatebin
mkdir /opt/docker-compose/privatebin/data
Then, create the docker-compose.yml file with the following code:
cd /opt/docker-compose/privatebin
nano docker-compose.yml
The application will be available on the 8080This is of little importance, as we're going to configure a reverse proxy. A shared network named nginx-net will be used by the 2 containers.
services:
  privatebin:
    image: privatebin/nginx-fpm-alpine
    restart: always
    read_only: true
    ports:
      - "8080:8080"
    volumes:
      - ./data:/srv/data
      - ./conf.php:/srv/cfg/conf.php:ro

networks:
  nginx-net:
    external: true
    name: nginx-net
When this is done, still in the same directory, create the file conf.php which corresponds to the configuration of the PrivateBin application itself. To fine-tune your configuration, please consult the official documentation. The one below is commented to make it easier for you to understand.
[main]
; Name displayed in web interface
name = "PrivateBin - IT-Connect"

; Allows users to protect a paste with a password
password = true

; Enables file upload functionality in addition to text
fileupload = true

; Maximum size allowed for a paste (text + file), here 10 MB (10 * 1024 * 1024)
sizelimit = 10485760

; Visual theme used for the interface, here "bootstrap-dark" for a dark theme
template = "bootstrap-dark"

; Information message displayed to users, useful for alerting them to conditions of use
notice = "Note: data from this service can be deleted at any time."

; Default interface language (here French)
languagedefault = "fr"

[model]
; Storage method used to save pastes.
; Here we use the local file system
class = Filesystem

[model_options]
; Directory where encrypted pastes are stored.
; The PATH keyword means that the path is relative to the installation root.
; Here, we use the data directory created earlier.
dir = PATH "data"
The final step is to manage rights to the data folder, which must be accessible to the application.
In principle, the application will write to this directory with the user nobody. If you have any doubts or problems, set the rights to 777then create a paste (when deployment is complete) to check permissions and adapt them accordingly.
sudo chown -R nobody:82 /opt/docker-compose/privatebin/data/
sudo chmod 700 /opt/docker-compose/privatebin/data/
Now you're ready to move on to the next step: creating the Nginx container.
B. Creating the Docker container for Nginx
We're now going to start configuring the Nginx reverse proxy to publish our application in HTTPS. In addition to configuring the Docker container, we'll need to configure Nginx and also create a self-signed certificate (for testing purposes).
Let's start by creating the :
mkdir /opt/docker-compose/nginx /opt/docker-compose/nginx/certsThen create the file docker-compose.yml to declare the container. We could have created a single Docker Compose file with the declaration of both containers to create a global project.
Here, we put the container listening on port 443. The file privatebin.conf will be mounted in the Nginx configuration and the folder certs will be used to store certificate files.
services:
  nginx:
    image: nginx:latest
    container_name: nginx-proxy
    ports:
      - "443:443"
    volumes:
      - ./privatebin.conf:/etc/nginx/conf.d/privatebin.conf:ro
      - ./certs:/etc/nginx/certs

networks:
  nginx-net:
    external: true
    name: nginx-net
Now create the file privatebin.conf to configure the Nginx server as a reverse proxy. The configuration below assumes that the reverse proxy has a frontend for the address privatebin.it-connect.local. In this case, the stream will be redirected to the PrivateBin container accessible on the server's IP address, on port 8080or http://192.168.10.200:8080.
# privatebin.it-connect.local
server {
     listen 443 ssl;
     server_name privatebin.it-connect.local;
     ssl_certificate /etc/nginx/certs/privatebin.it-connect.local.crt;
     ssl_certificate_key /etc/nginx/certs/private.key;
     location / {
         proxy_pass http://192.168.10.200:8080;
         proxy_set_header Host $host;
         proxy_set_header X-Real-IP $remote_addr;
     }
}
Another important point to understand:
/etc/nginx/certs/privatebin.it-connect.local.crtexpected path and name of TLS certificate/etc/nginx/certs/private.keypath and expected name of the private key associated with the TLS certificate
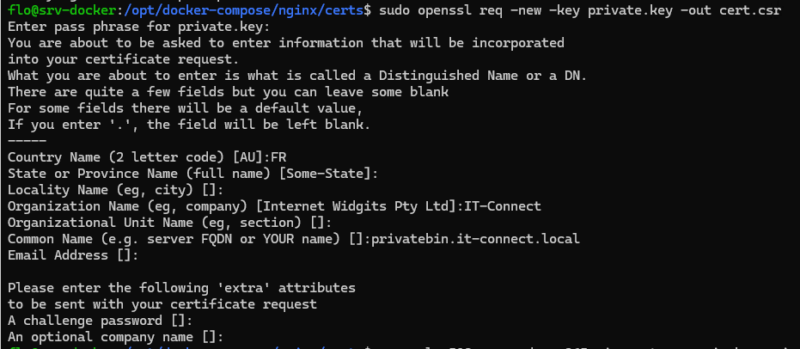
We now need to create the self-signed TLS certificate. You need the package openssl to perform this task. Chances are it's already present on your machine. Start by accessing the appropriate directory:
cd /opt/docker-compose/nginx/certsCreate a private key named private.key using the RSA algorithm. Here, we don't ask for a passphrase to allow direct reading by Nginx.
openssl genpkey -algorithm RSA -out private.key -pkeyopt rsa_keygen_bits:2048Next, create a certificate signing request (CSR):
openssl req -new -key private.key -out cert.csrYou will then be prompted to enter various information: country, organization, etc... As well as the Common Name, where you must indicate the domain name of your application.
Finally, generate the self-signed certificate from the two files created earlier. This certificate will be valid for 365 days.
openssl x509 -req -days 365 -in cert.csr -signkey private.key -out privatebin.it-connect.local.crtOn exit, you should obtain the certificate under the name privatebin.it-connect.local.crt.
Nginx reverse proxy configuration is now ready.
C. Creating the Docker network
Our two containers will try to use the Docker network named nginx-netexcept that it doesn't exist. Run this command:
sudo docker network create nginx-netList your Docker networks, and the one you've just created should appear.
sudo docker network ls
D. Launching Docker containers for PrivateBin
Finally, we'll launch the two Docker containers, as the configuration is now complete.
Execute these commands:
# PrivateBin container
cd /opt/docker-compose/privatebin
sudo docker compose -p privatebin up -d

# Nginx container
cd /opt/docker-compose/nginx
sudo docker compose -p nginx up -d
Both containers will run in the background. You can list the containers currently running with this command:
sudo docker ps

CONTAINER ID   IMAGE                         COMMAND                  CREATED       STATUS
4d8238b5815f   nginx:latest                  "/docker-entrypoint.…"   3 hours ago   Up 3 hours
6bd8f00849c8   privatebin/nginx-fpm-alpine   "/etc/init.d/rc.local"   4 hours ago   Up 3 hours
All that's left is to test...
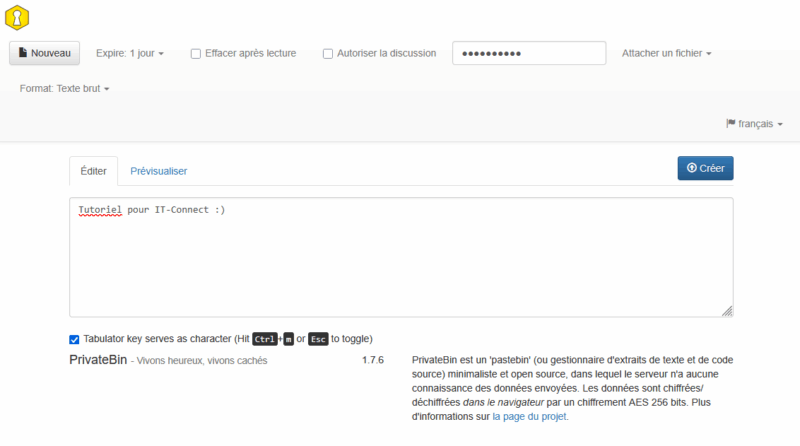
E. Using PrivateBin
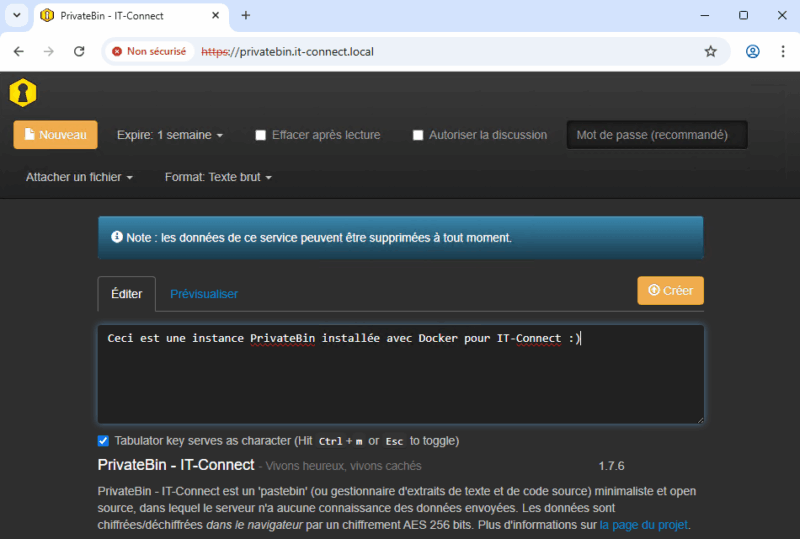
Open a browser and go to https://privatebin.it-connect.local (adapt, of course). If your reverse proxy is operational, you should arrive at the PrivateBin interface. If you're using a self-signed certificate, you must first ignore the security warning.
All you have to do is create your first paste. You can choose an expiry date (5 minutes, 1 hour, 1 week, etc.), a password, and even delete it automatically after playback. The input zone lets you enter your text. When you click on the "Create" button, you validate the paste.
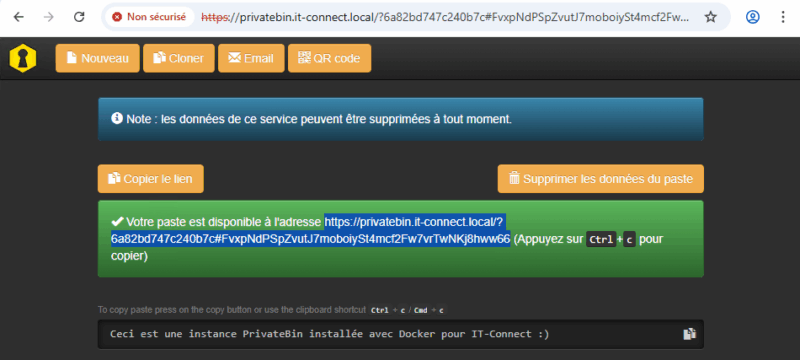
You then receive a validation message accompanied by a link. All you have to do is transfer this link to the recipient, who will then retrieve the paste information. Practical, isn't it?
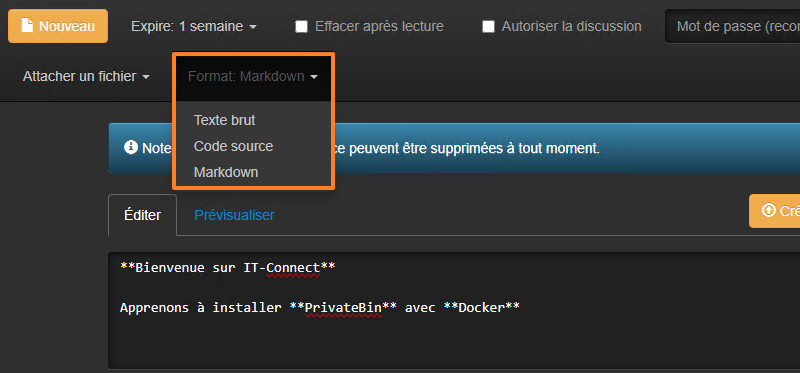
You can also choose another format, such as source code or Markdown, instead of plain text.
III. Conclusion
PrivateBin is a simple, effective application that meets a very specific need: secure information sharing with a temporary link system and data encryption. It's with this kind of tool that you can avoid finding passwords or other sensitive information in e-mails, conversations on Teams or other platforms.
What do you think?