
Group management under Linux : commands and practical examples
Table of Contents
I. Introduction
This article looks at group management on Linux, with particular emphasis on the importance of the "/etc/group" file and the use of several essential commands to accomplish various administrative tasks.
On a workstation or server, whether under Linux or Windows, group management is an operation that every system administrator should be able to perform. This is particularly useful with multi-user systems or systems on which different services are deployed.
As a reminder, groups can be used to group together several users and assign them common permissions. These may include permissions on files or directories. This simplifies the management of access rights, while offering greater flexibility in administration.
II. The /etc/group file
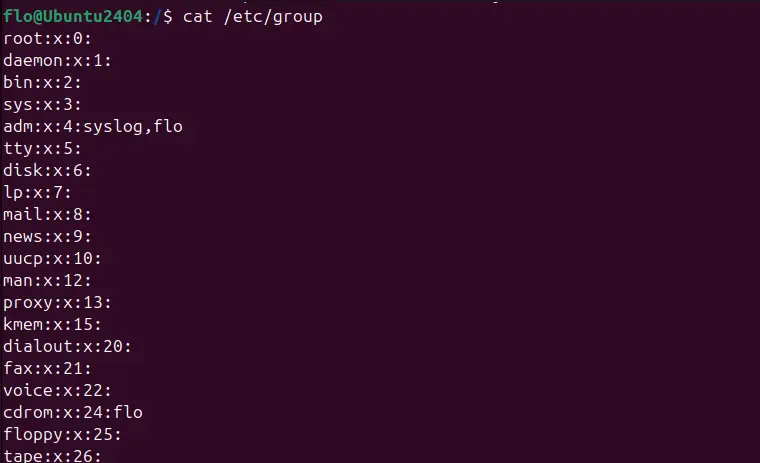
On Linux machines, the "/etc/group" file plays a central role in group management. Why? Simply because it contains a list of all groups present on the system, along with their attributes. In this file, which you can view by executing the command below, each line represents a group.
cat /etc/groupHere is a preview of the file:
Its content follows the following syntax:
[group_name]:x:[GID]:[user_list]- group_name: group name.
- x: indicates that the group password is stored elsewhere (often unused).
- GID: the group's unique identifier.
- user_list: group members, separated by commas.
Each user can belong to one or more groups, and each group has a unique identifier called GID (Group ID).
When a user is created, a group with the same name is usually also created. For this reason, you may see a line similar to the one below, where "flo" corresponds to the user name. For items created by the system administrator, the GID starts from 1000 and then increments by 1 (1001, 1002, etc.).
flo:x:1000:Here's another example of a line you might encounter:
it-connect:x:1001:flo,sysadminIn this example, the "it-connect" group has GID 1001 and the following members: flo, sysadmin.
III. Linux: primary and secondary groups
On a Linux machine, each user is associated with a primary group and can also belong to several secondary groups. What does this mean? What are the differences? Let's find out.
A. Primary group
The primary group is the main group to which a user is assigned. It is defined when the user is created and is generally used by default for files created by the user.
Each user is associated with a primary group. The primary group is specified in the "/etc/passwd" file for each user. For example, the user "flo" has a group named after him (created when the user was created) as his primary group. This is the default behavior. This is why we have the following line in the "/etc/passwd" file:
flo:x:1000:1000:flo:/home/flo:/bin/bashWhen a user creates a file or directory, the group owning the file is defined with its primary group, unless another configuration is in place (setgid).
B. Secondary groups
Secondary groups are additional groups to which a user can belong. They enable a user to be given additional permissions on files or resources that are associated with these groups (shared directory, common resources, etc.). This can be a custom group that you create and add your user to.
A user can belong to several subgroups. These groups are defined in the "/etc/group" file. When a user accesses a file or directory, Linux checks its permissions against the secondary groups to determine whether access is authorized or not.
IV. How do I create a group under Linux?
A. Create a standard group
To create a group, use the command groupadd, followed by the name of the group you wish to create. Here's a basic example of how to create a group called "admins":
sudo groupadd adminsThis command adds a group with an automatically assigned GID, according to the incrementation principle described above. To specify a GID manually, use the "-g" option:
sudo groupadd -g 1010 adminsThe command below will create a group named "admins" with GID "1010". If it is already taken by another group, an error will be returned. In any case, as soon as a group is created, it is added to the /etc/group file.
B. Create a system group
A group created with the "-r" option via the groupadd command is a system group, while a group created without this option is a standard group. So, we've already created a standard group. But what are the differences between these two types of group?
- System groups are intended for use by system services or daemons. For example, a service such as ssh or cron may have an associated group.
- Standard groups are used to group users or manage their permissions (on a directory, for example).
There is also a notable difference in the range of GIDs assigned. Remember that :
- For system groups, automatically assigned GIDs fall within a range reserved for system groups. On most Linux distributions, including Ubuntu and Debian, this range is between 1 and 999. Please note that the first GIDs are already reserved.
- For standard groups, the automatically assigned GIDs lie within a range, which is also reserved. Generally, from 1000.
These GID ranges may vary depending on the configuration of the "/etc/login.defs" file. If you consult this file, you'll see that the contents echo the explanations in this article:
#
# Min/max values for automatic gid selection in groupadd
#
GID_MIN			 1000
GID_MAX			60000
# System accounts
#SYS_GID_MIN		  100
#SYS_GID_MAX		  999
Let's finish with an example of the creation of a system group named "backup" :
sudo groupadd -r sauvegardeV. Managing groups under Linux: commands you need to know
A. The usermod command
Under Linux, the usermod command is used to modify a user's attributes. Among the actions it can perform, there's one of particular interest to us: adding a user to a group.
The command below will add the user "flo" to the "admins" group. The "-aG" option followed by the group name and then the user name is used to perform this action, without modifying other memberships. To be more precise, the "-a" option means "--append" and the "-G" option means "--groups".
sudo usermod -aG admins floHow do you check that the user has been added to this group? That's what we'll look at in the next part of this article.
B. Ordering groups
The groups command displays the groups to which a user belongs. Without arguments, it displays the groups of the current user (with whom you are logged in):
groupsTo find out which groups belong to a particular user, specify the user's name:
groups floSample result:
flo : flo adm cdrom sudo dip plugdev users lpadmin adminsThe user is indeed a member of the "admins" group, as it is returned in the list!
C. The groupdel command
To delete a group, use the groupdel command. The following command removes the "admins" group from the "/etc/group" file. Note that the group's users will not lose their accounts, but they will no longer be part of the group.
sudo groupdel adminsD. The groupmod command
The groupmod command is used to modify the attributes of a group. For example, to rename a group. The example below renames the "admins" group to "administrators" (note the order of values).
sudo groupmod -n administrators adminsTo change the GID of a group, use the "-g" option, as shown here to associate GID 2000 with our group:
sudo groupmod -g 2000 administratorsE. The chgrp command
Finally, we'd like to mention the chgrp command. Under Linux, this command is used to change the ownership group of a file or directory. It's the equivalent of the chown command, but only for the group. For example:
sudo chgrp administrators credentials.txtThe image below illustrates the group present on a file before and after execution of the chgrp command.

It is perfectly possible to apply the change recursively to a :
sudo chgrp -R administrators /path/to/folderVI. Conclusion
As a system administrator or simple Linux user, it's important to be able to manage groups under Linux, in particular via the commands discussed in this article. Group management is also linked to permissions management under Linux.