www.it-connect.fr
How to Copy Files in PowerShell with Copy-Item?
Table of Contents
I. Introduction
In this chapter, we will learn how to use the PowerShell command “Copy-Item” which is useful for copying a file from one folder to another folder, as well as a set of data. We will see how to use this cmdlet through several examples, as it proves practical for copying data.
These examples allow you to perform simple actions, but which address frequent cases! It's an alternative to the historical command “xcopy”, but also to the excellent command-line tool “robocopy”.
II. Copying a File with PowerShell
Let's start simple with copying a file from folder A to folder B. For this first example, I'm working in the folder “C:\TEMP\PS”, where I create “FolderA”, “FolderB”, and a file named “it-connect-1.txt” in “FolderA”.
New-Item -ItemType Directory -Path “C:\TEMP\PS” -Name “FolderA”
New-Item -ItemType Directory -Path “C:\TEMP\PS” -Name “FolderB”
New-Item -ItemType File -Path “C:\TEMP\PS\FolderA” -Name “it-connect-1.txt”
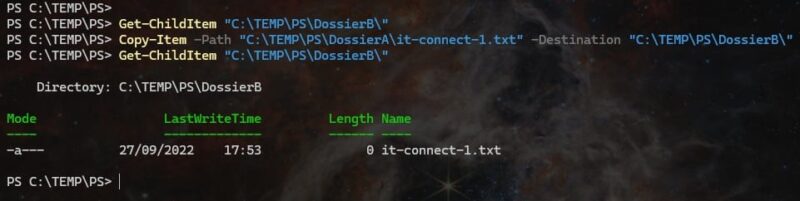
Now, we will move this file from “FolderA” to “FolderB”:
Copy-Item -Path “C:TEMPPSFolderAit-connect-1.txt” -Destination “C:TEMPPSFolderB”
The file is successfully copied (not moved):
In the previous example, we keep the same name between the source and the destination. However, we can make the file change its name in the destination. For example, if we want the copy to be named “it-connect-2.txt”:
Copy-Item -Path “C:TEMPPSFolderAit-connect-1.txt” -Destination “C:TEMPPSFolderBit-connect-2.txt”
We can also shorten this command by using “Copy” which is the alias for “Copy-Item” and by specifying, in order: the source and destination. However, remember that using aliases is not recommended in PowerShell scripts.
Copy “C:\TEMP\PS\FolderA\it-connect-1.txt” “C:TEMP\PS\FolderB”
III. Copying Files by Applying a Filter
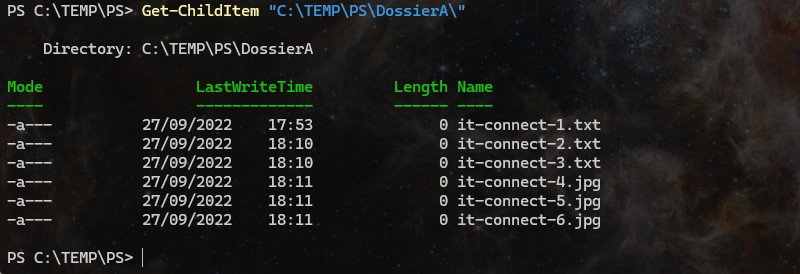
For this other practical case, we will see how to copy files by applying a filter to include or exclude only files with a specific extension. To have a bit more material, I created some TXT files and JPG files in my “FolderA”:
For example, we will only copy the “.JPG” files from the “FolderA” directory to “FolderB”. This results in a filter with the “-Include” parameter and at the source path level, we also add the wildcard character (“*”) to include all the contents of this folder (which will be filtered thanks to -Include):
Copy-Item -Path “C:\TEMP\PS\FolderA*” -Destination “C:\TEMP\PS\FolderB” -Include *.jpg
It should be noted that in the previous example, based on “-Include”, it is not possible to add “-Recurse” and thus include files matching the filter and present in subdirectories. The “-Include” filter applies only to the top-level folder. However, the “-Recurse” parameter works with exclusions.
In my folder, I have “TXT” files and “JPG” files, if I want to copy only JPG files, I must exclude the “TXT” extension, like this:
Copy-Item -Path “C:\TEMP\PS\FolderA*” -Destination “C:\TEMP\PS\FolderB” -Exclude *.txt -Recurse
Adding “-Recurse” also allows copying files located in subdirectories, creating the folder in the destination to reproduce the directory structure.
IV. Copying a File to a Remote Computer
The “Copy-Item” cmdlet does not contain a “-Computer” parameter to specify a destination computer, but it has a “-ToSession” parameter that allows copying data to a remote computer using a PowerShell session.
Here's an example below, keeping in mind that the reverse is also possible: copying data from the remote computer to the local computer, using the “-FromSession” parameter on the same principle.
This implies enabling Windows Remote Management (WinRM) and creating a PowerShell session.
In this example, the PowerShell session targets the computer “PC-01” and authentication is performed with the account “IT-Connectflorian”.
$Session = New-PSSession -ComputerName “PC-01” -Credential “IT-Connectflorian”
Once the session is connected, we can copy a file to the remote computer by calling this session. Here, we copy the file “C:TempPSDossierAit-connect-1.txt” to “C:TEMP” (local path on the target computer).
Copy-Item -Path “C:TempPSDossierAit-connect-1.txt” -Destination “C:TEMP” -ToSession $Session

V. Copying a Complete Folder with PowerShell
We will discuss another case that you are likely to encounter: copying an entire directory structure from one location to another. Thus, we can copy all the contents of “FolderA”, that is, its files, as well as its subfolders and their contents, to “FolderB”. In other words, we will perform a recursive data copy.
Copy-Item -Path “C:TEMPPSFolderA*” -Destination “C:TEMPPSFolderB” -Recurse
If we remove the “-Recurse” parameter, then we copy only the files located in the top-level directory. This means we ignore the subfolders.
VI. Copying Multiple Folders to a Single Location
In the case where we want to copy the contents of multiple source folders to the same destination (merge the contents of the folders), it will be necessary to separate the source directories with a comma. As for the destination folder, it is not mandatory to create it: it can be created during the copy.
To move the contents of folders “FolderA” and “FolderB” to “FolderC”, it looks like this:
Copy-Item -Path “C:TEMPPSFolderA*”,“C:TEMPPSFolderB*” -Destination “C:TEMPPSFolderC”
In the same spirit with recursion:
Copy-Item -Path “C:TEMPPSFolderA*”,“C:TEMPPSFolderB*” -Destination “C:TEMPPSFolderC” -Recurse
Be aware of potential name conflicts, which can generate some errors without preventing the rest of the copy.
VII. Conclusion
You are now able to copy files with PowerShell using the “Copy-Item” command!