ForEach loops
Table of Contents
I. Introduction
Having studied For loops in the previous chapter, we'll now turn our attention to a second type: "ForEach" loops in PowerShell. They're indispensable, and by far the ones I use most often in my scripts, or directly in the console. Let's take a look at some examples to understand how "ForEach" loops work, but first let's talk about how they work in general and how they differ from For loops.
II. The principle of ForEach loops
A "ForEach" loop allows you to manipulate a collection of data in its entirety. This is advantageous because the "ForEach" loop will automatically process all the elements in our collection, so there's no need to know in advance how many there are, as is the case with a "For" loop.
A "For" loop is generally used when you know how many times you want the loop to run. For example, if you want something to repeat exactly 10 times, you can use a "For" loop. The native behavior of a "ForEach" loop is to cycle through each element of a collection or array, so there's no need to count the number of elements or the length of the array (as is the case with a "For" loop).
Practical and simple in appearance, it can be used in a variety of ways, each with its own specific features. It can be used directly on the command line within a PowerShell console, or in a script with the appropriate syntax. We'll see that there are two different names:"ForEach " and"ForEach-Object".
This chapter is available in video format:
III. Getting to grips with ForEach loops
A. Syntax of a ForEach loop
In a script, a "Foreach" loop is declared in a relatively simple and classic way for PowerShell. The syntax of a "ForEach" loop is as follows:
Foreach (<element> in <collection>)
{
 # block of instructions / processing
}
The collection corresponds to our set of values, represented by a variable. It can be the contents of a CSV file, the list of processes running on your PC, the list of local users, the list of services, the result of a user search in the Active Directory, etc... or a table declared and populated by you. Anything that retrieves a set of values. In other words, the collection can simply be the result of the "Get-Service" command.
The element corresponds to a variable which will take the value of each element to be processed in the data collection. For example, on the first loop, the element will be our first line of the CSV file; on the second loop, it will be the second, etc., until we reach the end of the file. This variable is only valid within the ForEach loop for internal loop processing.
The instruction block corresponds to the actions to be performed on the object being processed (element variable) at each loop turn. For example, if we use a CSV file containing a list of first and last names, we can imagine that we'll want to create a user in the Active Directory for each line in the CSV.
B. ForEach loop: first example
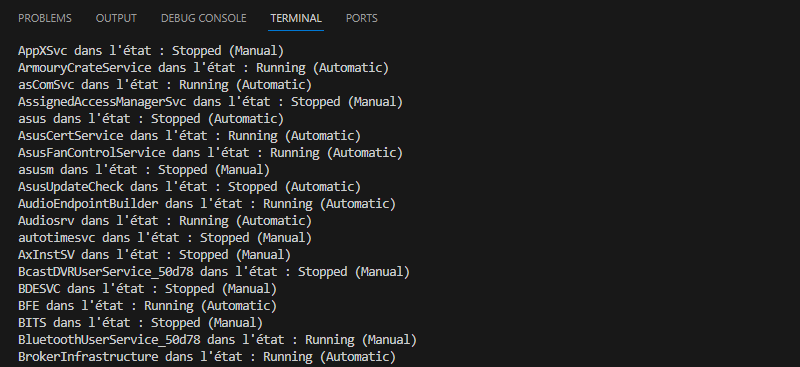
Let's take an example : we're going to retrieve the list of services on our PC (Get-Service), which we'll store in the "$collection" variable, and display the status of the service, i.e. whether it's started or stopped, with a custom phrase.
$collection = Get-Service

Foreach ($element in $collection)
 {
 "$($element.Name) in state : $($element.Status) ($($element.StartType))"
}
Ina "natural" way, the "ForEach" loop will run through the entire collection, whether it's made up of 10 services, 50 services or 200 services. Very practical.
Of course, here I've specified the names "$element" and "$collection" for the variables, but you can use other names... The result will contain the name of the service, its current status and its startup type (manual or automatic).
We obtain the following result:
We could have done the same thing with this syntax:
Foreach ($element in Get-Service)
 {
 "$($element.Name) in state : $($element.Status) ($($element.StartType))"
}
With each iteration of the "ForEach" loop, the "$element" variable will take on a new element from our "$collection" collection, i.e. a new service. Each time, we can access the object's properties and methods. Thus, we can easily retrieve the service's name by reading "$element.Name", as well as its status with "$element.Status" and its startup type with "$element.StartType".
This syntax is very interesting and powerful, as it allows you to perform a set of actions on a complete collection of data previously loaded into a variable. Beware of memory consumption on your PC, as the entire collection will be loaded into memory before processing.
C. ForEach loop: second example
Let's take a look at a second example that could meet a concrete need on a Windows computer. We're going to use a "ForEach" loop to clean up a folder containing temporary files. Our aim is to delete all files in the "C:\TEMP" directory that have remained unmodified for more than 7 days. This will require us to couple the use of "ForEach" with conditional structures.
Here's some PowerShell code to help you do just that:
# Path of folder in which to perform cleanup
$DossierCible = "C:\TEMP"

# Get a list of all files in the target folder
$ListeDesFichiers = Get-ChildItem -Path $DossierCible

# Browse the file list with a ForEach loop
ForEach ($Fichier in $ListeDesFichiers) {

    # If the file is more than 7 days old, it will be deleted, otherwise it will be kept.
    if ($Fichier.LastWriteTime -lt (Get-Date).AddDays(-7)) {

        # Delete file (without confirmation)
        Remove-Item -Path $Fichier.FullName -Force
    }
}
This script uses a "Foreach" loop to analyze each file present in the specified folder (variable "$TargetFolder"). For each file, the script checks whether the last modification date is earlier than 7 days before the current date. If so, it deletes the file. Otherwise, no action is taken.
Note that this script actually deletes files without asking for confirmation! So if you decide to try it out, be careful!
Note: the"LastWriteTime" property returned by the Get-ChildItem command is used to obtain the last modification date of a file. To use the creation date instead, use the"CreationTime" property.
IV. Discovering ForEach-Object
Another way of using a "ForEach" loop is to pass the collection of elements to be processed directly into the loop through a pipeline. In this case, the loop is no longer called "ForEach" but "Foreach-Object" - although the "ForEach" keyword still works, the difference is worth noting. Note also that "%" is an alias for "ForEach-Object".
To make it easier for you to understand the difference in syntax, let's go back to the first example. If we're using a "Foreach-Object" loop, and we want to reproduce exactly the same result as before, the syntax will be as follows:
Get-Service | Foreach-Object { "$($_.Name) in status: $($_.Status) ($($_.StartType))" }
This one-line syntax is perfectly suited to the PowerShell console. The "Get-Service" command will send its entire collection of objects to the"Foreach-Object" loop, which will process each object.
With this syntax, we drop our $element variable, since we can retrieve the current element directly by calling the automatic variable: $_.
Good to know: in terms of memory consumption, the impact is lower than with the previous method, because we process the objects as we go along, and don't store the entire collection of objects in a variable before processing it. Nevertheless, this method is less efficient from a performance point of view. Sometimes, it may be useful to store the collection in memory in a variable, especially if we plan to use the data several times.
Finally, it's worth noting that, like the "Where-Object" command, the "Foreach-Object" command also has a simplified syntax. If we wish to display only one property (Name, for example), we must write the following:
Get-Service | Foreach-Object { $_.Name }
Using the simplified syntax (which limits the possibilities), here are two examples without and with the alias :
Get-Service | Foreach Name
Get-Service | % Name
Now you know the two possible syntaxes for a "ForEach" loop in PowerShell, with the advantages and disadvantages of each method.
V. ForEach-Object and the Parallel parameter
For the release of PowerShell 7 in early 2020, Microsoft has introduced a new feature to the "ForEach" loops used via "ForEach-Object". This is a feature used to parallelize the processing of items received from the pipeline by running several jobs simultaneously. This new feature is accessible via the"-Parallel" parameter.
In its classic behavior, a ForEach-Object loop processes all elements received by the pipeline sequentially, i.e. one by one, in order. With the"-Parallel" parameter, the ForEach-Object loop can process several elements in parallel! The aim is to reduce the processing and execution time of your scripts, but this feature should not be used systematically, as it could well have the opposite effect. Here's how it works.
Note: this option only works for the ForEach-Object loop when used after the pipeline. It does not currently exist for a ForEach(){} type loop where the upstream object collection is determined, for example, in this form: ForEach($element in $collection){ # instructions }.
A. Using the -Parallel parameter
Let's start by looking at a simple example of how this parameter is used. This will give us the opportunity to compare behavior with and without this parameter, with a case in point where I'm sure it will be beneficial.
The example is as follows: we have a collection containing values from 1 to 5 (which can be obtained via "1..5") and for each value we'll write to the console"Number <value> " and pause for one second between each iteration.
With the classic "ForEach-Object" loop, this gives :
1..5 | ForEach-Object {
 "Numéro $_"
 Start-Sleep -Seconds 1
 }
In the console, we get the expected result:
Number 1
Number 2
Number 3
Number 4
Number 5
Using the"Measure-Command", we're going to calculate the execution time of this block in order to have a reference time. This is easily done via :
(Measure-Command { 1..5 | ForEach-Object {
 "Numéro $_"
 Start-Sleep -Seconds 1
 }
 }).Seconds
The result is: 5, i.e. 5 seconds. This is consistent since we have 5 values and there's a one-second pause each time.
Now we're going to add a dose of parallelization to execute this same block. We'll use two parameters: "-Parallel" and "-ThrottleLimit". The first parameter is used to activate parallelization on the "ForEach-Object" loop, while the second specifies the number of script blocks to be executed at the same time. By default, ThrottleLimit = 5.
The syntax is as follows:
1..5 | ForEach-Object -Parallel {
 "Number $_"
 Start-Sleep -Seconds 1
 } -ThrottleLimit 5
The result returned by this command is the same as with the sequential method. However, it is interesting to calculate the execution time of this command to see if parallelization is beneficial.
(Measure-Command { 1..5 | ForEach-Object -Parallel {
 "Number $_"
 Start-Sleep -Seconds 1
 } -ThrottleLimit 5
 Seconds
Miracle! The execution time has been reduced to just 1 second! This is logical, because with parallelization, we've authorized the execution of 5 block scripts at the same time(ThrottleLimit), so the 1 second pause included in the processing of each object doesn't affect the next element, since everything was done in parallel.

B. Use cases for the -Parallel parameter
A "ForEach-Object" loop executed with the"-Parallel" parameter builds on the principle of PowerShell workspaces called "Runspace" to run several tasks in parallel.
You should prioritize the use of this option on machines equipped with a multi-core processor, in order to optimize performance and avoid saturating the host. To use this option, you also need to determine whether or not it makes sense, depending on the action performed by your "ForEach-Object" loop. This applies mainly in the following two cases:
- A loop that waits for something: if you have to wait for the end of an operation or add a timeout to process each element, this wasted time can be limited thanks to parallelization. The first example in this article is a very simplified example of this type.
- Processing large quantities of data: if you need to execute several processes in the instruction block for each item, and these operations take a long time, you may want to consider using parallelization to run several of them at the same time. Examples: processing batches of files, log files or executing actions on remote hosts.
In some cases, parallelization is of no use and may even lengthen the execution time of your script. In fact, the time it takes to create a new workspace for each instance is both resource-intensive and time-consuming, so it can make your processing more cumbersome than it is optimized.
To optimize performance and processing time, you should also adjust the"-ThrottleLimit" parameter to allow more or less workspace to be created in parallel on your machine.
C. Insulating a workspace
When you use the Parallel option, you'll be using the workspace principle: for each process launched, a workspace is created and used to process the object. This execution context creates an isolation of each workspace, which is not neutral: the runspace cannot access variables in your main program, because it is isolated.
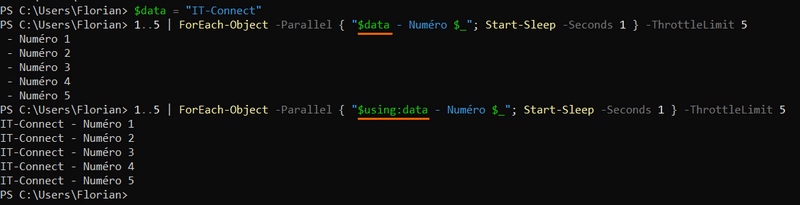
Let's take an example from the one we saw earlier. We'll define a variable "$data" with a simple value outside the "ForEach-Object" loop... And we'll call this variable to display it in the console. Which gives:
$data = "IT-Connect"
1..5 | ForEach-Object -Parallel {
 Write-Output "$data - Number $_"
 Start-Sleep -Seconds 1
 } -ThrottleLimit 5
If we execute this code, we get the output below. This proves that the workspace has no access to our variable.
- Number 1
- Number 2
- Number 3
- Number 4
- Number 5
To make a variable accessible within the workspace, we need to prefix it with the keyword "$using:". For example, for the variable "$data" the call would be: "$using:data".
If we apply this method to our previous example, we get :
$data = "IT-Connect"
1..5 | ForEach-Object -Parallel {
 Write-Output "$using:data - Number $_"
 Start-Sleep -Seconds 1
 } -ThrottleLimit 5
This time, the feedback visible in the console corresponds to our expectation.
Nevertheless, it's important to point out that this method is contrary to the principle of runspace isolation and creates an isolation violation. In effect, the variable is shared between workspaces, so be careful how you use it.
In conclusion, I'd say that this parallelization feature can be useful in many cases, but it all depends on the content of your instruction block to determine whether or not it's worth using it. You'll need to carry out some tests to find the most interesting scenario, both in terms of resource utilization and execution time. For this, the "Measure-Command" we've just briefly explored will be your ally.
VI. Conclusion
Mastering "ForEach" loops (and the alternative "ForEach-Object") in PowerShell is a must. Those who are more comfortable can explore the "-Parallel" parameter discussed in this chapter, but this should not be your priority.