www.it-connect.fr
10 Commands to Configure the Network Under Windows with PowerShell
Table of Contents
- I. Introduction
- II. Obtaining the List of Network Interfaces
- III. Renaming a Network Interface
- IV. Enabling, Disabling or Restarting a Network Interface
- V. Obtaining the IP Configuration of an Interface
- VI. Set an IPv4 Address
- VII. Set a DNS Server on the Network Interface
- VIII. Define a DNS Suffix
- IX. Test Name Resolution
- X. Perform a Connectivity Test
- XI. Test a Port
- XII. Conclusion
I. Introduction
To manage the network of a Windows machine, we can use different PowerShell cmdlets, particularly those present in the “NetTCPIP” module which is natively integrated into Windows. Thus, as a system administrator, it will allow you to perform Windows network configuration via command line, whether through the console or from a script.
In this chapter, we will study a set of 10 practical commands to allow you to manage the network with PowerShell, without using historical commands such as “ipconfig”, “netsh” or “ping”. Moreover, if you plan to configure a Windows Server in Core mode, that is, without a graphical interface, these commands will be useful to you.
II. Obtaining the List of Network Interfaces
Before being able to configure a network interface on a machine, you must identify it. For this, we can rely on the “Get-Net-Adapter” cmdlet. It allows you to obtain the list of network interfaces detected by Windows and also visible via the “Network and Sharing Center” console.
Get-NetAdapterThis command is capable of listing Ethernet adapters (RJ45 and Wi-Fi), as well as Bluetooth adapters. The returned list contains a set of properties corresponding to characteristics of each network interface (name, status, MAC address, connection speed, etc.).

To obtain the list of all active network interfaces, we can filter the list this way:
Get-NetAdapter | Where-Object { $_.Status -eq "Up" }III. Renaming a Network Interface
By default, the network interface under Windows is named "Ethernet0". This name is not very explicit and on a machine with multiple network interfaces, it will be wise to name each interface. For this, we can use the PowerShell cmdlet "Rename-NetAdapter".
We can rename the “Ethernet0” interface to “LAN” this way:
Rename-NetAdapter -Name Ethernet0 -NewName LANThis implies opening the PowerShell console as an administrator to avoid facing an “Access denied”.
IV. Enabling, Disabling or Restarting a Network Interface
From the Windows Network and Sharing Center
, we can enable or disable a network interface. This action is sometimes useful in case of malfunction on a network interface, or simply to change the state of a network interface without physically intervening on the connection support (Ethernet RJ45 cable, for example).
With PowerShell, we will be able to enable or disable a network interface, but also restart a network interface. Windows contains the following three cmdlets designed for this purpose:
- Enable-NetAdapter: to enable a network interface
- Disable-NetAdapter: to disable a network interface
- Restart-NetAdapter: to restart a network interface
Depending on the action to be performed, you simply need to choose the right command and specify the name of the interface.
To disable the network interface named “LAN”, we can use the “Disable-NetAdapter” cmdlet with the “-Name” parameter which will allow us to specify the name of the network interface.
Disable-NetAdapter -Name LANThen, we can use the first cmdlet mentioned in this chapter to read the value of the “Status” property on our network interface named “LAN”. In principle, the value “Disabled” should be returned.
(Get-NetAdapter -Name LAN).StatusAt any time, we can enable the interface named “LAN” with this command:
Enable-NetAdapter -Name LANFinally, to restart a network interface, we will use the “Restart-NetAdapter” cmdlet on the same principle.
Restart-NetAdapter -Name LANV. Obtaining the IP Configuration of an Interface
The cmdlet “Get-NetIPConfiguration”, whose alias is “gip”, is an alternative to the famous MS-DOS command “ipconfig”. By default, this command will provide the TCP/IP network configuration of all network interfaces on the machine, except those that are not connected. The loopback interface is also excluded.
Get-NetIPConfiguration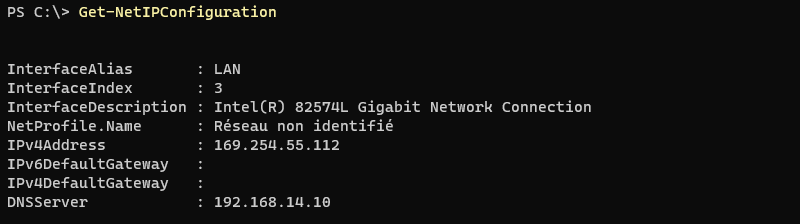
To get information on all interfaces, regardless of type and status, the -All
parameter must be added.
Get-NetIPConfiguration -AllIn daily use, consider using the alias “gip” in the console, as it is much faster to type than the full cmdlet name.
If you find that this cmdlet doesn't return enough information, you can add the “-Detailed” parameter.
Get-NetIPConfiguration -Detailed
gip -Detailed
It allows you to display additional interesting properties, including these:
- NetProfile.NetworkCategory: network type, which allows you to know if you are on a public, private, or domain network.
- NetProfile.IPv4Connectivity: IPv4 connectivity status, allows you to know if the machine has Internet access via this interface.
- NetIPv4Interface.DHCP: DHCP status on IPv4.
- NetIPv6Interface.DHCP: DHCP status on IPv6.
- DNSServer: the IP address of the DNS server.
In addition to this cmdlet, we can use “Get-NetIPAddress” which has the advantage of listing all IP addresses configured on the local machine, in IPv4 and IPv6, as well as for the loopback.
Get-NetIPAddressWe can even generate a summary table this way:
Get-NetIPAddress | Sort-Object -Property InterfaceAlias | Format-Table InterfaceAlias, IPAddress, AddressFamilyHere's an example:

VI. Set an IPv4 Address
We will configure a static IP address on the “LAN” network card present on the local machine and freshly renamed. Using the “New-NetIPAddress” cmdlet, we will be able to define an IPv4 address on this network card.
This involves using this cmdlet with a set of parameters:
- The “-InterfaceAlias” or “-InterfaceIndex” parameter to specify the name of the interface or the index number of the interface to configure. It is imperative to target the interface by its name or index number. We can retrieve this information with the “Get-NetAdapter” cmdlet.
- The “-IPAddress” parameter to indicate the IPv4 address to associate with the network card.
- The “-PrefixLength” parameter to specify the length of the subnet mask (in CIDR format).
- The “-DefaultGateway” parameter to specify the default gateway (router)
Let's take an example: we want to set the IP address “192.168.14.50/24” on the “LAN” network card. The default gateway will be “192.168.14.2”. Here's the complete command to execute:
New-NetIPAddress -InterfaceAlias LAN -IPAddress 192.168.14.50 -PrefixLength 24 -DefaultGateway 192.168.14.2 -AddressFamily IPv4The IP address will be immediately set on the network card, and associated with two stores, “ActiveStore” and “PersistentStore”. The IP address will therefore be persistent even after a machine restart.
Subsequently, if you want to change the IP address on this interface, you must delete it, then add a new IP address. So, to use the IP address “192.168.14.51” instead of “192.168.14.50”, we must use these cmdlets:
Remove-NetIPAddress -InterfaceAlias LAN -IPAddress 192.168.14.50
New-NetIPAddress -InterfaceAlias LAN -IPAddress 192.168.14.51
VII. Set a DNS Server on the Network Interface
We have just configured the IP address and default gateway on our interface named “LAN”, but an important element is missing: the DNS server(s) to query for name resolution. We need to use two additional cmdlets:
- Get-DnsClientServerAddress: to obtain the list of DNS servers configured on each network interface of the machine.
- Set-DnsClientServerAddress: to define a list of DNS servers on a network interface.
To use the first cmdlet, you just need to call it without specifying any parameters (although there are parameters, notably to filter IPv4 or IPv6, or specify an interface with its name or index number).
Get-DnsClientServerAddressThe command below allows defining DNS servers with IP addresses “192.168.14.10” and “192.168.14.11” on the interface named “LAN”.
Set-DnsClientServerAddress -InterfaceAlias LAN -ServerAddresses ("192.168.14.10","192.168.14.11")Next, we can verify that this configuration has been properly applied:

VIII. Define a DNS Suffix
In addition to the IP addresses of DNS servers, it is common to define a DNS suffix on the network interface connected to a corporate network, especially in an Active Directory environment. To perform this configuration, we can use the cmdlet “Set-DnsClient”.
The example below defines the DNS suffix “it-connect.local” on the interface named “LAN”:
Set-DnsClient -InterfaceAlias LAN -ConnectionSpecificSuffix it-connect.localIX. Test Name Resolution
The PowerShell cmdlet “Resolve-DnsName” is an alternative to the “nslookup” command that will allow us to perform name resolution. This will be an opportunity to verify if the configuration we have just performed is operational.
Here are some examples of its usage.
- Resolve the hostname “it-connect.fr”
Resolve-DnsName it-connect.fr- Resolve the hostname “it-connect.fr” by querying the DNS server “8.8.8.8”
Resolve-DnsName it-connect.fr -Server 8.8.8.8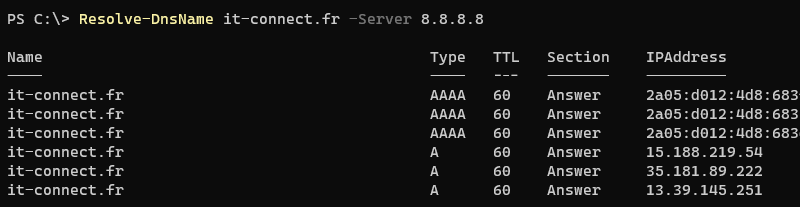
- Obtain information about the MX (mail exchanger) of the domain “it-connect.tech”
Resolve-DnsName it-connect.tech -Type MX- Resolve the hostname “it-connect.tech” using only the data present in the local DNS cache
Resolve-DnsName it-connect.tech -CacheOnly- Resolve multiple hostnames with a single command, focusing on IPv4 records (type A)
"google.com", "google.fr" | Resolve-DnsName -Type A
The cmdlet “Resolve-DnsName” is very practical and it might make you forget about the “nslookup” command, which you may have been used to using until now. Moreover, the fact that it's a PowerShell cmdlet allows us to use it more easily in a script, as we have access to a set of properties.
X. Perform a Connectivity Test
Generally, when we need to perform a network connectivity test to a machine or equipment, we use the "ping" command. Be aware that PowerShell includes the "Test-Connection" cmdlet designed for this purpose as it will send ICMP packets to the remote host to test communication between two devices.
For example, we can ping the IP address “1.1.1.1” using this command:
Test-Connection 1.1.1.1Here is the result obtained:

The “Source” property indicates the name of the local machine, while the “Time (ms)” property indicates the response time. If you see a value equal to “0”, it's synonymous with an excellent response time on your network. For comparison, the usual ping tool would indicate the value “time<1ms”.
With this cmdlet, we can also perform a ping to multiple machines. The cmdlet will ping each machine in turn. Simply separate the hostnames with a comma.
Test-Connection 1.1.1.1,8.8.8.8,google.frAdditionally, the “-Count” parameter allows you to specify the number of pings to perform. Thus, we can associate the value “1” to perform a very quick ping test to a set of machines.
Test-Connection 1.1.1.1,8.8.8.8,google.fr -Count 1Here is the result obtained:

Finally, we could even go further and perform a connectivity test on a set of machines from a list obtained from a CSV file or from the organization's Active Directory.
The example below consists of obtaining the names of all computers joined to Active Directory using the “Get-ADComputer” cmdlet present in the PowerShell “ActiveDirectory” module. This list is stored in the “$ComputerList” variable and then processed by the “Test-Connection” cmdlet to perform a ping test to each machine.
$ComputersList = (Get-ADComputer -Filter *).Name
Test-Connection $ComputersList -Count 1
To delve deeper into this last example, consult this article:
XI. Test a Port
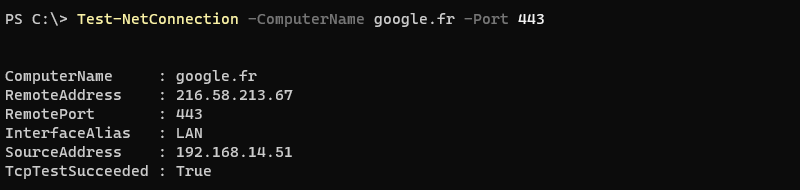
Thanks to the PowerShell cmdlet “Test-NetConnection”, we can perform a test on a specific port (TCP only). This will allow us to determine whether a port is open or not, as we can do with the “Telnet” client (by repurposing its basic function).
To use the “Test-NetConnection” cmdlet, we need to specify two parameters:
- -ComputerName: the name or IP address of the target.
- -Port: the port number to test
If we want to test the host “google.fr”, on port “443”, associated with the HTTPS protocol and generally used by Web servers, we need to execute this command:
Test-NetConnection -ComputerName google.fr -Port 443We get a positive response, indicating that port “443” is open on this host. This is not surprising as we are directly targeting “google.fr”. We can verify this thanks to the “TcpTestSucceeded” property whose value is “True”, indicating that the test was successful.
Finally, know that this cmdlet also supports the names of certain services, which avoids having to specify the port number. To perform a test on port “80”, we can specify the parameter “-CommonTCPPort” with the value “HTTP”:
Test-NetConnection -ComputerName 1.1.1.1 -CommonTCPPort HTTPLet's end with a bonus: if you want to display the list of all ports on which a server (or workstation) is listening, you can use the “Get-NetTCPConnection” cmdlet in this way:
Get-NetTCPConnection -State ListenXII. Conclusion
After reading this chapter, you are now familiar with about a dozen PowerShell commands that we have explored through 10 specific practical cases. This will allow you to be more comfortable in managing network interfaces and network connectivity on a Windows machine.