www.it-connect.fr
10 Commands to Administer Windows with PowerShell
Table of Contents
- I. Introduction
- II. Retrieving Information About the Computer
- III. Restarting the Local or Remote Computer
- IV. Renaming the Computer
- V. Integrating the Computer into Active Directory
- VI. Installing a Role or Feature
- VII. Managing Windows Processes
- VIII. Stopping a Windows Process
- IX. History of Installed Updates
- X. Searching for Large Files
- XI. Consulting Windows Event Logs
- XII. Conclusion
I. Introduction
In this chapter, we will explore PowerShell commands that are useful for administering Windows workstations and Windows Server, using 10 practical cases as examples! This list is not exhaustive, and we will continue to manipulate other cmdlets in the upcoming chapters.
II. Retrieving Information About the Computer
The “Get-ComputerInfo” cmdlet can be used to retrieve general information about the local computer. It will return diverse information about the operating system, hardware, regional settings, system parameters, and even the BIOS. It can be very useful in many situations.
Get-ComputerInfoHere's an example of the result:
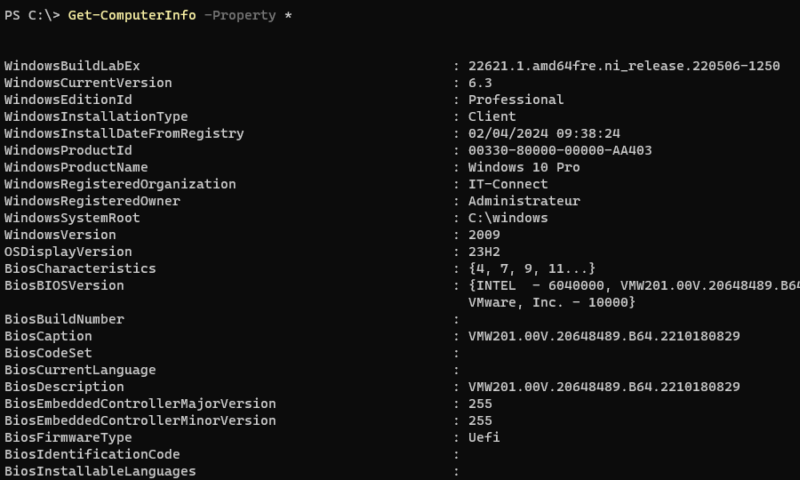
For example, the “OsName” property will return the full name of the operating system (“Microsoft Windows 11 Professional”) while the “OsBuildNumber” property will return the build number (“22631”).
In fact, this is a cmdlet that consolidates information we can obtain through WMI classes, except here, we don't need to know the corresponding WMI queries. This avoids using the “Get-WmiObject” and “Get-CimInstance” cmdlets.
III. Restarting the Local or Remote Computer
If you want to restart a computer using PowerShell from the command line, you can use the "shutdown" command with the right options, but also the PowerShell cmdlet "Restart-Computer". It is compatible only with Windows, and we can use it to restart the local machine or remote machines.
Executing it on a local machine, without specifying any parameters, will trigger an immediate restart of the machine.
Restart-ComputerIt is very useful for restarting multiple remote machines, which will avoid connecting and opening a session on the machines in question to initiate a restart. This implies that remote management is enabled on the remote machine and that you have sufficient permissions (otherwise, you must use the “-Credential” parameter).
The example below allows restarting the host “SRV-ADDS-01.it-connect.local”.
Restart-Computer -ComputerName SRV-ADDS-01.it-connect.localWe can also use the “Restart-Computer” cmdlet in a script and instruct PowerShell to wait for the machine to restart before continuing the script execution. For this, we need to use additional parameters.
The example below allows restarting the host “SRV-ADDS-01.it-connect.local”, then we will wait for the restart for 3 minutes (timeout of 180 seconds), while checking every 3 seconds if the machine is back online. The “-Force” parameter is useful to force the restart, even if there is a user logged on to the machine.
Restart-Computer -ComputerName SRV-ADDS-01.it-connect.local -Wait -Timeout 180 -Delay 3 -Force
IV. Renaming the Computer
After installing a new Windows machine, you can rename the system using the “Rename-Computer” cmdlet. The “-NewName” parameter allows you to specify the new hostname, while the “-Restart” parameter will allow you to restart the machine immediately to finalize the operation.
Here's an example to assign the name “PC-W11” to the local machine.
Rename-Computer -NewName "PC-W11" -RestartWe can also act on a remote machine using the “-ComputerName” parameter.
V. Integrating the Computer into Active Directory
To integrate a Windows machine into an Active Directory directory, we can navigate through the Windows graphical interface, or use the PowerShell cmdlet named "Add-Computer". The advantage is that it's used the same way on Windows 10, Windows 11, Windows Server, etc... So, we won't waste time navigating through Windows menus that vary from one version to another.
The example below allows integrating the domain “it-connect.local” and we will be prompted to provide credentials to authenticate with Active Directory directory services. The “Get-Credential” cmdlet is used to ask the user to enter credentials (a username and password), and the information entered will be used as the value for the “-DomainCredential” parameter.
Add-Computer -DomainName "it-connect.local" -DomainCredential (Get-Credential)VI. Installing a Role or Feature
On a Windows workstation, we can install additional features by selecting from a list of optional features. On a Windows Server, we can also install roles and features: DHCP server, DNS server, WSUS, Active Directory Domain Services, etc.
Therefore, depending on the type of operating system, we must not use the same cmdlet to install or uninstall features or roles:
- Install-WindowsFeature on Windows Server
- Enable-WindowsOptionalFeature on Windows
These cmdlets must be used from a PowerShell console opened as an administrator.
A. Servers Running Windows Server
Before even trying to install a Windows Server feature or role, we will generate a list to indicate the status of each item.
Get-WindowsFeatureHere is an example of output where we can see that the roles “DHCP Server” and “DNS Server” are installed.

If we want to obtain a precise list of all roles and features installed on a server, we can filter like this:
Get-WindowsFeature | Where-Object { $_.InstallState -eq "Installed" }Then, to proceed with the installation, we must use the “Install-WindowsFeature” cmdlet. This cmdlet can install one or more features at a time, and it can also act on a remote machine.
The following example installs the “Hyper-V” role on the server, including the management tools (“-IncludeManagementTools”), which means the “Hyper-V Manager” as part of this role installation. The server will also restart automatically (“-Restart”).
Install-WindowsFeature -Name Hyper-V -IncludeManagementTools -RestartThe reverse operation, namely uninstalling a feature or role, is possible using the “Uninstall-WindowsFeature” cmdlet.
B. Windows Workstations
Now, we will discuss managing optional features on Windows workstations.
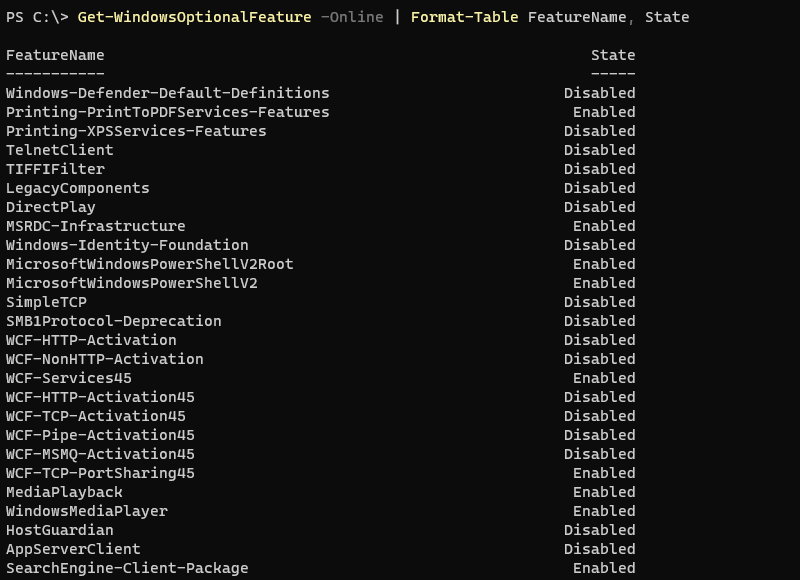
We can list all available optional features using the “Get-WindowsOptionalFeature” cmdlet. Specifying the “-Online” parameter means we are targeting the online Windows image, which is the one running on the current machine.
Get-WindowsOptionalFeature -Online | Format-Table FeatureName, StateThis will provide a table with the name of all features and their status. If the “State” property contains “Enabled”, it means the feature is activated, and therefore installed, on the local machine.
Then, we can install a feature using the “Enable-WindowsOptionalFeature” cmdlet. For example, to install the Hyper-V role on Windows 10 or Windows 11, we should use the following command:
Enable-WindowsOptionalFeature -Online -FeatureName Microsoft-Hyper-V -AllThis will install the Hyper-V role on Windows, along with any potential dependencies.
VII. Managing Windows Processes
The PowerShell “Get-Process” cmdlet allows listing active processes on a machine. It will provide numerous pieces of information about them, including their name, PID, consumed memory, consumed CPU, the date and time when the process was created, etc.
Get-ProcessWithout using PowerShell, we can use the Windows “Task Manager” to get a real-time overview of processes running on the local machine.
The “Get-Process” cmdlet will allow doing the same thing using PowerShell. Running it without parameters will list the active processes at time t:
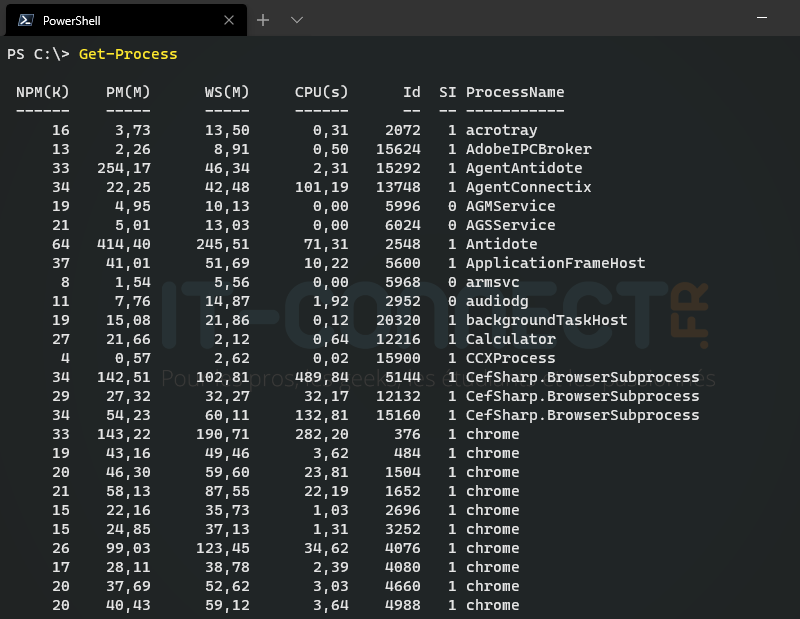
In the output above, it's interesting to note that the property names (columns) are actually aliases of properties to other property names. The “Get-Member” command we studied in a previous chapter allows us to verify this:
Get-Process | Get-Member

Name MemberType Definition
---- ---------- ----------
Handles AliasProperty Handles = Handlecount
Name AliasProperty Name = ProcessName
NPM AliasProperty NPM = NonpagedSystemMemorySize64
PM AliasProperty PM = PagedMemorySize64
SI AliasProperty SI = SessionId
VM AliasProperty VM = VirtualMemorySize64
WS AliasProperty WS = WorkingSet64
To get an output that closely resembles the display of the “Task Manager”, and specifically to have the name of the user who initiated the process execution, we will add the parameter “-IncludeUserName”.
Get-Process -IncludeUserName
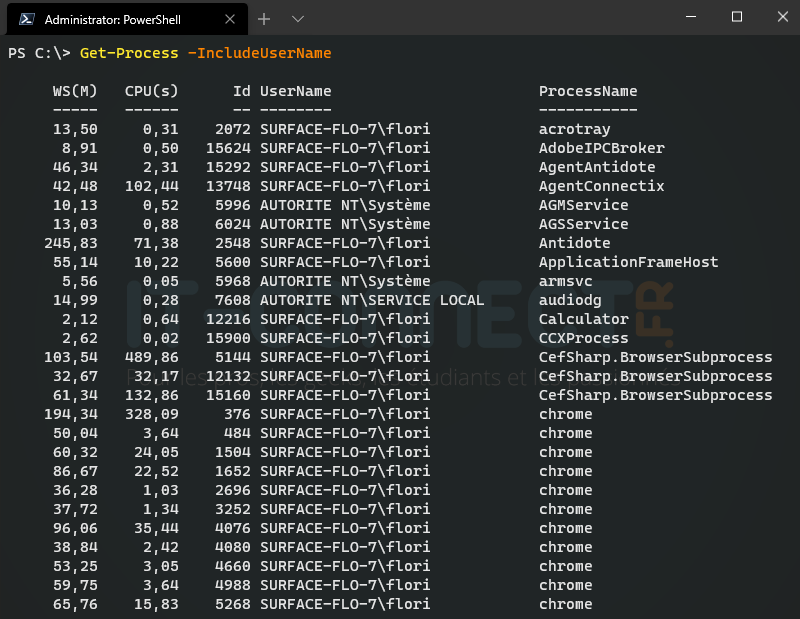
The property named “WS” corresponds to “”WorkingSet, which actually indicates the RAM consumption of this process, here in “Megabytes”. While the “CPU” column indicates the processor usage time.
With the initial command (without “-IncludeUserName”), the value is in bytes. Thus, to get the list of all processes that consume at least 100 MB of RAM, we will use the value “100000000”.
Get-Process | Where-Object { $_.WorkingSet -ge 100000000 }
If we are looking for a specific running process related to a software, for example, the Chrome browser and its process “chrome”, we can refine the command:
Get-Process -Name “chrome” -IncludeUserName
Or, simply:
Get-Process -Name “chrome”
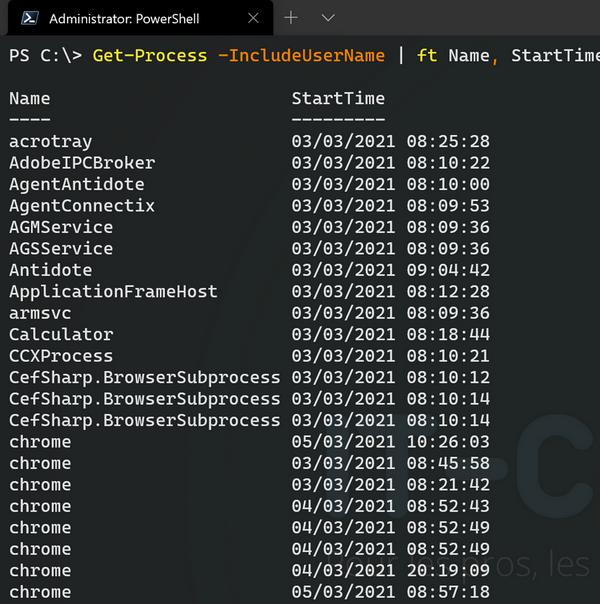
The list of properties available with the “Get-Process” command is very long. We can, for example, get the creation date of each process using the “StartTime” property.
Get-Process | Format-Table Name, StartTime
VIII. Stopping a Windows Process
In addition to the “Get-Process” cmdlet, the one named “Stop-Process” plays a key role in process management, as it will allow us to stop a process. This can be very useful for attempting to force quit a program that you can't stop properly.
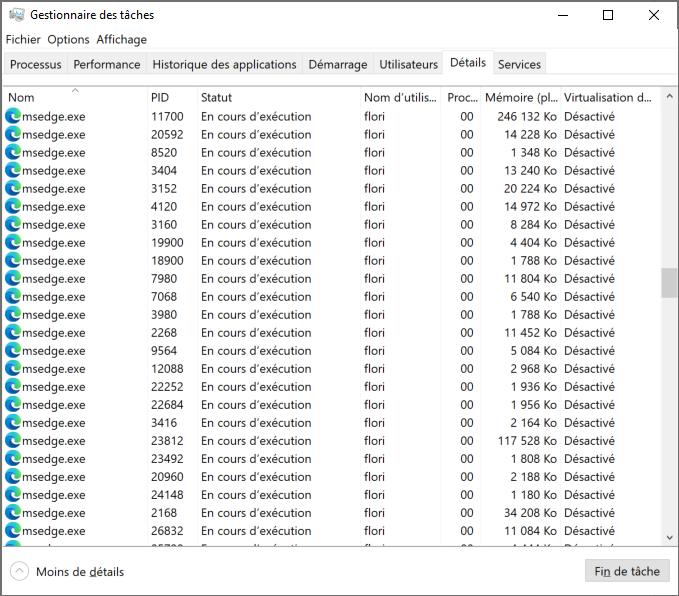
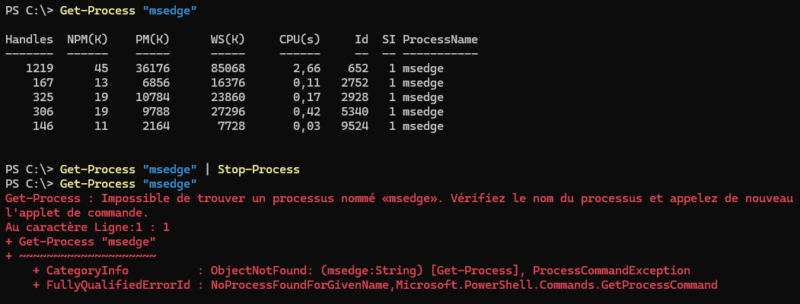
We will try to stop all processes associated with the “Microsoft Edge” browser. We can list these processes with the “Get-Process” cmdlet:
Get-Process "msedge"Then, we can send the list of processes to “Stop-Process” via the pipeline. This will immediately kill all processes, so this command is powerful but can also be dangerous.
Get-Process "msedge" | Stop-ProcessWe can see that all “msedge” processes have been stopped:
If you want to stop only a process with a specific ID, it's possible. In this case, we must use the parameter “-Id” followed by the ID of the process to stop. For example:
Stop-Process -Id 652To identify your target, first work with “Get-Process” then initiate “Stop-Process”. You can even store the result in a variable and then call it with “Stop-Process”.
IX. History of Installed Updates
Tracking Windows updates is very important. On this operating system, the “Windows Update” component is responsible for searching and installing updates.
PowerShell offers a cmdlet named “Get-HotFix” that allows you to get the list of hotfixes installed on the local machine, relying on the WMI “Win32_QuickFixEngineering” class. We can use it this way to get a list of hotfixes, sorted by installation date (from newest to oldest):
Get-HotFix | Sort-Object -Property InstalledOn -DescendingHere's an example:
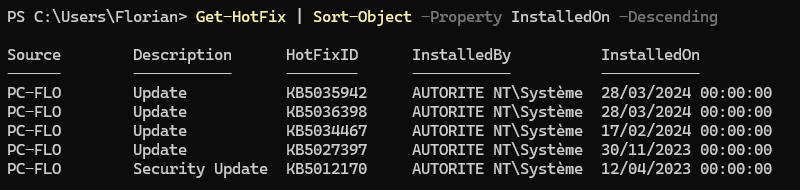
The problem is that this history does not contain the list of all installed updates, so it doesn't provide a complete overview of the update history.
To get more accurate results, we will install the “PSWindowsUpdate” module on our machine. This community module is available on the PowerShell Gallery website.
Install-Module -Name PSWindowsUpdate -ForceThis module works with Windows PowerShell and PowerShell, including PowerShell 7. Once the installation is complete, we can list the available commands in this module:
Get-Command -Module PSWindowsUpdateThis module allows for comprehensive management of Windows Update. It is very complete and not limited to obtaining the list of installed updates.
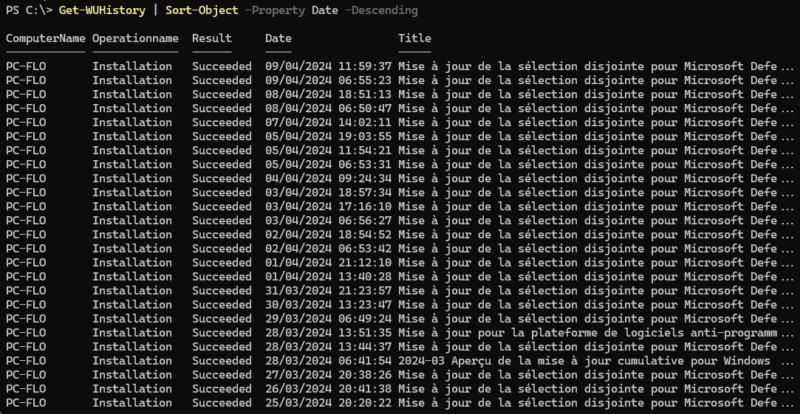
The example below will obtain the list of all installed updates, from the most recent to the oldest. It also includes definition updates for Microsoft Defender, those for PowerShell (for PowerShell 7, if updates through Windows Update are enabled), etc.
Get-WUHistory | Sort-Object -Property Date -DescendingHere's an example:
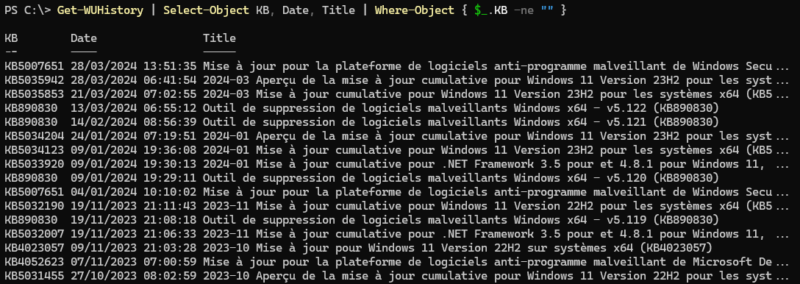
We can improve this display by selecting three properties: “KB” to have the KB number of the update, “Date” to have the date and time of installation, and “Title” to have the full title of the update. We can also use a graphical display mode via “Out-GridView”, although this is optional. We only display updates where the “KB” column is not empty.
Get-WUHistory | Select-Object KB, Date, Title | Where-Object { $_.KB -ne "" }
Get-WUHistory | Select-Object KB, Date, Title | Where-Object { $_.KB -ne "" } | Out-GridView
The result obtained is much more interesting than with the “Get-HotFix” cmdlet.
We can also display all updates installed from a certain date, thanks to the “-MaxDate” parameter. To get the updates installed in the last 31 days, it looks like this:
Get-WUHistory -MaxDate $((Get-Date).AddDays(-31))While for updates installed since March 1, 2024, it looks like this:
Get-WUHistory -MaxDate "01/03/2024"Finally, you can search for a specific update by its KB name. Here's an example to search for the update “KB5035853”.
Get-WUHistory | Where-Object { $_.KB -eq "KB5035853" }X. Searching for Large Files
The “Get-ChildItem” cmdlet is used to list the contents of a directory or a complete tree structure as it will return all files and folders present under the specified root. It has access to the properties of folders and files, which opens up many possibilities: performing a search on specific file types (based on extension), performing a search based on file size, etc.
The command below lists the top-level content present in “C:Windows”.
Get-ChildItem -Path "C:Windows"If we want to list all files and folders recursively, we need to add this parameter:
Get-ChildItem -Path "C:Windows" -RecurseWe can refine our search based on a filter using the “-Filter” parameter. For example, to display only executable files with the “.exe” extension:
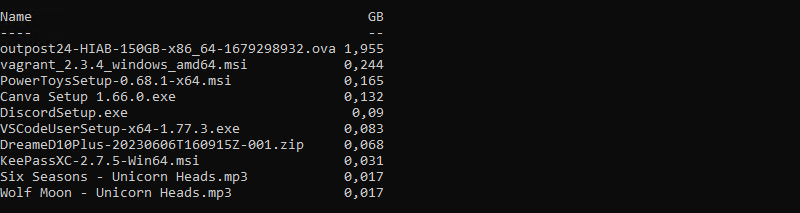
Get-ChildItem -Path "C:Windows" -Recurse -Filter *.exeNow, we will try to obtain the list of the 10 largest files present on the “P:” volume of a machine, which could be a workstation or a server. We get a ranking of files, from the largest to the smallest. We could have a more substantial list by adjusting the value of the “-First” parameter of the “Select-Object” cmdlet.
Get-ChildItem P: -Recurse | Sort-Object -Descending -Property Length | Select-Object -First 10 Name, Length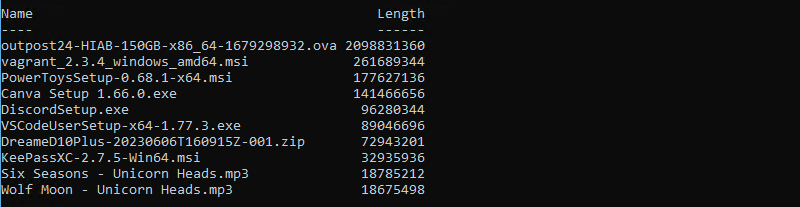
To make the size more easily readable, we can create a calculated property based on using the “[math]:round()” method to display the size in GB:
Get-ChildItem P: -Recurse | Sort-Object -Descending -Property Length | Select-Object -First 10 Name, @{Name="GB";Expression={[math]::round($_.Length/1Gb, 3)}}Here is the result obtained:
Finally, to make it more precise, we can add the “DirectoryName” property as it will add the path corresponding to the file location.
Get-ChildItem P: -Recurse | Sort-Object -Descending -Property length | Select-Object -First 10 name, @{Name="MB";Expression={[math]::round($_.Length/1mb, 2)}},DirectoryNameFinally, know that we could also target the search on a specific file type. For example, to get the “Top 10” ZIP archives present on the “P:” volume of the machine, we can adjust the previous command like this:
Get-ChildItem P: -Recurse -Include "*.zip" | Sort-Object -Descending -Property length | Select-Object -First 10 name, @{Name="MB";Expression={[math]::round($_.Length/1mb, 2)}},DirectoryNameXI. Consulting Windows Event Logs
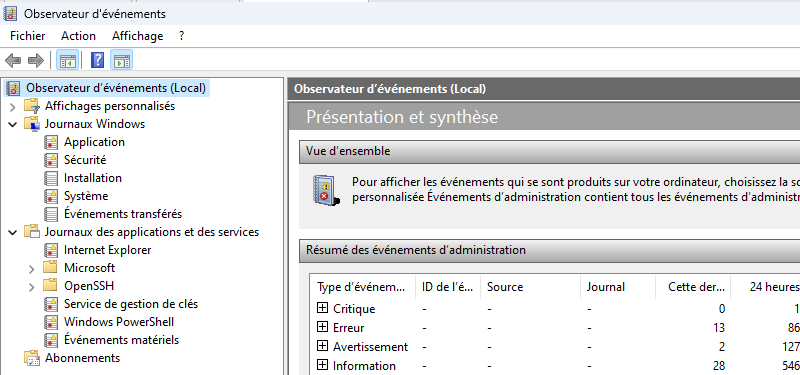
On a Windows machine, logs are accessible through the "‘Event Viewer’" which contains a set of logs, notably the "Application", "System", and "Security" logs which are the most well-known.
Certain actions performed on the system are likely to create an event. Errors are also visible in the logs. This makes it a very interesting source of information for investigating troubleshooting or security issues, even if sometimes the logs lack details (which may prompt us to use a tool such as “Sysmon”).
PowerShell is capable of interacting with Windows logs, whether it's to create a log, create an event or view existing events. We will focus on the latter point.
There are two cmdlets for viewing Windows logs: “Get-EventLog” and “Get-WinEvent”. The second is the successor to the first, but both still work, and in some cases, “Get-EventLog” can be more advantageous.
First, we can list all the logs present on the local machine:
Get-WinEvent -ListLog *We get a list with several pieces of information, including the name of each log, as well as the number of events it currently contains, and its maximum size in bytes.
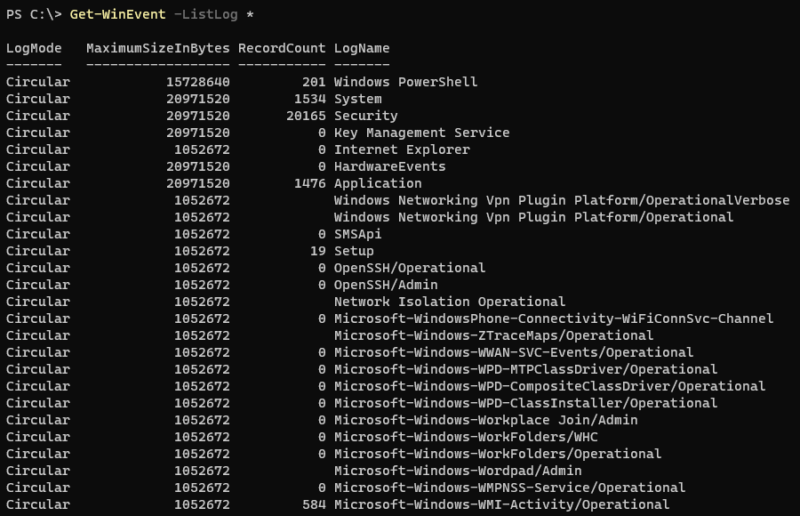
This cmdlet is capable of accessing events present in logs under “Windows Logs” and “Applications and Services Logs”.
Then, we can use this cmdlet to perform some searches in these logs. Here are some examples.
- List all events in the “System” log
Get-EventLog -LogName "System"
Get-WinEvent -LogName "System"- List the 10 most recent events from the “System” log
Get-EventLog -LogName "System" -Newest 10The “Get-WinEvent” cmdlet doesn't have a “-Newest” parameter, so if we want to get the 10 most recent events, we need to use the “-MaxEvents” parameter or associate it with “Select-Object”, although the first option is more relevant:
Get-WinEvent -LogName "System" -MaxEvents 10
Get-WinEvent -LogName "System" | Select-Object -First 10- List the latest errors in the “System” log
Get-EventLog -LogName "System" -EntryType ErrorIt's important to note that the “Get-EventLog” cmdlet doesn't have access to logs under “Applications and Services Logs”, which prevents us from reading certain logs. In this case, we can use “Get-WinEvent” with a filter on the “LevelDisplayName” property. But be careful, as the value takes into account the language of the operating system.
Here's how to filter to display only errors:
Get-WinEvent -LogName "System" | Where-Object { $_.LevelDisplayName -eq "Erreur" }- List events corresponding to a specific ID
If you're looking for all events associated with a specific ID, here's the syntax to use:
Get-EventLog -LogName "System" -InstanceId 107The example below allows you to search for events with ID “107” in the “System” log.
- Perform a keyword search in a log
The -Message
parameter of the Get-EventLog
cmdlet allows you to perform a search based on the content of the message, that is, the description of the event. This is useful for performing a keyword search.
Here's the syntax:
Get-EventLog -LogName "System" -Message "*<mot clé>*"It's important to specify the asterisk before and after your keyword (consisting of one or more words) to perform a matching search.
XII. Conclusion
There are many other very interesting cmdlets that respond to other use cases and scenarios, as PowerShell is a very rich language: we will continue to manipulate others in the upcoming chapters.